If you own a Breville Barista Pro, you already know it’s a fantastic machine for making café-quality espresso at home. But like any high-performance appliance, it needs regular care to keep running smoothly. One of the most important maintenance steps is flushing your machine. Flushing isn’t just a “nice to do”—it’s essential for taste, machine health, and even the life of your Barista Pro. Yet many new owners don’t fully understand how or why to flush their espresso machine, or they miss small steps that make a big difference.
In this guide, I’ll walk you through everything you need to know about how to flush the Breville Barista Pro. You’ll learn what flushing is, when to do it, how to do it properly, and why it matters. I’ll also share tips that most guides miss, like how water hardness and cleaning tablets can change your routine, and what mistakes can shorten your machine’s life. Whether you’re a first-time owner or just want to improve your coffee, you’ll find clear steps, helpful tables, and answers to common questions.
What Does “flushing” Mean For The Breville Barista Pro?
Flushing means running clean water through the machine’s internal parts—like the group head, steam wand, and pipes—to remove old coffee oils, milk residue, and mineral buildup. It’s a bit like “rinsing out” your machine, but more thorough and targeted.
Flushing helps with:
- Removing old coffee oils that can turn bitter
- Clearing milk residue that can lead to bacteria growth
- Washing out mineral deposits that block water flow
- Prepping the machine for descaling or deeper cleaning
Think of flushing as a reset for your machine after every use. Coffee particles and oils are sticky and can cling to the smallest parts. If you don’t flush, these leftovers slowly build up in the group head and pipes.
Over time, this affects water flow, making extraction uneven and harming taste. Milk is especially stubborn—it dries quickly and gets stuck inside the steam wand or even the internal tubes if not flushed right after use.
Mineral buildup happens without you noticing, especially if you have hard water. Even if your coffee looks and tastes fine today, minerals like calcium slowly create scale inside the machine, which blocks water and can cause expensive damage.
If you skip flushing, your coffee may taste off, and your machine may develop clogs or leaks over time. Small things, like skipping a flush after a milk drink or only flushing once a week, can reduce your machine’s lifespan and require repairs much sooner.
Why Flushing The Breville Barista Pro Is Important
You might wonder, “Doesn’t the cleaning cycle handle everything?” Flushing is different from the cleaning cycle. The cleaning cycle uses a tablet and backflush disc to deep-clean the group head, but regular flushing is about everyday hygiene and performance.
Here’s why it matters:
- Taste: Old oils and residue add bitter, sour, or burnt flavors.
- Machine health: Clogs can damage the pump or heating system.
- Consistency: Flushing keeps shot temperature and pressure stable.
- Safety: Prevents bacteria from milk and coffee residue.
- Warranty: Ignoring maintenance can void your warranty.
A 2023 survey by the Specialty Coffee Association found that machines with regular flushing lasted 30–40% longer than those without.
There’s another reason flushing is important: your machine works best when it’s clean inside. A dirty group head or steam wand makes it hard to get the same shot quality every time. For example, you might notice your espresso has less crema or comes out faster or slower than usual. These are signs of residue or blockages inside the machine, not just coffee grind or tamping problems.
Also, if you share your Barista Pro with family or friends, regular flushing keeps things hygienic. Milk and coffee residue can grow bacteria quickly, especially in a warm, damp machine. Even if you use your machine only for black coffee, old oils can go rancid and make future drinks taste bad.
Finally, if you ever want to sell or pass on your Breville, a well-maintained machine is worth more. Buyers often check for signs of good cleaning, and a machine that’s been flushed regularly is more likely to pass their test.
When Should You Flush Your Breville Barista Pro?
There are three main times to flush:
- Daily Flushing: After every use, especially after steaming milk or pulling a shot.
- After Cleaning Cycle: To rinse out detergent.
- After Descaling: To remove any acid or minerals left behind.
If your machine sits unused for a few days, flush it before making coffee to ensure freshness.
Regular flushing should become a habit, not just something you do when you see visible dirt. Many users notice their coffee tastes worse or their machine starts to sound different after skipping flushes for a few days. Even if you only make one cup a day, those small bits of residue add up.
If your area has very hard water, or you use the machine many times a day (like in a busy family), it’s smart to flush between every few uses. This helps prevent mineral buildup and keeps the group head and steam wand clear.
Signs Your Machine Needs Flushing
- Coffee tastes strange or off
- Steam wand spits or smells sour
- Water flow is uneven or weak
- Visible residue on group head or wand
- Error messages about cleaning or descaling
Sometimes, the signs are subtle—like a faint sour smell from the steam wand, or a slightly burnt taste in your espresso. If you notice water sputtering or spraying unevenly from the group head, this often means there’s a partial clog that a good flush can fix.
Pay attention to any changes in taste, sound, or flow, and flush right away if you notice something is off.
Tools And Materials Needed For Flushing
You don’t need fancy tools, but having the right items ready will make the process smooth:
- Fresh water (filtered is best)
- A large cup or pitcher (to catch rinse water)
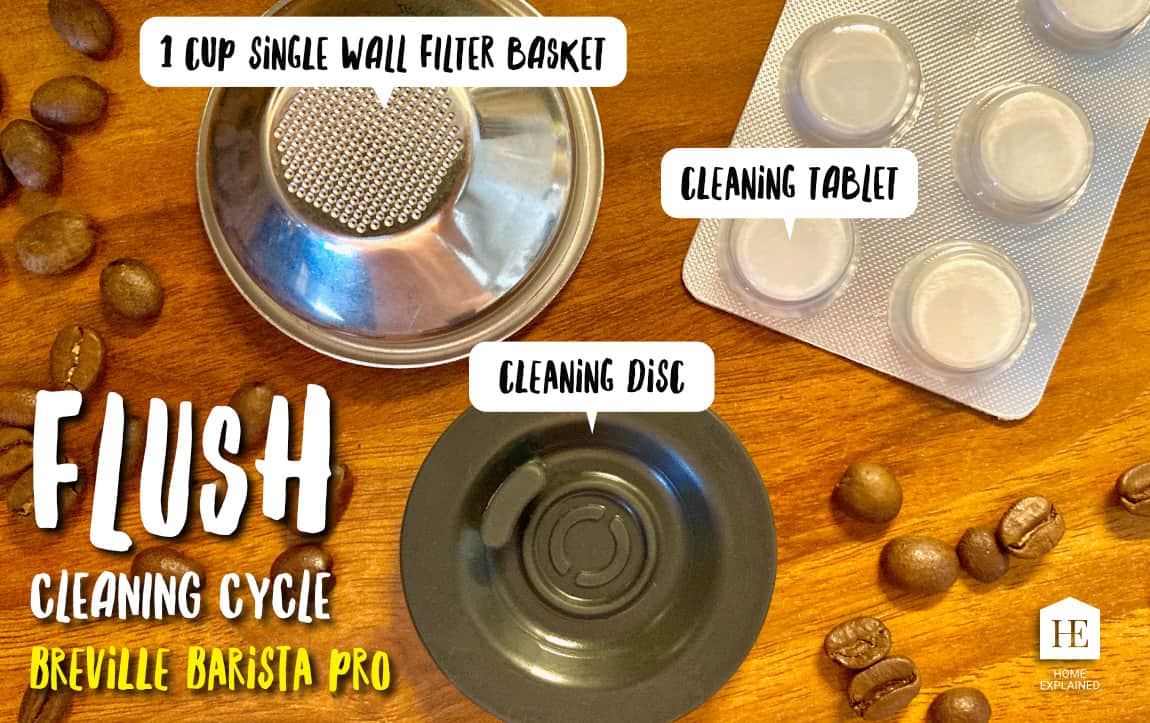
- Cleaning disc (for cleaning cycle, not daily flush)
- Cleaning tablets (for deep cleaning only)
- A clean cloth or sponge
- Descaling solution (for descaling, not regular flush)
- Water hardness test strip (optional, for checking mineral levels)
Filtered water is recommended because it reduces mineral buildup and improves taste. If your tap water is very hard, consider bottled or filtered water.
Using a large cup or pitcher is helpful because the flush water can be hot and sometimes splashes. Always use a cloth that’s only for your coffee machine—kitchen towels can have cooking oil or food particles that add unwanted flavors or bacteria.
If you want to check your water hardness, many Barista Pro kits include a test strip. Testing just once can give you a good idea of how often to flush and descale. If your water is very hard (over 120 ppm), you might want to buy a small water filter jug just for your espresso machine.

Credit: www.reddit.com
Step-by-step Guide: How To Flush The Breville Barista Pro
Let’s break down the flushing process into clear, manageable steps. I’ll cover both the daily flush and the deeper flushes after cleaning or descaling.
1. Daily Flushing Routine
This takes just a few minutes and should be done every day you use your machine.
Flushing The Group Head
- Remove the portafilter from the group head.
- Place a large cup under the group head.
- Turn the machine ON and allow it to heat up.
- Press the single shot button to run hot water through the group head for 5–10 seconds.
- Repeat once or twice if you see lots of residue.
For best results, do this right after brewing, while the group head is still hot. This helps loosen and wash away sticky coffee oils. If you notice water is brown or cloudy, flush again until it runs clear.
Flushing The Steam Wand
- Turn the steam dial to start steam for 5 seconds.
- Wipe the wand with a damp cloth immediately after steaming milk.
- After steaming, turn the dial to hot water for 5 seconds to clear milk residue.
- If the tip is clogged, use the included cleaning tool to poke out any milk.
Many users overlook the “hot water flush” after steaming. This step is important because it pushes any milk left inside the wand out before it can dry and block the tip. If the wand makes a popping sound or sprays unevenly, that’s a sign of a partial blockage—don’t wait to clean it out.
Flushing The Hot Water Outlet
- Place a cup under the hot water outlet.
- Turn the dial to hot water and run for 10 seconds.
- Wipe the outlet with a clean cloth.
This part is easy to skip, but remember that any water sitting inside the outlet can become stale or pick up a metallic taste. If you use the hot water outlet for tea or Americanos, flushing it ensures your drinks taste fresh.
2. Flushing After Cleaning Cycle
The cleaning cycle uses a detergent tablet. Always flush with water after to remove any leftover chemicals.
- Remove the cleaning disc and tablet.
- Run the single shot and double shot buttons with a cup under the group head for 15–20 seconds each.
- Run the hot water and steam for 10 seconds each.
- Repeat if you smell detergent.
After a cleaning cycle, the water might have a slight chemical smell or taste. It’s okay to flush as many times as needed until the water smells and tastes completely neutral. Don’t rush this step—even a trace of detergent can affect your next espresso.
3. Flushing After Descaling
Descaling uses an acid solution. It’s critical to flush thoroughly to remove all traces.
- Fill the water tank with fresh water (no descaler).
- Run the descale cycle again, but with only water.
- Repeat until there’s no smell or taste of descaler.
- Run steam and hot water for 10 seconds each.
If you’re sensitive to taste, try tasting a small drop of water from the group head after flushing. If you notice even a slight chemical or sour taste, flush again. Descaler is safe for the machine, but not good for your coffee or health if left inside.
Pro Tip
If your water is very hard (high mineral content), flush more often, as buildup occurs faster.
Even with filtered water, minerals can build up over time. It’s better to flush too much than too little, especially if you notice white or chalky spots on the steam wand or inside the water tank.
Flushing Sequence: What Order Matters?
Many users don’t realize that the order you flush parts of the machine can make a difference.
- Always flush the group head first. This prevents old grounds from entering the steam system.
- Flush the steam wand after every milk drink. Milk residue can clog the tip within hours.
- Flush the hot water outlet last. This clears out any loose residue.
A common mistake is to flush the steam wand before the group head. This can push milk residue into the internal pipes.
Another tip: If you’re doing several back-to-back drinks, flush between each one, especially if you switch from milk drinks to straight espresso or Americanos. This keeps flavors pure and prevents mixing.
How Long Does Flushing Take?
A basic daily flush takes 2–4 minutes. After cleaning or descaling, expect to spend 5–10 minutes flushing thoroughly. Skipping steps to save time can lead to bigger problems later.
If you use your machine heavily (4+ drinks per day), add an extra minute or two for a more thorough flush, especially for the steam wand. A few extra seconds make a big difference in long-term machine health.
Comparing Flushing Vs. Cleaning Cycle Vs. Descaling
It’s easy to confuse these three processes. Here’s a quick comparison:
| Process | Purpose | Frequency | Tools Needed |
|---|---|---|---|
| Flushing | Remove daily coffee and milk residue | Daily/after each use | Water, cloth |
| Cleaning Cycle | Deep clean group head with detergent | Every 1–2 weeks | Cleaning disc, tablet |
| Descaling | Remove mineral scale from inside machine | Every 2–3 months | Descaler solution |
To avoid confusion: Flushing is your daily routine, the cleaning cycle is for removing sticky oils that won’t wash out with water, and descaling is for fighting invisible mineral buildup inside the pipes.
Common Mistakes When Flushing (and How To Avoid Them)
Even experienced users sometimes make errors that reduce the benefits of flushing. Here are the most frequent mistakes:
- Not flushing after every milk drink: Milk dries fast, creating tough clogs.
- Using dirty cloths: Wiping with an old or unclean cloth spreads bacteria.
- Skipping the hot water outlet: It can harbor old residue too.
- Forgetting to remove the portafilter: Flushing with the basket in place traps old coffee.
- Rushing the process: Short flushes may leave residue behind.
- Not refilling the water tank: Running dry can damage the pump.
- Ignoring water quality: Hard water increases mineral buildup, requiring more frequent flushes.
One mistake many users make is only wiping the steam wand’s outside, thinking it’s clean. Milk can get inside the tip, so always flush with steam and hot water. If you notice a bad smell from the wand even after wiping, it’s likely there’s dried milk inside.
Soak and clean it as soon as possible.
Another common issue is using a cup that’s too small to catch all the flush water. Overflowing hot water can damage your counter or burn your hands. Use a large, heat-resistant cup or pitcher for safety.
Advanced Tips For Better Flushing
Most guides stop at the basics. Here are two advanced tips that can extend your machine’s life:
1. Use the “blank shot” method
Before making your first espresso of the day, run a blank shot (no coffee in the portafilter). This heats up the group head and flushes out stale water, which improves taste and temperature stability.
Some advanced users also run a short flush after pulling a shot, before removing the portafilter. This helps push out any coffee grounds that might be stuck in the screen. It’s a small step, but it keeps your group head cleaner and makes deep cleaning easier later.
2. Track water hardness and adjust schedule
If your area has hard water, flush and descale more often. You can test your water with a simple test strip (included with some machines). Adjust your routine based on the result, as shown below:
| Water Hardness | Recommended Flushing | Descale Frequency |
|---|---|---|
| Soft (0–60 ppm) | Daily | Every 3–4 months |
| Medium (61–120 ppm) | Daily + extra after heavy use | Every 2–3 months |
| Hard (121+ ppm) | Twice daily | Every 1–2 months |
If you’re unsure about your water, it’s always safer to flush more often and descale sooner than recommended. Machine repairs are far more expensive than a little extra maintenance.
Credit: cafioccidente.com
How To Flush Specific Parts Of The Breville Barista Pro
Group Head
- Remove portafilter and basket
- Run water through for 10–20 seconds
- Use a brush if visible grounds are stuck
If you make back-to-back espressos, a quick flush between shots keeps the group head from getting clogged, and ensures your next shot isn’t affected by leftover grounds.
Steam Wand
- Purge steam for 5 seconds before and after use
- Wipe with clean, damp cloth each time
- Unscrew tip weekly and soak in hot water if clogged
A handy trick: If the steam wand starts to hiss or spit, soak the tip in a cup of boiling water for 15–20 minutes, then use the cleaning tool to clear any blockages.
Hot Water Outlet
- Run for 10 seconds after each use
- Check for scale buildup monthly
If you notice water flow slowing down from the hot water outlet, it’s a sign of early mineral buildup. Clean and flush as soon as possible to prevent bigger issues.
Drip Tray And Water Tank
- Rinse drip tray daily; empty and clean with soap weekly
- Remove water tank, rinse and wipe weekly; avoid leaving water sitting for days
Stale water in the tank can lead to odors and even mold. Always refill with fresh water, and don’t leave the tank empty while the machine is plugged in, as this can damage the pump.
How Often Should You Flush? A Practical Schedule
Here’s a practical schedule for flushing and related tasks:
| Task | Frequency |
|---|---|
| Flush group head | After every use |
| Flush steam wand | After every milk drink |
| Flush hot water outlet | Daily |
| Clean drip tray | Daily |
| Deep cleaning cycle | Every 1–2 weeks |
| Descale | Every 2–3 months (or as needed) |
Don’t wait for problems to start before sticking to a schedule. Consistency is the easiest way to avoid bigger maintenance issues.
How Flushing Improves Coffee Taste And Machine Life
Regular flushing does more than just keep your machine clean. It has a measurable impact on your coffee’s flavor and the machine’s durability.
- Taste: Removing old oils and milk prevents bitter or sour flavors.
- Consistency: Temperature and pressure stay stable, leading to better crema and extraction.
- Fewer repairs: Pumps and pipes last longer when not clogged with residue.
- Lower costs: You’ll spend less on repairs and replacement parts.
- Machine value: A well-maintained machine keeps its value for resale or warranty claims.
A real-world example: A Barista Pro owner who flushes daily and descales every 2–3 months reported over 5 years of trouble-free use, compared to just 2–3 years for those who skipped maintenance.
If you’ve ever tasted an espresso that’s bitter, metallic, or has an odd aftertaste, it’s usually a sign of a dirty machine. Flushing keeps flavors clean and bright. It also prevents sudden breakdowns that happen when a pipe or valve gets blocked.
Many machine failures start with small bits of residue that could have been washed away with a simple flush.
Troubleshooting: What If Flushing Doesn’t Fix A Problem?
Sometimes, even after flushing, you may notice issues. Here’s what to check:
- Weak water flow: Could mean a deeper clog or scale; try a cleaning cycle or descale.
- Strange taste: Check water source, clean all removable parts, and flush longer.
- Steam wand still blocked: Soak the tip in hot water and use the cleaning tool.
- Error messages: Follow the machine’s prompts for cleaning or descaling cycles.
If you flush and still have problems, check the drip tray and water tank for blockages. Sometimes, old coffee grounds or scale can get stuck in places you can’t see. Remove, clean, and reinstall these parts. Also, check the water filter—if it’s old or clogged, replace it.
For more detailed help, consult the Breville manual or their online support.
If problems continue, check the official Breville support page or contact their customer service. Sometimes, a professional service is needed for internal blockages.

Credit: www.youtube.com
Using Flushing As Part Of A Complete Maintenance Routine
Flushing is just one part of keeping your Breville Barista Pro in top shape. Combine it with:
- Weekly cleaning cycles
- Regular descaling
- Changing filters as recommended
- Keeping the grinder clean and dry
By building these habits, you’ll enjoy better coffee and a machine that performs like new for years.
A fully clean espresso machine is greater than the sum of its parts. Flushing, cleaning cycles, and descaling work together to prevent problems before they start. Keeping the grinder clean and dry is also essential—old grounds and oils can affect taste and machine performance as much as old water or milk.
Flushing For Different Water Sources
Not all water is the same. If you use:
- Hard tap water: Flush more often, descale more regularly.
- Filtered water: Fewer minerals, but still flush daily.
- Bottled water: Check mineral content; some brands are hard.
- Well water: Test for minerals and possible contaminants.
If you travel or move and use different water sources, always check your water quality and adjust your flushing and descaling routine as needed. Even bottled water can sometimes be high in minerals, so it’s worth reading the label.
For details on water quality and espresso machines, see the Specialty Coffee Association’s water quality guide.
Frequently Asked Questions
How Do I Know If My Breville Barista Pro Needs Flushing?
If your coffee tastes strange, the steam wand spits, or you see residue around the group head, it’s time to flush. Also, always flush after steaming milk, cleaning cycles, or descaling.
Can I Use Vinegar Instead Of Descaler For Flushing?
No, vinegar is not recommended for flushing or descaling your Breville Barista Pro. It can damage seals and leaves a strong smell. Use only water for flushing, and use a proper descaling solution for descaling.
Is It Safe To Flush The Machine With The Portafilter In Place?
No, always remove the portafilter and basket before flushing the group head. This ensures all residue is washed away and prevents old coffee from recirculating.
How Often Should I Replace The Water Filter In The Breville Barista Pro?
Replace the water filter every 2–3 months, or as recommended by Breville. A fresh filter reduces mineral buildup and improves taste, but does not replace the need for flushing.
What Happens If I Don’t Flush My Machine Regularly?
Without flushing, your machine will develop clogs, bacteria, and mineral buildup. This leads to bad-tasting coffee, poor performance, and expensive repairs. Regular flushing is quick insurance for a great espresso experience.
Taking the time to flush your Breville Barista Pro properly pays off every day, in every cup. When you build this simple habit, you enjoy better coffee, fewer problems, and a machine that lasts for years. Treat flushing as a core part of your espresso routine, and your Barista Pro will reward you with delicious results—every time.