If you love the look of real wood kitchen cabinets but have laminate, painted, or outdated cabinets, you might be surprised by what a little paint and technique can do. Painting kitchen cabinets to look like wood is one of the most budget-friendly ways to refresh your kitchen.
With the right materials, careful prep, and a few tricks, you can create a finish that closely resembles natural wood grain—even on surfaces that are not wood at all.
Many homeowners think that achieving a wood look is expensive or too difficult for a DIY project. The truth is, while it does require patience and attention to detail, this project is completely doable for most people. The key is using faux wood painting techniques—sometimes called “wood graining”—to mimic the appearance of real wood. This article guides you through every step, from preparation to finishing touches, so you can transform your kitchen without the cost of new cabinetry. Along the way, you’ll learn practical tips and common mistakes to avoid, making your kitchen makeover a rewarding experience.
You don’t need to be a professional painter or artist. Most people who try this project are surprised at how forgiving the process can be if they prepare carefully and practice before starting on the main cabinets. Even if you make small mistakes, they are usually easy to fix or touch up.
The best part is, you get to control exactly what your finished kitchen looks like—you can choose the wood shade, grain style, and how dramatic or subtle you want the effect. With some time and effort, your kitchen can have the warmth and character of real wood, all for a fraction of the price.
Why Paint Kitchen Cabinets To Look Like Wood?
Many people want the warmth and elegance of wood cabinets but face challenges:
- Real wood cabinets are expensive.
- Existing cabinets may be made of laminate, MDF, or have damaged surfaces.
- Painting is less wasteful and more eco-friendly than replacing.
By painting cabinets to look like wood, you can:
- Save thousands of dollars
- Customize the color and wood type appearance
- Increase your home’s value
- Enjoy the satisfaction of a DIY transformation
There’s also a creative aspect: you can match the “wood” to your décor, or even try unusual wood tones that would be hard to find in real wood. For example, you could create a driftwood-gray, a deep espresso, or a honey maple look. This level of customization is hard to achieve with pre-made wood cabinets. You can also update only the cabinet doors or drawer fronts if you’re short on time or budget, and still make a big impact on your kitchen’s appearance.
Another benefit is that painting over cabinets—even ones that are chipped, stained, or just plain old—can hide flaws and give your kitchen a fresh, clean look. If you rent your home or don’t want to invest in new cabinetry, faux wood painting is a smart, reversible option.
Understanding The Faux Wood Technique
Before you start, it’s important to know what “faux wood” painting means. This technique uses paint and glaze to create the illusion of wood grain on a flat or non-wood surface. You do not need special artistic skills—just patience and practice. The process involves two main steps:
- Applying a base color (to mimic the lighter parts of wood)
- Creating grain patterns using a glaze or wood grain tool
There are many types of wood grains—oak, walnut, cherry, maple—each with different patterns and colors. You can choose the wood look you prefer and match it to your kitchen’s style.
It helps to look at pictures of real wood cabinets before you start. Notice how the grain runs in long lines or waves, sometimes with little knots or swirls. The beauty of faux wood is in these small details. Even if your first try isn’t perfect, the overall effect will usually still look convincing—especially once hardware and dishes are back in place.
If you want to get creative, you can combine grain styles or add extra depth with multiple layers of glaze. Some advanced DIYers even add subtle highlights or lowlights to mimic sun-faded areas or richer grain. The more you observe real wood, the better your painted cabinets will look.

Credit: thebeautyrevival.com
Tools And Materials Needed
To paint kitchen cabinets and make them look like wood, you’ll need specific tools and supplies. Gathering everything before you start will help the project go smoothly.
| Item | Purpose | Tips |
|---|---|---|
| Screwdriver | Remove doors & hardware | Label parts to avoid confusion |
| Cleaner/Degreaser | Clean cabinet surfaces | Use TSP or a dedicated kitchen cleaner |
| Sandpaper (120/220 grit) | Smooth and scuff surfaces | Use a sanding block for even pressure |
| Primer (bonding) | Help paint stick to cabinets | Choose stain-blocking if cabinets are dark |
| Paint (base coat) | Main color under the grain | Choose satin/eggshell finish |
| Glaze or Wood Grain Tool | Creates wood grain effect | Water-based glazes are easier to use |
| Painter’s Tape | Protect walls and edges | Buy high-quality tape for clean lines |
| Brushes & Rollers | Apply paint and glaze | Foam rollers give smoother results |
| Clear Topcoat/Polyurethane | Protect the finish | Water-based dries faster, less odor |
| Rags & Drop Cloths | Clean and protect surfaces | Old sheets work as drop cloths |
Non-obvious insight: Many beginners skip using a dedicated bonding primer, but it is essential for long-lasting results, especially on laminate or glossy cabinets.
If you want the most realistic look, buy a wood grain rocker tool. These are affordable and make it much easier to create natural-looking patterns. You can find them at most hardware stores or online. But if you can’t get one, a stiff paintbrush, artist’s brush, or even a clean comb can help create grain lines.
Choosing The Right Colors And Wood Grain Style
The colors you choose will decide what type of wood your cabinets resemble. Each wood species has its own tone and grain pattern. Here’s a quick guide:
| Wood Type | Base Color | Glaze Color | Grain Characteristics |
|---|---|---|---|
| Oak | Light tan/beige | Medium brown | Open, wavy grain |
| Walnut | Medium brown | Dark brown | Straight, fine grain |
| Cherry | Reddish brown | Deep red/brown | Smooth, subtle grain |
| Maple | Pale cream/yellow | Golden brown | Very subtle, straight grain |
Pro tip: Always test your colors on a scrap board or the inside of a cabinet door before committing to the whole kitchen. Lighting can change how colors look.
If your kitchen gets a lot of sunlight, lighter wood tones will brighten the space. For a more dramatic or cozy feel, try darker shades like walnut or espresso. If you want a modern look, consider gray-washed or whitewashed wood.
For small kitchens, lighter grains such as maple or oak help make the space feel larger.
When choosing glaze and base colors, remember that the base color should be lighter than the glaze. If you’re unsure, look for sample boards at a paint store or online for inspiration. Sometimes two colors that look good on a paint chip don’t work together in your kitchen’s light, so always do a test section.
Step-by-step Process: Painting Cabinets To Look Like Wood
Transforming your cabinets is a multi-day project. Here’s how to do it right.
1. Remove Cabinet Doors And Hardware
Take off all cabinet doors, drawers, handles, and hinges. Place hardware in labeled bags to keep them organized. This makes painting easier and avoids drips on hinges or handles. Lay out the doors flat on a work surface for the best results.
If you have a small kitchen, you can work on everything at once. For larger kitchens, do a few doors at a time to stay organized. It’s a good idea to number the doors and the corresponding cabinets with masking tape so you remember where everything goes.
2. Clean Surfaces Thoroughly
Kitchens are full of grease, dust, and food particles. Use a degreaser or strong cleaner, like trisodium phosphate (TSP), to scrub all surfaces. Rinse with water and let dry. Skipping this step can cause peeling or uneven paint.
Non-obvious insight: Even small traces of oil or cleaner residue can prevent primer from sticking. Wipe cabinets with a clean, damp cloth after degreasing.
Don’t forget the edges and corners, where grease often builds up. If your cabinets are especially dirty, clean them twice. This step can be boring, but it’s the foundation for a long-lasting finish.
3. Sand All Surfaces
Lightly sand all cabinet frames, doors, and drawer fronts with 120–220 grit sandpaper. You do not need to remove all old paint or finish—just roughen the surface so primer sticks. Wipe away sanding dust with a tack cloth.
Pro tip: If your cabinets are heavily varnished or have a glossy finish, sand a bit more or use a liquid deglosser.
Sanding also helps smooth out small scratches or chips. If you find large dents or holes, fill them with wood filler, let dry, then sand flush. This is especially important for older cabinets.
4. Tape Off Adjacent Surfaces
Use painter’s tape to protect walls, countertops, and inside cabinet boxes. Cover floors with drop cloths. Good prep saves cleanup time later.
If you’re painting only the doors and not the cabinet frames, tape carefully around the edges to keep lines clean. Press the tape down firmly so paint doesn’t bleed underneath.
5. Apply A Quality Bonding Primer
Use a brush or foam roller to apply a bonding primer. This step is essential for paint to adhere, especially on laminate or previously painted cabinets. Let the primer dry according to the manufacturer’s instructions (usually 2–4 hours).
Choose a primer that matches your paint (water-based or oil-based), but most people prefer water-based for easy cleanup. If your cabinets are dark, a stain-blocking primer prevents old color from showing through.
6. Paint The Base Color
Choose a base color that matches the lighter tones of your desired wood. Apply with a high-quality brush or foam roller for a smooth finish. Paint in the direction of the “grain” you want to create. Let dry completely (usually 4–6 hours).
- Apply a second coat if needed for full coverage.
- Let cure for at least 24 hours before the next step.
A smooth, even base coat is critical. Any brush marks or roller lines will show through the glaze, so take your time. If you see drips or bubbles, sand lightly before adding another coat.
7. Mix And Apply The Glaze
Mix a water-based glaze with your chosen “wood grain” color. Most glazes can be tinted with latex paint. Use a ratio of about 4 parts glaze to 1 part paint for a semi-transparent effect.
- Brush or roll the glaze over the base color in small sections.
- Work quickly—glaze dries faster than paint.
If you’re not sure about the consistency, test on a piece of cardboard. The glaze should be see-through but still add color. If it looks too dark, add more glaze; if too light, add more paint.
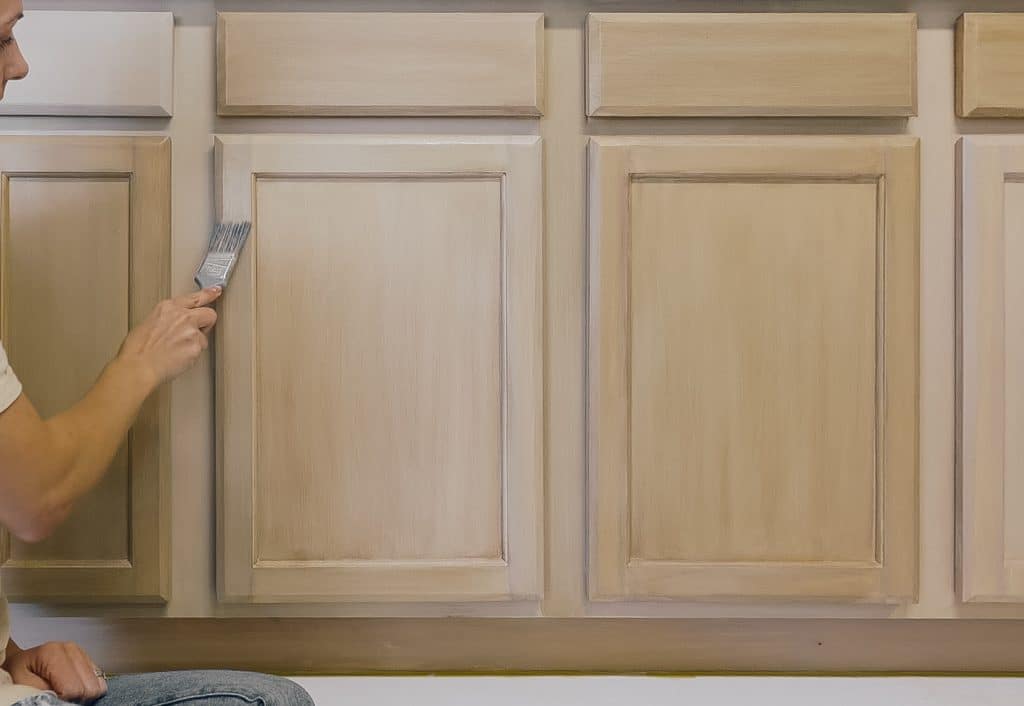
8. Create The Wood Grain Effect
This is the artistic part. There are a few ways to mimic wood grain:
- Wood grain tool (rocker): Drag the tool through wet glaze while rocking it side to side to create realistic grain.
- Soft brush or graining comb: Drag the brush or comb through glaze for straight grains, knots, or waves.
- Feathering: Use a dry brush to gently blend and soften lines for a more subtle wood look.
Practice first on cardboard or the back of a cabinet door. Each pass will look a little different, just like real wood.
If you want to add knots, twist the tool or use a small brush to paint circular shapes, then drag the tool through to blend. For extra realism, vary your strokes—real wood grain is never perfectly straight or even.
9. Repeat For All Surfaces
Work on one area at a time. Let the glaze dry before moving on to the next section to avoid smudges. Remember to match the grain direction on doors, drawers, and frames for a realistic look.
If you need to stop for a break, finish a whole section first, like a full door or drawer front, so you don’t end up with visible lines where you restarted.
10. Allow Proper Drying Time
Glaze usually takes 24 hours to dry. Don’t rush this step—touch-ups are easier before the clear coat is applied.
If your kitchen is humid, allow extra time. Touch a hidden spot gently to check if the glaze is dry before moving ahead.
11. Apply A Clear Protective Topcoat
A clear polyurethane or acrylic topcoat protects your work from scratches, stains, and water. Use a water-based topcoat for less yellowing and faster drying. Apply 2–3 thin coats, letting each dry as directed.
Pro tip: Sand lightly with 320 grit between coats for a glass-smooth finish.
Make sure to cover all edges and corners. If you miss a spot, moisture can get underneath and damage the paint. If you want a super-durable finish for a busy kitchen, use three coats of topcoat.
12. Reassemble Cabinets
Once fully dry, reinstall hardware and hang doors and drawers. Touch up any tiny spots if needed.
Take your time with this step to avoid bumping or scratching the new finish. Clean or replace old hardware for a totally fresh look.
Comparing Faux Wood To Real Wood Cabinets
Wondering if the effort is worth it? Here’s a quick comparison.
| Feature | Faux Wood Paint | Real Wood Cabinets |
|---|---|---|
| Cost | Low (under $300 for most kitchens) | High ($3,000–$12,000+) |
| Customization | Any color, any grain | Limited by wood type |
| Durability | 5–10 years with care | 20+ years |
| DIY-Friendly | Yes | No (professional install) |
| Eco-Impact | Low (reuse existing) | Higher (new materials) |
Another important difference is maintenance. Painted cabinets are easier to touch up if they chip or scratch, while real wood may need sanding and refinishing. However, real wood offers natural beauty and can be refinished many times. If you like to change your style often, faux wood is more flexible and less expensive.
Credit: www.lilyardor.com
Advanced Tips For A Professional Finish
Once you master the basics, these advanced techniques can take your cabinets to the next level.
Layering Different Grain Colors
Real wood has depth. Try layering two or even three glaze colors for a more complex look. For example, start with a medium brown, let it dry, then add subtle lines of a darker brown.
You can also use a lighter glaze for highlights. Apply it sparingly along the center of panels or on raised edges, then gently blend with a dry brush. This creates the illusion of light reflecting off wood grain.
Creating Knots And Imperfections
Use a small artist’s brush to paint “knots” or unique grain swirls. Study photos of real wood and add a few imperfections—they make the finish more believable.
Don’t overdo it—just a few knots or swirls per door look natural. If you make a mistake, wipe off the glaze quickly and try again.
Highlighting With Dry Brushing
After the glaze dries, use a nearly dry brush with a lighter color to add highlights along edges and raised panels. This mimics the way light hits real wood.
You can also use this technique to soften harsh lines or blend two colors together. The goal is subtlety—just a hint of color will do.
Sealing With Satin Or Matte Topcoat
A satin or matte finish looks more like natural wood. Glossy topcoats can make cabinets look fake or too shiny.
If you want a higher-end look, mix a little matte and satin finish for the final coat. This blends the best of both finishes for a soft, realistic sheen.
Cleaning Up Edges
Remove painter’s tape before the final topcoat dries completely to avoid peeling. Touch up any wobbly lines with a small brush.
For sharp lines between cabinets and walls, run a craft knife along the tape edge before pulling it away.
Common Mistakes And How To Avoid Them
Many DIYers make the same errors. Here’s how to avoid them:
- Skipping primer. Without it, paint will peel—especially on laminate.
- Rushing drying times. Paint and glaze need time to cure for durability.
- Not practicing grain technique. Try different tools on scrap first.
- Using too much glaze. Heavy glaze looks muddy; use thin, even layers.
- Ignoring grain direction. Always paint and grain in the same direction as real wood would run.
- Applying topcoat too soon. Wait until glaze is fully dry to avoid smearing.
- Neglecting hardware. Old, dirty handles can spoil the new look. Clean or replace them.
Pro tip: Take your time. Rushing this project often leads to disappointment.
Another common mistake is not cleaning up drips or runs right away. Keep a damp rag handy and check each door or drawer a few minutes after painting. Small fixes now prevent big problems later.
Maintaining Painted Faux Wood Cabinets
With care, your painted cabinets will look great for years.
- Clean regularly with a damp, soft cloth and mild soap.
- Avoid abrasive cleaners or scouring pads, which can scratch the finish.
- Repair chips or scratches with a small brush and leftover paint/glaze.
- Reapply a clear topcoat every few years in heavy-use kitchens.
If you have children or pets, pay extra attention to lower cabinets, which get bumped and touched most often. If you see any worn spots, touch them up before they get worse.
For stubborn stains, use a little baking soda on a damp cloth, but rub gently to avoid dulling the finish.
When To Hire A Professional
Most people can tackle this project, but there are times when a pro is a better choice:
- Large kitchens with many cabinets
- Difficult surfaces (heavily damaged, warped, or water-damaged)
- You want a very specific or artistic wood grain
- No time or space to do the project yourself
Professional painters have specialized tools and experience to deliver flawless results—but the cost will be much higher.
If you are unsure about your skills, consider hiring a pro for the doors and drawers, and painting the frames yourself. This compromise saves money but still ensures a beautiful finish.

Credit: retique.com
Real-life Example
Sarah, a homeowner in Ohio, transformed her 1980s white laminate cabinets using the faux wood technique. The whole kitchen cost under $250 (including paint, primer, glaze, and tools). Friends and family thought she had installed new cabinets! After two years, the finish still looks great with only minor touch-ups.
Sarah’s tip: She practiced her grain technique on old cardboard boxes for a few days before starting on her kitchen. She also took photos of each step, so she could see her progress and remember which color mixes worked best.
Another example: Jack in California used this method on just his kitchen island. He chose a dark walnut look for the island and a lighter oak for the other cabinets, creating a custom two-tone kitchen for less than $300.
Environmental Impact
Painting your existing cabinets instead of replacing them reduces landfill waste. Most old cabinets end up in dumps when replaced. By reusing and refreshing what you have, you’re making a greener choice.
You also avoid the energy and resources needed to make and ship new cabinets. Many paints and glazes today are low-VOC (low in harmful fumes), which is better for indoor air quality and the environment. If you’re eco-conscious, ask for environmentally friendly paint at your local store.
Where To Learn More
If you want more inspiration, there are many online communities and tutorials. For more details on painting techniques and materials, check out this This Old House guide.
You can also search for video tutorials on YouTube, where you’ll find step-by-step walkthroughs from both professionals and homeowners. Seeing someone else do the grain technique can boost your confidence before you try it yourself.
Frequently Asked Questions
How Long Does It Take To Paint Kitchen Cabinets To Look Like Wood?
Most projects take 4–7 days, including drying time between coats. The process can be faster in smaller kitchens or if you have help. Don’t rush—allow each layer to dry fully for the best finish.
If you are painting in a humid or cold climate, expect longer drying times. It’s better to wait an extra day than to risk sticky or damaged paint.
Can I Use This Technique On Laminate Or Mdf Cabinets?
Yes. Faux wood painting works well on laminate, MDF, and even metal cabinets, as long as you use a good bonding primer and clean surfaces thoroughly. Skipping primer can cause the paint to peel.
If your cabinets have deep grooves or damage, fill them with wood filler and sand smooth before starting.
What Type Of Paint Is Best For The Base Coat?
Use a high-quality acrylic latex paint in a satin or eggshell finish. These paints are durable, easy to clean, and work well as a base for glazing.
If you want extra durability, some people use cabinet-specific paints or add a hardener to regular latex paint.
How Durable Is The Faux Wood Finish?
With proper prep and a protective topcoat, the finish can last 5–10 years. In high-traffic kitchens, reapply the topcoat every few years to keep cabinets looking fresh.
If you see wear and tear, spot-treat with leftover glaze and base paint, then add a little topcoat for protection.
Can I Change The Color Or Wood Look Later?
Yes. If you want a new look in the future, you can sand lightly, prime, and repeat the process with different colors and grain patterns.
Many people change their cabinet style every few years to keep up with trends or update their space for resale.
Revamping your kitchen cabinets to look like wood is a satisfying, cost-effective project that brings warmth and elegance to your space. With patience and attention to detail, you’ll enjoy cabinets that not only look beautiful but also reflect your personal style and creativity.
The best transformations are those that blend practical skill with your own unique vision—so don’t be afraid to experiment, learn, and enjoy the process.