Removing glaze from cabinets is a project that many homeowners consider. Sometimes, the finish on your cabinets may look too dark, too shiny, or simply outdated. You might want to bring back the natural beauty of the wood or prepare your cabinets for a new color.
Whatever your reason, understanding how to remove glaze from cabinets is essential for getting the result you want without damaging the wood underneath.
This process can sound intimidating, especially if you have never worked with cabinet finishes before. The good news is that with the right tools, a bit of patience, and some practical advice, you can achieve professional-looking results at home. Whether your cabinets are in the kitchen, bathroom, or another part of the house, removing the glaze is possible if you follow the correct steps.
This guide covers everything you need to know, from understanding what glaze is and why it’s used, to step-by-step methods, tips for avoiding mistakes, and handling tricky situations. You’ll also find useful tables comparing methods, frequently asked questions, and advice based on real-world experience.
If you want to give your cabinets a fresh look or fix a glazing job that didn’t turn out as expected, this article will help you feel confident taking on the task. Let’s get started.
What Is Cabinet Glaze And Why Remove It?
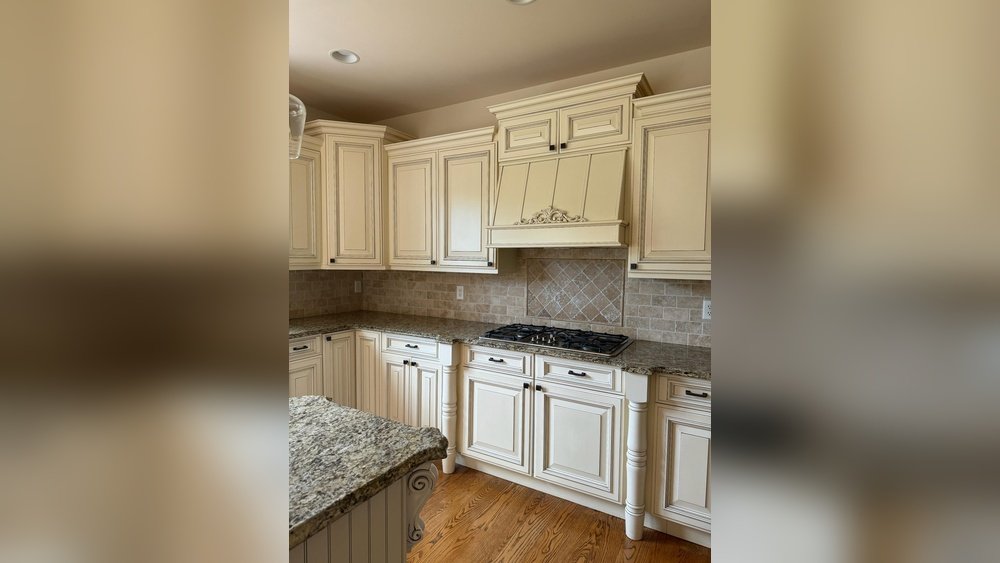
Cabinet glaze is a semi-transparent coating applied over paint or stain. Its main job is to add depth, highlight details, and create an aged or artistic look. Glazes can be clear or tinted, and are often found in kitchens and bathrooms to give cabinets a high-end or custom appearance.
But sometimes, the glaze might not be to your taste. Maybe you bought a home with cabinets that look too old-fashioned, or the glaze has worn unevenly over time. Some glazes can turn yellow, chip, or collect dirt, making cabinets look dirty. Removing the glaze can return the cabinets to their original style or prepare them for a new paint job.
Common Reasons For Removal
- Style Update: You want a more modern look.
- Damage or Wear: The glaze is chipped or uneven.
- Refinishing: Preparing cabinets for a new stain or paint.
- Cleaning Issues: Glaze has trapped dirt or grease.
Understanding your reason helps you choose the best removal method and avoid damaging the cabinet material.
Safety First: Preparing For Glaze Removal
Before you begin, it’s important to protect yourself and your workspace. Many products used in the process can be harsh or produce strong fumes.
Personal Protection
- Wear gloves to protect your skin from chemicals.
- Use safety glasses to avoid splashes.
- Wear a mask or respirator if using strong solvents.
- Work in a well-ventilated area to reduce fume exposure.
Protecting The Work Area
- Lay down drop cloths or old sheets to catch drips and dust.
- Remove or cover items near the cabinets.
- Tape off walls, floors, and countertops with painter’s tape.
These steps will keep you safe and prevent accidental messes.
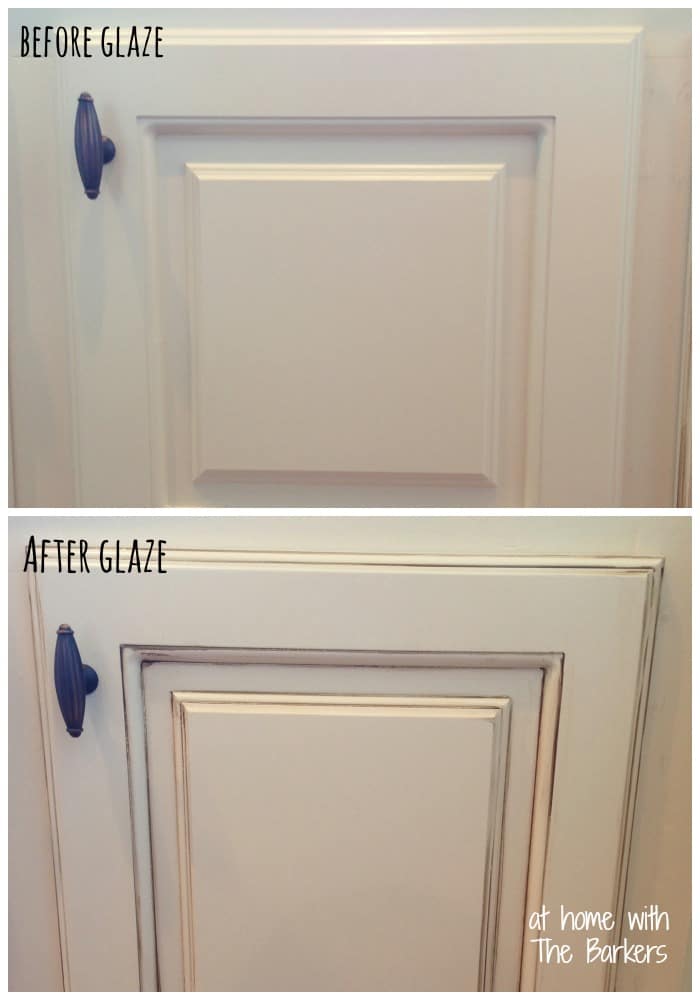
Credit: athomewiththebarkers.com
Tools And Materials You’ll Need
Having the right tools makes glaze removal much easier and less stressful. Here’s a list to prepare:
- Screwdriver (for removing cabinet doors and hardware)
- Rubber gloves and protective eyewear
- Respirator mask (especially for strong chemicals)
- Plastic or metal scraper
- Fine steel wool (grade 000 or 0000)
- Sanding sponge or sandpaper (220–320 grit)
- Chemical paint stripper (if needed)
- Mineral spirits or denatured alcohol
- Clean rags or paper towels
- Buckets and sponges
- Mild dish soap
- Warm water
- Painter’s tape and drop cloths
- Vacuum (for cleaning up dust)
Not every project needs all of these items, but having them ready will save time.
Types Of Cabinet Glaze And How They Affect Removal
Glaze can be water-based or oil-based, and can sit on top of the finish or be mixed into it. Knowing what you’re dealing with helps you choose the right removal method.
Water-based Glaze
- Dries quickly
- Easier to remove with mild solvents or sanding
- Less likely to stain wood
Oil-based Glaze
- Takes longer to dry
- Harder and more durable
- Requires stronger solvents or more sanding
Top-coat Vs. In-grain Glaze
- Top-Coat Glaze sits above the finish and is easier to remove.
- In-Grain Glaze is absorbed into the wood or finish, making removal more challenging.
If you’re unsure, test a small hidden spot using a mild solvent. If the glaze wipes off, it’s likely water-based or top-coat. If it stays, you may need stronger methods.
Methods For Removing Glaze From Cabinets
There are a few main ways to remove glaze: cleaning, sanding, using solvents, or stripping. Each method has pros and cons. The method you choose depends on the type and age of glaze, the cabinet material, and your goal.
Here’s a quick comparison of methods:
| Method | Best For | Pros | Cons |
|---|---|---|---|
| Cleaning with Soap/Water | Light, fresh glaze | Safe, easy | Limited effectiveness |
| Sanding | Surface glaze, prep for refinishing | Control, smooth finish | Requires effort, dust |
| Chemical Solvents | Oil-based or stubborn glaze | Effective, fast | Fumes, need for care |
| Paint Stripper | Thick, old glaze layers | Powerful, thorough | Strong chemicals, mess |
Let’s look at each method in detail.
1. Cleaning With Soap And Water
If the glaze is light, new, or just surface dirt mixed with glaze, try this first. It’s gentle and safe for most cabinets.
Steps:
- Mix a few drops of mild dish soap in warm water.
- Dip a soft sponge in the solution and wring out excess water.
- Gently scrub the glazed area.
- Rinse with clean water.
- Dry with a soft cloth.
This method often works for new cabinets where the glaze hasn’t fully cured. It’s also a good way to test if the glaze is easy to remove.
2. Sanding
Sanding is effective for removing thin layers of glaze, especially on flat surfaces.
Steps:
- Remove cabinet doors and hardware.
- Use 220-grit sandpaper or a sanding sponge.
- Sand lightly in the direction of the wood grain.
- Check your progress often. Don’t sand too deep or you’ll damage the wood.
- Wipe away dust with a damp cloth.
Tip: For detailed areas or corners, use a small piece of folded sandpaper or fine steel wool.
3. Using Chemical Solvents
When the glaze is stubborn or oil-based, solvents like mineral spirits or denatured alcohol can help.
Steps:
- Test the solvent on a small, hidden spot first.
- Dampen a rag with solvent, not soaking wet.
- Rub gently on the glazed area.
- Wait a few minutes, then wipe off with a clean cloth.
- Repeat as needed.
Note: Always wear gloves and work with good airflow. Some solvents can dull the underlying finish, so go slow.
4. Paint Or Finish Stripper
If sanding and solvents don’t work, a chemical stripper might be needed. This is the most aggressive method.
Steps:
- Apply the stripper with a brush, following the product instructions.
- Let it sit for the recommended time (usually 15–30 minutes).
- Scrape off the softened glaze with a plastic scraper.
- Wipe away residue with a clean rag.
- Rinse with water or the recommended neutralizer.
- Allow the cabinet to dry completely.
Warning: Some strippers can damage the wood or underlying paint. Always test in a hidden spot first.
5. Combination Methods
In many cases, you may need to combine methods. For example, use a solvent first, then sand lightly to finish the job. This is common when the glaze has built up in grooves or corners.
Non-Obvious Insight: Using a toothbrush with solvent can help get glaze out of carvings and detailed moldings without scratching the wood.
Step-by-step Glaze Removal Process
Now, let’s put these methods together into a complete process. This approach works for most cabinets and lets you adjust steps as needed.
Step 1: Remove Cabinet Doors And Hardware
Unscrew the doors, handles, and hinges. Label each part so you can put them back easily. This makes the work easier and avoids damaging hardware.
Step 2: Clean The Surface
Wipe cabinets with a mild soap and water solution to remove dirt and grease. Dry with a clean towel.
Step 3: Test The Glaze
Test a small area with a mild solvent. If the glaze comes off, you know you can use this method. If not, try a stronger method on another small spot.
Step 4: Apply Your Chosen Removal Method
Start with the least aggressive method (soap and water), then move up as needed.
- For light glaze: Clean or sand
- For stubborn glaze: Solvent or stripper
Apply the product, wait, then wipe or scrape as described above.
Step 5: Detail Work
For carvings or grooves, use a toothbrush or cotton swab with your solvent. Be gentle to avoid scratching.
Step 6: Final Sanding
Once most glaze is gone, use fine sandpaper (320 grit) for a smooth finish. Always sand with the grain.
Step 7: Clean Up
Vacuum dust and wipe down surfaces with a damp cloth. Let everything dry completely before refinishing or reattaching hardware.
Handling Problems And Common Mistakes
Even with the best plans, issues can come up. Here’s how to handle them.
Sticky Or Tacky Surface
Sometimes, after using solvents or strippers, the surface feels sticky. This can mean residue is left behind.
Solution: Wipe again with clean water or the recommended neutralizer. Dry thoroughly.
Uneven Removal
If some areas still look glazed:
- Sand lightly with fine sandpaper
- Use steel wool for corners
- Reapply solvent or stripper as needed
Damage To Wood
Sanding too hard or using harsh chemicals can scratch or lighten the wood.
Solution: Go slowly. Always test products on a small, hidden spot before doing the whole cabinet. If damage occurs, you may need to use a wood stain or touch-up pen to blend the area.
Missed Details
Glaze often hides in carvings, grooves, or edges.
Non-Obvious Insight: Use wooden toothpicks or a soft-bristle brush to remove glaze from tight spaces without harming the cabinet.
Strong Odors
Some solvents and strippers smell strong and can linger.
Solution: Ventilate with fans and open windows. Place bowls of baking soda or activated charcoal in the room to absorb odors.
How Long Does Glaze Removal Take?
Time depends on:
- Cabinet size
- Glaze thickness
- Method chosen
For an average kitchen, expect:
- Cleaning: 1–2 hours
- Sanding: 4–6 hours
- Solvents: 2–4 hours (with drying time)
- Stripping: 6–10 hours (including waiting time)
Pro Tip: Work in sections. Start with one door or area to get the feel, then move on.
Should You Remove Glaze Yourself Or Hire A Pro?
DIY glaze removal saves money but takes time and patience. Hiring a professional can be a good choice if:
- Cabinets are antique or valuable
- You have allergies to chemicals
- You want a guarantee of results
Here’s a comparison of doing it yourself vs. hiring out:
| DIY | Professional |
|---|---|
| Lower cost | Higher cost ($200–$1,000+) |
| More time required | Faster results |
| Learning curve | Expert results |
| Flexible timing | Schedule needed |
For most modern cabinets, DIY is safe if you go slow and test your methods.
Tips For Best Results
- Test First: Always try your removal method on a hidden spot.
- Go Slow: It’s better to repeat a gentle method than damage the wood.
- Stay Organized: Keep screws and hardware in labeled bags.
- Use Good Lighting: Glaze can be hard to see in poor light.
- Allow for Drying: Don’t rush to paint or refinish before cabinets are fully dry.
- Ventilate: Open windows and use fans when working with chemicals.
- Protect Floors: Put down drop cloths to catch drips and dust.
- Check Your Progress: Step back often to see if the glaze is coming off evenly.
- Ask for Help: If you’re unsure, ask a hardware store expert.
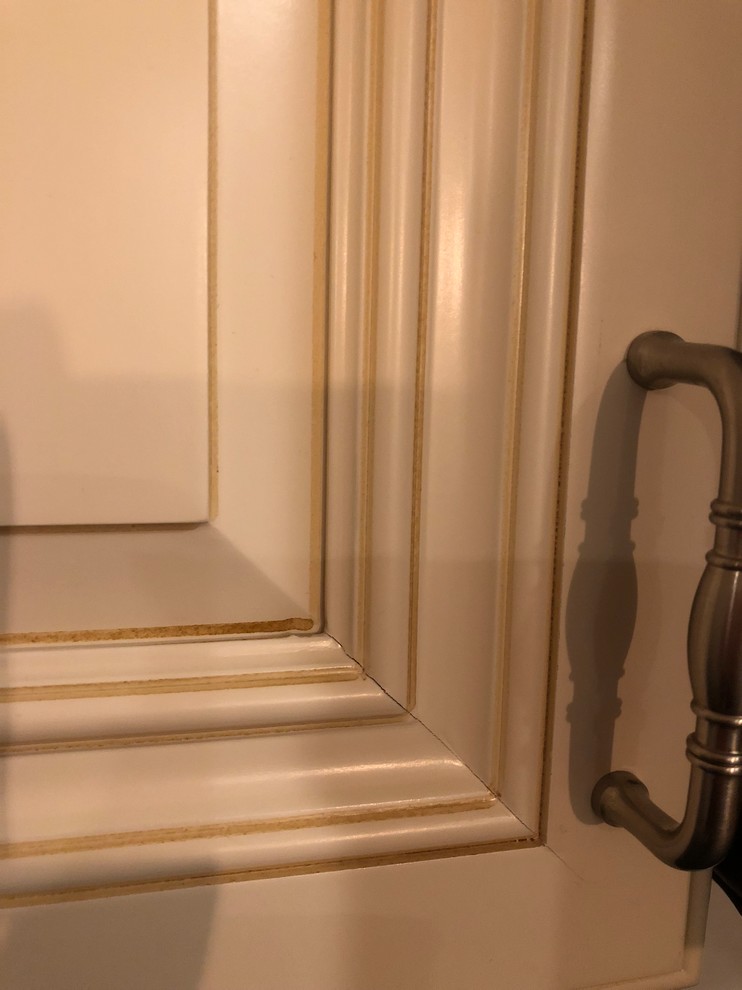
Credit: www.houzz.com
When To Stop Removing Glaze
It’s easy to get focused on perfection, but sometimes it’s best to stop before you go too far.
- If the cabinet wood is starting to lighten or change texture, stop.
- If you only want to lighten the glaze, not remove it completely, you may be done sooner.
- For cabinets with deep carvings, it’s okay if a little glaze remains in the grooves—this often adds character.
Prepping Cabinets For Refinish Or Paint
Once the glaze is gone, you may want to stain, paint, or seal your cabinets. Here’s how to prepare:
- Sand lightly with 320-grit sandpaper for a smooth base.
- Wipe clean with a tack cloth or damp rag.
- Prime if painting, especially if using a light color.
- Test your new finish on a small area first.
What To Avoid
Many beginners make mistakes that can be costly or hard to fix. Here’s what to steer clear of:
- Don’t use metal scrapers on soft woods—they scratch easily.
- Avoid harsh abrasives like steel brushes.
- Don’t rush the process—let chemicals work before scraping.
- Never mix different solvents or strippers unless directions allow.
- Don’t forget to ventilate; fumes can be dangerous.
How To Dispose Of Old Glaze And Chemicals
Used solvents, strippers, and rags can be hazardous.
- Let rags dry completely outside before throwing away.
- Take leftover chemicals to a hazardous waste center—never pour down the drain.
- Wash hands and tools thoroughly when finished.
For more on safe disposal, see the EPA’s guide on household hazardous waste.
Example Project: Removing Glaze From Oak Cabinets
Let’s look at a common real-world example.
Project: A set of oak kitchen cabinets with a dark brown glaze that’s chipped and sticky.
Method:
- Remove doors and hardware.
- Clean with soap and water.
- Test with mineral spirits—glaze comes off a little.
- Use denatured alcohol with a rag, rubbing gently.
- For corners, use a toothbrush with solvent.
- Sand lightly with 220-grit sandpaper.
- Wipe clean and let dry overnight.
Result: Cabinets are lighter, natural oak color returns, ready for a clear seal or new paint.
Time: 2 days (including drying time)
Cost: About $30 for supplies.
Should You Strip Or Just Sand?
Some situations call for full stripping, others only need sanding.
| Situation | Recommended Method |
|---|---|
| Light surface glaze, good wood underneath | Sanding |
| Thick, old, or uneven glaze | Chemical stripper + sanding |
| Detailed carvings or grooves | Solvent + toothbrush or steel wool |
| Unknown finish, valuable cabinet | Test, consult a pro if unsure |
How To Tell If All The Glaze Is Gone
Run your hand over the surface. If it feels rough, sticky, or uneven, some glaze may remain. Look at the color—if it’s lighter and more uniform, you’re close. Shine a light at an angle; leftover glaze often reflects differently.
Practical tip: If painting, use a bonding primer after cleaning to help the new finish stick, even if a bit of glaze remains.
Frequently Asked Questions
How Do I Know If My Cabinets Have Glaze Or Just Stain?
Glaze usually looks like a thin layer on top of the stain, often darker in corners and grooves. Stain soaks into the wood and colors evenly. Run a damp cloth over the surface—if color comes off, it’s likely glaze.
Can I Remove Glaze Without Damaging The Underlying Paint Or Stain?
Yes, if you use gentle methods and go slowly. Always test solvents or sandpaper on a hidden area. For painted cabinets, use a mild solvent and avoid strong strippers.
What If The Glaze Doesn’t Come Off With Soap And Water?
Move to the next method—try mineral spirits or denatured alcohol. If still stuck, sanding or a chemical stripper may be necessary. Always test each method before doing the whole cabinet.
Can I Re-glaze My Cabinets After Removing The Old Glaze?
Absolutely. Once the old glaze is removed and the surface is clean, you can apply a new glaze, stain, or paint. Make sure to seal the new finish for durability.
Is It Safe To Remove Glaze Indoors?
Yes, if you use proper ventilation, wear protection, and follow safety guidelines. Open windows, use fans, and avoid working near open flames when using flammable solvents.
Giving your cabinets a new look by removing old glaze is a rewarding project. With careful planning, the right materials, and some patience, you can transform your space without hiring a professional. Remember to work slowly, test your methods, and protect yourself and your home.
Whether you want to restore natural wood or prepare for a bold new color, following these steps will help you get the best results with confidence.
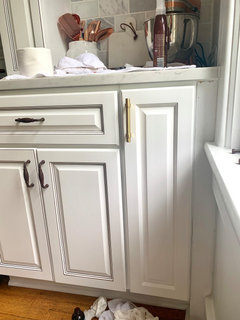
Credit: www.houzz.com