Keeping your Vitamix blender in top shape is essential if you want smooth blends and long-lasting performance. One area many users overlook is the sharpness of the blades. Over time, even the strong stainless steel blades in a Vitamix can become dull, especially if you blend hard ingredients like ice, frozen fruits, or nuts.
Dull blades lead to rough textures, longer blending times, and more stress on the motor. If you’ve noticed your smoothies are not as creamy or you hear the motor working harder, your blades might need attention.
But sharpening Vitamix blades is not as simple as sharpening a kitchen knife. The blades are fixed inside the blending jar, and they are designed differently. Most people are unsure whether they should sharpen them, replace them, or even if it’s safe to do so.
This guide will walk you through everything you need to know about sharpening Vitamix blades, from how to check if they’re dull to safe sharpening methods, maintenance tips, and when replacement is the better option. Whether you’re a home cook or a smoothie enthusiast, you’ll find step-by-step instructions, practical advice, and expert insights that will help you keep your Vitamix performing like new.
Understanding Vitamix Blades
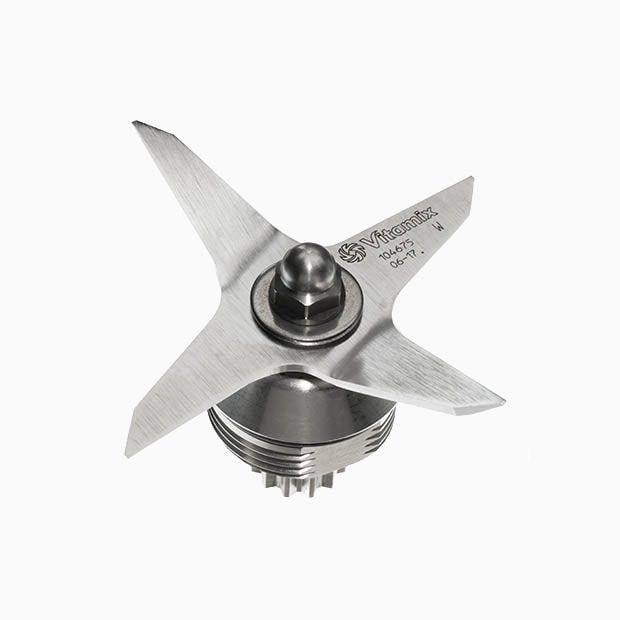
Vitamix blenders are known for their durable stainless steel blades. Unlike typical kitchen knives, these blades are not razor-sharp out of the box. Instead, they have a robust, slightly dull edge that relies on high-speed rotation and force to blend ingredients. This design helps prevent injuries and makes the blades less likely to chip or break.
The blades are made from aircraft-grade stainless steel and are usually set at a fixed angle inside the container. Most Vitamix models, including the classic 5200 and newer Ascent series, use similar blade assemblies. The blades are not meant to be removed often, and the company does not market them as user-sharpenable. Still, with proper care, you can restore their performance and extend their life.
Why Blades Become Dull
Even though Vitamix blades are tough, they can lose their blending efficiency due to:
- Frequent use with hard items like ice, nuts, or seeds
- Blending dry ingredients without enough liquid
- Accidental blending of foreign objects (utensils, fruit pits)
- Normal wear and tear after years of use
A dull blade won’t cut or pulverize ingredients as effectively. You’ll notice uneven textures, longer blend times, or increased noise. For example, blending frozen bananas or making nut butter regularly can put extra stress on the blade edges. Over time, even high-quality steel develops tiny dents and micro-abrasions, which are not always visible but can affect performance.
Many users don’t realize that running the blender on high speed without enough food or liquid can also cause the blades to hit air pockets, resulting in repeated impact and dullness. It’s not just what you blend, but how you blend that matters.
How To Tell If Your Blades Are Dull
Before sharpening, confirm if your blades need it. Some signs include:
- Smoothies or soups have chunks or gritty texture
- Ingredients bounce around instead of blending
- Blades feel rounded or very smooth to the touch (be careful checking!)
- The motor sounds like it’s working harder
A simple test: try blending a handful of dry oats or ice cubes. If you see unblended pieces or hear the blender straining, it’s a sign the blades have lost their edge.
Another less obvious sign is when you start needing to blend for longer than before to get the same results. If your favorite green smoothie now takes twice as long and still isn’t as silky, that’s a warning. Some users also notice more food getting stuck under the blades or in corners, as dull blades can’t pull ingredients down as efficiently.
Is It Safe And Necessary To Sharpen Vitamix Blades?
This is a common question. Vitamix does not officially recommend users sharpen blades themselves, mainly for safety reasons and to avoid damaging the jar or assembly. However, many users and repair experts have safely sharpened their blades, restoring performance without causing harm.
Sharpening is not always necessary. Sometimes, cleaning or replacing the blade assembly is a better option. If your blender is under warranty, contact Vitamix first; unauthorized sharpening might void your warranty.
If your blender is out of warranty, and you’re comfortable with DIY projects, you can sharpen the blades following safe procedures. Always prioritize safety and proper technique.
It’s also important to consider how much you use your Vitamix. If you only blend soft fruits and liquids, sharpening might never be needed. But for heavy users who make nut butters, thick hummus, or crush ice daily, periodic maintenance is more important.
Some users even opt for professional sharpening services, especially if they’re not confident working with sharp tools.

Credit: www.amazon.sg
Tools And Materials You’ll Need
Before you start, gather these items:
- Protective gloves (cut-resistant if possible)
- Small sharpening stone or diamond file
- Screwdriver (if removing the blade assembly)
- Soft cloth
- Mild dish soap and brush
- Vitamix container wrench (for certain models)
Do not use electric grinders or sandpaper, as these can damage the blade or container.
A common mistake is skipping safety gear. Even though the blades aren’t razor-sharp, they can still cause cuts, especially if your hand slips. Gloves give you a better grip and more confidence during the process. A small sharpening stone or diamond file is best for the tight spaces inside the container.
Large stones or files are hard to maneuver and can scratch the plastic walls, reducing container clarity and making cleaning harder.
How To Safely Remove The Vitamix Blade Assembly
Not all Vitamix models allow blade removal. Check your manual. For models with removable blades:
- Unplug the blender and remove the container.
- Wash and dry the container to avoid slipping.
- Wear protective gloves to prevent cuts.
- Flip the container upside down.
- Use the Vitamix wrench (or a compatible tool) to unscrew the retaining nut.
- Carefully lift out the blade assembly.
If your model does not allow removal, you can sharpen the blades inside the container, but be extra careful not to scratch the walls.
Some newer Vitamix containers have security features that make removal more difficult. If you’re unsure, consult your user manual or check the Vitamix support website. Forcing a blade assembly out of a non-removable container can crack the base or ruin the seal, leading to leaks.
If you feel resistance or see special screws, it’s better to sharpen in place or seek professional help.
Step-by-step Guide: Sharpening Vitamix Blades
1. Clean The Blades Thoroughly
Before sharpening, make sure the blades are free from food residue and oils. Wash with warm water, mild soap, and a brush. Dry with a soft cloth.
Residue, especially from sticky foods like nut butters or dried fruit, can hide the true edge of the blade. If you sharpen over food buildup, you’ll miss spots and may even push gunk further into cracks.
2. Inspect For Damage
Check for bent, cracked, or chipped blades. If you see serious damage, it’s safer to replace the assembly.
Look at the blade edges under a strong light. Small chips or bends can sometimes be seen at the tips, especially if you’ve accidentally blended a spoon or other hard object. Damaged blades won’t sharpen well and could break during use.
3. Choose The Right Sharpening Tool
A small, fine-grit sharpening stone or diamond file works best. Avoid large stones or anything that might scratch the container.
A diamond file is easier to control for beginners. It’s also good for touching up only the working edge, not the whole surface. Avoid coarse grit, which removes too much material and can change the blade’s shape.
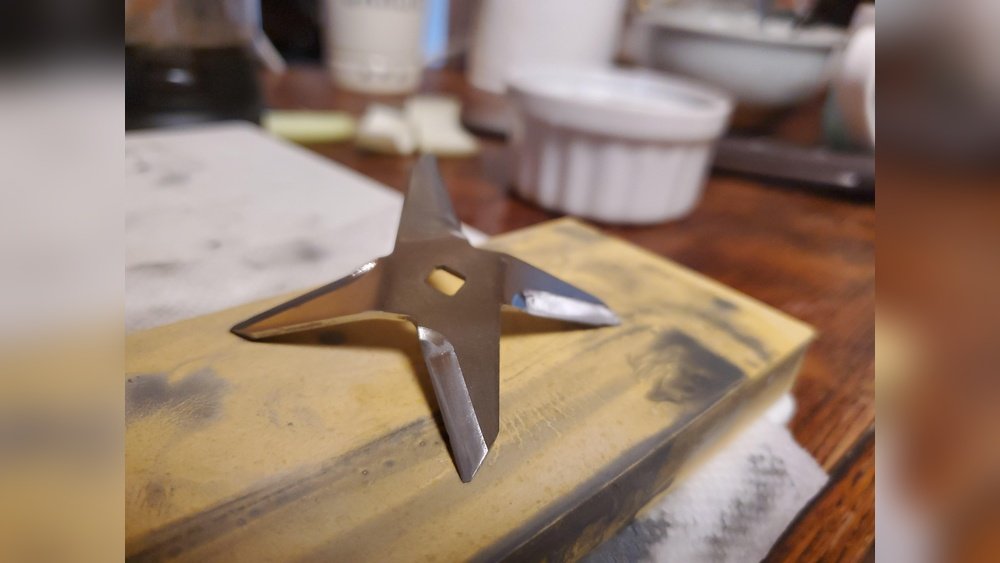
4. Sharpen Each Blade Edge
Wearing gloves, hold the blade assembly securely. For each blade:
- Hold the sharpening stone at the same angle as the blade edge (usually around 20-25 degrees).
- Move the stone along the edge, applying gentle, even pressure.
- Stroke in one direction, from the base toward the tip.
- Repeat 5-8 times per edge, checking for a slightly sharper feel.
If blades are inside the container, move the file carefully along the exposed edge, keeping away from the plastic.
Don’t try to make the blades razor-sharp. The goal is to restore the original edge, not to create a knife-like finish. Over-sharpening can make blades brittle or cause them to chip during high-speed operation. Beginners often miss the importance of keeping the angle consistent—changing it can reduce blending efficiency.
5. Rinse And Dry
After sharpening, rinse the blades to remove metal shavings. Dry with a clean cloth.
This step is crucial to keep metal filings out of your food. If you see any residue left, repeat rinsing and wipe down the container walls as well.
6. Reassemble The Container
If you removed the blade assembly, reinstall it tightly. Make sure the seal is secure and the blades spin freely.
Double-check the gasket and seal for any wear. A loose assembly can cause leaks or vibration. Spin the blades by hand to confirm smooth movement.
7. Test The Results
Try blending a small amount of ice or oats. You should notice smoother blending and less noise.
If the texture is still not right, repeat the sharpening process gently. Sometimes, the first attempt only restores part of the edge, especially if blades were very dull.
Table: Sharpening Tools Comparison
Here’s a quick look at common sharpening tools and their suitability for Vitamix blades.
| Tool | Effectiveness | Risk of Damage | Ease of Use |
|---|---|---|---|
| Sharpening Stone | High | Low | Moderate |
| Diamond File | High | Low | Easy |
| Electric Grinder | Too aggressive | High | Difficult |
| Sandpaper | Low | Medium | Moderate |
| Professional Service | Very high | Very low | Easy |
Some users wonder about using kitchen knife sharpeners. These are not suitable for Vitamix blades due to their size, shape, and the way they’re mounted.
Common Mistakes To Avoid
Many beginners make errors that can damage their Vitamix or reduce blending quality.
- Using power tools: Electric grinders can heat and warp the blades. Always use hand tools.
- Applying too much pressure: This can change the blade angle or cause cracks.
- Sharpening too often: Over-sharpening reduces blade life.
- Forgetting to clean after sharpening: Metal filings can end up in food.
- Ignoring safety: Not wearing gloves or working on a slippery surface can cause injury.
Another mistake is not checking the blade assembly for proper reinstallation. A loose or misaligned blade can leak, vibrate, or even come off during blending. If your blender sounds different or leaks after sharpening, stop and check the assembly.
When To Replace Instead Of Sharpen
Sometimes, sharpening is not enough. Replace the blade assembly if:
- Blades are bent or chipped
- The container is leaking
- Blades make unusual noises
- There’s excessive rust or discoloration
- The blender is still under warranty (contact support first)
Replacement assemblies are available online or from Vitamix. This is often the safest and most effective solution if you’re unsure about sharpening.
Replacement is also better if your container has become scratched or cloudy, as this can reduce blending efficiency no matter how sharp the blades are. If you see deep grooves or stress marks around the blade base, replace the assembly to avoid leaks or breakage.
Maintenance Tips To Keep Blades Sharp
Prevent dullness and extend blade life with these habits:
- Always add enough liquid to help ingredients circulate
- Avoid blending utensils, pits, or bones
- Cut large, hard items into smaller pieces before blending
- Clean immediately after use to prevent buildup
- Run the self-cleaning cycle (blend warm water with soap for 30 seconds)
- Store the blender dry to prevent rust
It’s also smart to inspect your blades every few months, especially if you use your Vitamix heavily. A quick look and feel (with gloves) can tell you if they’re still in good condition. If you notice more residue sticking to the blades after blending, this can signal a loss of edge.
If you use your Vitamix in a commercial setting or for meal prepping large batches, consider keeping a spare container and blade assembly. Rotating between them can balance wear and give you backup during busy times.
How Often Should You Sharpen?
Most users don’t need to sharpen their Vitamix blades more than once every 2–3 years, depending on use. Frequent ice crushing or nut butter making can dull them faster, while basic smoothie use keeps them sharp longer.
If your blends suddenly start taking much longer, or you need to run cycles twice for the same results, it might be time for sharpening. Remember, it’s not just a matter of years—it’s about signs of dullness and your personal usage.
Table: Blade Life By Usage Type
Here’s an estimate of blade longevity based on usage.
| Usage Type | Blade Life (Years) | Sharpening Needed? |
|---|---|---|
| Daily Smoothies (soft ingredients) | 4-5 | Rarely |
| Frequent Ice Crushing | 2-3 | Every 2 years |
| Nut Butters & Seeds | 1-2 | Annually |
| Professional Use | 1 | Every 6-12 months |
Real-world Example: Restoring A Dull Vitamix
Let’s look at a real scenario. Sarah, a home cook, noticed her Vitamix 5200 wasn’t blending frozen fruit as smoothly as before. She tried cleaning the blades, but the problem remained. She used a diamond file, carefully sharpened each edge, and rinsed the assembly.
After sharpening, her smoothies returned to their original creamy texture. She also realized she was blending too many frozen items without enough liquid, which contributed to dullness.
The insight here is that sometimes blending habits matter as much as blade sharpness. Using the right ratio of liquid can reduce stress on the blades and motor.
Another example: A café owner used their Vitamix for daily green smoothies and nut butters. After a year, they noticed their pesto wasn’t as silky. Instead of replacing the container, they sharpened the blades and added more liquid to their recipes. This small change restored both texture and efficiency, saving money on new parts.

Credit: www.youtube.com
Should You Use Professional Sharpening Services?
Some kitchen appliance repair shops offer blade sharpening. This is a good option if you’re not comfortable doing it yourself. Professional sharpeners use the right tools and angles, reducing risk. However, the cost can be similar to buying a new blade assembly, so compare prices before deciding.
If you live in a city, search for small appliance repair shops or ask at stores that sell commercial blenders. Always check reviews and ask if they have experience with Vitamix products. For rare or older models, professionals might have access to better tools and parts.
Table: Sharpening Vs. Replacement
Let’s compare sharpening and replacing Vitamix blades.
| Option | Cost | Skill Needed | Time Required | Warranty Impact |
|---|---|---|---|---|
| Sharpening Yourself | Low | Moderate | 30-60 min | May void |
| Professional Sharpening | Medium | None | 1-2 days | Safe if authorized |
| Replacement | Medium-High | Low | 15-30 min | Usually safe |
Important Safety Tips
- Always unplug your blender before working on it.
- Use cut-resistant gloves when handling blades.
- Keep children and pets away during the process.
- Dispose of any damaged blade assemblies safely.
- Never use the blender without the container and lid in place.
A less obvious safety tip: Always check for leftover cleaning products or metal dust before your first blend after sharpening. Even small traces can affect food taste or safety.
Non-obvious Insights For Beginners
- Blade design matters: Vitamix blades are intentionally not razor-sharp. Their power comes from speed and shape. Don’t try to make them as sharp as a kitchen knife—just restore the original edge.
- Container condition affects blending: Scratched or cloudy containers can slow down blending. Sometimes, replacing the jar improves results even if blades seem fine.
A third insight: Ingredient order in the container matters. Adding liquids first, then softer items, then hard ones like ice or nuts on top, can reduce blade stress and improve blending. Many people overlook this, but it’s a small habit that protects your blades.
How To Store And Care For Your Vitamix
Proper storage can prevent accidental dulling:
- Store the blender with the lid off to avoid moisture buildup.
- Do not stack heavy objects on top of the container.
- If you have multiple containers, rotate their use to balance wear.
If you store your Vitamix for long periods, check the blades before use. Sometimes, moisture left inside can lead to rust spots, which dull the blades quickly. Leaving the lid off helps air circulation and prevents musty smells.
What To Do If Sharpening Doesn’t Help
If you’ve sharpened your blades and blending is still poor:
- Check for motor or drive socket issues.
- Inspect the gasket and seals for leaks.
- Try a new container.
- Contact Vitamix support for diagnostics.
Sometimes, the problem is not the blades but another part of the blender.
If you notice burning smells, loud rattling, or leaking even after blade maintenance, stop using the blender until you find the cause. Continuing to use a damaged blender can cause further problems or void your warranty.
The Bottom Line
Sharpening Vitamix blades can restore blending performance and extend the life of your blender, especially if you use it for tough jobs. But it’s not always necessary or safe for every model. If you choose to sharpen, use the right tools, follow safety steps, and always check for damage before and after.
In many cases, regular maintenance and good blending habits will keep your Vitamix working for years.
For more detailed information on blade materials and blender maintenance, you can check this Wikipedia page on blenders.
Frequently Asked Questions
How Do I Know If My Vitamix Blades Need Sharpening?
If you notice uneven blending, chunky textures, or the motor working harder, your blades may be dull. Try blending dry oats or ice—if you see large unblended pieces, sharpening may help.
Can I Sharpen Vitamix Blades Without Removing Them?
Yes, you can carefully sharpen the exposed blade edges inside the container using a small diamond file. Be gentle to avoid scratching the plastic. Always wear gloves.
Will Sharpening The Blades Void My Vitamix Warranty?
If your blender is under warranty, sharpening the blades yourself may void the warranty. It’s best to contact Vitamix support first or use an authorized service.
How Often Should I Sharpen Vitamix Blades?
For most home users, sharpening every 2–3 years is enough. If you blend ice or nuts daily, you may need to sharpen annually. Always check blade condition before deciding.
What If Sharpening Doesn’t Improve Performance?
If blending is still poor after sharpening, check for motor issues, leaks, or worn gaskets. Sometimes, replacing the container or blade assembly is necessary. Contact Vitamix support for help.
Keeping your Vitamix blades sharp is a smart way to get smooth blends and protect your investment. With careful sharpening, proper care, and a little know-how, your blender can stay powerful for many years.
Credit: www.vitamix.com