Building your own wall cabinets can completely change the way a room looks and works. Maybe your kitchen lacks storage, your home office needs organizing, or your garage tools are always out of place. Wall cabinets are the answer. The best part?
Making them yourself is possible—even if you’re not a master carpenter. With some careful planning, basic tools, and patience, you can create cabinets that fit your exact needs and style.
This guide walks you through everything: planning, materials, cutting, assembly, finishing, and installation. Along the way, you’ll learn tricks that professionals use, and avoid mistakes that frustrate many beginners. Whether you want simple utility cabinets or stylish kitchen units, the same core steps apply. Let’s dive in and unlock the skills to build practical, beautiful wall cabinets.
Understanding Wall Cabinets
Wall cabinets are storage units fixed to walls—usually above counters, desks, or workbenches. Their main job is to provide storage without using floor space. You see them most often in kitchens, bathrooms, laundry rooms, and garages. They range from simple open shelves to detailed units with doors, drawers, and decorative trim.
Why build your own? Store-bought cabinets are often expensive, and sizes may not fit your space. Custom cabinets can match your needs, color, and style perfectly. Plus, building them yourself saves money and gives you a sense of achievement.
Key features of wall cabinets:
- Mounted above counters or workspaces
- Usually 12–16 inches deep (shallower than base cabinets)
- Hung at a height that leaves space above counters (typically 18–20 inches)
- Can include doors, shelves, or open cubbies
- Made from wood, plywood, MDF, or particleboard
Planning Your Wall Cabinets
Before you touch a saw or buy materials, you need a clear plan. This step is where many beginners go wrong—rushing ahead leads to wasted time and costly mistakes.
Measure Your Space
Start by measuring the wall where you’ll install the cabinets. Use a tape measure and note:
- Wall length and height
- Ceiling height
- Space above counters or appliances
- Window and door locations
Tip: Sketch the wall and mark all measurements. Include outlets, switches, and any obstacles. This will prevent surprises later.
Decide Cabinet Size And Layout
Think about what you need to store. Dishes? Office supplies? Tools? This helps decide how many cabinets you need and their sizes.
Standard wall cabinet dimensions:
- Height: 12″, 18″, 24″, 30″, 36″, or 42″
- Depth: 12″ to 16″
- Width: 12″ to 36″ (in 3″ increments)
Choose cabinet heights that fit your ceiling. For kitchens, a common gap above counters is 18–20 inches.
Sketch Your Cabinets
Draw a simple sketch of the cabinet faces. Show the doors, shelves, and where they’ll go on the wall. You don’t need to be an artist—just clear enough for your own use.
Choose A Cabinet Style
There are three main types:
- Frameless (Euro-style): Clean, modern look. The doors cover the entire front edge.
- Face-frame: A wood frame is attached to the front. Doors sit inside or over the frame. More traditional, sturdy.
- Open shelving: No doors, just open boxes. Simple and easy.
Your choice affects how you build and hang the cabinets.
Plan For Hardware
You’ll need:
- Hinges: Concealed (for frameless) or surface-mount (for face-frame)
- Handles or knobs
- Mounting screws
- Shelf supports
Choose hardware that matches your style.
Gathering Tools And Materials
Having the right materials and tools makes building cabinets smoother. Some items are essential, while others (like power tools) make the work faster.
Materials Checklist
- Plywood (3/4″ thick for cabinet box, 1/4″ for back panel)
- Solid wood strips (for face frames, if using)
- Wood glue
- Wood screws (1-1/4″ to 2″)
- Wood filler or putty
- Sandpaper (100, 150, 220 grit)
- Paint or stain
- Primer (if painting)
- Cabinet hardware (hinges, handles)
- Mounting screws (3″ for wall studs)
Why plywood? It’s strong, stable, and resists warping better than solid wood. For visible parts (doors, face frames), you can use hardwood for a richer look.
Tools Needed
- Circular saw (or table saw)
- Drill/driver
- Measuring tape
- Straightedge or level
- Clamps
- Square
- Screwdriver
- Paintbrushes or rollers
- Stud finder
- Safety glasses and ear protection
Optional:
- Pocket hole jig (for strong, hidden joints)
- Random orbit sander
- Nail gun
Material Comparison
Here’s how common cabinet sheet materials stack up:
| Material | Strength | Cost | Moisture Resistance | Finish Quality |
|---|---|---|---|---|
| Plywood | High | Medium | Good | Excellent |
| MDF | Medium | Low | Poor | Very Smooth |
| Particleboard | Low | Low | Poor | Fair |
Tip: For kitchens or bathrooms, avoid MDF and particleboard unless they’re well-sealed. Moisture can make them swell and weaken.
Cutting And Preparing Cabinet Parts
Careful measuring and cutting are the heart of good cabinets. Rushing this step leads to crooked, unstable cabinets.
Breaking Down Plywood
Lay your plywood sheet on a flat surface (use sawhorses or a workbench). Mark all your parts—sides, top, bottom, shelves, back—before cutting. Use a straightedge as a guide for your saw. Label each piece with a pencil as you cut.
Pro tip: Cut all same-size pieces at once for consistency. For example, cut both sides together.
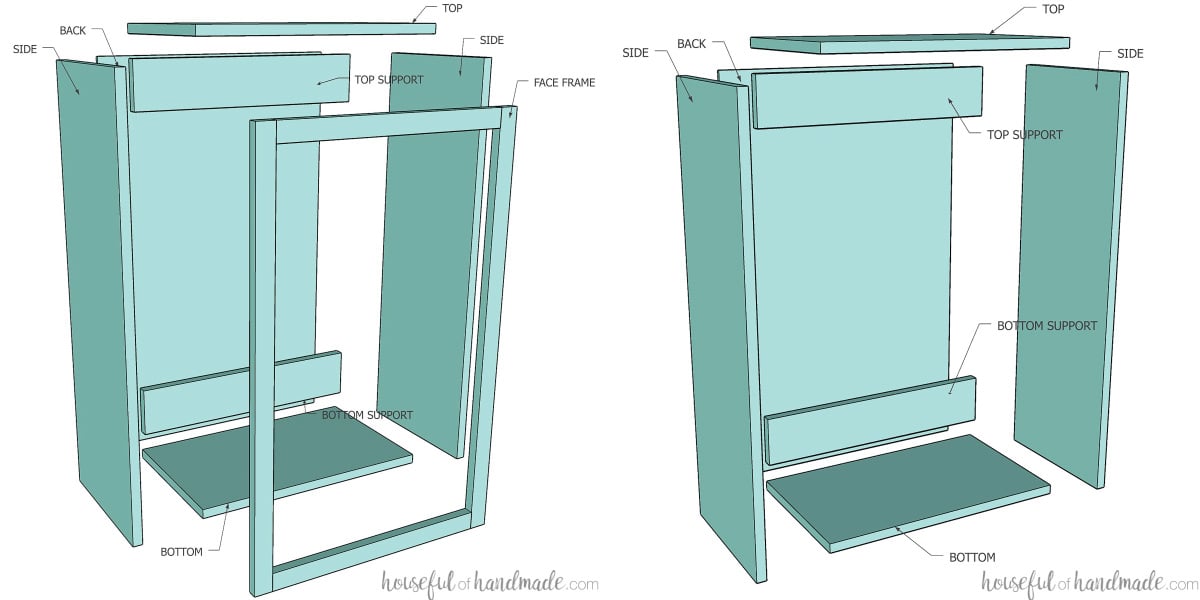
Standard Cabinet Box Parts
- Sides: 2 pieces (height x depth)
- Top and bottom: 2 pieces (width x depth)
- Shelves: 1 or more (width x depth)
- Back panel: 1 piece (width x height, usually thin plywood)
Face frame: If using, cut rails (horizontal) and stiles (vertical) from solid wood strips.
Edge Finishing
The edges of plywood can look rough. Cover them with edge banding (thin wood strips with glue backing) or use the face-frame style to hide them.
Non-obvious insight: Always sand cut edges before assembly. It’s much easier than after the cabinet is built.
Drilling Shelf Holes
If you want adjustable shelves, drill holes for shelf pins before putting the box together. Use a template or shelf pin jig for evenly spaced holes.
Assembling The Cabinet Box
This is where your project starts taking shape. Take your time—accurate assembly means strong, square cabinets.
Dry Fit First
Before using glue or screws, put all parts together without fasteners. Check for fit and squareness with a carpenter’s square.
Gluing And Screwing
- Apply wood glue to the joints.
- Clamp pieces together.
- Drill pilot holes to prevent splitting.
- Use screws to hold parts until glue dries (1-1/4″ to 1-1/2″ are common for 3/4″ plywood).
Tip: Attach the top and bottom between the two sides. This hides screw ends and gives a cleaner look.
Attaching The Back
- Cut the back panel slightly smaller to fit inside the box.
- Secure with glue and small nails or screws.
- The back adds strength and keeps the box square.
Face frame: If you’re building a face-frame cabinet, glue and nail the frame to the front edges now.
Shelf Installation
For fixed shelves, glue and screw them in place. For adjustable shelves, just set them on shelf pins after finishing.
Cabinet Box Assembly Example
Here’s a quick look at how dimensions come together for a 30-inch high, 12-inch deep, 24-inch wide cabinet:
| Part | Quantity | Size (inches) |
|---|---|---|
| Sides | 2 | 30 x 12 |
| Top/Bottom | 2 | 22.5 x 12 |
| Back Panel | 1 | 29.5 x 23.5 |
| Shelf | 1+ | 22.5 x 12 |
Why aren’t the top/bottom as wide as the cabinet? Because they fit between the sides. Always subtract the thickness of both sides from the width.
Making And Attaching Cabinet Doors
Doors add style and keep dust out. You can build simple flat doors or use a shaker style for a more classic look.
Choosing A Door Style
- Slab doors: Flat plywood or MDF. Easy and modern.
- Shaker doors: Frame and panel (a frame around a flat center). More traditional.
Measuring For Doors
If you want the doors to cover the face of the cabinet (full overlay), make each door about 1/8″ smaller than the opening on all sides. For two doors, split the opening in half and subtract 1/16″ from each for a small gap.
Building Simple Slab Doors
- Cut plywood to the measured size.
- Sand all edges smooth.
- For a finished look, add edge banding.
Building Shaker Doors
- Cut four frame pieces (stiles and rails) for each door.
- Cut a center panel from plywood.
- Join frame pieces with pocket holes or dowels, glue the panel inside.
Non-obvious insight: Let your door panels “float”—don’t glue them tightly into the frame. This allows for wood movement and prevents cracks.
Drilling For Hinges
Use a concealed hinge jig for consistent hinge cup holes. Mark hinge locations about 3″ from the top and bottom edges.
Attaching Doors
- Attach hinges to doors first, then to the cabinet.
- Adjust screws so the doors line up and swing smoothly.
Adding Handles Or Knobs
- Drill small pilot holes for handles.
- Use a template or mark carefully for even placement.

Credit: www.youtube.com
Painting, Staining, Or Finishing
A good finish protects your cabinets and makes them look professional.
Preparation
- Fill screw holes with wood filler.
- Sand all surfaces: Start with 100 grit, finish with 220 grit.
- Wipe away dust with a damp cloth.
Painting
- Apply primer (especially on MDF or if using light colors).
- Use a small roller or brush for smooth coats.
- Apply two finish coats, sanding lightly between each.
Staining
- Use a pre-stain conditioner on soft woods.
- Apply stain with a brush or cloth, wipe excess.
- Finish with clear polyurethane for protection.
Tip: Paint doors and shelves before installation for easier coverage.
Installing Wall Cabinets
Mounting cabinets safely is just as important as building them well. Cabinets full of dishes or tools are heavy, so they must be anchored securely to the wall studs.
Marking The Wall
- Mark the top and bottom edges of the cabinet on the wall.
- Find wall studs with a stud finder and mark their locations—studs are usually 16″ apart.
Prepping The Cabinets
- Drill holes through the back panel at stud locations.
- For multiple cabinets, screw them together side by side before hanging.
Hanging The Cabinets
- If possible, get a helper. Cabinets are heavy and awkward.
- Set a temporary ledger board (a straight board screwed to the wall) to support the cabinet’s bottom while you screw it in place.
- Lift the cabinet onto the ledger.
- Drive 3″ screws through the cabinet back and into the studs. Use at least two screws per stud.
- Check for level. Adjust if needed.
Removing The Ledger
Once the cabinet is secure and level, remove the temporary ledger board.
Final Adjustments
- Adjust the doors so they hang evenly.
- Install shelves.
- Check that everything opens and closes smoothly.
Professional insight: For long rows, hang corner cabinets first and work outwards. This keeps everything aligned.
Credit: housefulofhandmade.com
Practical Tips For Success
Building wall cabinets can be challenging. Here are a few extra tricks that save time and headaches:
- Label every part as you cut. This avoids confusion during assembly.
- Work on a flat, clean surface for accurate assembly.
- Don’t overtighten screws—it can split plywood or strip holes.
- Drill pilot holes for all screws.
- Check for square at every step. A crooked box means doors won’t fit.
- Use painter’s tape to mark out cabinet sizes on the wall before building.
- Practice on scrap wood if you’re unsure about hinge drilling or finishing.
Common Mistakes To Avoid
Even skilled DIYers make errors. Here are problems to watch out for:
- Skipping the stud finder: Drywall anchors won’t hold heavy cabinets. Always screw into studs.
- Ignoring wood movement: Solid wood expands and contracts. For doors, allow a small gap and don’t glue panels tightly.
- Forgetting to sand edges: Rough plywood edges look unfinished and can cause splinters.
- Not checking for square: Cabinets must be square or doors will bind.
- Using the wrong screws: Drywall screws are too brittle; use cabinet or wood screws.
Credit: www.thehandymansdaughter.com
Cost Breakdown And Time Estimate
Building your own wall cabinets is more affordable than buying custom units. Here’s an approximate budget for a standard 30″x30″x12″ cabinet:
| Item | Estimated Cost (USD) |
|---|---|
| 3/4″ Plywood (1/2 sheet) | $30–$40 |
| 1/4″ Plywood (back) | $8–$12 |
| Hinges & hardware | $10–$20 |
| Screws, glue, filler | $5–$10 |
| Paint or stain | $10–$20 |
| Total | $63–$102 |
Time estimate: For a first-time builder, expect 6–10 hours per cabinet from start to finish, not counting drying time for paint or stain.
When To Buy Instead Of Build
Sometimes, buying cabinets is smarter:
- If you need a large number quickly
- If you don’t have tools or workspace
- For complex designs (like curved doors or glass inserts)
But for most standard cabinets, building your own is rewarding and cost-effective.
Where To Learn More
To see more cabinet styles, advanced joinery, and finishing techniques, check out the Family Handyman guide for extra tips and project ideas.
Frequently Asked Questions
How Deep Should Wall Cabinets Be?
Most wall cabinets are 12 to 16 inches deep. Kitchen wall cabinets are often 12″ deep so you can easily reach the back. For offices or garages, you can go a bit deeper if needed, but always leave enough space to move comfortably under the cabinet.
What Wood Is Best For Making Wall Cabinets?
Plywood is the top choice because it’s strong, stable, and holds screws well. Use furniture-grade plywood for visible parts. For face frames or doors, hardwood like maple or oak adds beauty and durability. Avoid particleboard in damp areas.
How Do I Hang Cabinets On Drywall?
Always screw into wall studs for safety. Use a stud finder to locate them, and use 3″ cabinet screws through the strong parts of your cabinet (like the top rail or thick back). Drywall alone cannot support the weight of a loaded cabinet.
Can I Build Cabinets Without Power Tools?
You can, but it’s much harder. A circular saw or drill saves hours of work and gives cleaner results. If you only have hand tools, use a sharp handsaw, a good square, and a brace for drilling. Take extra care with measurements.
What Finish Is Most Durable For Kitchen Cabinets?
A high-quality paint or clear polyurethane finish is most durable. Use at least two coats for protection. Oil-based finishes last longer but take more time to dry and have strong fumes. For the best results, sand between coats and use a primer under paint.
Building wall cabinets is a project that pays off for years. With the right plan, materials, and a steady approach, you’ll end up with custom storage that looks and works great. Take your time, check your measurements, and enjoy the process—your new cabinets will be a point of pride every time you walk into the room.