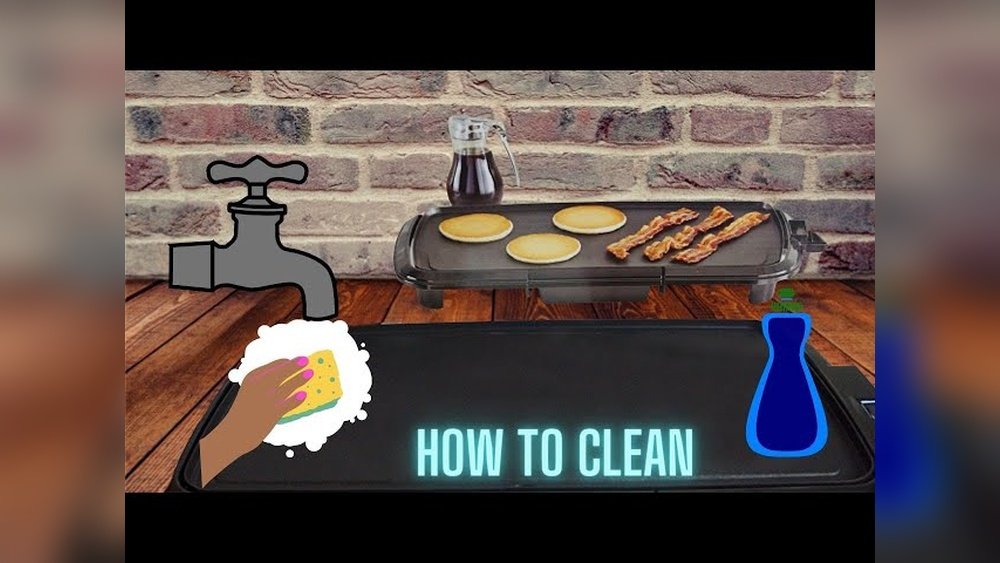
Keeping your electric skillet clean is not just about looks—it’s about health, safety, and making your appliance last longer. Many people use their skillet almost daily for breakfasts, family dinners, or even quick snacks. Over time, bits of food, oil, and residue build up. If you don’t clean it well, you’ll notice odd smells, uneven cooking, or even electrical problems. The good news? Cleaning an electric skillet isn’t hard if you know the right steps and avoid common mistakes. This guide covers everything you need to know, from quick wipe-downs to deep cleaning, so your skillet works perfectly every time you cook.
What Is An Electric Skillet And Why Proper Cleaning Matters
An electric skillet is a flat, heated cooking surface with its own power source. It often has a nonstick or stainless steel interior, a lid, and temperature controls. Many households love it because you can fry, sauté, bake, or simmer without using the stove.
But because it’s an electric device, cleaning must be done with care. You can’t just submerge the whole thing in water like a regular pan. If you let food and grease build up, you invite bacteria and risk damaging the electrical parts.
Regular, careful cleaning not only keeps your food safe but also prevents odors and keeps the skillet working for years.
Safety First: Preparing To Clean Your Electric Skillet
Before you start, it’s important to focus on safety:
- Unplug the skillet. Never clean while it’s still plugged in, even if switched off.
- Let it cool. Wait until the skillet is cool to the touch. Hot surfaces can burn you, and cold water on a hot skillet may cause warping or cracks.
- Remove the temperature control. Most electric skillets have a detachable temperature probe or cord. Take it out and keep it dry.
These simple steps prevent shocks, burns, or electrical damage—problems that are easy to avoid with a few seconds of care.
Tools And Materials You’ll Need
You don’t need any fancy supplies to clean your skillet, but a few key items make the job easier:
- Soft sponge or cloth: Avoid steel wool or abrasive pads, which can scratch nonstick surfaces.
- Mild dish soap: Strong chemicals can damage the coating.
- Plastic or wooden spatula: Good for scraping stubborn bits without scratching.
- Baking soda: For tough stains or sticky residue.
- White vinegar: Great for deodorizing and breaking down grease.
- Paper towels or microfiber cloth: For drying and buffing.
- Small brush or toothbrush: Helps get into corners and around rivets.
Having these ready before you start saves time and helps you avoid damaging your skillet.
Step-by-step: How To Clean An Electric Skillet
Cleaning your electric skillet is not complicated if you break it down into simple steps. Let’s go through each one in detail.
1. Unplug And Cool Down
Always start by unplugging the skillet. This is non-negotiable. Then, let the skillet cool completely. If you try to clean while hot, you risk burns and may also damage the nonstick layer.
2. Remove Food Debris
Use a plastic or wooden spatula to gently remove large pieces of food. Do this before adding any water or soap. Scraping gently protects the surface from scratches.
3. Detach The Temperature Control
Most electric skillets have a removable temperature probe. Pull it out carefully, and set it aside in a dry place. Never get this part wet.
4. Wipe Away Excess Grease
Take a paper towel and blot up any extra oil or grease. This makes washing easier and stops grease from spreading around the pan.
5. Wash The Cooking Surface
Add a few drops of mild dish soap to a soft sponge or cloth. Dip it in warm water (not hot). Wipe the skillet’s interior in gentle circles, covering every part, including the sides.
- For nonstick surfaces: Be extra gentle. Abrasive scrubbing can ruin the coating.
- For stainless steel interiors: You can use a bit more pressure, but still avoid steel wool.
If your skillet has food stuck on, let it soak—but only use a small amount of water. Pour just enough warm water to cover the stuck area, then let it sit for 10-15 minutes. After soaking, try wiping again.
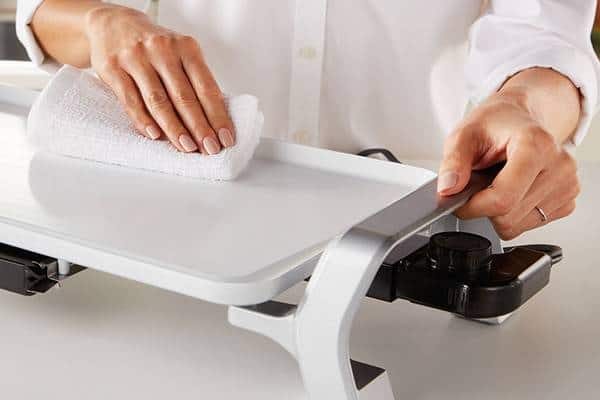
6. Clean The Edges And Exterior
Wipe the outside of the skillet and the rim with your damp sponge. Grease often collects here, especially near the handles.
7. Rinse With A Damp Cloth
Never put your electric skillet under running water or in the dishwasher. Instead, take a clean, damp cloth and wipe away soap and residue. Rinse the cloth as needed, and keep wiping until the surface feels clean.
8. Dry Thoroughly
Use a microfiber cloth or paper towels to dry every part of the skillet, inside and out. Make sure no water remains, especially around the connector for the temperature probe.
9. Clean The Lid And Accessories
The glass or metal lid can usually be washed like any other dish—warm soapy water, rinse, and dry. If your skillet has removable handles, check the manual to see if they’re dishwasher-safe.
10. Reattach And Store
Once everything is dry, reconnect the temperature control. Store your skillet in a dry place, away from moisture and dust.
How To Deep Clean An Electric Skillet
Sometimes, regular cleaning isn’t enough. Maybe you forgot to wash the skillet right after cooking, or you notice stubborn stains and strange smells. Here’s how to give your skillet a deep clean.
Removing Tough Stains
- Baking soda paste: Mix three parts baking soda with one part water to make a paste. Spread it over the stained area, and let it sit for 30 minutes.
- Gentle scrubbing: Use a soft sponge or toothbrush to scrub the paste gently. This lifts most stains without scratching.
- Vinegar rinse: Dampen a cloth with a little white vinegar and wipe the area. Vinegar helps neutralize odors and remove any leftover baking soda.
Dealing With Burnt-on Food
For burnt food, fill the skillet with a half-inch of warm water and a few drops of dish soap. Let it soak for 30-60 minutes. Use your spatula to loosen the burnt bits, then wash as normal.
Eliminating Odors
If your skillet smells like fish, garlic, or other strong foods, wipe the inside with a vinegar-soaked cloth. Rinse with a damp cloth, then dry. Leaving the lid off for a few hours also helps air out odors.
Cleaning The Heating Element (if Exposed)
Some electric skillets have exposed heating elements under the base. Use a dry brush or cloth to gently remove dust or crumbs. Never use water on these parts.
Comparing Cleaning Methods: Quick Clean Vs. Deep Clean
Choosing the right cleaning method depends on how dirty your skillet is. Here’s a quick comparison.
| Method | When to Use | Time Required | Best For |
|---|---|---|---|
| Quick Clean | After every use | 5-10 minutes | Light grease, no burnt food |
| Deep Clean | Once a month or as needed | 30-60 minutes | Stubborn stains, odors, burnt food |
Regular quick cleans prevent the need for frequent deep cleaning and keep your skillet in top shape.

Credit: streetphotographersfoundation.com
Nonstick Vs. Stainless Steel Skillets: Cleaning Differences
Not all electric skillets are the same. The interior surface affects how you should clean it.
| Surface Type | Cleaning Tips | Common Mistakes |
|---|---|---|
| Nonstick | Use only soft sponges, avoid abrasive cleaners | Scratching with steel wool, using harsh chemicals |
| Stainless Steel | More tolerant to scrubbing, baking soda for stains | Leaving acidic foods too long, not drying completely |
Nonstick skillets are popular because food doesn’t stick easily, but the coating is delicate. Even a few scratches can ruin the nonstick effect, making cleaning harder in the future. Always choose gentle tools and cleaners.
Stainless steel is tougher and handles more aggressive cleaning, but water spots and discoloration are common if not dried properly.
Common Mistakes When Cleaning Electric Skillets
Even careful people sometimes make mistakes that shorten their skillet’s life or affect cooking results. Here are the most common problems to avoid:
- Submerging the whole skillet in water: This can destroy the electrical parts. Only the cooking surface and lid should get wet.
- Using harsh chemicals: Bleach, oven cleaner, or strong detergents can damage both nonstick coatings and stainless steel.
- Scrubbing with metal pads: This scratches the surface, making food stick more and leading to rust or flaking.
- Not drying completely: Water in the electrical connector can cause shocks, corrosion, or short circuits.
- Ignoring the exterior: Grease and crumbs on the outside can attract insects or cause bad smells.
- Washing while hot: Sudden temperature changes can warp the skillet or crack nonstick surfaces.
A little care prevents big problems. Always read your skillet’s manual for brand-specific advice.
Credit: thedaringkitchen.com
How To Maintain Your Electric Skillet For Years
Cleaning is just one part of keeping your skillet in great condition. Here are some tips for long-term care:
- Season the surface (for some types): If your skillet’s manual suggests it, rub a little vegetable oil on the cooking surface after washing and drying. This protects nonstick and some stainless steel skillets.
- Store with the lid off: This prevents moisture buildup and odors.
- Check the cord and probe: Inspect the temperature control for cracks, frayed wires, or discoloration. Replace if damaged.
- Don’t overload: Avoid using sharp utensils or cutting food directly in the skillet.
- Use correct oil: Some oils (like olive oil) have a low smoke point and can leave sticky residue if overheated. Vegetable or canola oil is safer for high-heat cooking.
Signs You’re Not Cleaning Your Skillet Properly
Sometimes, your skillet “tells” you when it needs more attention. Watch for these warning signs:
- Sticky or uneven cooking: Food starts to burn or stick in certain spots, even with oil.
- Lingering smells: Odors remain after cleaning, often because of residue or hidden grease.
- Visible stains or discoloration: Brown or black patches that don’t wash off easily.
- Buzzing or sparking: This is rare but serious; water may have reached the electrical parts. Unplug immediately and consult a professional.
If you notice these problems, give your skillet a deep clean or check for damage before using it again.
How Often Should You Clean Your Electric Skillet?
- After every use: Wipe down the cooking surface and lid, even if you only made eggs or pancakes.
- Weekly: Clean the exterior and handles.
- Monthly: Deep clean, focusing on stains and the area around the temperature control.
- As needed: If you cook strong-smelling foods (like fish), clean more often to prevent odors.
This routine keeps your skillet safe and ready for any meal.
Eco-friendly Cleaning Tips
If you want to avoid harsh chemicals and reduce your environmental impact, try these ideas:
- Baking soda and vinegar: These natural cleaners handle most messes without damaging the skillet.
- Reuse old toothbrushes: Great for scrubbing corners or grooves.
- Microfiber cloths: Wash and reuse instead of paper towels.
- Avoid single-use wipes: Not necessary for most skillet cleaning jobs.
By using simple, safe products, you protect both your appliance and the environment.
Troubleshooting: What To Do If Your Electric Skillet Gets Wet
Sometimes accidents happen. If water spills into the connector or base, don’t panic, but act fast:
- Unplug immediately.
- Wipe all visible water.
- Leave upside down in a dry place for 24-48 hours.
- Do not plug in until completely dry.
If you see rust or hear unusual sounds when you use it again, consult the manufacturer or a repair shop.
Real-world Example: Cleaning A Skillet After A Messy Meal
Imagine you just cooked bacon and eggs. The skillet has grease, bits of egg, and a few burnt spots.
- Unplug and let cool.
- Wipe out grease with paper towels.
- Scrape off stuck eggs with a wooden spatula.
- Apply a baking soda paste to burnt spots, let sit 20 minutes.
- Scrub gently with a sponge.
- Wipe entire surface with damp, soapy cloth.
- Rinse with clean damp cloth until no soap remains.
- Dry thoroughly, including handle and rim.
- Wash lid and dry.
- Reattach probe, store with lid off.
This method handles tough messes without harming your skillet.
Electric Skillet Cleaning: Myths Vs. Facts
Let’s clear up a few myths:
- Myth: You can use any cleaner on stainless steel.
- Fact: Some chemicals cause pitting or discoloration.
- Myth: Dishwasher is safe for all parts.
- Fact: Only some lids and handles are dishwasher-safe; check your manual.
- Myth: Scratches don’t matter on nonstick skillets.
- Fact: Even small scratches reduce nonstick power and can release dangerous flakes.
- Myth: Skillet won’t work if connector gets wet once.
- Fact: If dried completely, it’s often fine, but repeated exposure is risky.
Electric Skillet Cleaning Checklist
For easy reference, here’s a simple cleaning checklist:
- Unplug and cool down
- Remove probe/cord
- Scrape off food
- Blot grease
- Wash with soapy sponge
- Rinse with damp cloth
- Dry thoroughly
- Wash lid and handles
- Reattach and store
Stick this list near your kitchen for quick reminders.

Credit: themontessoritwinmama.com
Electric Skillet Brands: Are Cleaning Steps Different?
Most electric skillets work the same way, but popular brands like Presto, Cuisinart, and Hamilton Beach sometimes have their own instructions. Always check the manual for details like:
- Which parts are dishwasher-safe
- If seasoning is needed
- Warranty requirements (some brands void the warranty if you use the wrong cleaner)
If you’ve lost your manual, most companies provide a free PDF download on their website.
Electric Skillet Cleaning And Food Safety
Cleaning your electric skillet is about more than just avoiding burnt food. Studies show that bacteria like Salmonella and E. coli can survive on cooking surfaces for hours. A 2022 report from the CDC found that improper cleaning of kitchen appliances is a leading cause of foodborne illness outbreaks in US homes.
By following proper cleaning steps, you reduce your risk of illness—especially important if you cook for children, elderly, or anyone with a weak immune system.
For more in-depth tips on food safety and appliance care, check out the resources at CDC Food Safety.
Comparing Electric Skillet Cleaning To Other Appliances
How does cleaning an electric skillet compare to other kitchen tools? Here’s a quick look:
| Appliance | Cleaning Difficulty | Dishwasher Safe? | Special Precautions |
|---|---|---|---|
| Electric Skillet | Medium | Only lid and handles (sometimes) | Never submerge base |
| Traditional Fry Pan | Easy | Usually yes | None |
| Slow Cooker | Easy | Ceramic insert only | Remove electronics first |
| Toaster Oven | Hard | No | Clean heating elements with care |
Electric skillets need more attention than a regular pan, but less than a toaster oven. Learning the right method saves time and prevents problems.
Frequently Asked Questions
How Do I Clean Burnt Food From My Electric Skillet?
Let the skillet cool, then fill with a little warm, soapy water. Let it soak for 30 minutes. Scrape off burnt bits with a wooden spatula, then use a baking soda paste for any remaining stains. Rinse and dry thoroughly.
Can I Put My Electric Skillet In The Dishwasher?
No. The main unit should never go in the dishwasher. Some lids and detachable handles may be dishwasher-safe, but always check your manual first.
What Should I Do If Water Gets Inside The Temperature Control Connector?
Unplug immediately and dry the area with a towel. Leave the skillet upside down in a dry spot for 24-48 hours. Do not plug back in until you’re sure it’s completely dry.
Is It Safe To Use Vinegar Or Baking Soda On Nonstick Surfaces?
Yes, both are safe if used gently. Make a thin paste and avoid scrubbing aggressively. Always rinse well to remove any residue.
How Often Should I Deep Clean My Electric Skillet?
A deep clean is recommended once a month, or anytime you notice stubborn stains, odors, or sticky residue. Regular wipe-downs after each use help reduce the need for deep cleaning.
Keeping your electric skillet clean does not have to be a chore. With the right steps, a few simple tools, and a little care, your skillet will deliver delicious meals for years to come. Taking a few extra minutes now saves you time, money, and frustration later.
Happy cooking!