A wood stove can make your home warm and cozy during the cold months. But if you want your stove to stay safe and efficient, you need to pay attention to one important job: cleaning the wood stove pipe. Many people overlook this task, thinking it’s dirty or difficult. In reality, cleaning your stove pipe is not only necessary, but it’s also easier than most beginners expect—if you know how to do it right.
A dirty stove pipe can lead to poor performance, dangerous creosote buildup, smoke in the house, or even a chimney fire. Regular cleaning helps avoid these problems and keeps your heating system working at its best. In this guide, you’ll learn everything you need: what tools you need, step-by-step instructions, safety tips, common mistakes to avoid, and how to spot signs of trouble. Whether you’re new to wood stoves or looking to improve your routine, this guide will give you confidence and keep your home safe.
Why Cleaning Your Wood Stove Pipe Matters
Let’s start with the basics. When you burn wood, smoke and gases travel up through the stove pipe and out the chimney. But they don’t leave the pipe completely clean. Over time, sticky, flammable creosote and soot collect inside. If you ignore this buildup, it can block airflow, make your stove less efficient, and, worst of all, cause a fire.
According to the National Fire Protection Association (NFPA), chimney fires are one of the top causes of house fires in homes with wood stoves. Most are preventable with simple cleaning. Even a thin layer of creosote (as little as 1/8 inch) is enough to catch fire. Cleaning also removes nests, leaves, or other debris that might block the pipe.
A clean stove pipe means:
- Better air flow and hotter fires
- Less smoke and odor inside your home
- Lower risk of dangerous fires or carbon monoxide leaks
- Longer life for your stove and chimney
Many homeowners are surprised how much better their stove works after a good cleaning. You’ll burn less wood and get more heat.
How Often Should You Clean A Wood Stove Pipe?
There’s no single answer for every home, because burning habits and wood types are different. But here’s a practical rule: clean the stove pipe at least once a year. If you use your wood stove daily in winter, check it every few months. If you burn wet wood or see lots of smoke, clean more often.
Some experts say: clean after every two cords of wood burned. If you’re not sure, check inside the pipe with a flashlight. If you see 1/8 inch or more of black, sticky material, it’s time to clean.

Credit: www.youtube.com
Tools And Supplies You’ll Need
You don’t need fancy equipment, but having the right tools makes the job easier and safer. Here’s what you’ll need for a typical cleaning:
- Chimney brush sized for your pipe (usually 6 or 8 inches, round or square)
- Flexible rods to attach to the brush
- Dust mask or respirator (to avoid breathing dust)
- Safety goggles or glasses
- Work gloves
- Drop cloths or old sheets to protect floors
- Stiff-bristle hand brush for stubborn spots
- Bucket for debris
- Screwdriver or wrench (to remove pipe sections)
- Vacuum (preferably a shop-vac, not a home vacuum)
- Flashlight
If you need to reach the chimney from the roof, you’ll also want a sturdy ladder and a safety harness. For most people, cleaning from inside is safer and easier.
Here’s a quick comparison of common brush types:
| Brush Type | Best For | Notes |
|---|---|---|
| Polypropylene brush | Metal or stainless pipes | Gentle, won’t scratch metal |
| Wire brush | Masonry flues | Removes heavy creosote |
| Round brush | Round stove pipes | Most common size: 6-8 inch |
| Square brush | Square or rectangular pipes | Check measurements before buying |
Pro Tip: Measure the inside diameter of your stove pipe before buying a brush. A brush that’s too small won’t clean well. Too large can get stuck.
Safety Precautions Before You Begin
Cleaning a wood stove pipe is not extremely dangerous, but you should always put safety first. Here’s what you need to keep in mind:
- Make sure the stove is completely cold (wait at least 12 hours after last use)
- Wear gloves, mask, and eye protection
- Make sure the work area is well-ventilated
- Let family members know you’re cleaning (to avoid surprises)
- If cleaning from the roof, use a safety harness and never work alone
Important insight: Creosote dust is not just dirty—it can irritate your lungs and eyes. Never skip the mask and goggles.
Step-by-step Guide: How To Clean A Wood Stove Pipe
Let’s break down the full process into clear, simple steps. You don’t need to rush. Most people can clean a typical stove pipe in one to two hours.
1. Prepare The Area
Lay old sheets or drop cloths around the stove and under the pipe joints. Remove rugs or furniture that might get dirty. Open a window for fresh air. Gather all your tools nearby so you don’t have to search mid-job.
2. Remove The Stove Pipe (if Possible)
In many homes, the stove pipe is made of sections that fit together. Look for screws or clamps that hold the sections in place. Use a screwdriver or wrench to loosen them. Carefully twist and remove each section, starting at the stove end and working upward.
Set the pieces on your drop cloth. If your pipe can’t be removed, you’ll clean it in place.
Beginner mistake: Forcing sections apart can bend the pipe or break seals. Wiggle gently and don’t rush.
3. Check For Blockages
Before cleaning, shine a flashlight into each section of the pipe. Look for bird nests, wasp nests, or big chunks of creosote. Remove large items by hand (with gloves) and place them in your bucket.
4. Brush Out Loose Soot And Creosote
Attach the brush to your first rod. Insert the brush into one end of the pipe and scrub back and forth, turning the brush as you go. Add more rods to reach the full length. Most soot falls out easily, but sticky creosote may take extra effort.
Brush both ends of each pipe section. If cleaning in place, brush from the stove upward to the chimney.
Non-obvious insight: Brush slowly and keep the brush centered to avoid scratching the pipe.
5. Scrub Stubborn Buildup
For hard, tar-like creosote, use a stiff hand brush or a special creosote remover (available at hardware stores). Scrape gently—don’t use sharp tools that could damage the pipe.
6. Clean The Chimney Cap And Thimble
If your pipe leads into a chimney, remove and clean the chimney cap at the top. Soot often collects here. Also check the thimble (the hole where the pipe enters the wall or chimney). Brush out any debris.
7. Vacuum And Wipe
Use a shop-vac to suck up loose soot inside the pipe and around the stove. Wipe the outside of the pipe with a damp rag. Avoid using a regular home vacuum (the fine dust can damage it).
8. Inspect For Damage
Check each pipe section for rust, cracks, or holes. Replace any damaged pieces. Also check that gaskets and seals are in good shape.
9. Reassemble The Stove Pipe
Fit the sections back together, starting at the top and working down. Make sure each joint overlaps properly and all screws or clamps are tight. Double-check the pipe is angled slightly upward toward the chimney for good airflow.
10. Final Check And Clean Up
Shine your flashlight through the pipe. Make sure it’s clear from end to end. Remove drop cloths, vacuum the area, and wash your hands and clothes.
Expert tip: Write the cleaning date on a piece of tape and stick it to the pipe or stove. This helps you remember when you last cleaned.
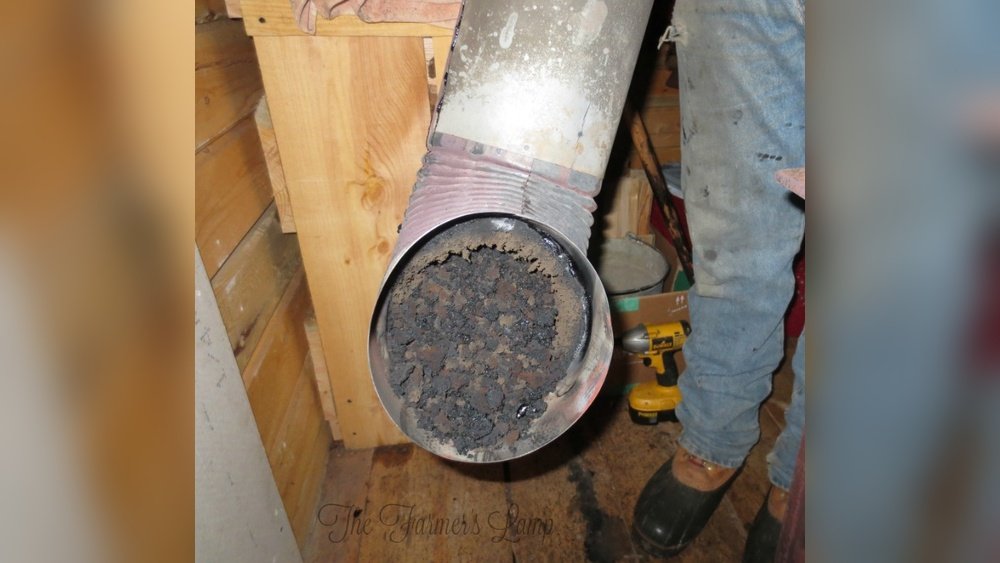
Understanding Creosote: What It Is And Why It Matters
Many beginners aren’t sure what creosote is or why it’s dangerous. When wood burns, especially at low temperatures, unburned particles condense on the cool walls of the stove pipe. Over time, these particles form creosote—a sticky, tar-like substance. It comes in three forms:
| Type of Creosote | Appearance | How Hard to Remove |
|---|---|---|
| Stage 1 | Sooty powder | Easy (brushes off) |
| Stage 2 | Flaky, crunchy | Medium (needs stiff brush) |
| Stage 3 | Hard, shiny glaze | Very hard (needs pro help) |
The higher the stage, the more dangerous it is. Stage 3 creosote is extremely flammable and often requires a professional to remove. Regular cleaning keeps creosote at Stage 1 or 2.
Non-obvious insight: Burning wet wood, or running your stove with the damper closed too much, produces more creosote. Use dry, seasoned wood and let your stove get hot for a few minutes each day.
Signs Your Wood Stove Pipe Needs Cleaning
How do you know it’s time to clean? Watch for these warning signs:
- More smoke inside when starting a fire
- Sooty smell or burning odor in the room
- Poor draft (fire doesn’t burn well, flames are weak)
- Black, sticky material around pipe joints or cap
- Visible buildup when you check with a flashlight
- Bits of debris falling into the stove
If you notice any of these, clean your pipe before using your stove again.
Common Mistakes Beginners Make
It’s easy to make small errors that lead to big problems. Here are mistakes to avoid:
- Using the wrong brush size. A brush that’s too small leaves creosote behind. Too big can get stuck.
- Not wearing protection. Soot and creosote dust can irritate skin, eyes, and lungs.
- Forgetting the chimney cap. Soot collects here and can block airflow.
- Cleaning too rarely. Waiting until the pipe is nearly blocked is risky.
- Ignoring wet wood. Wet wood produces more creosote—always burn dry, seasoned logs.
- Not checking for damage. Small holes or rust can lead to leaks or fire hazards.
- Assuming all creosote is harmless. Hard, shiny creosote is dangerous and hard to remove.

Credit: www.motherearthnews.com
When To Call A Professional
Most homeowners can clean a wood stove pipe themselves. But in some cases, you need expert help:
- Stage 3 creosote (hard, shiny, thick glaze) that doesn’t brush off
- Very tall or steep roofs (safety risk)
- Damaged or missing parts you’re unsure how to fix
- Chimney fire history (always have a pro inspect after a fire)
Professional sweeps use special tools and can inspect for hidden problems. If you’re not sure, it’s better to be safe.
How To Reduce Buildup And Keep Your Stove Pipe Clean Longer
Regular cleaning is important, but you can make your job easier with some simple habits:
- Burn only dry, seasoned wood (less than 20% moisture)
- Avoid burning trash, cardboard, or green wood
- Let the stove burn hot for 20-30 minutes each day to burn off deposits
- Open the damper fully when starting the fire
- Clean out ashes regularly (too much ash can block airflow)
- Install a chimney thermometer to monitor temperature (keep it in the “safe” zone)
Many people find they only need to clean once per year with these habits.
Comparing Diy Cleaning Vs. Hiring A Chimney Sweep
Some people prefer to hire a pro, while others like to do it themselves. Here’s a side-by-side look:
| Aspect | DIY Cleaning | Professional Sweep |
|---|---|---|
| Cost | $40-$100 (tools last years) | $150-$300 per visit |
| Time | 1-2 hours | 1 hour (you don’t work) |
| Skill needed | Basic DIY | None (they do the work) |
| Thoroughness | Good for light to medium buildup | Best for heavy buildup or repairs |
| Safety | Safe if done carefully | Very safe (trained pros) |
| Inspection | Visual only | Often includes camera inspection |
What To Do If You Find Rust, Holes, Or Damage
A stove pipe in good condition is smooth and solid, with tight seams. If you find:
- Rust spots: Sand lightly and repaint with high-temperature stove paint
- Small holes: Replace the section—patches are not safe long-term
- Loose joints: Tighten screws or replace gaskets
- Heavy corrosion: Replace the entire pipe
Never ignore pipe damage. Even small leaks can allow smoke or dangerous gases into your home.
How To Clean A Double-wall Or Insulated Stove Pipe
Some modern wood stoves use double-wall stove pipes (one pipe inside another, with air or insulation between). These pipes are more efficient and safer, but cleaning is a bit different:
- Use only soft brushes (never wire) to avoid damaging the inner lining
- Never take double-wall pipes apart unless the manufacturer says it’s safe
- Clean from both ends (stove and chimney cap) if possible
- Some double-wall pipes have clean-out doors—use these if available
Always check your stove’s manual for special instructions.
Environmental And Health Considerations
Cleaning a wood stove pipe is not just about fire safety—it’s about your family’s health and the environment. Soot and creosote can contain harmful chemicals. If your pipe is dirty, smoke and gases can leak into your home, increasing risks of carbon monoxide poisoning or respiratory problems.
Dispose of creosote debris carefully. Bag it and put it in the trash—never burn it, compost it, or use it as fertilizer. Wash hands and change clothes after cleaning.

Credit: www.youtube.com
What If You Smell Smoke After Cleaning?
If you smell smoke when you use your stove after cleaning:
- Double-check that all pipe joints are tight
- Make sure the damper is open and draft is strong
- Look for leaks at seams or thimble
- Check the chimney cap for blockages
If problems continue, call a professional to inspect. Never ignore smoke indoors—carbon monoxide is odorless and deadly.
Keeping A Cleaning Log
Many homeowners forget when they last cleaned the stove pipe. A simple log (a notebook or a phone reminder) helps you stay on schedule. Write down:
- Date of each cleaning
- What you found (amount of soot or creosote)
- Any repairs made
- Unusual smells or draft problems
This record helps you spot patterns and keeps your stove safe year after year.
Trusted Resources For More Information
If you want to learn more, check out the Chimney Safety Institute of America or your local fire department. Many have free guides or videos. For more details on stove safety and maintenance, see NFPA Chimney and Woodstove Safety.
Frequently Asked Questions
How Do I Know What Size Brush To Use For My Wood Stove Pipe?
Measure the inside diameter of your stove pipe (usually 6 or 8 inches). Buy a brush that matches this size. If you’re not sure, take a photo and ask at a hardware store. Using the right size brush ensures all soot and creosote are removed.
Can I Use Regular Household Cleaning Products To Clean My Stove Pipe?
No, avoid using household cleaners or water inside the pipe. These can cause rust and damage. Use only chimney brushes, dry cleaning methods, or special creosote removers designed for wood stoves.
Is It Safe To Clean The Wood Stove Pipe From The Roof?
It can be, but only if you have a sturdy ladder, safety harness, and experience with heights. Most people find it safer and easier to clean from inside the house by removing the stove pipe sections.
How Long Does It Usually Take To Clean A Wood Stove Pipe?
For most homes, cleaning takes 1 to 2 hours. It may take longer if there’s heavy buildup or if you have to remove many pipe sections. Experienced homeowners often finish in less than an hour.
What Should I Do If I Find A Lot Of Hard, Shiny Creosote In My Pipe?
This is Stage 3 creosote, which is very flammable and hard to remove. Do not use your stove until it’s cleaned. It’s best to call a professional chimney sweep. They have special tools and chemicals to remove this dangerous buildup safely.
Keeping your wood stove pipe clean is one of the most important jobs for any wood stove owner. It’s not just a chore—it’s a way to protect your home, your family, and your investment. With the right tools, regular cleaning, and safe habits, you’ll enjoy warm fires all winter long with peace of mind.