Every homeowner loves a kitchen with a big, bright window over the sink. Natural light while doing dishes is a small luxury that makes daily tasks more pleasant. But if you decide to renovate your kitchen or build a new one, you might quickly discover a plumbing challenge: how to vent a kitchen sink under a window. The window sits right where a traditional vent pipe would rise. Many get stuck here, unsure how to do it safely and legally, or if it’s even possible.
The truth is, venting a kitchen sink under a window is not only possible, but also common. However, it requires a good understanding of plumbing codes, smart planning, and careful installation. This guide will walk you through everything—from essential venting basics, code requirements, and step-by-step installation, to troubleshooting and safety tips.
By the end, you’ll know exactly how to tackle this project, whether you’re a DIY enthusiast or working with a plumber.
Why Proper Venting Matters
Before diving into the methods and steps, it’s important to understand why venting is crucial for any kitchen sink. Plumbing vents do more than just let air out. They keep your drain system working properly and your home safe.
1. Prevents Siphoning
When water drains, it pulls air with it. If your sink isn’t vented, the draining water can create a vacuum and suck water out of the trap. This removes the water seal, allowing sewer gases to enter your kitchen.
2. Keeps Drains Flowing
Proper venting allows air into the pipes, so water flows smoothly. Without a vent, you may hear gurgling, experience slow draining, or even get backflow.
3. Reduces Odors And Health Risks
Sewer gases are not just unpleasant—they can be dangerous. Methane and hydrogen sulfide, common in sewer gas, are both health hazards.
4. Required By Code
Building codes in the US require all fixtures to be vented properly. Ignoring this can mean failed inspections, expensive repairs, or denied insurance claims.
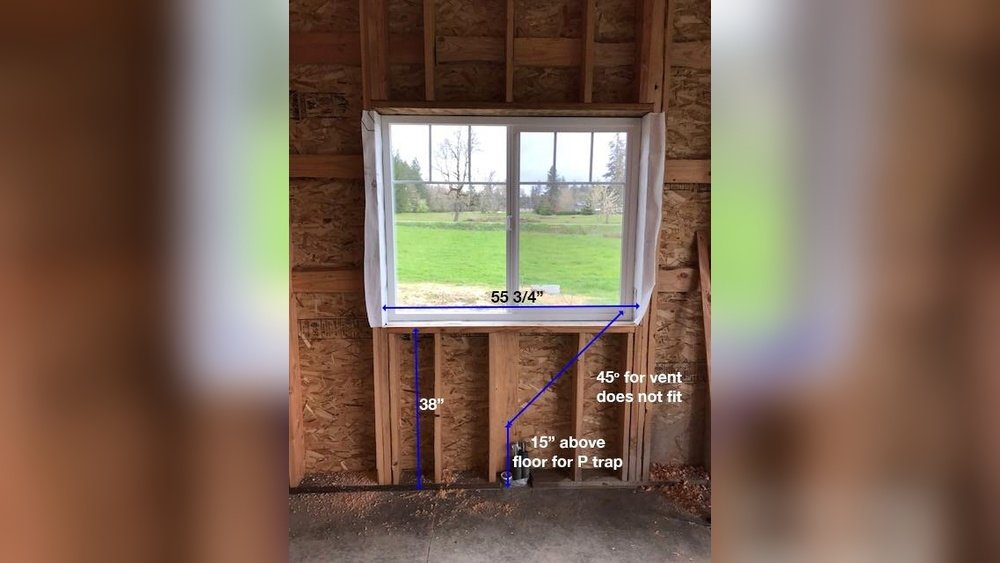
The Challenge: Kitchen Sink Under A Window
Traditional plumbing runs a vertical vent pipe straight up from the drain, through the wall, and out the roof. But when a window is in the way, you can’t run the vent pipe up the same wall. The main challenges include:
- Obstructed Path: The window blocks the usual vertical route.
- Limited Wall Space: Modern windows are larger and often extend close to the countertop.
- Aesthetics: Visible pipes above or near windows can ruin your kitchen’s look.
Homeowners and contractors must find solutions that keep the vent hidden, meet code, and don’t compromise the window.
Plumbing Codes And What They Mean
Understanding plumbing codes is key. In the US, the International Residential Code (IRC) and the Uniform Plumbing Code (UPC) are most common. While local rules can differ, some core requirements apply almost everywhere:
- Every fixture must have a vent.
- No horizontal vent pipe below the flood level rim of the sink.
- The vent must connect to a vent stack or exit the roof.
- The vent pipe must be sized correctly for the drain.
Check with your local building department before starting. Some allow Air Admittance Valves (AAVs), while others do not. Never guess—always confirm.
Methods For Venting A Kitchen Sink Under A Window
There are several ways to vent a kitchen sink when a window is in the way. Each has its pros, cons, and code considerations. Let’s look at the main options.
1. Loop Vent (island Vent)
A loop vent is often used for island sinks, but works well under windows too. Here’s how it works:
- The drainpipe drops down from the sink.
- Before connecting to the main drain, a vent pipe loops up as high as possible (usually below the countertop), then back down.
- This loop connects to a vent stack elsewhere.
Benefits:
- No need for a vertical vent behind the sink.
- Works even when the window fills the wall.
Drawbacks:
- Takes up space in the cabinet.
- Requires more pipe and fittings.
2. Air Admittance Valve (aav)
An AAV is a mechanical device that lets air in, but not sewer gas out. It’s installed under the sink, after the trap.
Benefits:
- Easy to install.
- No need for a roof vent.
Drawbacks:
- Not allowed everywhere.
- Needs access for maintenance.
- Lifespan is less than a traditional vent.
3. Re-routing The Vent
If there’s enough wall to the side of the window, you can run the vent sideways (at a slight upward angle), then up another wall.
Benefits:
- Uses traditional venting.
- No mechanical parts to fail.
Drawbacks:
- May require opening more wall.
- Needs careful slope (minimum 1/4 inch per foot upward).
4. Studor Vent (special Brand Of Aav)
A Studor vent is a brand of AAV, widely recognized and approved in many places. The principles are the same as with any AAV.
5. Soffit Or Boxed Chase
If your kitchen has a soffit (a lowered section of ceiling), you can run the vent pipe horizontally through the soffit, then up to the roof.
Benefits:
- Keeps pipe hidden.
- Works in open-plan kitchens.
Drawbacks:
- May require building a soffit or chase.
- Slightly more complex framing.
6. Combination Approaches
Some homes use a mix: an AAV under the sink, plus a vent stack elsewhere for code compliance.
Comparing Venting Methods
To help you decide, here’s a comparison of the main methods:
| Method | Allowed by Code | Ease of Installation | Maintenance | Cost |
|---|---|---|---|---|
| Loop Vent | Yes | Moderate | Low | $$ |
| Air Admittance Valve | Depends | Easy | Medium | $ |
| Re-routed Vent | Yes | Hard | Low | $$$ |
| Soffit Chase | Yes | Moderate | Low | $$ |
Tools And Materials Needed
For most projects, you’ll need:
- PVC or ABS pipe (size per code, usually 1½” or 2″)
- Pipe fittings (elbows, tees, couplings)
- Pipe cutter or hacksaw
- Pipe cleaner and cement (for PVC/ABS)
- Drill and bits
- Measuring tape
- Stud finder
- Level
- AAV (if using)
- Support brackets or straps
- Protective gloves and goggles
For loop vents or rerouted vents, you may also need:
- Access panels
- Drywall patching materials
Step-by-step: How To Vent A Kitchen Sink Under A Window
Let’s break down the installation process step by step, focusing on the loop vent and AAV methods—since these are most common for windows.
Step 1: Plan The Layout
Start by sketching your sink, window, cabinet, and wall. Mark where the drain will drop, where the window sits, and any obstacles. Identify the nearest vent stack or main drain.
Pro Tip:
Measure twice, cut once. Mistakes here create headaches later.
Step 2: Shut Off Water And Clear Space
Turn off water to the kitchen. Remove everything from the cabinet and cover the floor.
Step 3: Cut The Drain Hole
Using a hole saw, cut a hole in the cabinet base for the drainpipe. If you’re replacing an old sink, use the same hole if possible.
Step 4: Install The Drain Assembly
- Place the sink strainer and attach the tailpiece (vertical pipe).
- Connect the P-trap.
- Dry-fit all pipes before gluing.
Step 5: Install The Vent (loop Vent Method)
- From the trap arm (horizontal pipe from the trap), run a pipe horizontally toward the back of the cabinet.
- Add a sanitary tee and turn the pipe upward. This is the start of your loop.
- Run the pipe up as high as possible under the countertop, then curve it back down.
- Run this pipe horizontally (with a slight upward pitch) to a wall away from the window.
- Turn up again and connect to the main vent stack.
Key Detail:
The top of the loop must be at least as high as the sink’s flood rim. This prevents water from spilling out if the drain backs up.
Step 6: Install The Vent (aav Method)
- After the trap, run a short horizontal pipe.
- Attach a sanitary tee and a vertical riser.
- At the top of the riser (at least 4″ above the trap), screw on the AAV.
- Make sure the AAV is accessible for inspection or replacement.
Step 7: Test The System
- Pour water down the drain.
- Listen for gurgling or slow draining (signs of vent problems).
- Check for leaks at every joint.
Step 8: Secure And Finish
- Strap pipes securely.
- Patch drywall or install access panels as needed.
- Clean up the work area.
Common Mistakes And How To Avoid Them
Many DIYers (and even some pros) make errors when venting a sink under a window. Here are some to watch for:
1. Too Low A Loop
The vent loop’s high point must be at or above the sink rim. Lower loops allow backflow and fail inspection.
2. Horizontal Vents Below Flood Rim
Code bans horizontal vent pipes below the sink rim. This can lead to sewer gas leaks.
3. Using Aav Where Not Allowed
Not all areas permit AAVs. Always check local rules before using one.
4. Improper Slope
Vent pipes must slope slightly upward (at least 1/4″ per foot). Flat or downward-sloping pipes trap water and block airflow.
5. Inaccessible Aavs
If you use an AAV, make sure it’s not hidden behind permanent walls or cabinets.
6. Wrong Pipe Size
Too small a vent pipe will not allow enough airflow. Follow code for your sink and total fixture units.
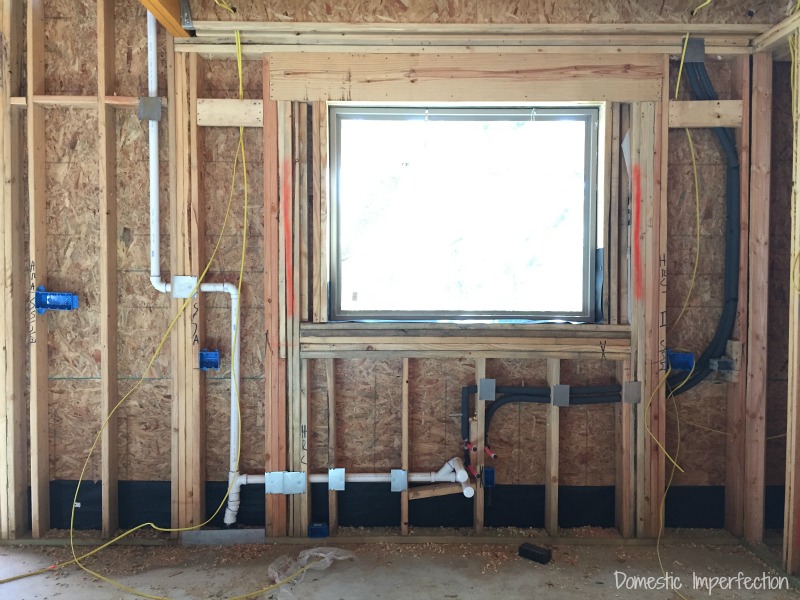
Real-world Example: A Homeowner’s Solution
Consider a 1980s kitchen remodel. The homeowner wanted a big window behind the sink and ran into the venting issue. Their solution:
- Used a loop vent inside the cabinet, rising just under the countertop.
- Ran the horizontal vent pipe through the cabinet side, into the adjacent pantry wall.
- Connected it vertically to the main vent stack.
Inspection passed, and the kitchen kept its clean look—no pipes visible above the window.
Table: Typical Pipe Sizing For Kitchen Sinks
Here’s a quick reference for pipe sizes (always check your local code):
| Fixture | Drain Pipe Size | Vent Pipe Size |
|---|---|---|
| Single Kitchen Sink | 1½” or 2″ | 1½” |
| Double Kitchen Sink | 2″ | 1½” or 2″ |
| Island Sink | 2″ | 2″ |
Inspecting And Maintaining Your Vent
Even after a perfect installation, vents need occasional attention.
- Listen for Gurgling: If you hear gurgling when draining, your vent may be blocked.
- Check for Odors: Sewer smells mean a vent problem or dry trap.
- AAV Maintenance: Replace every 5-10 years, or if it sticks.
Never ignore slow drains or odors—they only get worse over time.
Troubleshooting: Problems And Solutions
If you have issues after installation, here’s how to address them:
Slow Draining
- Possible Cause: Blocked vent, undersized pipe, or incorrect slope.
- Solution: Check that all vent pipes are clear and sloped upward. Snake the vent if needed.
Gurgling Sounds
- Possible Cause: Vent not letting in enough air.
- Solution: Inspect for blockages, or check if AAV is stuck.
Sewer Odors
- Possible Cause: Dry trap, leaky connection, or failed AAV.
- Solution: Run water to refill trap; inspect all joints; replace AAV if necessary.
Water Leaks Under Sink
- Possible Cause: Loose fittings, cracked pipe, or poor glue job.
- Solution: Tighten and reseal all joints. Replace damaged sections.
Credit: terrylove.com
Safety Tips And Building Code Compliance
Working with plumbing involves risks, both to your home and health. Keep these tips in mind:
- Wear gloves and eye protection.
- Ventilate the area when using pipe solvent or glue.
- Always follow code—what passes in one town may fail in another.
- Never cover or seal vents where access is required.
- Get permits and inspections when required. Unpermitted work can void insurance or affect home value.
For the most current code information, see the International Code Council.
Upgrading Existing Kitchens
If you are renovating an old kitchen and want to add a window, you may need to change the venting:
- Remove the old vent pipe section behind the sink.
- Cap or reroute the vent as required.
- Consider a loop vent or AAV for the new setup.
- Patch walls and repaint after inspection.
Tip:
Take photos of the plumbing before closing the wall, for future reference.
Credit: www.plbg.com
When To Call A Professional
Some jobs are best left to licensed plumbers:
- Complex rerouting through multiple walls or floors.
- Connecting to main stacks in hard-to-reach spaces.
- Multiple fixture installations.
- If local codes are unclear or change often.
A good plumber knows the code, has the right tools, and ensures a safe, legal installation.
Cost Estimates For Venting A Kitchen Sink Under A Window
Costs vary by method, home layout, and labor rates. Here’s a general range:
- DIY with AAV: $50–$150 (parts only)
- DIY with Loop Vent: $100–$250
- Professional Installation: $250–$800 (simple), $800–$2000 (complex rerouting or new construction)
Permits and inspection fees may add $50–$200.
Table: Cost And Complexity Comparison
Here’s a summary for quick reference:
| Method | DIY Friendly | Parts Cost | Labor Cost (Pro) |
|---|---|---|---|
| Loop Vent | Moderate | $100–$250 | $300–$900 |
| AAV | Easy | $50–$150 | $250–$600 |
| Rerouted Vent | Hard | $150–$350 | $600–$2000 |
Two Non-obvious Insights
1. Cabinet Height Affects Loop Vent
Many homeowners forget that the height inside the base cabinet limits how high the vent loop can go. If you have a deep sink or thick countertop, the loop may not reach the required height. Plan your sink and cabinet choices together.
2. AAVs Need Airflow, Not Just Access
It’s not enough to reach the AAV for maintenance—it must also have free airflow. Don’t seal it in a tight box or airtight cabinet, or it won’t work.
Final Thoughts
Venting a kitchen sink under a window may seem tricky, but with the right approach, it’s very doable. Whether you choose a loop vent, an AAV, or reroute a traditional vent, the keys are careful planning, code compliance, and attention to detail. Don’t cut corners—proper venting protects your health, your home, and your investment.
If in doubt, consult your local building department or a licensed plumber. A few hours of planning can save days of problems down the road. With the tips and steps here, you’re ready to enjoy that bright kitchen window—without worrying about odors, slow drains, or failed inspections.
Frequently Asked Questions
What Is The Easiest Way To Vent A Kitchen Sink Under A Window?
For most homeowners, using an Air Admittance Valve (AAV) is the simplest method. It requires minimal pipe rerouting and avoids cutting through the wall or roof. However, always check if AAVs are allowed by your local code before choosing this option.
How High Should The Vent Loop Be For A Kitchen Sink?
The top of the loop vent must be at least as high as the sink’s flood rim (the top edge where water would overflow). This ensures the vent works properly and doesn’t let water escape during a backup.
Can I Use An Air Admittance Valve For My Kitchen Sink?
Yes, in many areas, but not all. Air Admittance Valves are allowed by the International Residential Code, but some local codes ban them. Always check with your building department before installing one.
What Size Vent Pipe Do I Need For A Kitchen Sink?
Most kitchen sinks use a 1½” vent pipe, but some codes require 2″ for double sinks or island sinks. Always confirm with your local plumbing code and size pipes for the number of fixtures connected.
Why Do I Smell Sewer Gas Under My Kitchen Sink?
Common reasons include a dry trap, a blocked vent, or a failed AAV. Run water to refill the trap, check for vent blockages, and replace the AAV if needed. If the smell remains, consult a plumber to inspect for leaks or code violations.

Credit: diy.stackexchange.com