When you open your oven’s manual and see a button labeled “Proof,” you might wonder what it actually does and why it matters. If you enjoy baking bread, cinnamon rolls, or even homemade pizza dough, learning how to use your oven’s proof setting can transform your baking results.
It’s a feature designed to create the perfect environment for dough to rise, helping both beginners and experienced bakers achieve lighter, fluffier, and more consistent results.
But what exactly is the proof setting? How is it different from just letting dough rise on the countertop? Many home bakers miss out on the benefits of proofing because they don’t fully understand how to use this feature. In this guide, you’ll learn everything about using the proof setting on your oven—step-by-step instructions, how it works, when to use it, troubleshooting tips, and even some advanced advice to get professional-quality results at home.
By the end, you’ll know how to proof like a pro and avoid the common mistakes that often ruin homemade bread.
What Is The Proof Setting On An Oven?
The proof setting on an oven is a special mode that creates the ideal temperature and humidity for yeast dough to rise. Most ovens with this feature gently heat the oven cavity to around 80°F to 100°F (27°C to 38°C). This temperature is warm enough to activate yeast but not so hot that it cooks the dough or kills the yeast.
Proofing, or “proving,” is a critical step in bread making and other yeast-based recipes. It allows yeast to ferment sugars in the dough, producing carbon dioxide that makes the dough expand and become light. Traditional proofing methods use room temperature, but home kitchens can be too cold or drafty, especially in winter.
The proof setting offers a controlled environment, so your dough rises evenly every time.
Key Benefits
- Consistent temperature: Keeps the dough at the perfect warmth for rising.
- Even humidity: Some ovens add a little moisture, which prevents the dough from drying out.
- Faster proofing: Dough rises more quickly than at room temperature, saving you time.
- Less risk: Reduces the chance of over-proofing or under-proofing, common problems for beginners.
How The Proof Setting Works
When you select the proof setting, your oven’s heating system turns on at a low level. Some models use the lightbulb or a separate heating element. A few ovens also use a fan to circulate warm air. If your oven has steam injection, it might even add a little moisture to keep dough soft.
The proof setting is NOT the same as “warm” or “keep warm. ” Those modes are usually hotter—between 150°F and 200°F—and can accidentally cook your dough’s surface or kill yeast cells. The proof setting is carefully calibrated for dough fermentation.
How Ovens Control Temperature
| Oven Feature | Proof Setting Range | Normal Warm Setting |
|---|---|---|
| Temperature (°F) | 80–100 | 150–200 |
| Humidity | Moderate to High (some models) | Low |
| Purpose | Yeast dough rising | Keeping food hot |
If your oven does not have a dedicated proof setting, you can mimic the environment by turning the oven light on and placing a bowl of hot water inside. However, using the built-in proof mode is much more reliable.
When To Use The Proof Setting
You should use the proof setting whenever your recipe calls for dough to “rise,” “proof,” or “double in size.” Common recipes that require proofing include:
- Bread loaves (white, wheat, sourdough)
- Rolls and buns
- Pizza dough
- Cinnamon rolls and sweet breads
- Bagels and pretzels
Some recipes have two or more proofing stages. The first rise (bulk fermentation) and the second rise (after shaping) both benefit from a controlled environment. Dough that contains eggs, butter, or sugar especially likes a slightly warmer proof, as these ingredients slow yeast activity.
Example: Typical Proofing Stages
- First rise (bulk): Right after mixing and kneading.
- Second rise (shaped): After you shape the dough into loaves or rolls.
- Optional: Cold proof: Some artisan recipes use the fridge for flavor, but still finish with a warm proof.
How To Use The Proof Setting On Your Oven
Most ovens with a proof setting make the process simple. Follow these steps for best results:
1. Prepare Your Dough
Mix and knead your dough according to your recipe. Place it in a large, lightly greased bowl to prevent sticking. If you’re proofing after shaping (like rolls or loaves), arrange them on their baking tray or pan.
2. Cover The Dough
Always cover the dough with plastic wrap, a clean towel, or a lid. This keeps the surface from drying out in the warm oven. For very sticky doughs, use oiled plastic wrap.
3. Place In The Oven
Put the covered bowl or tray in the center of the oven. Avoid placing it near the door, where drafts can affect temperature.
4. Select The Proof Setting
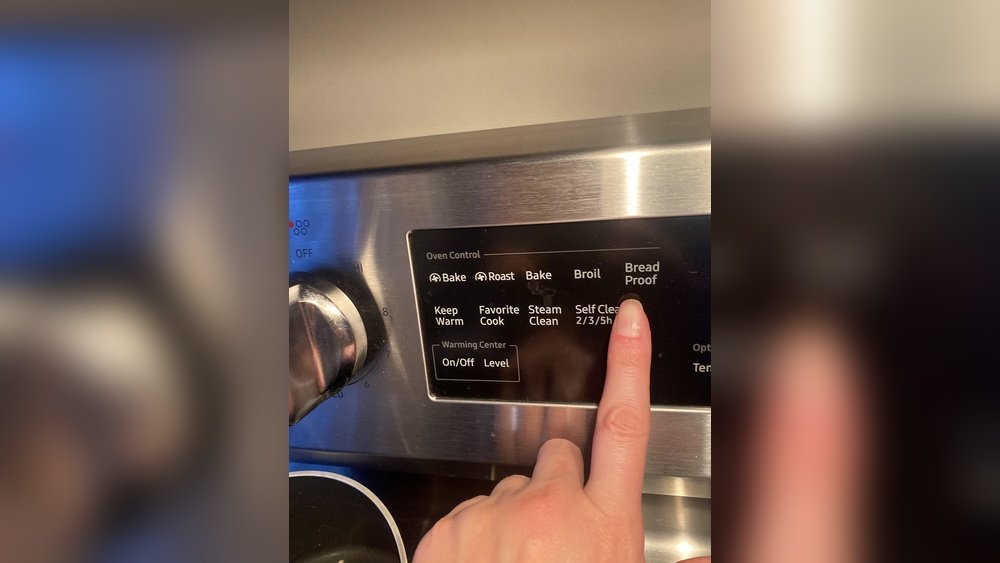
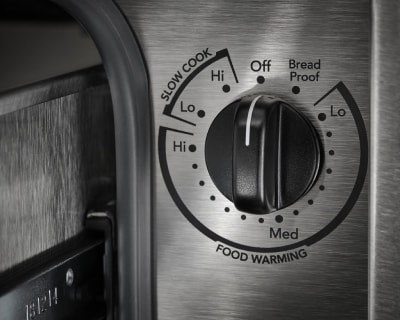
Press the “Proof” button or turn the dial to “Proof.” On some ovens, you may need to press “Bake,” then set the temperature to “Proof” or select a low temp (like 85°F). Consult your manual if unsure.
5. Set A Timer
Follow your recipe’s recommended rise time—usually 45 minutes to 2 hours. The dough should rise until it’s doubled in size, not just for a set amount of time.
6. Check Progress
Dough is ready when it looks puffy and springs back slowly when poked with a floured finger. If it collapses, it’s over-proofed; if it doesn’t move, it needs more time.
7. Remove And Bake
Take the dough out before preheating the oven for baking. Never proof and bake at the same time.
Practical Example
Let’s say you’re making classic white sandwich bread. After kneading, you place the dough in a greased bowl, cover it, and put it in your oven’s proof setting for about 1 hour. When it’s doubled, you punch it down, shape it into a loaf, and return it (covered) for a second 45-minute proof.
Your bread will rise evenly and bake up light and airy.
Common Mistakes With Oven Proofing
Even with a proof setting, mistakes can happen. Here are problems to watch for—and how to fix them:
1. Over-proofing
Leaving dough too long in the proof setting can cause it to collapse or bake up with large holes and a flat top. Always check dough size and texture, not just the clock.
2. Under-proofing
If you remove dough too soon, your bread will be dense and heavy. Make sure it has visibly doubled and passes the “poke test. ”
3. Not Covering Dough
Uncovered dough will dry out, forming a crust that prevents proper rise. Use plastic wrap or a towel to keep it moist.
4. Using The Wrong Setting
Don’t use “warm,” “keep warm,” or high temperatures. These can kill yeast and ruin your dough. Only use the dedicated proof setting or set the oven to 80–100°F manually.
5. Skipping The Manual
Different ovens work differently. Always check your oven’s manual for the correct steps, as some models require different button sequences or settings.
Tips For Perfect Proofing Every Time
To get bakery-quality results, try these practical tips:
Use An Oven Thermometer
Not all ovens are perfectly calibrated. Place an oven thermometer inside during proofing to make sure the temperature stays in the 80–100°F range.
Add Moisture For Crusty Breads
If your oven doesn’t add humidity, place a shallow pan of hot water on the bottom rack during proofing. This helps prevent dry skin on dough and improves texture.
Proof Multiple Batches
If you’re making more than one batch, the proof setting can handle several trays at once. Just make sure air can circulate around each tray.
Don’t Rush The Process
Faster isn’t always better. If your kitchen is already warm, the dough may rise quickly, but slower proofing often gives better flavor and texture.
Experiment With Timing
Recipes give suggested times, but the dough tells you when it’s ready. Use visual cues (doubling in size, puffy appearance) and the poke test for accuracy.

Credit: www.reddit.com
How The Proof Setting Compares To Other Proofing Methods
Is the oven proof setting really better than traditional methods? Let’s compare:
| Method | Pros | Cons |
|---|---|---|
| Oven Proof Setting | Consistent temperature, faster rise, less risk of drafts | Uses electricity, not all ovens have it |
| Room Temperature | No special equipment needed, works well in warm climates | Can be slow or inconsistent in cool homes |
| Heated Proofing Box | Precise control, portable, ideal for serious bakers | Extra cost, takes up space |
| Microwave (with water) | Quick DIY method, uses existing appliance | Hard to control temp, risk of overheating |
The proof setting is the easiest, most consistent method for home bakers. It’s especially useful in winter, in air-conditioned homes, or when you want to bake multiple batches.
Advanced Proofing Techniques
Once you master basic proofing, you can use the oven’s proof setting for more advanced baking:
Cold Proof Combined With Warm Proof
Artisan bakers sometimes refrigerate dough overnight for flavor development, then finish proofing in the oven. This gives the best of both worlds: complex taste and even rise.
Multiple Rises
Some enriched breads (like brioche or babka) require three or more rises. The proof setting keeps things predictable, even for complicated recipes.
Sourdough
Sourdough needs special attention. The proof setting can help when your kitchen is too cold, but avoid overheating (yeast and bacteria in sourdough are sensitive).
Using Steam For Crust
For baguettes and other crusty breads, proofing with extra humidity in the oven prevents skin from forming, so the bread can “spring” in the oven for a crisp crust.
Pre-shaped Proofing
Shaping rolls, buns, or loaves before the final proof and using the oven setting ensures a perfect final rise and shape.
Signs Of Properly Proofed Dough
How do you know when your dough is ready to bake? Look for these signs:
- Doubled in size: The classic sign—dough is about twice as big.
- Puffy and light: Press gently with a finger; dough should spring back slowly.
- Smooth surface: Well-proofed dough looks smooth and slightly domed.
- Small bubbles: You may see small air bubbles just under the surface.
If in doubt, it’s better to err on the side of slightly under-proofed than over-proofed, as dough will continue to rise in the oven (called “oven spring”).
Cleaning And Maintenance Tips
Proofing doesn’t make a mess, but a few good habits keep your oven clean:
- Wipe up any flour or dough spills after use.
- If you add a pan of water for humidity, remove it right after proofing to avoid mineral buildup.
- Don’t leave plastic wrap in a hot oven—remove before preheating for baking.
- If your oven uses a steam function, clean the reservoir as instructed in your manual.
Credit: www.kitchenaid.com
What If My Oven Doesn’t Have A Proof Setting?
Not all ovens have a proof mode, especially older or basic models. Here’s how to create a similar environment:
Oven Light Method
- Place dough in the oven with just the oven light turned on.
- The light produces gentle heat, often around 80–90°F.
Hot Water Method
- Boil water and pour into a shallow oven-safe dish.
- Place the dish on the bottom rack and dough on the upper rack.
- Close the door—the steam warms and humidifies the air.
Low Temperature Setting
If your oven can be set to 80–100°F, use that manually. Always check with a thermometer to avoid overheating.
Using The Proof Setting For Other Foods
While designed for dough, the proof setting can also help with:
- Yogurt making: Ferment milk into yogurt at a controlled temperature.
- Fermenting batter: For foods like dosa, idli, or injera.
- Softening butter: Gently bring cold butter to room temperature.
- Tempering chocolate: Use the gentle warmth for melting without burning.

Credit: www.reddit.com
The Science Behind Proofing
Yeast is a living organism that eats sugars and releases carbon dioxide and alcohol. The gas gets trapped in dough, making it rise. The proof setting speeds up this process by giving yeast a warm, stable place to work. Too cold and the yeast slows down; too hot and the yeast dies.
A well-proofed dough has:
- Balanced gluten: Gives bread structure and chew.
- Fine bubbles: Light, even crumb.
- Developed flavor: Fermentation adds complexity.
Comparing Popular Oven Brands’ Proof Settings
Different ovens handle proofing in unique ways. Here’s how some leading brands compare:
| Brand | Proof Setting Temp | Humidity Feature | User Control |
|---|---|---|---|
| Samsung | 95°F | No | Simple button |
| LG | 85–100°F | Some steam models | Button or menu |
| GE | 80–100°F | No | Button or dial |
| Bosch | 85°F | Some models | Menu selection |
| Whirlpool | 90°F | No | Button |
Check your manual for the exact features, as even within brands, models differ.
Non-obvious Insights Most Beginners Miss
- Humidity matters almost as much as temperature. Dry air can form a crust on dough, making it hard to rise. If your oven’s proof setting feels dry, always add a little moisture with a pan of hot water.
- Proofing time is flexible. Recipes give time as a guide, but room temperature, flour type, and dough ingredients all affect rising speed. Learn to judge by dough appearance, not just the clock.
- Proof setting is useful for more than bread. Try it for fermenting batters, making yogurt, or even for gentle chocolate melting.
Troubleshooting Proofing Problems
- Dough won’t rise: Check your yeast (it may be expired or killed by too-hot water), or your oven proof setting may be too cold.
- Dough rises too quickly: Lower the temperature, or shorten the proof time.
- Crust forms on dough: Add humidity, or cover dough more tightly.
- Uneven rise: Make sure dough is centered and not touching oven walls.
If you’re new to baking, don’t be discouraged by a few failed attempts. Proofing takes practice. The proof setting is a great tool for learning.
Frequently Asked Questions
What If My Oven Doesn’t Have A Proof Setting?
You can create a warm, draft-free spot by turning on the oven light or placing a bowl of hot water in the oven with the dough. These methods mimic the proof setting’s gentle warmth.
How Long Should I Proof Dough In The Oven?
Most doughs take 1–2 hours to double in size. However, always judge by appearance and texture—dough should look puffy and spring back slowly when gently poked.
Can I Over-proof Dough Using The Proof Setting?
Yes. Over-proofing can happen if you leave dough too long, even in the ideal environment. Always check dough’s rise and texture, not just the timer.
Is The Proof Setting Good For Sourdough?
It can help if your kitchen is cold, but keep temperatures at the lower end (around 80°F) since sourdough cultures are heat-sensitive.
Can I Use The Proof Setting For Things Other Than Bread?
Yes! It’s great for fermenting yogurt, proofing batter for pancakes or dosa, or gently softening butter and chocolate.
For more about yeast fermentation and proofing, you can visit the Wikipedia article on proofing in baking.
Mastering your oven’s proof setting can turn average bread into bakery-quality masterpieces. With a little practice and attention to detail, you’ll enjoy fresh, fluffy loaves and rolls every time you bake.