Turning on a Dash Air Fryer can feel confusing if you’ve never used one before. Whether you just unboxed your new device or you’re struggling with the controls, you’re not alone. Many people want to cook healthier meals with less oil, but the first step—simply starting the air fryer—can seem tricky.
The good news? Once you learn the basics, the Dash Air Fryer is easy to use. In this article, you’ll find everything you need to know, from unboxing to the first use, troubleshooting, and even advanced tips. You’ll also see common mistakes to avoid, practical examples, and answers to frequent questions.
If you follow these steps, you’ll be air frying your favorite meals in no time, safely and confidently.
Understanding Your Dash Air Fryer
Before you turn on your Dash Air Fryer, it’s important to know the parts and how they work together. Most Dash models, like the Tasti-Crisp or Deluxe, have a simple design. Here’s what you’ll usually find:
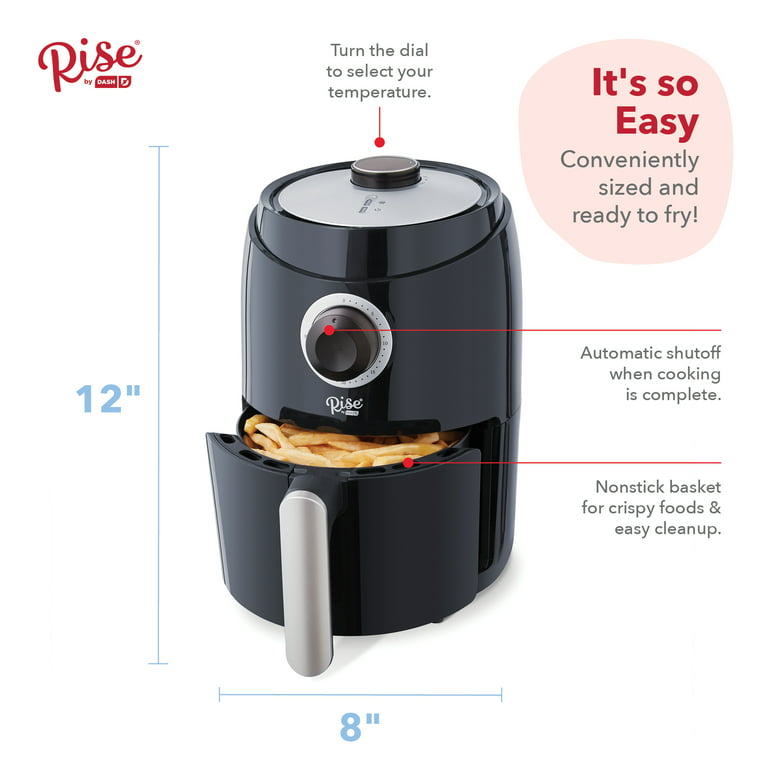
- Basket: The main compartment where food is placed.
- Crisper Tray: A removable tray that sits inside the basket for better air circulation.
- Control Panel: Dials or digital buttons to set temperature and time.
- Heating Element: Located above the basket, this part heats the air.
- Fan: Circulates hot air around the food.
- Power Cord: Supplies electricity to the unit.
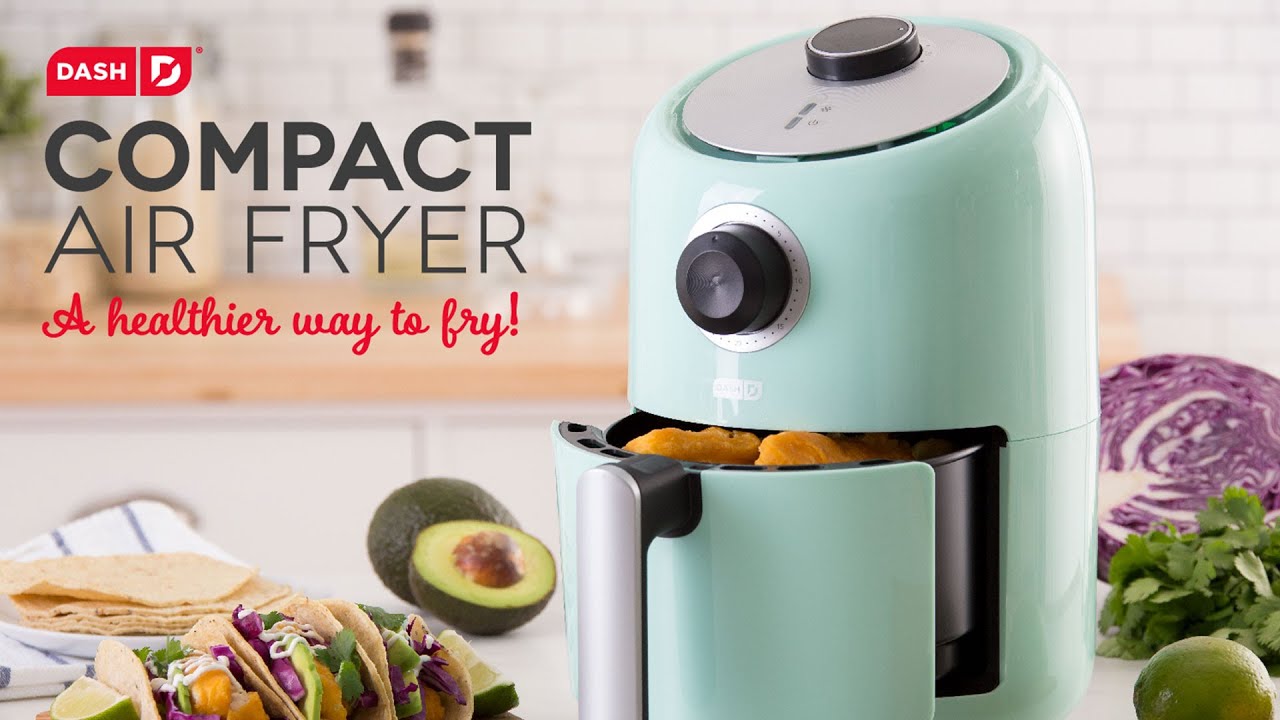
The Dash Air Fryer is known for its compact size and easy-to-use controls. Unlike some other brands, most Dash models do not have a lot of complex presets or smart features. This makes learning the basics even more important.
Many new users overlook the importance of reading the user manual. While the device looks simple, each model can have small differences in control layouts or basket design. For example, the Dash Compact model has a manual timer dial, while the Digital Tasti-Crisp uses touch buttons.
Knowing the difference can help you avoid mistakes.
Setting Up For First Use
Taking a few minutes to set up your Dash Air Fryer correctly can prevent problems later. Here’s what you should do:
- Unpack Carefully: Remove all packaging, stickers, and plastic from the fryer, basket, and crisper tray.
- Wash Removable Parts: Clean the basket and crisper tray with warm, soapy water. Dry them completely.
- Check Placement: Set the air fryer on a flat, heat-resistant surface. Make sure there’s at least 5 inches of space on all sides for ventilation.
- Inspect the Power Cord: Ensure there are no frays or damage. Plug it into a grounded outlet (never use an extension cord).
- Reassemble: Put the crisper tray back in the basket, then slide the basket into the fryer.
A common mistake is placing the air fryer too close to walls or cabinets. This can cause overheating and affect cooking results. Always give your appliance enough space.
How To Turn On Dash Air Fryer: Step-by-step Guide
Turning on your Dash Air Fryer is straightforward once you know the process. The following steps work for most Dash models, but always check your specific manual if you notice differences.
1. Plug In The Air Fryer
- Find a stable, nearby outlet.
- Insert the power cord fully. The fryer will not turn on until plugged in.
2. Insert The Basket Correctly
- Slide the basket into the main unit. You should hear or feel a soft click.
- If the basket isn’t seated properly, the fryer will not start.
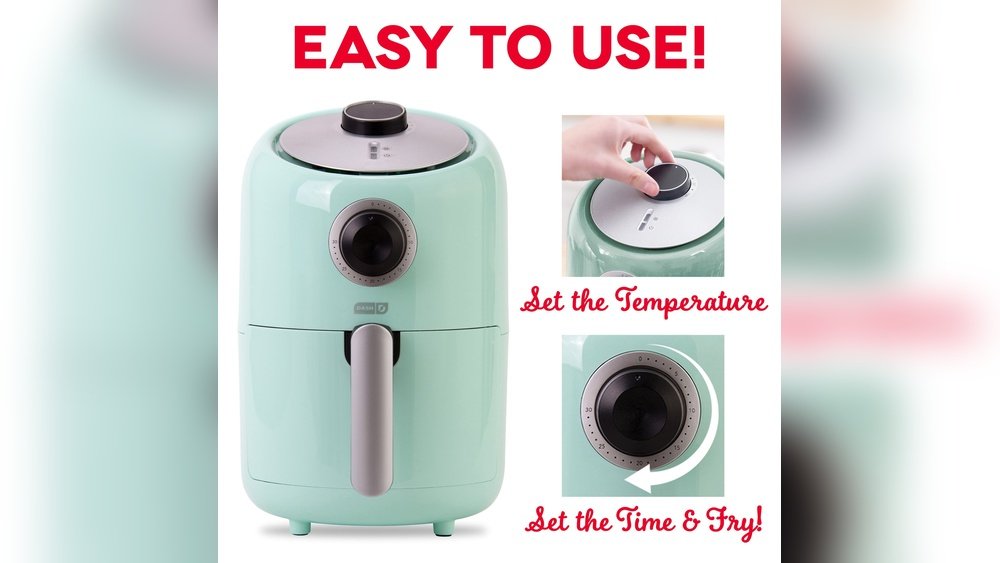
3. Set The Temperature
- For manual dials: Turn the temperature dial to your desired setting (usually between 170°F and 400°F).
- For digital models: Press the “Temp” button, then use the “+” or “–” buttons to select the temperature.
4. Set The Timer
- For manual dials: Turn the timer dial to the desired time (from 0 to 30 or 60 minutes, depending on model).
- For digital models: Press “Time,” then use “+” or “–” to select the cooking time.
5. Start Cooking
- For manual models: The fryer starts as soon as you turn the timer dial. You’ll hear a fan noise and see the power light come on.
- For digital models: Press the “Start” or “Power” button after setting time and temperature.
6. Pause Or Stop
- To pause, pull out the basket during cooking. The fryer will automatically pause (for most models).
- To stop, turn the timer to “0” or press “Power”/“Cancel” on digital models.
Pro Tip: Preheating
Some recipes work better if you preheat your air fryer for 2–3 minutes before adding food. Just set the temperature and timer with an empty basket, let it run, then load your food.
Example Scenario
Let’s say you want to cook frozen French fries:
- Plug in the fryer.
- Insert clean basket.
- Set temperature to 400°F.
- Set timer for 15 minutes.
- The fryer turns on, and the fan starts.
- After a few minutes, shake the basket for even cooking.
This process works for chicken wings, vegetables, and almost any other air fryer recipe.
Dash Air Fryer Controls: Manual Vs Digital
Dash offers both manual dial and digital touch air fryers. Understanding the difference helps you avoid confusion.
| Feature | Manual Dial | Digital Touch |
|---|---|---|
| Temperature Control | Turn dial | Press “+” or “-” buttons |
| Timer | Turn dial | Set with buttons |
| Start/Stop | Starts when timer is set | Requires pressing “Start” |
| Display | No digital display | LED digital display |
| Price | Lower | Higher |
Manual models are popular for their simplicity. Digital models give you more control and sometimes extra features, like “Keep Warm. ” Be aware that each model’s controls may look a bit different, so check the manual for symbols or button names.
Safety Tips When Turning On Your Dash Air Fryer
Safety should always come first. Here are essential tips for using your Dash Air Fryer safely:
- Never block air vents: The fryer gets hot. Vents are needed to let heat out.
- Keep away from water: Do not place the fryer near sinks or wet surfaces.
- Do not use extension cords: Plug directly into the wall to avoid electrical risks.
- Watch for smoke: If you see smoke, unplug the fryer immediately and check for food or oil buildup.
- Check basket placement: An improperly inserted basket can cause uneven cooking or prevent the fryer from turning on.
Unusual smells are normal the first time you use the appliance. This is the heating element burning off factory oils. If the smell lasts for more than two uses, contact Dash support.
Troubleshooting: Dash Air Fryer Won’t Turn On
Sometimes, your Dash Air Fryer might not turn on. Here are the most common causes and solutions:
1. Not Plugged In
Check the power cord. Make sure it’s inserted all the way into the outlet.
2. Faulty Outlet
Test the outlet with another device, like a lamp. If it doesn’t work, try a different outlet.
3. Basket Not Inserted Properly
The fryer will not start if the basket is not fully pushed in. Remove and reinsert it until you hear a click.
4. Timer Not Set
On manual models, the fryer only starts when the timer is set to a non-zero time.
5. Overheating Protection
Some Dash models have an automatic shut-off if they overheat. Let the fryer cool for 10–15 minutes, then try again.
6. Blown Fuse Or Circuit
If nothing works, check your circuit breaker or fuse box. Air fryers can trip breakers if too many appliances are used at once.
7. Internal Malfunction
If the device still won’t start, it may be defective. Contact Dash customer service for help or replacement.
Non-obvious Insight
Many people don’t realize that residual food pieces or basket misalignment can keep the unit from starting. Always check for crumbs or obstructions before you try to turn it on.
Common Mistakes And How To Avoid Them
New users often make small mistakes when trying to turn on their Dash Air Fryer. Here’s how to avoid them:
- Skipping the manual: Each model is slightly different. Spend 5 minutes reading the guide.
- Forgetting to set the timer: On manual models, nothing happens until the timer is set.
- Not pushing the basket in fully: The safety switch won’t engage unless the basket is properly seated.
- Using the wrong voltage: US models use 120V. Plugging into higher voltage outlets can damage the device.
- Turning the temperature dial only: Both temperature and timer must be set for the fryer to start.
Many people also try to “preheat” by setting only the temperature. But unless you set the timer, the fryer won’t run. Always set the timer, even for preheating.
Preheat Or Not? When And Why
Some recipes call for preheating your air fryer, while others do not. So, when should you preheat your Dash Air Fryer?
- Preheat for crispier results: Foods like French fries, chicken nuggets, and breaded items benefit from a hot basket.
- Skip preheating for delicate foods: Fish fillets and baked goods often cook better if you start from a cold basket.
To preheat, simply set the temperature and timer for 2–3 minutes. When the timer rings, load the food and reset the timer for the actual cooking time.
Non-obvious Insight
A little bit of oil on the crisper tray or basket can help reduce sticking, especially when preheating. Use a spray or brush for best results.

Credit: www.walmart.com
Dash Air Fryer Models: Quick Comparison
Dash has several air fryer models. Knowing the differences can help you understand which controls you have.
| Model Name | Control Type | Capacity | Timer Max | Display |
|---|---|---|---|---|
| Dash Compact | Manual Dial | 2 qt | 30 min | No |
| Tasti-Crisp Digital | Digital Touch | 2.6 qt | 60 min | Yes |
| Deluxe Electric | Manual Dial | 6 qt | 30 min | No |
If you’re unsure which model you own, check the bottom of the unit or the product box for the model name.
Step-by-step Example: First-time Use
Let’s walk through the entire process with a real example—cooking frozen chicken nuggets.
- Unpack and Wash: Clean the basket and crisper tray.
- Dry and Reassemble: Make sure all parts are dry, then put the basket back.
- Plug In: Insert the power cord into a wall outlet.
- Preheat (Optional): Set temperature to 400°F, timer for 3 minutes. Let the fryer run empty.
- Add Food: Open basket, place chicken nuggets in a single layer.
- Set Cooking Time: Set temperature to 400°F, timer for 10 minutes.
- Start: The fryer turns on (fan noise, power light).
- Shake Basket: Halfway through, pull out the basket, shake to turn nuggets, and return.
- Finish: When the timer rings, the fryer stops. Remove food with tongs.
- Unplug and Cool: Always unplug after use.
Following these steps ensures safe and easy air frying every time.
Advanced Tips For Better Results
Once you master turning on your Dash Air Fryer, try these tips to get the most out of your appliance:
- Don’t overcrowd: Arrange food in a single layer for even cooking.
- Use parchment liners: Special air fryer liners reduce sticking and make cleanup easier.
- Shake or turn food: For best results, shake the basket halfway through cooking.
- Use minimal oil: A light spray increases crispiness without extra calories.
- Check early: Air fryers can cook food faster than expected. Check a few minutes before the timer ends.
Some users find that lightly coating the basket with oil before each use prevents sticking, especially with battered foods.
Cleaning After First Use
Proper cleaning after use keeps your Dash Air Fryer working longer and safer.
- Unplug and cool: Wait until the fryer is cool before cleaning.
- Wash basket and tray: Use warm, soapy water. Most parts are dishwasher safe, but check your manual.
- Wipe main unit: Use a damp cloth for the outside; never submerge the main unit.
- Remove crumbs: Check for crumbs or oil at the bottom of the unit.
Do not use metal utensils or abrasive sponges—they can damage the nonstick surface.
Credit: www.walmart.com
Comparing Dash Air Fryer To Other Brands
If you’re curious how Dash compares to other brands, here’s a quick look.
| Brand | Control Type | Capacity | Special Features | Price Range |
|---|---|---|---|---|
| Dash | Manual/Digital | 2–6 qt | Simple, compact | $40–$100 |
| Ninja | Digital | 4–8 qt | Multiple presets | $90–$200 |
| Cosori | Digital | 3.7–5.8 qt | Preheat, shake reminder | $80–$150 |
| Instant | Digital | 4–6 qt | Rotisserie, presets | $90–$180 |
Dash is a great choice for beginners due to its simple controls and affordable price.
Frequently Asked Questions
How Do I Know If My Dash Air Fryer Is Turned On?
When your Dash Air Fryer is on, you’ll hear the fan running and see the power indicator light. On digital models, the display will light up. If you don’t see or hear these signs, check the power source, basket position, and timer settings.
Can I Use My Dash Air Fryer Without Preheating?
Yes, you can use your air fryer without preheating. However, preheating helps food cook more evenly and become crispier, especially with frozen or breaded items. Some recipes, like baked goods, work better without preheating.
What Should I Do If My Dash Air Fryer Doesn’t Start?
First, check that the device is plugged in and the outlet works. Make sure the basket is fully inserted and the timer is set. If it still doesn’t start, let it cool for 15 minutes, then try again. If the problem remains, contact Dash customer service.
Is It Safe To Leave The Dash Air Fryer Unattended While In Use?
While the Dash Air Fryer is designed to be safe, it’s best not to leave it unattended, especially when using it for the first time or when cooking greasy foods. Always keep an eye on the device to prevent burning or accidents.
Where Can I Find More Recipes And Tips For My Dash Air Fryer?
You can find recipes and tips in the user manual, on the official Dash website, or on trusted cooking sites like Allrecipes. There are also many online forums and video tutorials for creative meal ideas.
Turning on your Dash Air Fryer is easy once you know the steps. With the right setup, safety checks, and a bit of practice, you’ll enjoy healthy, crispy meals in minutes. Remember to read your manual, use the correct controls, and clean the fryer after each use.
Small details, like basket placement and timer settings, make a big difference. Enjoy your Dash Air Fryer and explore new recipes as you become more confident. Happy air frying!
Credit: www.youtube.com