Staining cabinets grey has become one of the most popular ways to update kitchens and bathrooms. The cool, modern look of grey fits almost any style, from sleek and contemporary to cozy farmhouse. But achieving the perfect grey stain isn’t as easy as just brushing on a coat of paint.
It takes careful planning, the right products, and step-by-step work to get results that look professional and last for years.
This guide will walk you through every part of the process. You’ll learn how to prepare your cabinets, which stains to pick, and how to avoid common mistakes that can ruin your finish. By the end, you’ll have the confidence to turn tired wood cabinets into a feature you’ll love.
Why Choose Grey Stained Cabinets?
Grey is a unique color for cabinets. It’s neutral but not boring, and can make a space feel larger and more sophisticated. Some benefits of grey-stained cabinets include:
- They hide dirt and fingerprints better than white
- Grey works with both warm and cool color schemes
- You can create a variety of looks, from weathered driftwood to smooth, modern finishes
- Grey stains highlight the natural wood grain, unlike paint which covers it
Many homeowners choose grey stain because it gives a custom, high-end look without the cost of replacing cabinets. It’s a practical way to increase your home’s value and style.
How Grey Stain Works On Wood Cabinets
Not all wood surfaces react the same way to grey stain. The type of wood, its previous finish, and the stain product you use all affect the final color and look.
Grey stain is semi-transparent. That means it soaks into the wood and lets the grain show through. If you use it on oak, you’ll see a lot of texture and pattern. On maple or birch, the look will be smoother and more subtle.
Here’s a quick comparison of how common cabinet woods react to grey stain:
| Wood Type | Stain Absorption | Final Grey Tone |
|---|---|---|
| Oak | High | Rich, strong grain |
| Maple | Low | Smooth, lighter grey |
| Pine | Variable | Rustic, knotty appearance |
| Cherry | Moderate | Warm, muted grey |
Pro tip: If you want a uniform color, choose cabinets made from the same type of wood. Mixed woods can look patchy with grey stain.
Tools And Materials Needed
Before you start, gather everything you’ll need. Having the right tools makes the job smoother and gives better results.
Essentials:
- Drop cloths or old sheets to protect floors
- Phillips and flathead screwdrivers
- Painter’s tape
- Sandpaper (120, 180, and 220 grit)
- Tack cloth or microfiber rags
- Chemical stripper (if removing old finish)
- Wood filler (for holes or dings)
- High-quality grey wood stain
- Pre-stain wood conditioner (for soft woods like pine)
- Stain brushes or lint-free cloths
- Foam brushes or rollers for clear coat
- Clear polyurethane or water-based topcoat
- Disposable gloves and safety goggles
Optional:
- Power sander (for large jobs)
- Small paint sprayer (for a super-smooth finish)
- New cabinet hardware (if you want a full makeover)
Having all supplies ready will save you time and prevent mistakes during staining.
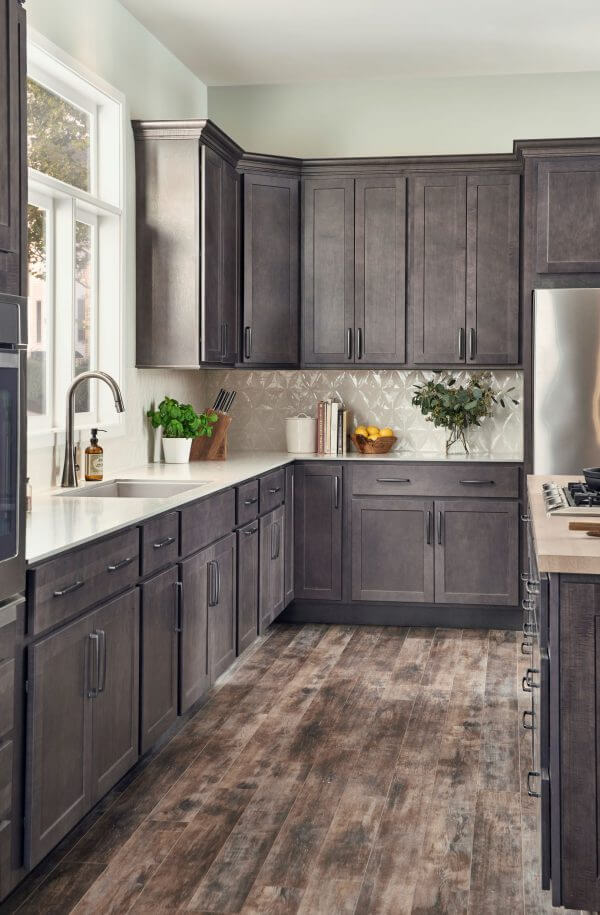
Step 1: Remove Cabinet Doors And Hardware
Start by taking off all cabinet doors, drawers, and hardware like handles and hinges. Label each door and its matching location with a piece of tape. This makes reassembly much easier.
Lay out the parts on a flat surface in a well-ventilated area. A garage or workshop is ideal. Place all screws and hardware in a container so nothing gets lost.
Insight: Many beginners skip this step to save time. But staining with doors attached is much harder and leads to uneven coverage and drips.

Credit: www.norfolkkitchenandbath.com
Step 2: Clean All Surfaces Thoroughly
Kitchen cabinets collect grease, dust, and fingerprints. Stain won’t stick to dirty wood. Use a degreasing cleaner or a mixture of warm water and mild dish soap. Scrub every surface, especially around handles and edges.
After cleaning, wipe everything with a damp cloth and let it dry completely. Any leftover cleaner can affect stain absorption.
Non-obvious tip: Run your hand over the wood. If it feels sticky, repeat cleaning—oil residues can block the stain.
Step 3: Remove Old Finish (if Needed)
Most cabinets have a factory finish or old varnish that can prevent stain from soaking in. If the wood has a shiny or sealed look, you’ll need to remove it.
There are two main methods:
- Sanding: Use 120-grit sandpaper to remove the old finish, then 180-grit to smooth the wood. Always sand with the grain, not against it.
- Chemical Stripper: Apply the stripper, wait for the finish to bubble, then scrape it off with a plastic putty knife. Follow up with sanding.
Here’s a summary of both methods:
| Method | Pros | Cons |
|---|---|---|
| Sanding | No chemicals, controls depth | Messy, time-consuming |
| Chemical Stripper | Fast, less dust | Requires ventilation, gloves |
Important: If you skip this step, your stain may turn out uneven and splotchy.
Step 4: Repair And Prep The Wood
Check the cabinets for dents, holes, or scratches. Use wood filler to repair damage. Let it dry, then sand smooth with 220-grit paper.
Next, remove all sanding dust with a tack cloth or vacuum with a brush attachment. Even tiny dust particles can ruin your finish.
Beginner insight: Many people forget to fill old hardware holes. If you’re switching from knobs to pulls (or vice versa), patch and sand the old holes now.
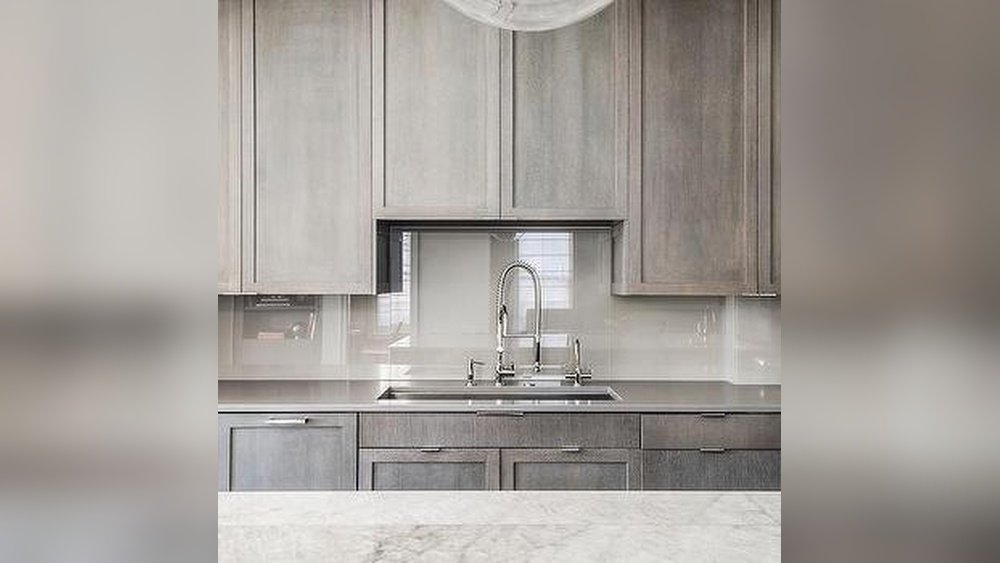
Step 5: Apply Wood Conditioner (if Needed)
Some woods, especially pine and maple, absorb stain unevenly. A pre-stain wood conditioner helps the stain soak in evenly and prevents blotches.
Apply the conditioner with a brush or rag, following the grain. Let it sit for 5-15 minutes, then wipe off any extra. Stain within two hours for best results.
Fact: Skipping conditioner can lead to dark patches and a streaky look, especially with grey stains.
Credit: quickshipkitchens.com
Step 6: Choose The Right Grey Stain
There are many types and shades of grey stain. The right one depends on your wood type, lighting, and the look you want.
Oil-based Vs. Water-based Stain
- Oil-based stains penetrate deeply and give rich color, but take longer to dry and have a strong smell.
- Water-based stains dry quickly, clean up with water, and are lower in odor, but may raise the wood grain.
Popular Grey Stain Shades
- Classic grey (light, neutral)
- Weathered grey (cool, rustic)
- Graphite (dark, modern)
- Driftwood (soft, beachy)
- Charcoal (bold, dramatic)
Always test your chosen stain on a hidden area or scrap wood first. Grey stains look very different depending on the wood.
External tip: For more on stain types and comparisons, visit the Family Handyman guide.
Step 7: Apply The Grey Stain
Staining is the most important part. Patience and technique matter.
How To Stain Cabinets Grey
- Stir the stain well before and during use.
- Use a high-quality brush or lint-free rag.
- Work in small sections, following the wood grain.
- Apply a thin, even coat—don’t flood the wood.
- Wait 2-5 minutes, then wipe off excess with a clean rag.
- Let the stain dry as directed (usually 8-24 hours).
For a deeper color, apply a second coat after the first has dried. Always let the stain dry completely before moving to the next step.
Expert insight: Rags give a more natural look, while brushes lay down more stain for darker color.

Credit: www.primecabinetry.com
Step 8: Check Color And Touch Up
After the first coat dries, inspect the color in both natural and artificial light. Grey can look different in the morning, afternoon, and evening.
If you want a darker or more even color, add another coat. If you see streaks or missed spots, lightly sand with 220-grit paper and touch up.
Non-obvious tip: Grey stain can look blue, green, or brown under some lights. Adjust your stain (or mix in a tiny bit of brown or black stain) to correct the undertone if needed.
Step 9: Seal The Cabinets With A Clear Topcoat
Stain alone is not durable enough for kitchen or bathroom cabinets. A clear topcoat protects the wood from water, grease, and scratches.
Types Of Topcoat
- Oil-based polyurethane: Very durable, slightly amber tone, longer dry time
- Water-based polyurethane: Fast-drying, stays clear, low odor
- Conversion varnish: Professional-grade, very tough, more expensive
Apply 2-3 thin coats with a foam brush or sprayer. Sand lightly with 320-grit paper between coats for a smooth finish.
Fact: Skipping the topcoat means your cabinets will stain, chip, or peel within months.
Step 10: Reinstall Doors And Hardware
After the final topcoat dries (24-48 hours is best), carefully reattach all hardware and hang the doors. Make sure everything lines up and opens smoothly.
If you want a full update, this is a great time to add new handles or knobs. Brushed nickel, matte black, or brass hardware all look great with grey cabinets.
Beginner error: Don’t rush reassembly. The finish may feel dry after a few hours, but can still scratch easily for several days.
Common Mistakes To Avoid
Grey-staining cabinets is simple, but easy to get wrong. Here’s what to watch for:
- Skipping prep work: Not cleaning, sanding, or conditioning leads to bad results.
- Using the wrong stain: Some stains are too light, too dark, or go on unevenly.
- Not wiping excess: Leaving stain puddles causes sticky, blotchy spots.
- Rushing the job: Not letting coats dry can ruin the finish.
- Ignoring undertones: Grey stains can look blue or green, so always test first.
- Missing the topcoat: Unprotected stain won’t last in kitchens and bathrooms.
- Inconsistent application: Not following the grain or using different tools can create stripes and patches.
Pro tip: Always work in good light, and take your time. Quality matters more than speed.
Tips For A Professional-looking Finish
Getting cabinets to look like they came from a designer showroom is possible with a few extra steps.
- Sand between all coats, including stain and topcoat, for a buttery-smooth finish.
- Use a sprayer for the topcoat if you want a perfectly even layer.
- Mix two shades of grey stain to create a custom color that matches your space.
- Add a hint of brown or beige stain to soften cool greys.
- Replace glass inserts or add under-cabinet lighting to show off your new finish.
Maintenance And Care For Grey-stained Cabinets
Grey-stained cabinets are easy to keep looking new if you care for them properly.
- Wipe up spills quickly to prevent water marks.
- Clean with a damp, soft cloth—avoid harsh chemicals or abrasive pads.
- Reapply a clear topcoat every few years in high-use areas.
- Touch up scratches with a matching stain pen.
- Keep humidity stable to prevent wood from swelling or shrinking.
With basic care, a good stain job can last 10 years or more before needing a refresh.
Cost And Time Estimates
Staining cabinets grey is much cheaper than replacing them. Here’s a rough cost and time breakdown for an average kitchen (20 doors and drawers):
| Item | Estimated Cost | Notes |
|---|---|---|
| Grey stain | $15 – $40 | One quart covers 200 sq. ft. |
| Topcoat | $20 – $60 | Polyurethane, 2-3 coats |
| Sandpaper & supplies | $20 – $40 | Includes rags, brushes, tape |
| New hardware (optional) | $50 – $200 | For a full set |
| Total | $55 – $340 | DIY, not including tools |
Time needed: Plan on 2-3 days for prep, staining, and drying. Rushing leads to mistakes.
Should You Hire A Pro Or Diy?
Staining cabinets is a DIY project if you have patience and basic tools. But there are cases where hiring a pro makes sense:
- If your cabinets have intricate trim or lots of details
- You want a flawless, spray-on finish
- You have allergies or can’t work with strong fumes
- You’re short on time or don’t want to risk mistakes
Fact: Professional cabinet refinishing can cost $1,000–$4,000, but may be worth it for high-end kitchens or if you plan to sell soon.
Creative Variations Of Grey-stained Cabinets
Grey doesn’t have to be boring. Here are some creative ideas to make your cabinets stand out:
- Two-tone cabinets: Use a darker grey on lowers, lighter on uppers.
- Distressed look: Lightly sand edges after staining for a rustic vibe.
- Glaze overlay: Brush on a black or white glaze for extra depth.
- Mix with natural wood: Stain some cabinets grey, leave others natural for a custom look.
- Add texture: Use a wire brush before staining to open up the grain.
These touches make your kitchen unique and can help blend old and new features.
Frequently Asked Questions
What’s The Difference Between Grey Stain And Grey Paint On Cabinets?
Grey stain soaks into the wood and lets the natural grain show through. It gives a subtle, layered look. Grey paint sits on top and covers the wood completely. Paint gives a solid, uniform color but hides the wood’s texture.
How Do I Fix Cabinets If The Grey Stain Looks Blotchy?
Sand the blotchy area lightly with fine (220-grit) sandpaper, then reapply a thin coat of stain. Wipe off quickly. If blotches are severe, you may need to strip and restart. Using a wood conditioner before staining helps prevent this problem.
Can I Stain Over Cabinets That Were Previously Painted?
No, stain won’t work on painted cabinets—the paint blocks the wood and the stain can’t soak in. You must remove all paint (by sanding or stripping) down to bare wood before applying grey stain.
How Long Should I Wait Before Using My Cabinets After Staining?
After the final topcoat, wait at least 24–48 hours before reinstalling and using cabinets. The finish will keep curing for a week, so avoid heavy cleaning or scrubbing during that time.
Do I Have To Sand Between Every Coat Of Stain And Finish?
Light sanding between coats (with 320-grit paper) is recommended. It smooths out any raised grain or dust and helps the next layer stick better, giving a pro-level finish.
Grey-staining cabinets is one of the most rewarding DIY projects. It updates your space, highlights natural beauty, and can be done in a long weekend. Careful prep, patience, and attention to detail are the secrets to a finish you’ll love for years.
If you follow these steps, your cabinets will not only look amazing but also stand up to daily use.