If your dishwasher’s drain hose is too long, you might notice poor drainage, water left in the tub, or even leaks. Many homeowners ignore this small detail, but the length of the drain hose has a big impact on how well your dishwasher works. Shortening the hose the right way helps water flow easily, prevents clogs, and keeps your kitchen safe from unwanted leaks. In this article, you’ll learn exactly how to shorten a dishwasher drain hose, why it matters, and how to avoid common mistakes. Whether you’re a DIY beginner or just curious, you’ll find clear instructions, practical tips, and expert advice to help you do the job right.
Why Drain Hose Length Matters
A dishwasher’s drain hose removes dirty water after each cycle. If the hose is too long, water can sit in low spots, creating a place for clogs or bacteria to grow. Sometimes, installers leave extra length in the hose, thinking it’s useful for moving the dishwasher later. But this extra hose can cause problems:
- Water pooling: Standing water can attract mold and bad smells.
- Backflow risk: Dirty water may flow back into the dishwasher, making dishes less clean.
- Pump strain: The dishwasher’s pump works harder, which can shorten its life.
- Leaks: Extra hose can develop kinks or cracks, causing slow leaks under the counter.
Most dishwasher manuals recommend keeping the drain hose as short as possible, with a gentle upward loop to prevent backflow. A typical dishwasher drain hose is about 6 to 10 feet. But for best results, measure your space and trim the hose so it just reaches your drain connection—no extra loops or coils.
When You Need To Shorten The Drain Hose
Not every dishwasher needs a hose cut. But there are clear signs you should consider shortening yours:
- Standing water: After a wash cycle, you see water at the bottom of the tub.
- Strange smells: Odors coming from the dishwasher, even after cleaning.
- Visible coils: The hose has extra loops or coils behind the dishwasher.
- Slow drainage: The dishwasher takes longer than normal to drain.
- Leaking: Water collects under the dishwasher, near the hose connections.
If you notice any of these signs, check the hose length. Shortening it can often solve the problem without expensive repairs.
:max_bytes(150000):strip_icc()/dishwasher-drain-hose-connections-2718613-09-3f63c303030749e9985b75df021aeeb6.jpg)
Credit: www.thespruce.com
Safety And Preparation
Before you begin, safety is key. Working with water lines and electricity can be dangerous if you’re not careful. Here’s how to prepare:
- Unplug the dishwasher. Find the power cord under the sink or behind the machine. Never work on a dishwasher with the power on.
- Turn off the water supply. Most dishwashers have a shutoff valve under the sink.
- Clear the area. Move anything stored under the sink or near the dishwasher to give yourself space.
- Gather tools and materials. Having everything ready will save time and reduce stress.
Essential Tools And Supplies
You don’t need fancy tools, but a few basics will help:
- Screwdriver (Phillips and flathead)
- Utility knife or sharp hose cutter
- Pliers
- Towel or small bucket for catching drips
- New hose clamps (in case the old ones are worn)
- Flashlight
Some dishwashers use special hose fittings. If you’re unsure, check your user manual or take a photo of your setup before you start.
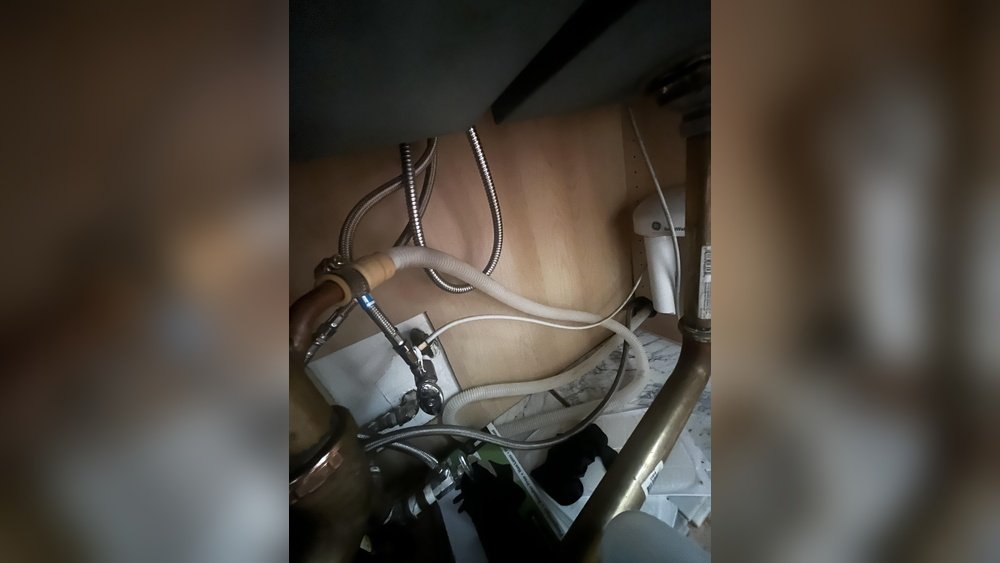
Understanding Your Dishwasher’s Drain System
Before you cut anything, it helps to understand how the drain system works. Your dishwasher’s drain hose connects to one of two places:
- Sink drain: The hose connects to a small fitting above the trap under your sink.
- Garbage disposal: If you have a garbage disposal, the hose connects to a special inlet.
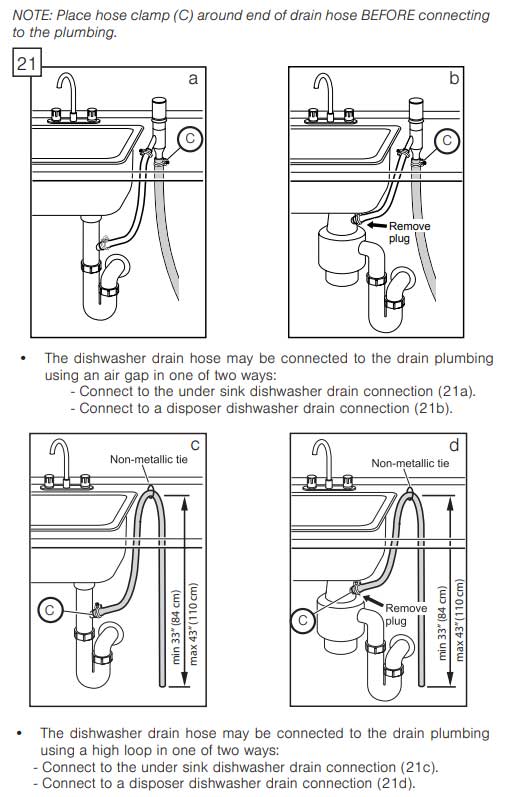
Most modern dishwashers also have an “air gap”—a small device mounted on the sink or countertop. The air gap prevents dirty water from flowing back into the dishwasher. If you see a small metal or plastic cap near your faucet, that’s the air gap.
Important: Keep the “high loop.” This means the hose should rise above the dishwasher’s drain outlet before going down to the sink or disposal. The high loop or air gap helps stop backflow and meets most plumbing codes.
Measuring The Correct Length
Getting the right length is crucial. Too short, and the hose will pull or disconnect. Too long, and you’ll have the same problems as before. Here’s how to measure:
- Pull out the dishwasher (if possible) to see the full hose path.
- Route the hose from the dishwasher’s drain outlet to the drain connection (sink or disposal), following the same path as the original.
- Add a few inches for slack, but keep it as straight as possible.
- Mark the cut point with a pen or tape.
Pro tip: Leave just enough hose to allow for gentle curves—sharp bends can kink the hose and block water flow.
Typical Measurements Table
Here’s a quick guide to common dishwasher drain hose lengths and the situations they fit best.
| Hose Length | Ideal For | Notes |
|---|---|---|
| 4–6 feet | Standard under-sink installs | Most common; fits directly to sink or disposal |
| 6–8 feet | Island sinks or farther connections | May need extra support or clamps |
| 8–10 feet | Rare, long-distance installs | Check dishwasher pump specs for max length |
If your hose is more than 6 feet, consider if you can move the dishwasher closer or reroute the hose for a shorter path.
How To Shorten A Dishwasher Drain Hose: Step-by-step Guide
Now, let’s get into the main steps. Take your time—rushing can lead to leaks or mistakes.
1. Unplug And Turn Off Water
Always start by unplugging the dishwasher and shutting off the water supply. This protects you from electric shock and flooding.
2. Access The Drain Hose
Open the cabinet under your sink. Find where the drain hose connects to the drain or garbage disposal. Most hoses are held by a metal clamp or plastic connector.
- If you have an air gap: The hose runs from the dishwasher to the air gap, then from the air gap to the drain.
- If no air gap: The hose runs directly from the dishwasher to the drain/disposal.
You may need to gently slide the dishwasher out a few inches to see the whole hose.
3. Disconnect The Hose
Place a towel or small bucket under the connection to catch water. Use pliers or a screwdriver to loosen the hose clamp. Carefully wiggle the hose off the fitting.
Some hoses are stiff—twist gently to avoid damaging the connector. If you see buildup or debris, clean it out before reattaching.
4. Measure And Mark
With the hose disconnected, stretch it out to its full length. Reroute it along the shortest possible path, maintaining the high loop if needed.
- Mark the spot where you want to cut, leaving a little slack for movement.
- Double-check: Measure twice, cut once.
5. Cut The Hose
Using a sharp utility knife or hose cutter, slice straight across the hose at your mark. Make sure the cut is clean—rough edges can cause leaks.
- Pro tip: If the hose is ribbed, cut just past one of the ribs for a better seal.
6. Attach And Secure
Slide the hose back onto the drain fitting or air gap. Position a new hose clamp over the end and tighten it firmly, but not so tight that you crush the hose.
- Test fit: Gently pull on the hose to make sure it’s secure.
- Check for kinks: The hose should curve smoothly, not bend sharply.
7. Restore Power And Water
Plug the dishwasher back in and turn the water supply on. Slide the machine back into place, making sure the hose isn’t pinched or twisted behind it.
8. Test For Leaks
Run a short rinse cycle to check for leaks at the connection points. Watch for drips under the sink and behind the dishwasher.
If you see any leaks:
- Tighten the clamp slightly.
- Check for debris at the connection.
- If leaks persist, cut a fresh end and try again.
Step-by-step Overview Table
Here’s a summary to keep you on track:
| Step | Action | Tips |
|---|---|---|
| 1 | Unplug and shut off water | Safety first—never skip this |
| 2 | Access and disconnect hose | Use a bucket for drips |
| 3 | Measure, mark, and cut | Leave a little slack; measure twice |
| 4 | Reattach and secure hose | Check for kinks and firm clamp |
| 5 | Restore power/water and test | Run a rinse cycle to check for leaks |
Common Mistakes To Avoid
Shortening a dishwasher drain hose sounds simple, but small errors can cause big headaches. Here are mistakes beginners often make and how to avoid them:
- Cutting too short: The hose should not be stretched tight when the dishwasher is moved or serviced. Always leave a few inches of slack.
- Skipping the high loop: Without this, dirty water can backflow into the dishwasher. Always keep the hose arching above the drain outlet.
- Using old clamps: Reusing rusty or weak hose clamps can cause leaks. Replace them with new, stainless steel clamps.
- Not checking for leaks: Even a small drip can damage cabinets over time. Always test after you finish.
- Forgetting to clean connections: Bits of old food or debris can block the hose. Wipe connections before reattaching.
Non-obvious insight: Many leaks happen not because of bad cuts, but because the hose isn’t pushed fully onto the drain fitting. Make sure the hose covers the fitting completely before tightening the clamp.
Extra Tips For A Reliable Installation
Professional plumbers know a few tricks that make the job easier and more reliable:
- Warm the hose end: If the hose is stiff, dip the end in hot water for a minute. It will slide onto the fitting more easily.
- Label wires or hoses: If you unplug other connections, label them for easy reassembly.
- Use zip ties: For long hoses, use zip ties to keep them raised and prevent sagging loops.
- Check local codes: Some areas require an air gap, not just a high loop. Check your city’s plumbing rules.
- Inspect regularly: Every few months, check under the sink for drips or dampness.
When To Replace The Hose Instead
Sometimes, it’s better to replace the whole hose rather than just cut it. Consider replacement if:
- The hose is cracked or brittle.
- You see mold or black buildup inside.
- The hose is more than 10 years old.
A new hose costs $10–$25 and is easy to install following the same steps above.
Pro tip: Choose a hose made of reinforced rubber or flexible plastic for longer life.
Comparing Diy Vs Professional Help
Most people can shorten a dishwasher drain hose in about 30–60 minutes. But if you’re unsure, hiring a plumber might be safer. Here’s a quick comparison:
| DIY | Professional |
|---|---|
| Low cost (just new clamps) | Higher cost ($100–$200) |
| Learn a useful skill | No effort required |
| Risk of leaks if done wrong | Warranty on workmanship |
| Immediate scheduling | Wait for appointment |
If your kitchen has very tight spaces, old plumbing, or you see signs of water damage, a professional might be the best choice.

Credit: www.reddit.com
Real-world Example
Let’s look at a real situation. Sarah installed a new dishwasher in her 1990s kitchen. The drain hose was almost 10 feet long, with two large loops behind the cabinet. After a month, she noticed a musty smell and water under the sink.
Following the steps above, she:
- Unplugged the dishwasher and turned off water.
- Disconnected and measured the hose, marking a new length of 5.5 feet.
- Cut the hose, reattached it with a new clamp, and ran a test cycle.
The smell disappeared, drainage improved, and there were no more leaks. Total cost: less than $10 for a new clamp.
Non-obvious insight: Sarah found that the long hose had collected a thick layer of old food inside. Shortening and cleaning the hose fixed the odor and drainage problem in one step.
Maintaining Your Dishwasher After Shortening The Hose
Once you’ve shortened your hose, a little regular care will keep things running smoothly:
- Check for leaks monthly by feeling under the sink.
- Clean the filter inside your dishwasher to catch food before it reaches the drain hose.
- Run a rinse cycle with hot water and vinegar every few months to clear any buildup.
- Watch for slow drainage—it could mean a new clog is forming.
If you notice changes, inspect the hose and connections before calling for repairs.
Credit: terrylove.com
Environmental And Efficiency Benefits
A properly sized drain hose doesn’t just prevent leaks—it helps your dishwasher work better and saves water. When drainage is smooth:
- Cycles run faster, using less electricity.
- Less water is wasted on repeat washes.
- Your dishwasher lasts longer, reducing appliance waste.
It’s a simple job with a big impact on both your home and the environment.
Where To Find More Information
If you need more technical details, your dishwasher’s manual has diagrams and recommended hose lengths. For advanced plumbing advice or to check your local codes, visit the International Plumbing Code website.
Frequently Asked Questions
What If My Hose Is Too Short After Cutting?
If you cut the hose too short, you’ll need to buy a drain hose extension kit. These kits have couplers and clamps to safely add length. Never try to stretch a hose—it can come loose and leak.
Can I Use Duct Tape Instead Of A Hose Clamp?
No. Duct tape will not hold under water pressure and can quickly fail. Always use a proper hose clamp for a secure, leak-free connection.
Is It Safe To Run The Dishwasher Without The High Loop?
No, it’s not safe. The high loop prevents dirty water from flowing back into your dishwasher. Skipping it can cause contamination and even damage your appliance.
How Do I Know If My Hose Needs Replacing?
Replace your hose if it’s cracked, brittle, has mold inside, or is over 10 years old. If you see leaks that don’t stop after tightening the clamp, a new hose is the safest fix.
Can I Shorten A Metal-braided Drain Hose?
Some dishwashers use metal-braided hoses for extra strength. These can be shortened with a special metal cutter, but the process is harder than with plastic hoses. Make sure to use the right tools, or ask a professional for help.
Shortening your dishwasher drain hose is a simple project that can prevent leaks and improve performance. With careful preparation, the right tools, and attention to detail, you’ll enjoy a cleaner, safer kitchen for years to come.