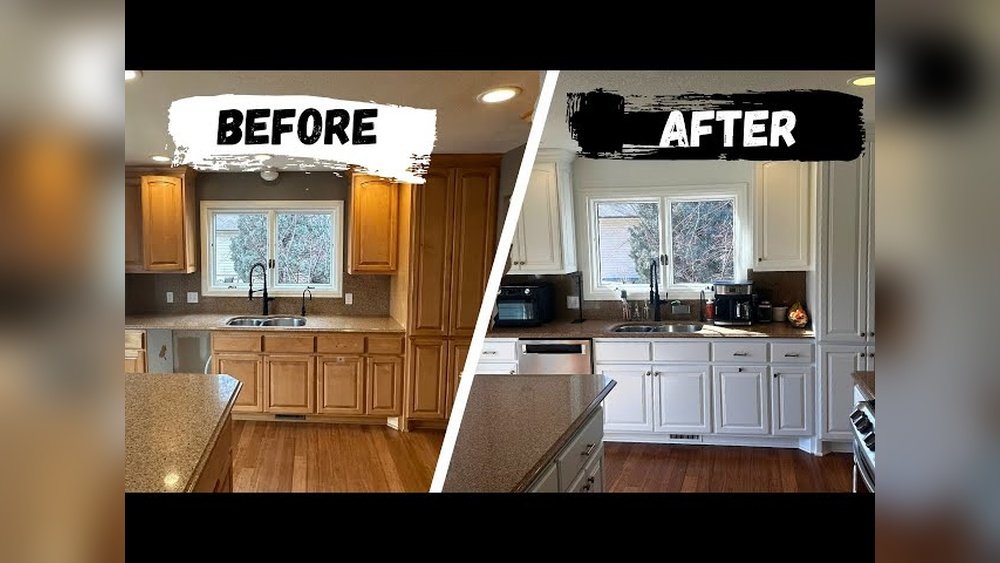
Refinishing maple cabinets can transform your kitchen or bathroom. Maple is a beautiful wood, but over time, cabinets can get scratched, faded, or simply out of style. Many people think replacing cabinets is the only answer, but that’s expensive and time-consuming.
Instead, refinishing lets you keep the strong maple wood, save money, and get a fresh, updated look.
Working with maple is a bit different than with oak or pine. Maple has a tight, smooth grain. It’s very durable, but it can be tricky to stain evenly. This guide will walk you through each step, from preparation to finishing touches, so you can avoid common mistakes and get professional-looking results.
You’ll also learn which products work best for maple, how to handle tough areas, and tips that even seasoned DIYers often miss. By the end, you’ll feel prepared to tackle this project—even if you’ve never worked with wood before.
Why Refinish Maple Cabinets?
Many homeowners ask why they should refinish instead of replace. There are good reasons, especially with maple:
- Cost savings: Refinishing is often 70% less expensive than replacing cabinets. It’s one of the most budget-friendly ways to update a kitchen or bathroom, especially when the cabinet boxes are still sturdy.
- Sustainability: Keeping your maple cabinets reduces waste. Maple is a hardwood that lasts for decades. By refinishing, you’re making a choice that’s better for the environment, keeping solid wood out of landfills.
- Customization: You can choose colors and finishes that match your current style. Want a modern gray, classic white, or a natural wood look? Refinishing gives you the freedom to change the look without changing the structure.
- Preservation: Maple’s natural beauty is worth saving. Refinishing highlights the wood’s unique character, including the subtle grain and soft sheen that many people love.
A 2023 survey by the National Kitchen & Bath Association showed that over 60% of homeowners prefer refinishing over replacing when the cabinet boxes are in good condition. This means you’re not alone in wanting to give your maple cabinets new life.
Another benefit is that refinishing is less disruptive. You can often use your kitchen during the project, while a full replacement might leave you without a working kitchen for weeks. If your cabinets have sentimental value—maybe they’re original to your home or have unique features—refinishing is the best way to keep them.
Tools And Materials Needed
Before starting, gather all the tools and materials. Using the right supplies makes a big difference, especially with maple’s hard surface. Here’s what you’ll need:
- Screwdriver (for removing doors and hardware)
- Drill (if you need to repair loose hinges)
- Drop cloths or plastic sheeting to protect floors and counters
- Painter’s tape for masking off edges and protecting walls
- Quality sandpaper (100, 150, 220 grit)
- Orbital sander (optional but recommended for large areas)
- Tack cloth or microfiber cloth to remove dust
- Degreaser (like TSP or a cabinet cleaner)
- Wood filler (for scratches or holes)
- Putty knife
- High-quality primer (stain-blocking, for maple)
- Paint or stain (cabinet-grade)
- Topcoat (polyurethane, water-based or oil-based)
- Paintbrushes and foam rollers (for smooth finishes)
- Respirator mask and gloves for safety
Choosing the right primer and topcoat is essential. Maple’s tight grain can make stains and paints look uneven without the right base. A shellac-based primer is often best for blocking stains and getting even color.
A few extra items can make your job easier and safer. For example, painter’s pyramids allow you to prop up cabinet doors for painting both sides. A good-quality respirator is important because sanding and finishing products can release fine dust or fumes.
If your cabinets have detailed trim or grooves, consider a detail sander or sanding sponge.

Credit: www.cabinetdoors.com
Planning Your Project
A successful cabinet refinish starts with a good plan. Maple cabinets may take longer than softer woods because the wood is dense and doesn’t absorb stain quickly.
- Set a timeline: Refinishing a typical kitchen (20-30 cabinets) usually takes 3-7 days, depending on drying times. If you have a large family or need to use your kitchen during the project, plan for some workarounds.
- Test your finish: Always test paint or stain on an inside door or scrap piece of maple before starting. This lets you see how the wood reacts and helps prevent surprises.
- Choose your look: Decide if you want to keep the wood grain visible (stain) or go for a painted look. Maple accepts both, but stains may appear lighter and less dramatic than on open-grain woods.
Think about the season, too. High humidity in summer or low temperatures in winter can change how paint and stain dry. If possible, choose a week with mild weather and low humidity for best results.
Common Mistakes To Avoid
- Rushing the sanding process. Maple needs extra sanding for the finish to stick. Skipping grits or using dull sandpaper can leave the surface too smooth for paint or stain to grab.
- Skipping primer. Even if you’re staining, a pre-stain conditioner is crucial. Primer gives paint or stain a proper base, and without it, you may see blotches or uneven color.
- Using cheap brushes or rollers. These can leave marks on maple’s smooth surface. Invest in high-quality tools for a smoother finish and easier cleanup.
- Ignoring proper safety. Always wear a mask, use gloves, and make sure your workspace is well-ventilated. Chemical fumes and fine dust can be harmful.
Step-by-step Refinishing Process
Let’s break down the process into clear, manageable steps. Each step is important for getting a lasting, beautiful finish.
1. Remove Cabinet Doors And Hardware
Take off all cabinet doors, drawers, and hardware (handles, knobs, hinges). Label each piece with painter’s tape so you know where it goes. This saves time and confusion when reassembling.
Stack doors flat and keep hardware in marked bags. Working on doors flat on a surface prevents drips and runs.
If your cabinets have soft-close hinges, check the manufacturer’s instructions for removal. Some hinges can be tricky to reinstall if you don’t keep track of their placement.
2. Clean All Surfaces Thoroughly
Maple cabinets, especially in kitchens, collect grease and grime. Use a strong degreaser or cabinet cleaner. Scrub all surfaces, including inside edges and corners. Rinse with clean water and let dry completely.
Pro tip: Even small traces of grease will prevent primer or stain from sticking. Don’t skip this step.
Pay extra attention to areas above the stove or near handles, where oils build up. You can use a toothbrush to get into corners and decorative trim. After cleaning, run your hand over the surface—if it feels slightly sticky, clean again.
3. Sanding: The Key To A Smooth Finish
Sanding maple is crucial but requires patience. Start with 100- or 120-grit sandpaper to remove old finish, then move to 150-grit, and finish with 220-grit for a smooth surface.
If you’re painting, you don’t need to remove all stain, just rough up the surface. For staining, sand until you see raw wood. Always sand with the grain to avoid scratches.
Sandpaper Comparison For Maple
| Grit | Purpose | When to Use |
|---|---|---|
| 100-120 | Removing old finish | First pass, heavy wear areas |
| 150 | Smoothing after initial sanding | After old finish is gone |
| 220 | Final smoothing | Before primer or stain |
Vacuum up all dust, then wipe with a tack cloth. Dust can ruin even the best finish.
For doors with raised panels or grooves, use a sanding sponge or detail sander. Don’t forget the edges—they’re the most touched parts and need careful sanding.
4. Repair Any Damage
Check for dents, scratches, or holes. Fill them with a wood filler that matches maple. Let it dry fully, then sand smooth with 220-grit sandpaper. Wipe clean again.
Maple is hard, so some dents may not fill perfectly with soft filler. For deep gouges, use a two-part epoxy wood filler.
If you have old hardware holes to fill, pack them tightly with filler and overfill slightly—wood filler shrinks as it dries. Once dry, sand flat and check for low spots. Refill if needed.
5. Apply Primer Or Pre-stain Conditioner
For painting, use a shellac-based or stain-blocking primer. Apply a thin, even coat with a high-quality brush or foam roller. Let dry completely, then sand lightly with 220-grit for a smooth base.
For staining, apply a pre-stain wood conditioner. Maple can absorb stain unevenly, causing blotches. Conditioner helps the stain soak in evenly for a professional look. Follow product instructions for drying time.
Don’t rush this step. The right primer or conditioner is the foundation for the final finish. If you see “fuzzy” wood after priming, sand lightly again with fine sandpaper to smooth it out.
6. Paint Or Stain The Maple Cabinets
Painting Maple Cabinets
Use a cabinet-grade paint for best results. Apply paint in thin, even coats with a foam roller or brush. Let each coat dry, then sand lightly with 220-grit before the next coat. Two coats are usually enough for full coverage.
Pro tip: Water-based paints dry faster and are low odor. Oil-based paints give a hard finish, but take longer to dry.
If you want a factory-smooth finish, consider spraying the paint. Practice on scrap wood first—spraying takes skill and special equipment, but gives excellent results.
Staining Maple Cabinets
Choose a gel stain for maple. Gel stains sit on top of the wood, giving more even color than liquid stains. Apply with a lint-free cloth or brush, working in the direction of the grain. Wipe off excess after a few minutes.
Repeat for a deeper color.
Maple won’t get as dark as other woods, even with multiple coats. Accept the natural look for the best results.
For a custom look, you can use a colored glaze over the stain. This highlights details and adds depth, but should be sealed with a clear topcoat.
7. Apply Protective Topcoat
A durable topcoat protects the finish from scratches, moisture, and stains. Use a water-based polyurethane for a clear, non-yellowing finish, or oil-based for a slightly warmer tone.
Apply at least two thin coats, sanding lightly between each with 320-grit sandpaper. Let the final coat cure for at least 48 hours before reassembling.
Topcoat Types For Maple Cabinets
| Type | Durability | Appearance | Dry Time |
|---|---|---|---|
| Water-based polyurethane | High | Clear, non-yellowing | 1-2 hours |
| Oil-based polyurethane | Very High | Warm, slight amber tint | 8-12 hours |
| Lacquer | Medium | Glossy, fast-drying | 30 min |
For high-moisture areas like bathrooms, use a topcoat rated for humidity. Always use a clean brush or foam applicator, and avoid over-brushing—this can cause bubbles.
Reinstalling Doors And Hardware
Once the topcoat is fully cured, reinstall all doors, drawers, and hardware. Tighten hinges and check that everything lines up. Replace old hardware if you want a new look.
If you labeled everything well at the start, this step will be quick and easy.
If your new hardware uses different screw holes, measure carefully before drilling. Patch any old holes with filler and touch up as needed.
Maintenance Tips For Newly Refinished Maple Cabinets
Maple cabinets are tough, but a little care will keep them looking great for years:
- Clean with a damp cloth and mild soap. Avoid harsh chemicals.
- Wipe spills quickly to prevent water damage.
- Check hardware every few months and tighten screws if needed.
- Avoid hanging damp towels on cabinet doors, which can soften the finish.
- Add bumpers to doors and drawers to prevent slamming and chipping.
These small habits will keep your new finish looking fresh.
For extra protection, use shelf liners inside cabinets and avoid dragging heavy pots or pans along the edges. If you see chips or scratches, touch them up quickly to prevent moisture from getting into the wood.
Common Refinishing Challenges And Solutions
Even with care, you might run into issues. Here are solutions to the most common problems:
- Blotchy stain: Always use a pre-stain conditioner with maple. If you see blotches after staining, lightly sand the area and reapply conditioner and stain.
- Paint drips: Use thin coats and let each dry fully before the next. If drips occur, sand them smooth once dry and touch up.
- Stain looks too light: Maple doesn’t absorb stain deeply. Try gel stain or accept a lighter look. For a richer tone, apply a tinted glaze or choose a darker paint.
- Sticky finish: Humidity or thick coats slow drying. Use thin coats and allow more drying time. If the finish feels tacky after several days, gently sand and apply another thin coat.
Another challenge is cloudy or hazy topcoat. This often happens if you apply a water-based polyurethane over an oil-based stain before the stain is fully dry. Always allow full drying and curing times between coats.
When To Call A Professional
Refinishing is a big project. If you’re short on time, dealing with water damage, or want a sprayed finish (for a super-smooth look), hiring a pro is wise. Professional refinishers have spray booths and special tools for a flawless result.
If your cabinets are warped or the maple is heavily damaged, new doors or cabinet boxes may be needed.
You might also want a professional if your kitchen layout is complicated or if you want to change the cabinet style (like adding glass inserts or trim). A professional can match colors and finishes across new and old components, giving your kitchen a seamless look.

Credit: www.nhance.com
Comparing Refinishing Vs. Replacing Cabinets
It helps to see the costs and impact side by side. Here’s a comparison for a typical kitchen (20-30 cabinets):
| Option | Average Cost | Time Needed | Disruption |
|---|---|---|---|
| Refinishing | $1,500 – $4,000 | 3-7 days | Low – can use kitchen most days |
| Replacing | $10,000 – $25,000 | 2-4 weeks | High – kitchen unusable |
Refinishing saves money and time, with much less mess.
A less obvious benefit: refinishing allows you to upgrade hardware, add soft-close features, or update cabinet interiors at the same time—improving both looks and function without a full remodel.
Two Non-obvious Insights For Beginners
- Maple’s density resists deep color changes. Many first-timers expect a dark, dramatic color. Even with multiple stain coats, maple keeps a lighter, more subtle color than oak or cherry. If you want a dark look, consider paint or a tinted glaze over the stain.
- Humidity affects curing time more than you think. If you refinish during wet weather, drying times for stain and topcoat can double. Always check the product’s ideal temperature and humidity range. Rushing this step leads to a sticky or uneven finish.
Another insight: maple’s smooth grain means even tiny sanding marks will show through a clear finish. Always do your final sanding with the grain, and never skip the tack cloth before applying finish.
Practical Tips For A Professional Result
- Practice on a hidden area first. Inside a cabinet door or a scrap board is perfect. This test piece helps you adjust your technique and get the look you want.
- Use a foam brush for corners. This gives you more control and fewer brush marks.
- Work in a well-ventilated area. Open windows or use fans to speed up drying and protect your health. If possible, take doors outside for painting.
- Keep pets and children away from the work area to prevent accidental smudges or damage.
Patience is your best tool. Give each coat time to dry fully before moving to the next step.
If you plan to refinish other woodwork (like trim or furniture), keep notes on the products and colors used. This makes it easy to match finishes in the future.
Frequently Asked Questions
How Long Does It Take To Refinish Maple Cabinets?
For a typical kitchen (20-30 cabinets), expect 3 to 7 days. This includes cleaning, sanding, priming, painting or staining, drying, and topcoat curing. Complex layouts or humid weather can add more time.
Can I Change Maple Cabinets From Light To Dark Color?
You can darken maple with gel stain or paint, but maple’s tight grain means it won’t get as dark as open-grain woods like oak. For a true dark look, paint is more reliable than stain.
Do I Need To Sand Maple Cabinets To Bare Wood Before Refinishing?
If you’re painting, sanding to rough up the surface is enough. For staining, you must sand to raw wood for even absorption. Skipping this step can cause blotchy or uneven color.
What Is The Best Finish For Maple Cabinets?
A water-based polyurethane is best for most homes. It’s clear, doesn’t yellow, and dries quickly. For a warmer look, an oil-based topcoat works well but takes longer to cure. Always use a finish labeled for cabinets.
Where Can I Find More Information About Maple Cabinet Refinishing?
For deeper technical details and inspiration, the This Old House guide is a trusted resource.
Refinishing maple cabinets is a rewarding project that can transform your space without a huge cost. With careful planning, the right tools, and a bit of patience, you can achieve a finish that looks professional and lasts for years. Enjoy your beautiful new cabinets and the satisfaction of a job well done!

Credit: www.youtube.com