Plumbing a kitchen sink with a garbage disposal and dishwasher might sound complex, but with the right guidance, it’s a project many homeowners can tackle. The satisfaction of doing it yourself and the potential savings make this task appealing. However, mistakes can cause leaks, bad odors, or even water damage.
This guide explains every step, from planning your setup to connecting every pipe and wire, with clear tips and insights that most beginners miss. You’ll also find practical tables, diagrams explained in words, and advice grounded in real experience.
Understanding The Kitchen Sink Plumbing System
Before you begin, it’s important to understand how the kitchen sink, garbage disposal, and dishwasher work together. All three connect to your home’s drain and water supply systems. The sink provides the main basin for washing, the garbage disposal grinds up small food scraps, and the dishwasher cleans dishes using both hot water and a drain line.
When connected correctly:
- The dishwasher empties its water into the disposal or a special inlet on the drain.
- The garbage disposal connects directly under one side of the sink (usually the smaller basin, if you have a double sink).
- The plumbing under the sink combines these flows and sends them into the drainpipe leading out of your house.
A common mistake is not allowing for proper air gaps or venting, which can cause water to back up into the dishwasher or sink. Knowing the role of each part makes the installation smoother.
Tools And Materials Needed
Gather all your tools and materials before you start. This avoids running to the store mid-project, saving time and reducing frustration.
Essential Tools
- Pipe wrench and adjustable wrench – For tightening and loosening connections.
- Screwdrivers – Both flat and Phillips heads.
- Plumber’s putty – Seals joints, especially around the sink drain.
- Pipe cutter or hacksaw – For trimming pipes to fit.
- Channel-lock pliers – Useful for gripping nuts and pipes.
- Measuring tape – Accurate lengths mean fewer leaks.
Key Materials
- PVC drain pipes and fittings – 1.5″ or 2″ diameter, depending on your existing setup.
- Garbage disposal unit – Choose a model suitable for your sink size and usage.
- Dishwasher installation kit – Includes drain hose, clamps, and inlet fitting.
- Sink strainer – For the non-disposal basin.
- Teflon tape – Seals threaded connections.
- Hose clamps – For securing dishwasher and disposal hoses.
- Air gap fitting (if required by code) – Prevents dirty water from backing into the dishwasher.
- Electrical wiring supplies – Wire nuts, cable clamps, and a power cord if the disposal doesn’t come with one.
Pro Tip: Many beginners forget to buy a dishwasher air gap or Y-branch tailpiece, which connects both appliances safely to the drain. Check your local code, as some places require an air gap.

Credit: www.youtube.com
Planning Your Layout
Every kitchen is unique, so take time to plan your setup. Measure the space under your sink to ensure everything will fit, especially if you have a double basin or a deep sink.
Key Planning Steps
- Measure cabinet space: Garbage disposals and dishwashers need room. Leave at least 12-15 inches under the sink for the disposal.
- Check electrical outlets: Your garbage disposal needs a power source. If you don’t have a switched outlet under the sink, you may need to install one.
- Locate the dishwasher inlet: It’s usually on the side of the disposal or the drainpipe.
- Plan pipe routes: Make sure the dishwasher drain hose runs uphill from the dishwasher to the air gap or disposal to prevent backflow.
Common Oversight: Many people install the disposal on the wrong side. It should go under the smaller sink bowl, or the one closest to the dishwasher, for the easiest hose connection.
Safety Precautions And Codes
Plumbing involves water and electricity. Safety is critical.
- Turn off water at the shutoff valves under the sink.
- Unplug electrical appliances before working.
- Wear gloves and eye protection; metal edges under the sink can be sharp.
- Follow local plumbing codes. In some areas, air gaps for dishwashers are required.
If you’re not sure about electrical work, get a licensed electrician to handle that part. Water and electricity are a dangerous mix.
Removing The Old Plumbing
If you’re replacing an old sink or updating your plumbing, you’ll need to remove the existing setup.
Steps To Remove Old Plumbing
- Disconnect water supply lines: Turn off both hot and cold water valves. Use a wrench to loosen the nuts.
- Remove drain pipes: Place a bucket under the P-trap to catch water. Unscrew the slip nuts and remove the pipes.
- Take out the old disposal (if present): Unplug it, disconnect the drain and mounting ring, and lower the unit.
- Detach the dishwasher drain hose: Loosen the clamp and pull it free from the old drain or disposal.
Dispose of the old parts responsibly. Some local recycling centers accept metal and plastic plumbing parts.
Installing The Sink Strainer
For double sinks, one basin gets the disposal and the other a strainer.
Step-by-step Installation
- Roll plumber’s putty into a rope and place it under the sink strainer’s lip.
- Insert the strainer into the sink hole.
- From underneath, slide on the rubber gasket and cardboard washer, then screw on the locknut.
- Tighten the locknut evenly. Excess putty squeezes out; wipe it away.
Tip: Don’t overtighten. Too much pressure can crack the sink, especially with porcelain or cast iron.
Mounting The Garbage Disposal
Installing the disposal is easier than most expect if you follow the instructions.
Disposal Mounting Process
- Install the mounting assembly that comes with your disposal. This usually involves a metal ring and snap ring.
- Apply plumber’s putty under the flange, set it in the sink, and secure with the mounting assembly from below.
- Attach the disposal to the mounting ring using a twisting motion. Lock it in place.
Electrical Hookup: If your disposal does not have a pre-installed cord, open the access panel and connect the wires—black to black (hot), white to white (neutral), and green to ground. Secure with wire nuts and close the panel.
Important Detail: If your dishwasher will drain through the disposal, knock out the plastic plug inside the dishwasher inlet on the disposal unit before connecting the hose.
Connecting The Dishwasher Drain
The dishwasher pump sends used water through a flexible drain hose. This hose must connect to the plumbing under the sink.
Proper Dishwasher Drain Routing
- High loop method: Run the hose up to the underside of the countertop before connecting it to the disposal or drain. This reduces the chance of dirty water flowing back into the dishwasher.
- Air gap installation: Insert the air gap (a small fitting mounted on the sink or countertop) and connect the dishwasher hose to one side, the other to the disposal or drain.
Steps
- Attach hose to dishwasher outlet with a hose clamp.
- Route the hose with a high loop or through the air gap.
- Connect to disposal or Y-branch tailpiece with a second hose clamp.
Pro Tip: Most beginners don’t secure the high loop, which can lead to drainage problems. Use a bracket or zip tie to keep it in place.

Credit: www.doityourself.com
Assembling The Drain Pipes
Now connect all the pipes under the sink so that both basins, the disposal, and the dishwasher all flow into the main drain.
Typical Pipe Assembly
- Disposal discharge pipe connects to a T-fitting or directly to the main drain line.
- Non-disposal basin connects to the same drain line, usually through a T or Y fitting.
- P-trap (U-shaped pipe) is installed downstream of the T-fitting to prevent sewer gases from coming up.
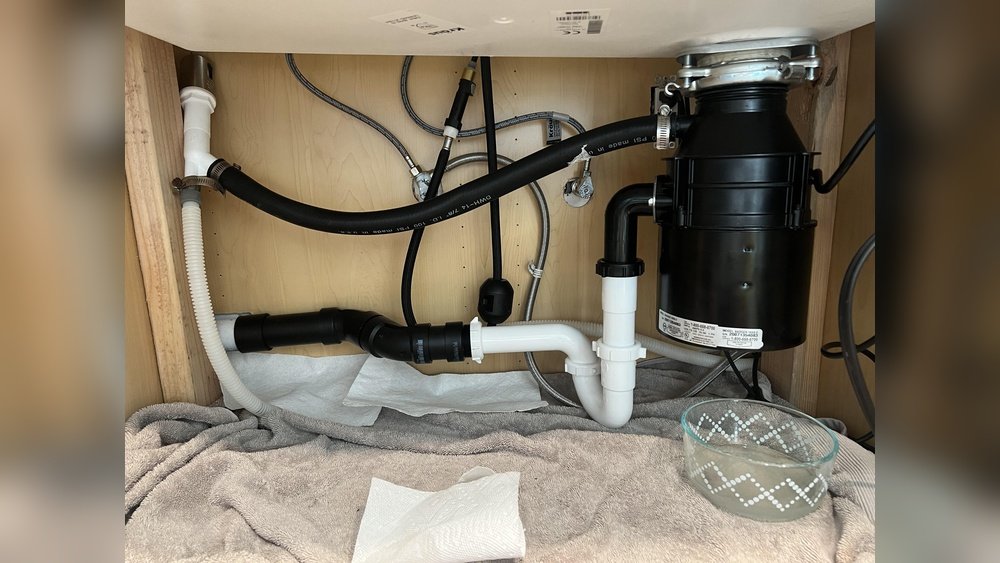
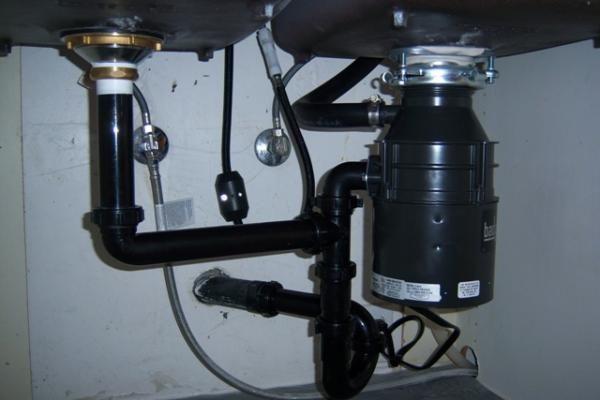
Here’s a visual description: Imagine the disposal outlet connects horizontally to a short pipe, which meets a T-fitting. The other sink bowl also connects to this T. Downstream, the P-trap leads into the wall or floor drain.
Common Pipe Layouts Compared
| Layout | Best For | Potential Issue |
|---|---|---|
| Single Basin, Disposal Only | Small kitchens | Simple, but no second drain backup |
| Double Basin, Disposal + Dishwasher | Standard family kitchens | More parts, needs careful alignment |
| Double Basin, No Disposal | Light use or composting kitchens | Food clogs more likely |
Tighten all slip nuts by hand first, then finish with pliers (not too tight—PVC cracks easily).
Securing The P-trap And Final Drain
The P-trap is essential. It holds water to block sewer gases, and its U-shape catches debris.
P-trap Installation
- Slide the P-trap onto the tailpiece coming down from the T-fitting.
- Align the trap arm with the wall or floor drainpipe.
- Tighten all connections. Double-check that gaskets are in place.
Mistake to Avoid: Forcing pipes to fit if lengths are wrong. Instead, cut pipes precisely and use extension pieces if needed.
Leak Testing And Adjustments
Once everything is connected, you must test for leaks before using the sink, disposal, or dishwasher.
How To Test
- Plug the sink and fill it with water.
- Remove the plug and watch all joints as the water drains. Look for drips or moisture.
- Run the garbage disposal with cold water running.
- Run the dishwasher through a short cycle.
If you see leaks:
- Check that slip nuts are tight.
- Make sure washers are seated properly.
- Adjust or reapply plumber’s putty if needed.
Non-obvious Insight: Wait 10-15 minutes after testing. Slow leaks may appear only after water sits in the pipes.
Wiring And Powering The Garbage Disposal
Electrical safety is crucial. Most disposals plug into a grounded outlet under the sink, often controlled by a wall switch.
Steps To Connect Power
- If using a cord, plug it into the outlet.
- If hardwiring, make sure the circuit is off at the breaker box. Connect wires as described earlier, using wire nuts and proper grounding.
- Secure the wiring in the disposal’s access panel with a cable clamp to prevent stress.
Stat: According to the National Fire Protection Association, over 20% of home electrical fires come from faulty wiring. Double-check connections.
Final Checklist And Troubleshooting
Before you call the project done, run through this final checklist:
- All pipes and hoses are tight, with no leaks.
- The garbage disposal runs smoothly and makes no unusual noises.
- The dishwasher drains fully and does not back up into the sink.
- The P-trap is properly aligned and water is present in the bend.
- The air gap (if used) does not leak water onto the countertop.
- Electrical connections are secure and covered.
Troubleshooting Table
| Problem | Possible Cause | Solution |
|---|---|---|
| Water leaking under sink | Loose slip nut or bad washer | Retighten or replace washer |
| Dishwasher doesn’t drain | Clogged hose or no high loop | Clear hose, add high loop |
| Disposal hums but won’t spin | Jammed or electrical issue | Use disposal wrench to free, check power |
| Odor from sink | Food stuck, no water in P-trap | Run disposal, flush with water, refill trap |
Upgrades And Maintenance Tips
A well-plumbed sink setup can last for years, but a few upgrades can make life easier and prevent future issues.
Useful Upgrades
- Stainless steel or brass drain fittings last longer than plastic.
- Deep disposal units handle larger amounts of food.
- Sound insulation kits reduce disposal noise.
- Anti-vibration mounts keep pipes from rattling.
Maintenance Practices
- Run cold water when using the disposal to solidify grease for grinding.
- Clean the disposal monthly with ice cubes and a bit of dish soap.
- Flush the drain with hot water weekly.
- Check for leaks every few months, especially after heavy use.
Pro Tip: Pour a mix of baking soda and vinegar down the disposal, let it foam, then rinse with hot water. This keeps odors away and pipes clear.
Environmental And Safety Considerations
Modern disposals and dishwashers are more efficient, but you can help the environment with good practices.
- Scrape large food scraps into the trash or compost, not the disposal.
- Run the dishwasher only when full to save water and energy.
- Avoid harsh drain chemicals; they can damage pipes and harm water systems.
Fact: The average US family uses over 300 gallons of water per day, with about 10% in the kitchen. Smart habits can reduce this.
When To Call A Professional
Some situations are best handled by a licensed plumber or electrician:
- Old or corroded pipes that may crumble during work.
- No existing electrical outlet for the disposal.
- Unusual plumbing layouts or multiple appliances needing special connections.
- Persistent leaks you can’t trace or stop.
Getting help can save money in the long run by avoiding water damage or electrical hazards.
Credit: www.doityourself.com
Frequently Asked Questions
How Does A Garbage Disposal Connect To The Dishwasher?
The dishwasher drain hose connects to a special inlet on the side of the garbage disposal. This allows the dishwasher to empty its water through the disposal, where any food debris is chopped up before entering the drain.
Do I Need An Air Gap For My Dishwasher?
In many areas, local plumbing codes require an air gap to prevent dirty water from siphoning back into the dishwasher. Check with your local building department or see guidelines at the International Plumbing Code.
What Size Pipes Should I Use Under My Kitchen Sink?
Most kitchen sinks use 1.5-inch PVC pipes for drains. However, if your home has a large dishwasher or high-capacity disposal, a 2-inch pipe may be better to handle the flow and prevent clogs.
Can I Use Flexible Pipes For The Drain Connections?
Flexible drain pipes (accordion style) are allowed in some locations and make fitting easier in tight spaces. However, smooth-walled pipes are less likely to clog and are preferred by most plumbers.
How Do I Stop Odors From Coming Up The Sink After Installation?
Odors usually come from trapped food, a dry P-trap, or buildup in the disposal. Run the disposal with cold water, clean it monthly, and make sure the P-trap always has water in its bend.
Plumbing your kitchen sink with a disposal and dishwasher is a project that brings real rewards—and real risks if rushed or done carelessly. Take your time, check each connection, and use the right materials. With patience and attention to detail, you’ll have a reliable, leak-free kitchen setup for years to come.