Making your refrigerator look built-in can transform your kitchen into a modern, seamless space. Many homeowners dream of the custom look found in designer kitchens—where the fridge blends with the cabinets, and everything looks intentional. But built-in refrigerators are expensive and not always practical. The good news: with a few smart strategies, you can get a built-in look for a standard fridge at a much lower cost.
In this guide, you’ll learn practical ways to make your refrigerator look built in, whether you’re remodeling, updating, or just want a stylish change. You don’t need to be a professional or have a huge budget. This article covers everything: planning, tools, DIY steps, and designer tips. You’ll see what works, what to avoid, and how to make your kitchen look more expensive—without buying a new appliance.
Why Make Your Refrigerator Look Built In?
A built-in fridge can make a kitchen look high-end. It creates clean lines and a cohesive style. When the refrigerator stands out, it can interrupt the visual flow and make the kitchen feel crowded or unfinished. By integrating your fridge, you:
- Increase home value: Many buyers prefer built-in appliances.
- Improve kitchen flow: Cabinets and fridge become one smooth surface.
- Maximize space: Fit everything neatly, especially in small kitchens.
- Add a custom look: Make even a basic kitchen feel special.
But the most important reason? It’s about feeling proud of your home. When your kitchen looks intentional and tidy, you enjoy cooking and entertaining more.
Understanding The Built-in Look
Before starting, it helps to know what “built-in” really means. True built-in refrigerators are designed to fit flush with cabinets. They are usually 24 inches deep (same as standard cabinets), with vents in the front, and special panels to match the doors.
They are often wider but shallower than regular fridges.
Most homes have freestanding refrigerators. These stick out a few inches from the cabinets because they’re deeper (28–36 inches). Their sides are exposed, and they have gaps above or beside them.
When people say “built-in look,” they mean making the fridge look like part of the cabinetry—even if it’s not a true built-in model. This is done by adding panels, trim, enclosure boxes, or other design tricks.
Key Differences
| Built-In Refrigerator | Freestanding Refrigerator | |
|---|---|---|
| Depth | 24 inches (flush with cabinets) | 28–36 inches (sticks out) |
| Ventilation | Front vents | Back/top vents |
| Integration | Cabinet panels, seamless sides | Exposed sides and top |
| Price | High ($5,000+) | Lower ($800+) |
Knowing these differences helps you plan the best way to achieve a built-in look with your current fridge.
Planning For A Built-in Look
Good planning saves time and money. Before you start, take these steps:
- Measure your space: Write down the height, width, and depth of your refrigerator. Measure the space around it—including gaps to the wall, cabinets, and ceiling.
- Check fridge ventilation: Most freestanding fridges need air flow behind and above. Never block vents or crowd your fridge too tightly, or you risk overheating.
- Decide your budget: Some solutions cost $50, others $1000 or more. Decide how much you want to spend.
- Look for inspiration: Search for photos of built-in fridges online or in magazines. Notice which styles you like.
- Check your DIY skills: Some options require simple painting, others need carpentry. Be honest about what you can do or if you need a pro.
Example
Let’s say your fridge is 36 inches wide, 70 inches tall, and 32 inches deep. The gap between the fridge and wall is 3 inches on the left, 4 inches on the right, and 8 inches on top. These details will guide your design choices.
Main Ways To Make Your Refrigerator Look Built In
There are several ways to create a built-in look. Each method has pros and cons, depending on your budget, skills, and kitchen layout.
1. Add Side Panels
Side panels are tall, cabinet-like boards that run from floor to ceiling on each side of your fridge. They create a clear border and hide the fridge’s sides.
Steps:
- Buy or build panels from MDF or plywood.
- Match the panels’ finish to your cabinets (paint or stain).
- Attach the panels to the wall, floor, or existing cabinets with screws.
- Leave enough space for fridge doors to open fully.
Pros:
- Easy to match with cabinets.
- Hides exposed fridge sides.
Cons:
- Takes up a few inches of space.
- Needs secure fixing to prevent wobble.
Non-obvious tip: Use melamine or high-pressure laminate for panels if you want an easy-to-clean surface.
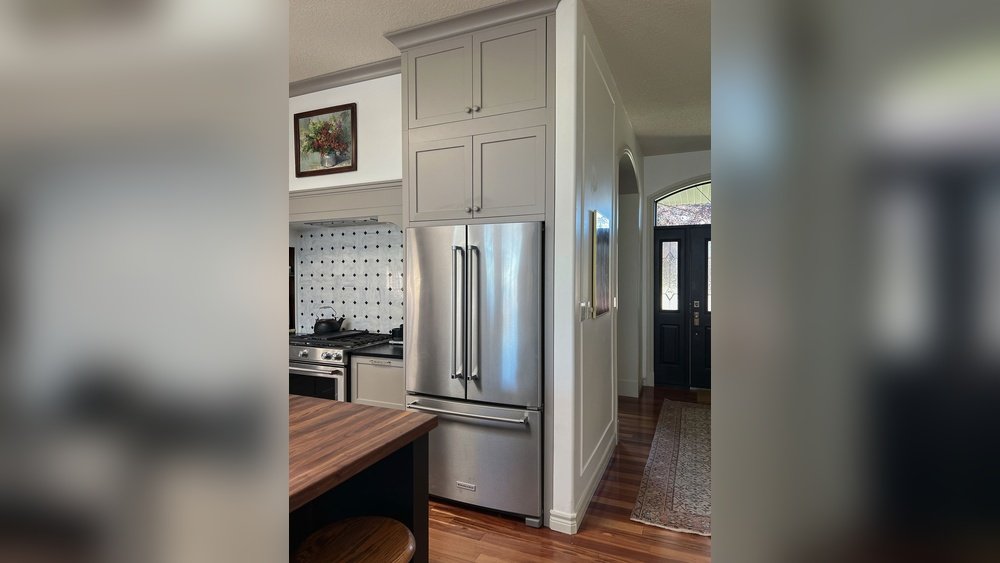
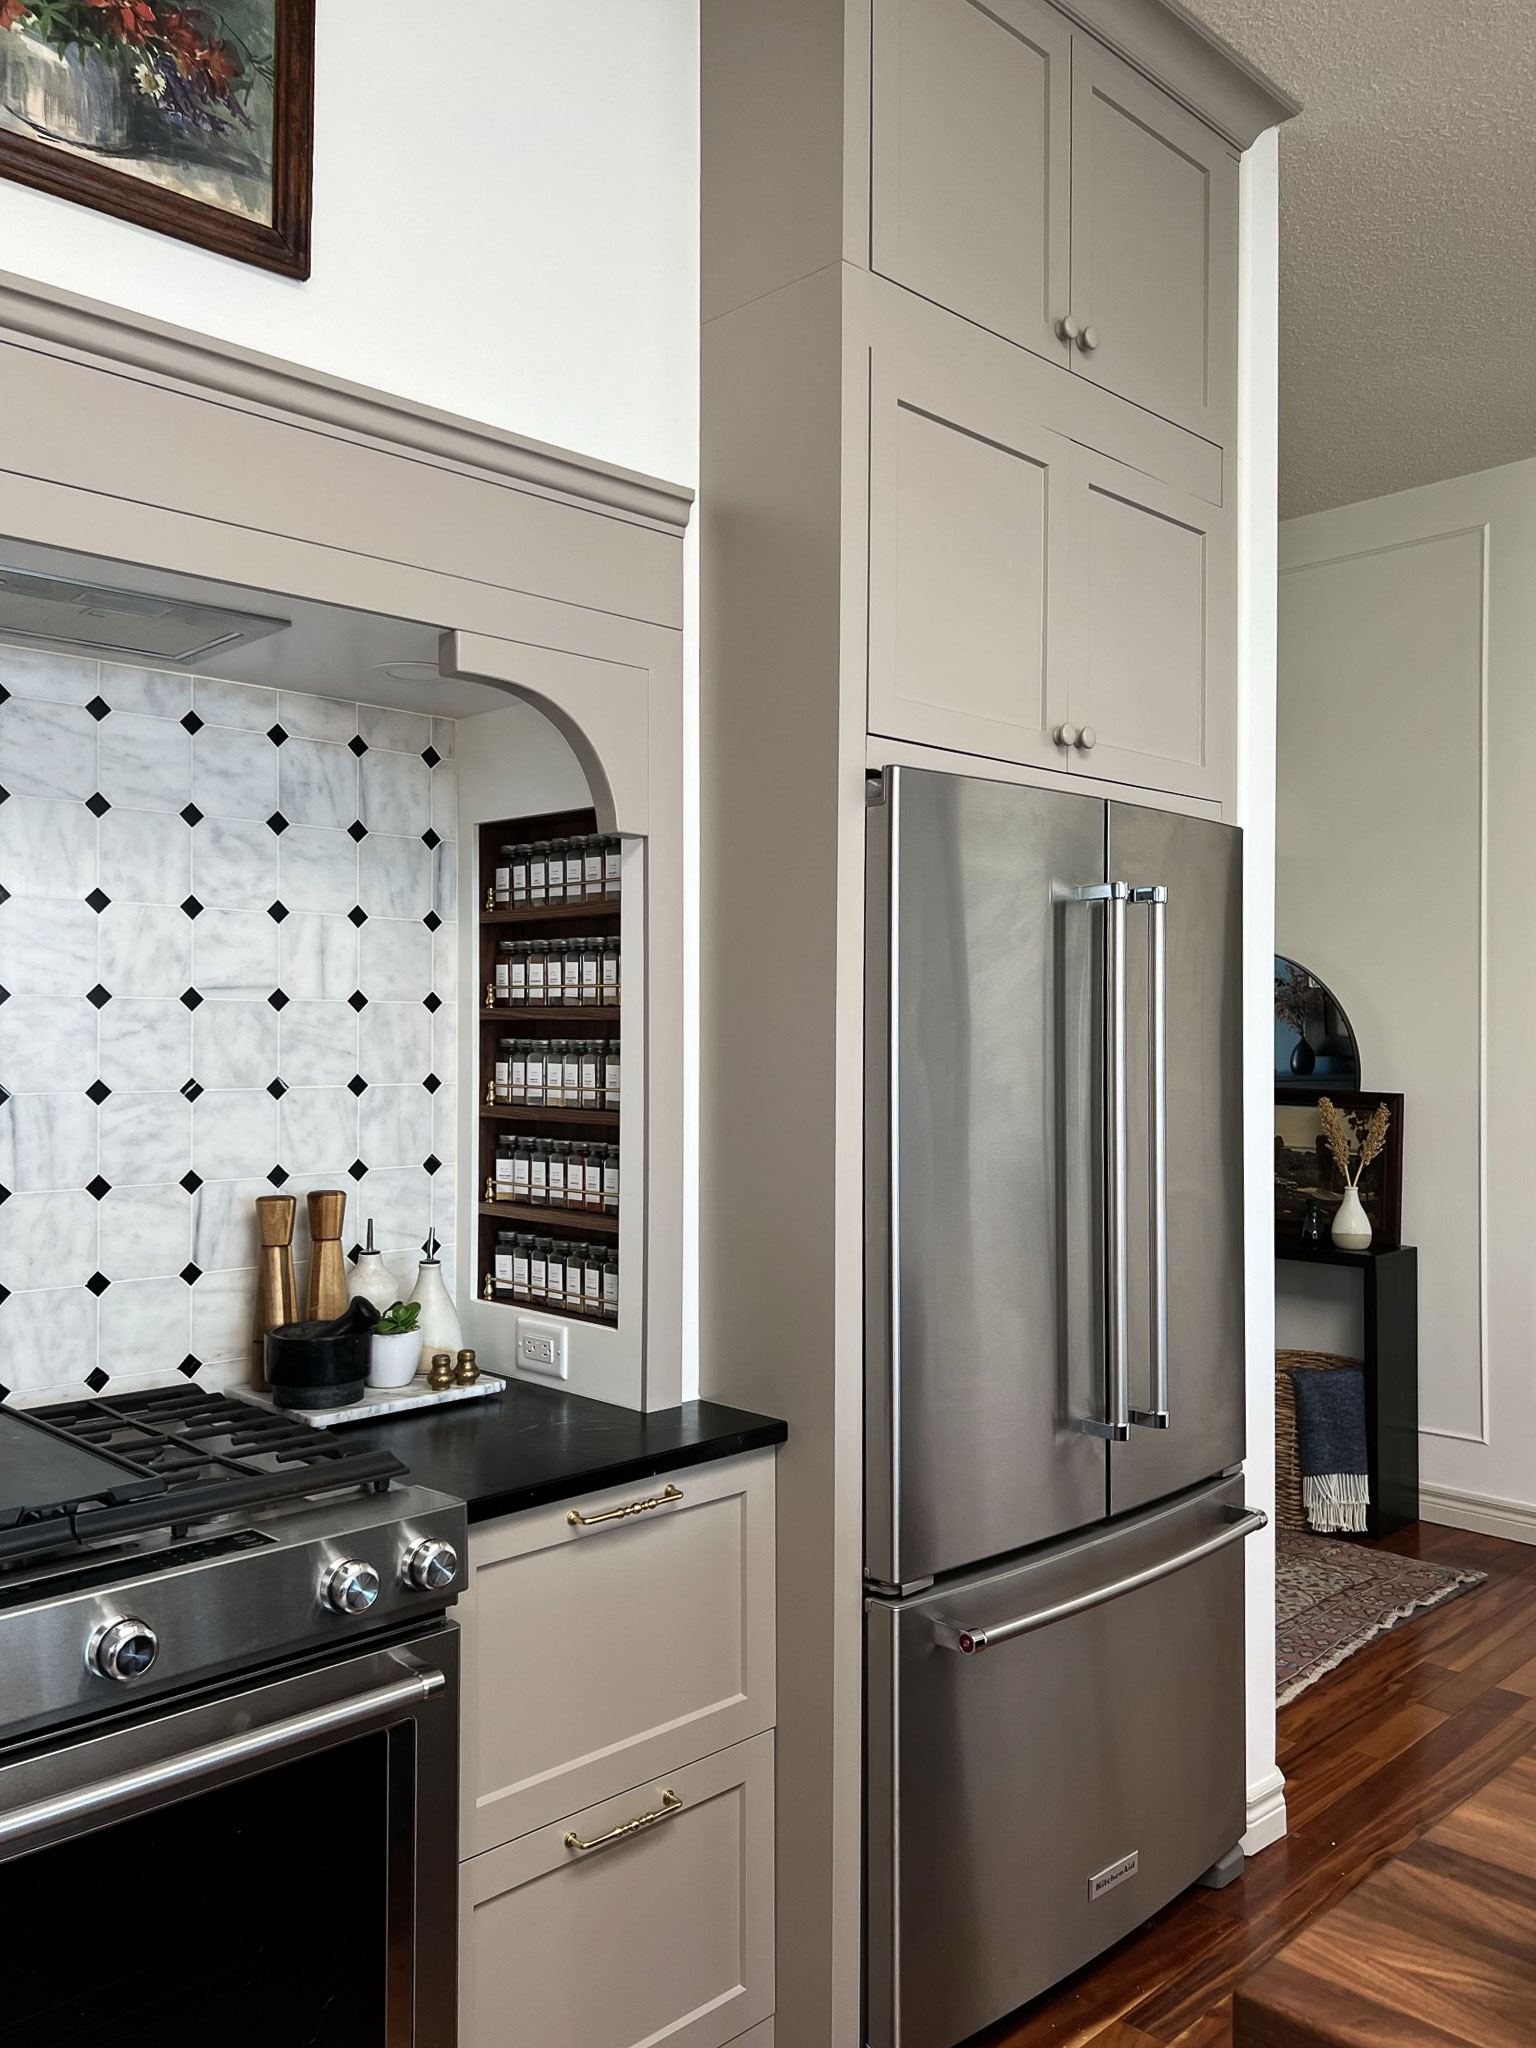
2. Build A Refrigerator Cabinet Enclosure
A cabinet enclosure surrounds the fridge on three sides (left, right, and top). It creates the most seamless look, especially if you add a cabinet above the fridge.
Steps:
- Install side panels as above.
- Add a horizontal cabinet or shelf over the fridge for storage.
- Use trim to cover any gaps.
Pros:
- Creates built-in storage.
- Makes the fridge look like part of the cabinetry.
Cons:
- More work and materials.
- Can be tricky to fit if ceiling is low.
Pro insight: Always check how far fridge doors need to swing open—if the side panels are too thick, you can block access to drawers or bins inside the fridge.
3. Use Filler Strips And Trim
Filler strips are narrow pieces of wood that fill small gaps between the fridge and cabinets. Trim is decorative molding that covers seams.
Steps:
- Measure gaps around the fridge.
- Cut filler strips to size.
- Nail or glue them in place.
- Paint or stain to match cabinets.
- Add trim on top for a finished look.
Pros:
- Inexpensive.
- Great for small gaps.
Cons:
- Does not hide sides of a deep fridge.
- Needs careful measuring.
Practical tip: Use caulk to seal small cracks after installing filler strips for a truly seamless finish.
4. Install A Cabinet Above The Fridge
A cabinet above the fridge fills the vertical gap and provides storage for trays, pans, or seasonal items.
Steps:
- Measure the space above the fridge.
- Buy or custom-build a cabinet that fits the width and depth.
- Mount it securely to the wall studs.
- Add trim or filler strips for a tight fit.
Pros:
- Adds useful storage.
- Fills empty space for a finished look.
Cons:
- May be hard to reach (use for rarely used items).
- Needs proper mounting.
Non-obvious insight: If you can’t match your existing cabinets, paint the new cabinet a contrasting color for a stylish, intentional look.
5. Choose A Counter-depth Refrigerator
A counter-depth refrigerator is shallower than a standard fridge and sits nearly flush with cabinets.
Steps:
- Measure your cabinet depth (usually 24 inches).
- Choose a fridge that matches or is close (24–27 inches deep).
- Install with side panels or trim for the built-in effect.
Pros:
- Instant built-in look.
- No need for deep enclosure.
Cons:
- Less interior space.
- Costs more than standard fridges.
Real-world example: Many new homes use counter-depth fridges with side panels for a custom look without the built-in price.
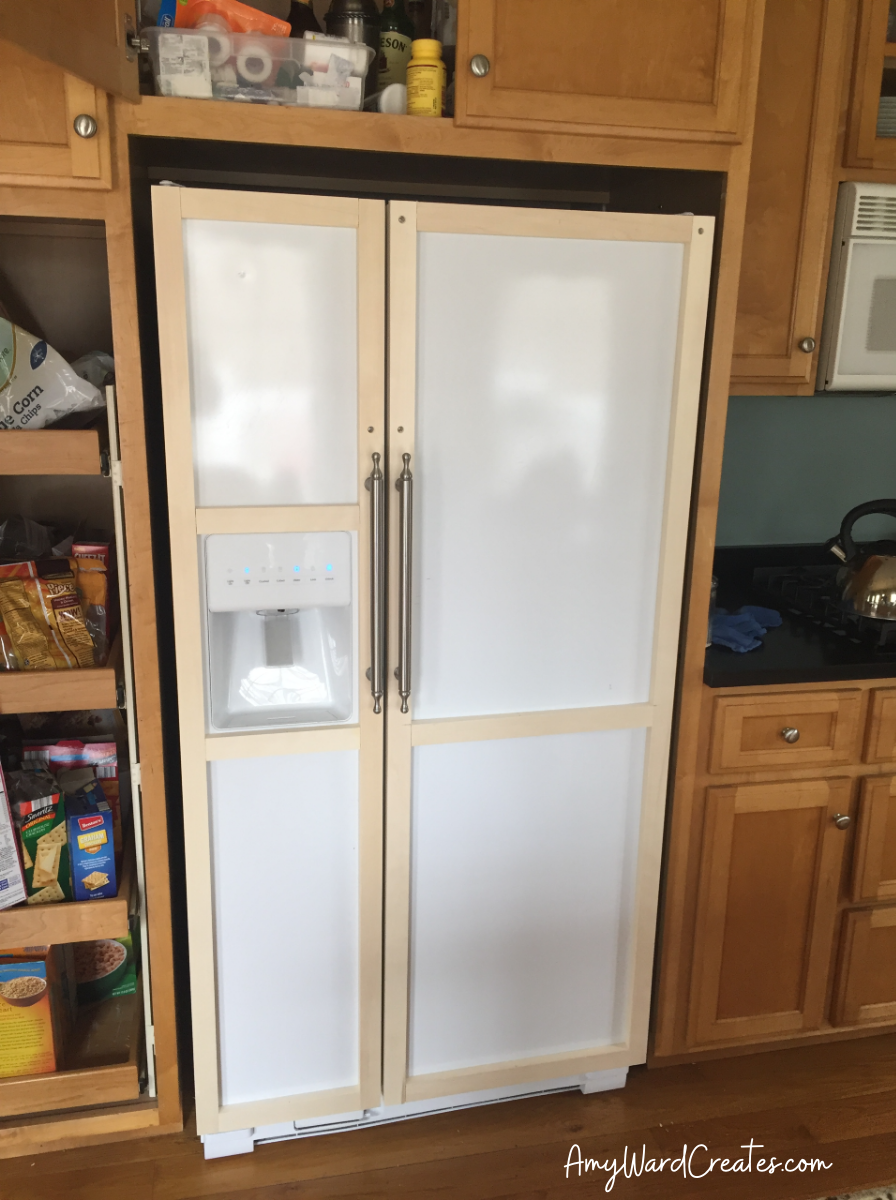
6. Install Custom Cabinet Doors (panel-ready Fridge)
Some fridges are “panel-ready,” meaning you can add custom cabinet doors to the front. This hides the fridge behind doors that match your cabinets.
Steps:
- Order a panel-ready fridge or check if your model allows door panels.
- Have cabinet doors made to match your kitchen.
- Attach panels to the fridge with hardware.
Pros:
- The most seamless, custom look.
- No visible appliance at all.
Cons:
- Only works with certain models.
- Cabinet panels can be expensive.
Non-obvious insight: Even if your fridge isn’t “panel-ready,” some creative DIYers have attached thin cabinet doors using strong magnets or adhesive strips (though this is not recommended by manufacturers).
7. Add Trim Kits
A trim kit is a set of metal or plastic strips that frame your fridge. These are especially popular for certain brands and help close gaps between the fridge and cabinets.
Steps:
- Buy a kit that fits your fridge model.
- Attach following instructions.
- Paint or finish the trim to match your kitchen.
Pros:
- Quick and easy.
- No carpentry needed.
Cons:
- Only hides gaps, not sides.
- Can look less custom if not matched well.
Pro tip: For a more subtle look, paint the trim the same color as your cabinets.
8. Paint Or Wallpaper The Sides
If your fridge sides are exposed, you can paint or wallpaper them to blend with your cabinets or walls.
Steps:
- Clean and lightly sand the fridge surface.
- Use appliance paint (for metal) or peel-and-stick wallpaper.
- Match the color to your cabinets or wall.
Pros:
- Inexpensive.
- Easy weekend project.
Cons:
- Not as durable as panels.
- Needs touch-ups over time.
Non-obvious idea: Use chalkboard paint for a side panel—kids can draw, or you can write grocery lists.
9. Use Floating Shelves Or Open Storage
Install floating shelves or open storage next to or above the fridge to fill empty space and draw attention away from the appliance.
Steps:
- Measure for shelves that fit between the fridge and wall or ceiling.
- Install using strong anchors.
- Style with plants, baskets, or cookbooks.
Pros:
- Adds storage and style.
- Distracts from the fridge.
Cons:
- Not a true built-in, but softens the look.
- Needs regular styling.
Pro tip: Use deep baskets or bins to hide clutter and keep the look streamlined.
10. Move The Refrigerator To A Niche
If you’re remodeling, build a niche for your refrigerator. This is a framed space just large enough for your appliance, with walls or panels on both sides.
Steps:
- Plan the niche size with at least 1 inch of air space around the fridge.
- Frame with wood or metal studs.
- Finish with drywall or cabinetry.
Pros:
- Professional, permanent look.
- Can add outlets or lights above.
Cons:
- Major project—usually for full remodels.
- Hard to change fridge size later.
Practical insight: Plan for future fridge replacements—leave a little extra space in the niche in case you buy a bigger model later.
11. Use Mirrors Or Reflective Surfaces
Mirrors or glossy panels on the side of your fridge or surrounding walls can make the area feel larger and less noticeable.
Steps:
- Cut mirror or acrylic sheets to fit.
- Attach to the wall or side panels with adhesive.
- Wipe clean regularly.
Pros:
- Visually expands small kitchens.
- Adds a modern touch.
Cons:
- Shows fingerprints easily.
- Needs careful installation.
12. Incorporate Appliances Nearby
Placing other appliances (like a wall oven or microwave) next to your fridge can help it blend in, especially if all appliances have matching finishes.
Steps:
- Align appliances in a row.
- Use matching trim or cabinetry around them.
- Add panels as needed.
Pros:
- Creates an “appliance wall.”
- Looks custom and expensive.
Cons:
- Requires more planning and space.
- Can look crowded if not done carefully.
Real-world tip: Stainless steel and black finishes are easiest to match between brands.
13. Hide The Refrigerator With A Sliding Door
A sliding barn door or pocket door can completely hide the fridge when not in use.
Steps:
- Install a track above the fridge opening.
- Hang a door panel matching your cabinets or wall.
- Slide open to access the fridge.
Pros:
- Completely hides the appliance.
- Adds a unique design element.
Cons:
- Needs space for the door to slide.
- Can block access to cabinets when open.
Non-obvious insight: Use frosted glass for the door to let in light but keep the fridge hidden.
14. Use Tall Pantry Cabinets On Both Sides
Tall pantry cabinets on each side of the fridge create a “built-in” alcove.
Steps:
- Buy or build pantry cabinets the same depth as your base cabinets.
- Place one on each side of the fridge.
- Fill any gaps with trim.
Pros:
- Lots of extra storage.
- Frames the fridge for a custom look.
Cons:
- Uses up wall space.
- May require adjusting upper cabinets.
Practical tip: Choose adjustable shelves in pantry cabinets for maximum flexibility.
15. Add Cabinet Hardware To The Fridge
If you can’t add panels, add cabinet-style handles to your fridge doors for a more integrated look.
Steps:
- Choose handles that match your cabinet pulls.
- Attach to the fridge with strong adhesive or screws (check your fridge’s manual).
Pros:
- Quick update.
- Ties the fridge visually to cabinets.
Cons:
- Only changes the look, not the shape or position.
- May void the fridge’s warranty.
Design Tips For A Seamless Look
Getting the built-in look is about more than just panels and trim. Small details make a big difference.
- Match cabinet style: If your cabinets have shaker doors, choose panels and trim in the same style.
- Color matters: Match paint or stain exactly, or use a contrasting color for a modern twist.
- Keep lines clean: Use flat panels and hidden hinges for a minimalist style.
- Lighting: Add LED strip lights above or beside the fridge to brighten dark corners.
- Avoid overcrowding: Leave enough space for air flow and door swing.
Common Mistakes To Avoid
- Blocking vents: Always leave space for air flow behind and above your fridge.
- Using panels that are too thick: This can block fridge doors or make it hard to open drawers.
- Not measuring carefully: Gaps or a too-tight fit can look sloppy or damage your fridge.
- Choosing materials that can’t handle moisture: Kitchens get humid—choose water-resistant panels and finishes.
- Forgetting future upgrades: Leave space in case you buy a larger fridge later.
Tools And Materials Needed
Depending on your method, you may need:
- Tape measure
- Level
- Stud finder
- Drill and screws
- Wood panels or MDF
- Paint or stain
- Trim molding
- Shelf brackets
- Cabinet handles
- Caulk or wood filler
- Appliance paint or peel-and-stick wallpaper
Cost estimate: Simple trim and paint can cost under $100. Full enclosures or custom cabinetry can cost $500–$2000, depending on materials and size.
Diy Or Hire A Pro?
Many built-in fridge projects are good for confident DIYers. If you’re comfortable with basic tools, you can install side panels, trim, or paint. For full enclosures, cabinetry, or electrical work, consider hiring a carpenter or contractor.
When to DIY:
- Adding trim, paint, or filler strips
- Installing open shelves
When to hire a pro:
- Building full enclosures or niches
- Installing custom cabinets
- Moving electrical outlets
Pro tip: Get at least two quotes if hiring a pro. Check reviews, ask for photos of past work, and confirm they understand your vision.
Sample Project: Diy Fridge Enclosure
Here’s a step-by-step example of making a basic fridge enclosure.
Materials
- Two 3/4-inch MDF panels (height of your fridge + 2 inches)
- One 3/4-inch MDF top panel (width of fridge + 2 inches)
- Paint or primer
- Screws, L-brackets, wood glue
- Trim molding
Steps
- Measure the space for the enclosure, leaving at least 1 inch around the fridge for air flow.
- Cut panels to size.
- Paint or finish panels to match your cabinets. Let dry.
- Attach side panels to the wall using L-brackets at the top, middle, and bottom.
- Install the top panel between the two sides, securing with wood glue and screws.
- Add trim molding where panels meet the cabinets or wall for a seamless look.
- Slide the fridge in. Check that doors open fully.
Practical Insights
- Use a level to make sure panels are straight.
- If the floor is uneven, shim under the panels for stability.
- Add felt pads where the fridge touches panels to reduce noise.

Credit: refrigeratortrimkits.com
Built-in Look: Before And After
The difference a built-in look can make is dramatic. Kitchens look more organized, with every element working together. Even a basic fridge feels upscale when framed with panels and trim.
Example: A 1990s kitchen with an old white fridge looked outdated. After adding gray-painted side panels, a matching cabinet above, and stainless steel handles, the fridge blended with new cabinets—and the kitchen felt 10 years newer.
How Much Does It Cost?
The price varies widely based on materials and method. Here’s a quick comparison:
| Method | DIY Cost | Pro Cost |
|---|---|---|
| Side Panels and Trim | $100–$300 | $400–$800 |
| Full Cabinet Enclosure | $400–$900 | $1,000–$2,500 |
| Counter-Depth Fridge | $1,200–$3,000 | Same |
| Panel-Ready Fridge | $2,500–$8,000 | Same |
Non-obvious insight: Sometimes, a few hundred dollars spent on panels and paint can give you 90% of the built-in look at 10% of the price.
Credit: amywardcreates.com
Real-world Examples
Many homeowners have shared their built-in fridge transformations online. For example, a family in Seattle used IKEA kitchen panels and trim to frame their standard fridge for just $250. Another homeowner in Texas built a custom enclosure with open shelves above—total cost under $500.
For inspiration, check out kitchen design forums or visit Houzz Magazine for real-world photos.
Frequently Asked Questions
What If My Fridge Is Much Deeper Than My Cabinets?
You can still achieve a built-in look by using side panels and a cabinet above the fridge. The front of the fridge will stick out, but the panels hide the sides and make the appliance look more integrated. For a truly flush look, consider a counter-depth fridge in the future.
Do I Need To Leave Space Around My Fridge For Ventilation?
Yes, always check your fridge’s manual. Most require at least 1 inch of space on the sides and top for air flow. Blocking vents can cause the fridge to overheat and shorten its life.
Can I Add Cabinet Panels To Any Fridge?
No, only “panel-ready” fridges are designed for custom cabinet doors. Attaching panels to other fridges can damage the doors or void the warranty. If you want this look, consider buying a panel-ready model.
Is It Hard To Remove A Built-in Enclosure If I Need To Replace The Fridge?
If you build with removable panels and screw them into place (not glue), you can easily remove them for maintenance or replacement. Always plan for future access when designing your enclosure.
Will Making My Fridge Look Built-in Increase My Home’s Value?
Yes, a built-in look is a selling point for many buyers. It makes your kitchen look more expensive and custom, which can add appeal and value when it’s time to sell.
Creating a built-in look for your refrigerator is one of the best ways to upgrade your kitchen without a full remodel. With the right panels, trim, and a little creativity, you’ll enjoy a seamless, stylish space every day.
Credit: erinzubotdesign.com