
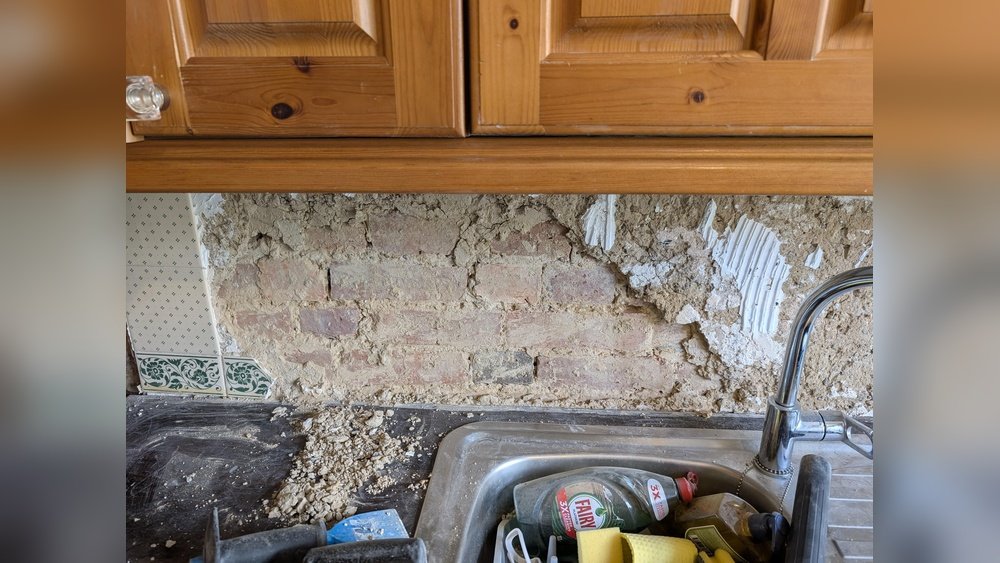
Tiles coming away from the kitchen wall can be frustrating and even dangerous. A loose tile may fall, causing injury or damaging your countertop and appliances. More importantly, it usually means there’s an underlying problem—maybe with the adhesive, the wall, or moisture.
If you notice tiles peeling or dropping, don’t ignore it. Fixing them quickly not only restores your kitchen’s look but also prevents bigger repair costs in the future.
Many homeowners face this issue, but not everyone knows the right steps to fix it. Some try to glue the tile back with whatever is on hand, only to see it fall again. Others worry it’s a sign of a deeper problem, like water damage or a shifting wall. The good news: with the right tools, materials, and a careful approach, you can often fix tiles coming away from your kitchen wall yourself, saving money and gaining skills. In this detailed guide, you’ll learn how to diagnose the cause, remove loose tiles safely, prepare the wall, re-attach tiles properly, and prevent the problem from returning.
Why Tiles Come Away From Kitchen Walls
Understanding why tiles detach helps you fix the problem at its source, not just on the surface. There are several common reasons:
Poor Adhesive Or Application
Often, the wrong type of tile adhesive was used, or it was applied too thinly. Tile adhesive should be suitable for the wall material (drywall, cement board, plaster, etc.) and the kitchen environment, which sees regular moisture and temperature changes.
Moisture And Water Damage
Kitchens are humid spaces. Water from cooking or cleaning can seep behind tiles, especially if grout lines are cracked or missing. Over time, moisture weakens the adhesive, causing tiles to fall.
Structural Movement
If your kitchen wall shifts due to settling, vibration, or building movement, tiles can come loose. This is common in older homes or where kitchen walls have been recently remodeled.
Incorrect Surface Preparation
Tiles need a clean, dust-free, and stable surface. If the wall was dirty, oily, or painted with glossy paint, the adhesive may not bond well.
Heavy Impact
Sometimes, a tile comes away because something hit it—maybe a pot, pan, or chair. Even a small impact can break the bond if the adhesive is already weak.
Not-so-obvious Insight 1
Even invisible hairline cracks in the wall can collect moisture, weakening the area behind the tiles long before you see any sign of damage.
Not-so-obvious Insight 2
If only a few tiles are loose but most are solid, you might have a localized problem (like a small water leak). If many tiles are coming away, suspect a bigger issue with adhesive or wall movement.
Assessing The Damage
Before you start repairs, you need to know how bad the problem is. This step prevents wasted effort and helps you decide if you can handle it yourself or need a professional.
Inspect All Tiles
Tap tiles gently with a wooden stick or the handle of a screwdriver. Hollow sounds mean the tile is not properly stuck. Check for cracks, wobbles, or gaps.
Check Grout And Caulk Lines
Loose, missing, or cracked grout lets water in. If grout is failing, tiles will soon follow.
Look For Signs Of Moisture
Stains, mold, or a musty smell behind or around tiles often means water is getting in. Use a moisture meter if you have one.
Examine The Wall Surface
Is the wall beneath crumbling, soft, or moldy? You may need to repair the wall itself, not just re-attach tiles.
When To Call A Professional
- If you find black mold or large areas of water damage, get expert help.
- If your wall is bulging or crumbling, it may be unsafe to repair yourself.
Credit: www.edwardmartin.com
Tools And Materials You’ll Need
Having the right tools and materials makes the job safer, faster, and ensures a better result.
| Tool/Material | Purpose | Notes |
|---|---|---|
| Hammer & Chisel | Remove loose tiles and old adhesive | Use with care to avoid damaging tiles |
| Putty Knife or Scraper | Clean wall and tile backs | Essential for good adhesion |
| Adhesive (Thinset or Mastic) | Attach tiles to wall | Choose type for your wall |
| Grout | Fill gaps between tiles | Match existing color |
| Grout Float | Apply grout | Rubber type is best |
| Sponge & Bucket | Clean tiles and grout | Use clean water |
| Level | Ensure tiles are straight | Small level is fine for kitchen walls |
| Tile Spacers | Keep even gaps | Optional for small repairs |
| Protective Gloves & Goggles | Safety | Important when chipping tiles |
Some repairs need extra materials, like mold-resistant primer or wall patch if you find moisture or damaged drywall.
Preparing The Area For Repair
A successful tile repair starts with good preparation.
Clear The Countertop
Move appliances, utensils, and food away from the area. Cover counters with a drop cloth or old sheet to catch dust and debris.
Remove Loose Or Damaged Tiles
Use a hammer and chisel to gently pry off loose tiles. Work slowly—if you plan to reuse tiles, try not to crack them. Remove any tiles that sound hollow or feel unstable, even if they’re not visibly loose yet.
Clean Off Old Adhesive
Scrape the wall and tile backs with a putty knife. Remove all old adhesive and grout. Tiles and wall must be smooth and free of dust for the new adhesive to bond.
Dry Out The Area
If you found moisture, let the wall dry completely. Use a fan or dehumidifier if necessary. Never re-attach tiles to a damp wall.
Repair The Wall If Needed
If you find crumbling drywall or plaster, patch it with new material. For mold, clean with a bleach solution (1 part bleach to 10 parts water), rinse, and let dry. Apply a mold-resistant primer if you had moisture issues.
Choosing The Right Tile Adhesive
Not all adhesives are the same. Picking the right one is critical, or you’ll face the same problem again soon.
| Type | Best For | Pros | Cons |
|---|---|---|---|
| Thinset Mortar | Cement board, drywall, wet areas | Strong, water-resistant | Needs mixing, harder to clean |
| Pre-mixed Mastic | Dry walls, small tiles | Easy to use, no mixing | Not for wet areas |
| Epoxy Adhesive | High moisture, heavy tiles | Very strong, waterproof | Expensive, tricky to use |
For most kitchen walls, thinset mortar or pre-mixed mastic work well. Use thinset if the area gets lots of moisture (like behind a sink). Mastic is fine for small repairs away from water.
Step-by-step Guide: Fixing Loose Kitchen Wall Tiles
Now you’re ready to repair. Follow these steps for a professional-looking result.
1. Test Fit The Tiles
Before applying adhesive, place the tiles dry on the wall to check the fit. Replace broken or badly chipped tiles. If you need replacements, take a sample to your tile store to match size, color, and texture.
2. Apply Adhesive
Use a notched trowel (size depends on tile size—usually 1/4″ notch for kitchen wall tiles) to spread adhesive on the wall. Hold the trowel at a 45-degree angle to create even ridges.
- Only cover as much area as you can tile in 15-20 minutes. Adhesive dries fast.
- For small repairs, it’s fine to spread adhesive on the back of the tile instead.
3. Press The Tile Into Place
Push the tile firmly into the adhesive, twisting it slightly to set. Use spacers if needed to keep even gaps. Check with a level to make sure tiles are straight.
4. Clean Excess Adhesive
Wipe away any adhesive that squeezes out from the sides with a damp sponge. Do this before it dries.
5. Let Adhesive Cure
Wait as long as the adhesive package says (usually 24 hours) before grouting. Don’t rush—tiles must not move while the adhesive sets.
6. Re-grout The Tiles
Mix grout according to the instructions. Use a grout float to press grout into the gaps. Hold the float at an angle, working diagonally across the tiles.
- Fill all gaps completely.
- Wipe off excess grout from the tile surface with a damp sponge before it dries.
- Let grout dry (check the packaging for time—usually a few hours).
- Buff haze from tiles with a clean, dry cloth.
7. Seal The Grout (optional But Recommended)
Grout is porous. Sealing helps stop stains and moisture. Wait for grout to cure (usually 2-3 days), then brush on grout sealer and wipe off the excess.
8. Clean Up
Remove all protective coverings and tools. Give the area a final clean with a damp cloth.
Not-so-obvious Insight 3
Don’t just patch the grout where you repaired—check nearby grout lines for cracks and fix those too. Small cracks let water behind the tiles and can cause repeat problems.
:strip_icc()/kitchen-blue-cabinets-white-subway-tile-DeW3BHNXqDI97ILhYwVCCH-cc9883aa24f14f3ab5a6f6ff4666ce72.jpg)
Credit: www.bhg.com
Preventing Tiles From Coming Away Again
A good repair should last for years. Here’s how to avoid loose tiles in the future:
- Use the right adhesive for your wall and tile type.
- Always prepare the wall well—clean, dry, and stable.
- Fix grout cracks or missing caulk as soon as you see them.
- Wipe spills and splashes quickly so water doesn’t seep behind tiles.
- If you see signs of leaks (under sinks, behind appliances), fix them at once.
Regular Maintenance Tips
- Clean tiles with a mild cleaner, not harsh chemicals that can weaken grout.
- Inspect grout and tiles every few months, especially in high-use areas.
- Apply grout sealer once a year for best moisture resistance.
Not-so-obvious Insight 4
Kitchen tiles near stoves and sinks face more steam, heat, and splashes. Check these areas more often, and use heat- and moisture-resistant adhesive when repairing here.
Common Mistakes To Avoid
Even experienced DIYers sometimes make these errors:
- Using the wrong adhesive. Mastic in wet areas or thinset on painted walls can both fail.
- Skipping wall preparation. Dust, grease, or old adhesive left on the wall ruins the bond.
- Not letting adhesive cure. If you grout or use the area too soon, tiles may slip or loosen.
- Patching only the tile, not the grout. This is a temporary fix. Water will still get in through cracks.
- Ignoring underlying moisture problems. If you don’t fix leaks or water sources, tiles will keep coming away no matter how carefully you repair.

Credit: www.edwardmartin.com
When To Replace The Whole Tiled Area
Sometimes, repairing a few tiles is not enough. Consider a full replacement if:
- More than 20% of the tiles are loose or sound hollow.
- The wall behind the tiles is soft, moldy, or crumbling.
- You see repeated problems, even after repairs.
A full replacement is more work and cost, but it lets you fix the wall, upgrade to better tiles, and use modern adhesives for a much longer-lasting result.
Cost And Time Estimates
Many homeowners want to know what to expect in terms of time and money.
| Repair Type | DIY Cost (USD) | Time Needed | Professional Cost (USD) |
|---|---|---|---|
| Single tile repair | $10 – $30 | 1-2 hours | $75 – $150 |
| 5-10 tiles | $30 – $80 | 2-4 hours | $200 – $400 |
| Full backsplash replacement | $100 – $300 | 1-2 days | $800 – $2,000 |
DIY is much cheaper, but only if you’re confident and the wall is in good shape.
Professional Vs Diy Tile Repair
Should you call a pro, or do it yourself? Here’s how the two compare:
DIY Repair
- Pros: Saves money, satisfaction of doing it yourself, can fix small issues quickly.
- Cons: Risk of mistakes, may not spot deeper problems, some jobs require special tools.
Professional Repair
- Pros: Faster, expert finish, can handle big or tricky repairs, spots hidden issues.
- Cons: More expensive, need to schedule and supervise.
When to DIY: For a few tiles, no sign of water damage, and you have the right tools.
When to Call a Pro: For large areas, mold, soft walls, or repeated problems.
Safety Considerations
Tile repair isn’t usually dangerous, but take these basic precautions:
- Wear safety goggles and gloves when removing tiles.
- Ventilate the area if using strong cleaners or adhesives.
- Be careful with sharp tools.
- Keep kids and pets away from the work area.
If you find black mold or suspect asbestos in old walls, do not proceed—call a professional.
Additional Resources
For more detailed guides on tile adhesives, wall repair, or mold treatment, visit:
Frequently Asked Questions
Why Do My Kitchen Wall Tiles Keep Coming Loose?
Repeated tile loosening is usually due to moisture, poor adhesive, or movement in the wall. Check for leaks, use the right adhesive, and make sure the wall is stable and clean before repairs.
Can I Glue A Tile Back Without Removing Old Adhesive?
No. For a strong bond, always remove old adhesive from both the wall and the tile back. New adhesive sticks best to clean, stable surfaces.
How Long Does Tile Adhesive Take To Dry?
Most tile adhesives need 24 hours to cure before you apply grout. Epoxy types may set faster, but always check the package instructions.
Do I Need To Seal Grout After Repairing Tiles?
It’s a good idea, especially in kitchens. Sealing grout protects against stains, moisture, and mold. Wait for grout to fully cure before sealing.
Is It Cheaper To Fix Tiles Myself?
Yes, DIY tile repair is much cheaper than hiring a professional, especially for small jobs. Just make sure you understand the process and have the right tools.
Taking the right steps to repair and prevent tiles coming away from your kitchen wall will save time, money, and stress. Good preparation, careful work, and regular maintenance are your best tools for a kitchen that looks great and lasts for years.