Connecting a Bosch dishwasher for the first time can feel challenging, especially if you’ve never installed an appliance before. The process has several steps, each important for safe and smooth operation. Whether you are upgrading your kitchen or replacing an old dishwasher, understanding each stage helps you avoid common problems and get the most out of your new machine. This guide explains every step in simple, clear English, helping you connect your Bosch dishwasher confidently—even if you’re not a technical expert.
Bosch dishwashers are known for their reliability, quiet operation, and advanced features. Proper installation is crucial to enjoy these benefits and avoid leaks, electrical issues, or poor cleaning results. This article walks you through preparing your kitchen, handling water and electrical connections, securing the dishwasher in place, and running your first test cycle.
Along the way, you’ll find tips, warnings, and real examples that most beginners miss.
If you want your Bosch dishwasher to work efficiently for years, every connection and adjustment matters. Let’s break down the process step by step.
Preparing For Installation
Before you begin, it’s important to gather the right tools, check your kitchen’s setup, and understand how your Bosch dishwasher will fit.
Choosing The Right Location
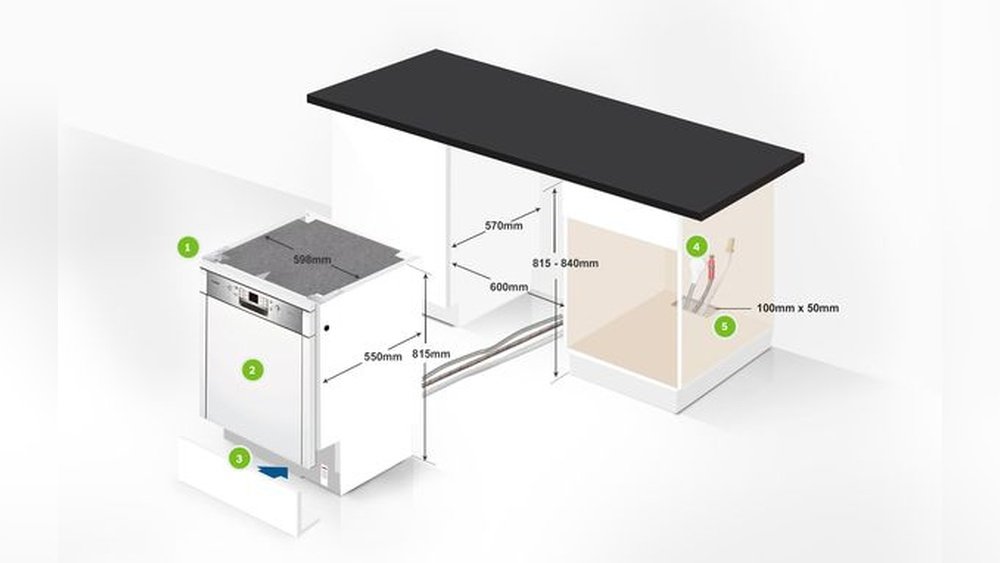
Most Bosch dishwashers are designed to fit under a standard kitchen countertop, with a width of 24 inches for full-size models and 18 inches for slimline versions. Measure the opening to ensure there is enough space. Leave at least 2 inches behind the unit for hoses and electrical cords.
Check for an existing water supply valve, a drain connection (usually under the sink), and a nearby electrical outlet or hardwired connection. The dishwasher should be within 4 feet of the sink for easy hose routing.
Tools And Materials Needed
Having the correct tools makes the installation smoother. You will need:
- Adjustable wrench
- Philips and flathead screwdrivers
- Drill with bits (if new holes are needed)
- Level
- Measuring tape
- Pliers
- Bucket and towels (for minor water spills)
- Teflon tape (for water connections)
- Power cord kit (if not included)
- Dishwasher installation kit (contains water line, drain hose, and fittings)
Some Bosch models require a 3/8″ compression fitting for the water connection, so check your user manual for specifics.
Checking Power And Plumbing
Bosch dishwashers use a standard 120V outlet or can be hardwired. Confirm your kitchen’s electrical setup matches the requirement. If your home uses a dedicated circuit for the dishwasher, you’re set. Otherwise, consult an electrician to avoid overloading circuits.
For water, you need a hot water supply (not cold), with water temperature between 120°F and 150°F. Cold water will result in poor cleaning and longer cycles.
Delivery Inspection
When your dishwasher arrives, inspect the box for damage. Open it and check for dents, cracks, or missing parts. If you spot any problems, contact the retailer before starting installation.
Removing The Old Dishwasher (if Replacing)
If you’re replacing an old dishwasher, removing it safely is key.
- Turn off the power at the circuit breaker and unplug the dishwasher.
- Shut off the water supply under the sink.
- Disconnect the drain hose from the sink’s garbage disposal or drain pipe.
- Remove the mounting brackets that hold the old dishwasher to the countertop or cabinets.
- Slide out the old unit carefully. Watch for water spills.
- Remove the old water supply line and electrical connections.
Keep a towel handy. Even with the water shut off, there may be some water left in the hoses.
Unpacking And Preparing Your Bosch Dishwasher
With the kitchen ready, it’s time to unpack your new Bosch dishwasher and prepare it for installation.
What’s In The Box?
Inside the box, you’ll find the dishwasher, a user manual, toe panel, mounting brackets, and sometimes a power cord or hose fittings. Check for all items before you begin.
Remove all packaging, foam blocks, and tape from the inside and outside of the machine. Look for any shipping bolts or brackets that need to be taken off before installation.
Adjusting The Height And Level
Bosch dishwashers have adjustable feet. Before sliding the unit into place, adjust the feet so the dishwasher is slightly lower than the countertop. This lets you level the machine once it’s in position.
If your floor is uneven, you’ll fine-tune the feet later.
Attaching Mounting Brackets
Mounting brackets secure the dishwasher to the countertop or side cabinets. Attach the brackets to the top or sides, depending on your kitchen design. Bosch dishwashers allow both options.
Use a screwdriver to secure the brackets. Do not overtighten—this can bend or break them.
Making The Water Connection
Connecting the water supply is one of the most important steps. A leak here can cause major kitchen damage, so pay attention to details.
Locating The Water Inlet
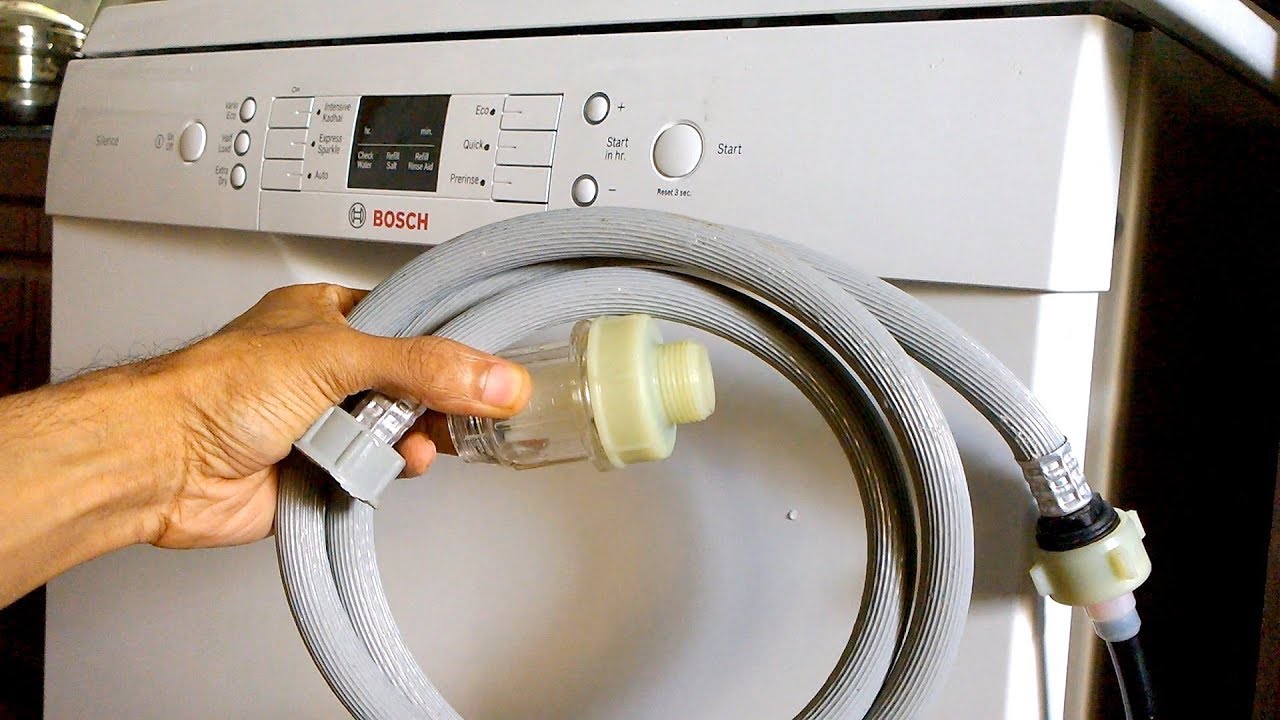
The water inlet is usually at the bottom left side at the back of the dishwasher. Your installation kit should include a 3/8″ compression fitting for the water line.
Steps For Connecting
- Wrap Teflon tape around the threads of the water inlet to prevent leaks.
- Attach the water supply line (usually a braided stainless-steel hose) to the dishwasher inlet and tighten with an adjustable wrench. Do not overtighten.
- Connect the other end of the hose to the shutoff valve under the sink.
- Turn on the water slowly and check for leaks at both ends.
If you see drips, turn off the water and tighten the connections gently.
Water Pressure And Quality
Bosch recommends water pressure between 15 and 145 psi. Low pressure means poor cleaning; high pressure can damage hoses. If you live in an area with hard water, consider using a water softener to prevent limescale buildup in your dishwasher.
Credit: www.youtube.com
Connecting The Drain Hose
The drain hose removes wastewater from the dishwasher. Proper installation prevents leaks and dirty water from flowing back into the machine.
Routing The Drain Hose
Bosch dishwashers come with a flexible drain hose, usually 6 feet long. Route the hose from the back of the dishwasher to the drain connection under your sink.
There are two common drain setups:
- Air gap (best practice): The hose connects to an air gap fitting mounted on the sink or countertop. This prevents backflow and meets code in many areas.
- High loop: If there’s no air gap, loop the drain hose up under the countertop before connecting to the drain or garbage disposal. This also prevents backflow.
Connecting To The Drain Or Disposal
Connect the end of the hose to the drain inlet or garbage disposal. Secure it with a hose clamp to prevent leaks.
Common mistake: Forgetting to remove the plug in the garbage disposal drain inlet. If you’re connecting to a new disposal, use a screwdriver to knock out the plastic plug inside the inlet.
Drain Height And Length
The drain hose should be at least 20 inches above the floor and not longer than 10 feet. If the hose is too low or too long, the dishwasher may not drain completely.
Making The Electrical Connection
Bosch dishwashers can be plugged in or hardwired. Check your local code and the model’s user manual.
Plug-in Connection
If your Bosch model comes with a power cord, plug it into a standard 120V grounded outlet. The outlet should be in the cabinet next to the dishwasher, not behind it (to avoid crushing the cord).
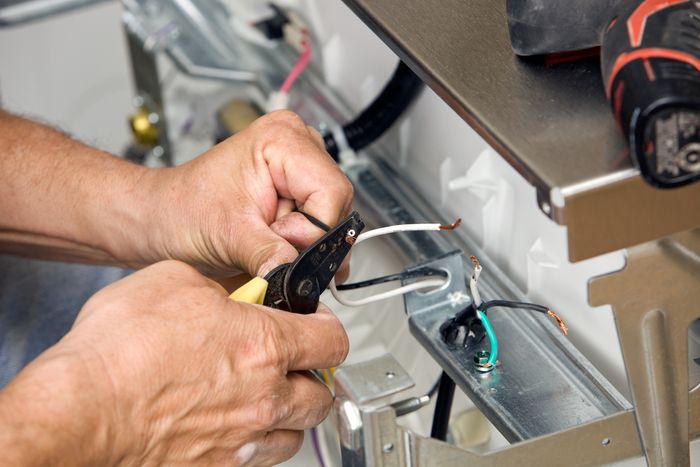
Hardwiring
If your home uses a hardwired connection:
- Turn off power at the breaker.
- Remove the dishwasher’s electrical box cover (usually at the bottom front).
- Connect the wires: Black to black (hot), white to white (neutral), green or bare to ground.
- Use wire nuts and electrical tape for safety.
- Replace the cover and restore power.
Warning: If you’re not sure about electrical work, hire a qualified electrician. Incorrect wiring can cause fire or shock.
Gfci And Afci
Modern building codes often require a GFCI (ground-fault circuit interrupter) or AFCI (arc-fault circuit interrupter) outlet for dishwashers. These add protection against shocks and electrical fires.
Sliding And Securing The Dishwasher
With hoses and wires connected, you’re ready to move the dishwasher into place.
Sliding Into Position
Slowly slide the dishwasher under the countertop. Guide the hoses and cords through the side of the cabinet. Go slowly to avoid kinking the hoses or pinching wires.
If the floor is uneven, use the adjustable feet to level the dishwasher front-to-back and side-to-side. A level machine is quieter and cleans better.
Securing With Mounting Brackets
Once the dishwasher is in position, use the mounting brackets installed earlier. Secure them to the countertop (for stone or granite, use side mounts to avoid cracking). Tighten screws just enough to hold the unit steady.
Reattaching The Toe Panel
The toe panel (or kick plate) covers the bottom of the dishwasher. Snap or screw it into place after all connections are finished.
Testing The Installation
Before running a full wash, check for leaks and electrical safety.
Leak Check
- Open the water supply valve and look under the sink and dishwasher for drips.
- Pay close attention to the water inlet and drain hose connections.
Running A Test Cycle
Turn on the power and select a short wash or rinse cycle. Listen for unusual noises (grinding, knocking) and watch for water leaks.
Check that the dishwasher fills with water, runs quietly, drains properly, and heats the water. If you see error codes or the cycle does not finish, consult the user manual for troubleshooting.
Common Problems And Fixes
- Dishwasher won’t start: Check power connection and door latch.
- Leaks: Tighten fittings or reposition hoses.
- Not draining: Check for clogs in the hose or disposal inlet.
Credit: www.universityelectric.com
Final Adjustments And Tips
Once your Bosch dishwasher passes the test, you’re almost done. A few finishing touches help your machine perform its best.
Leveling And Door Alignment
A level dishwasher prevents leaks and helps the door close properly. Adjust the feet as needed with a wrench. If the door looks crooked, check that the machine is not twisted inside the opening.
Insulation Blanket
Bosch dishwashers include an insulation blanket for sound reduction. Make sure it’s not bunched up or missing—this can make your dishwasher much noisier.
Registering Your Product
Register your Bosch dishwasher on the official Bosch website. This activates your warranty and makes support easier if you have problems later.
Reading The User Manual
Each Bosch model has unique features. Take a few minutes to read the manual for tips on detergent, cycle selection, and maintenance.
Table: Bosch Dishwasher Connection Overview
This summary shows the main steps and what to check at each stage.
| Step | What to Do | Common Issues |
|---|---|---|
| 1. Prepare Kitchen | Measure space, locate water/electrical | Space too small, wrong power outlet |
| 2. Water Connection | Attach supply line, check for leaks | Loose fitting, wrong hose size |
| 3. Drain Hose | Route and secure, test for leaks | Backflow, disposal plug not removed |
| 4. Electrical | Plug in or hardwire, test power | Improper wiring, no GFCI |
| 5. Secure & Test | Level, mount, run test cycle | Leaning dishwasher, leaks |
Special Cases: Common Kitchen Setups
Every kitchen is a bit different. Here’s how to handle some common situations:
Connecting To A Granite Or Stone Countertop
Stone can crack if you drive screws into it. Bosch includes side-mount brackets for these situations. Attach the brackets to the inside of the cabinet, not the countertop.
Older Homes Without Dedicated Outlets
If your kitchen lacks a nearby outlet, you may need a licensed electrician to add one. Never run an extension cord under the dishwasher—this is unsafe and can void your warranty.
Installing In An Island
If your dishwasher is in an island, you may need longer hoses and extra planning to route water and drain lines through the floor or cabinets. Keep all hoses accessible for future repairs.
Table: Power Connection Options
Compare the two main power connection types for Bosch dishwashers:
| Connection Type | Pros | Cons | Best For |
|---|---|---|---|
| Plug-In (Cord) | Easy, fast, can unplug for repair | Requires nearby outlet | Most kitchens, DIY installs |
| Hardwired | Clean look, no visible cord | More complex, may need electrician | Older homes, professional install |

Credit: www.youtube.com
Maintenance After Installation
A well-installed Bosch dishwasher is just the beginning. Regular maintenance keeps it running smoothly for years.
Cleaning The Filter
Bosch dishwashers use a fine-mesh filter system. Check and clean the filter every month to avoid clogs and odors.
- Twist out the filter at the bottom of the tub.
- Rinse under running water.
- Replace it carefully—never force it.
Descaling
If you have hard water, descale your dishwasher every 2-3 months. Use a dishwasher cleaner or citric acid product recommended by Bosch.
Inspecting Hoses
Every 6 months, check water and drain hoses for leaks, cracks, or kinks. Replace any damaged hoses immediately.
Keeping The Door Seal Clean
Wipe the door gasket with a damp cloth every month. Food or debris can cause leaks if the seal is not clean.
Table: Bosch Dishwasher Maintenance Schedule
A simple maintenance plan helps you remember what to do.
| Task | Frequency | Why Important |
|---|---|---|
| Clean Filter | Monthly | Prevents clogs, keeps water clean |
| Descale | Every 2-3 months | Stops limescale buildup |
| Check Hoses | Every 6 months | Prevent leaks, water damage |
| Clean Door Seal | Monthly | Prevents leaks, keeps seal soft |
Non-obvious Tips For First-time Installers
Many first-time installers miss a few key details that can cause trouble later.
- Leave slack in hoses: Don’t pull hoses tight behind the dishwasher. A little slack prevents stress and makes repairs easier.
- Don’t overtighten fittings: Hand-tight, plus a quarter turn with a wrench, is enough for most water connections.
- Test for leaks with a dry paper towel: Run a towel along all connections during the first cycle. Even a small drip will show up as a wet spot.
- Label shutoff valves: Mark which valve controls the dishwasher. If you need to shut it off quickly, you’ll know which one to use.
When To Call A Professional
DIY installation is possible for most people, but some situations require help:
- Electrical work beyond plugging in
- Plumbing changes (adding a new valve or drain)
- If your floor is uneven or cabinets are not standard size
- Noisy operation or persistent leaks after installation
Hiring a professional costs more up front but can prevent expensive damage later.
Environmental Considerations
Bosch dishwashers are energy efficient, but proper installation helps maximize savings. Use the shortest water line possible to reduce heat loss. Check for leaks regularly; even a small drip wastes water and energy.
If your old dishwasher is still working, consider donating it rather than sending it to a landfill. Many local charities accept gently used appliances.
Troubleshooting After Installation
If you run into problems, here’s how to solve the most common issues:
- Dishwasher does not fill: Check that the water valve is open and the float switch inside the tub is not blocked.
- Water won’t drain: Inspect the drain hose for kinks or clogs.
- Strange odors: Clean the filter and run a cycle with dishwasher cleaner.
- Error codes: Most Bosch dishwashers have a display that shows error codes. Consult the user manual or the Bosch website for solutions.
Advanced Features Worth Connecting
Some Bosch models have advanced features that require special setup.
Home Connect (wi-fi)
Many modern Bosch dishwashers support Home Connect, allowing control via smartphone. To set this up:
- Download the Home Connect app.
- Connect your phone to the dishwasher using the instructions in the app.
- Link your dishwasher to your home Wi-Fi.
This lets you start, stop, and monitor cycles remotely.
Third Rack And Adjustable Tines
If your model has a third rack or adjustable tines, follow the manual to set them up for your dishes. This improves cleaning and loading flexibility.
Water Softener Setup
Some Bosch models have a built-in water softener. Adjust the setting based on your local water hardness (test strips are included). Add dishwasher salt if required.
Additional Resources
For more detailed installation diagrams or model-specific instructions, visit the official Bosch Home Appliances website. You’ll find manuals, videos, and customer support.
Frequently Asked Questions
How Long Does It Take To Install A Bosch Dishwasher?
Most installations take 2 to 3 hours if you have the right tools and connections. If you need to add a new outlet or water valve, it may take longer.
Can I Install A Bosch Dishwasher Myself, Or Do I Need A Plumber?
Many people can install a Bosch dishwasher themselves if basic connections are in place. If you’re adding plumbing or are unsure about electrical work, hiring a professional is safest.
Why Is My Bosch Dishwasher Not Draining After Installation?
Common causes are a kinked or clogged drain hose, or forgetting to remove the plug in a new garbage disposal. Check both before calling for service.
Do Bosch Dishwashers Need A Hot Or Cold Water Connection?
Bosch dishwashers require a hot water connection for best cleaning and to keep cycles short. Connecting to cold water will reduce cleaning quality.
What Should I Do If My Dishwasher Leaks After Installation?
First, turn off the water supply. Then check all hose connections for tightness and look for cracks or damage. If you can’t find the cause, contact Bosch support or a licensed plumber.
Connecting a Bosch dishwasher is a detailed process, but with patience and attention to each step, you’ll have a quiet, efficient machine that makes your kitchen life much easier. Take your time, check every connection, and enjoy the results—clean dishes with every cycle.