
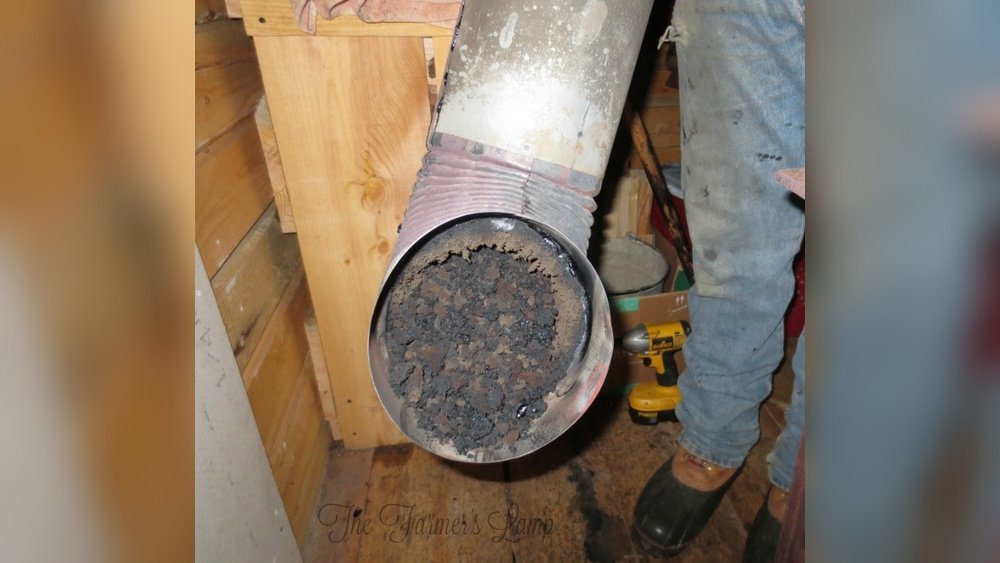
Keeping a wood stove clean is not just about looks. It’s a critical step for safety, efficiency, and the life of your stove. One of the biggest challenges for wood stove owners is creosote. This sticky, flammable substance builds up in your stove and chimney every time you burn wood. If left alone, creosote can block airflow, reduce heating power, and even start dangerous chimney fires. Many people think cleaning creosote is a job only for professionals, but with the right knowledge and tools, you can do it yourself—and save money.
This guide gives you a full roadmap to cleaning creosote from your wood stove. You’ll learn what creosote is, why it forms, how to spot it, and the safest, most effective ways to get rid of it. We’ll cover step-by-step cleaning, the best tools and products, and share practical tips most beginners miss.
By the end, you’ll know how to keep your wood stove working safely and efficiently all winter long.
Understanding Creosote
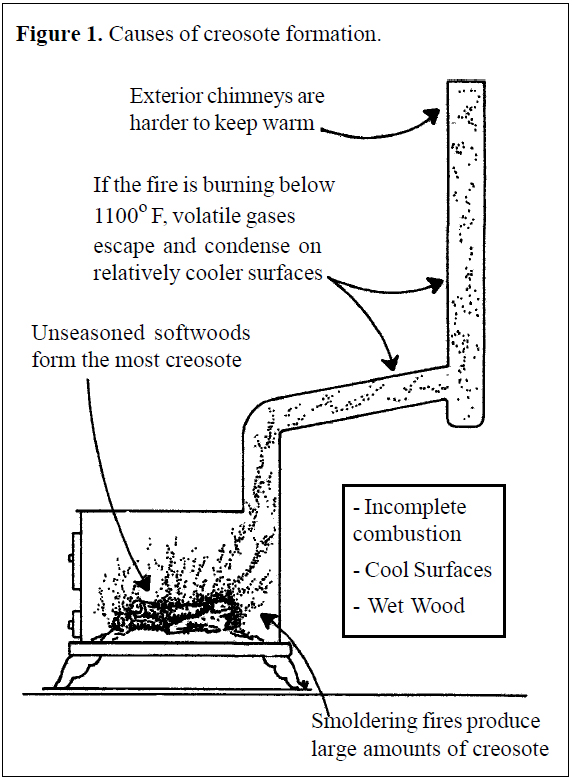
Creosote forms when wood doesn’t burn completely. When smoke goes up the chimney, it cools and leaves behind tar-like residue. This residue sticks to the inside of your stove, stovepipe, and chimney. The cooler your fire, the more creosote forms.
Burning wet wood, closing the air vents too much, or letting the fire smolder all increase creosote buildup.
There are three main stages of creosote:
- Stage 1 (Soot): Soft, flaky, easy to brush away.
- Stage 2 (Tar): Crunchy or sticky, harder to clean, often black and shiny.
- Stage 3 (Glazed): Hard, shiny, and glass-like. Very stubborn and dangerous. Needs strong chemical cleaners or professional help.
Important: Even a thin layer of creosote can catch fire at 451°F (233°C). Chimney fires can reach over 2,000°F, enough to crack bricks and melt metal.
Why Regular Cleaning Matters
Cleaning your wood stove and chimney does more than prevent fire. It also:
- Improves heating efficiency: Clean stoves burn hotter and use less wood.
- Reduces smoke and odors: Less creosote means cleaner air in your home.
- Extends stove life: Creosote is acidic and can eat away at metal and mortar.
- Saves money: Fewer repairs and less wood needed.
According to the National Fire Protection Association, dirty chimneys cause nearly 25% of home heating fires in the US each year. Most could be prevented with regular cleaning.
Signs Of Creosote Buildup
Don’t wait for a problem to show up. Check for these warning signs:
- Thick, dark residue inside stove, pipe, or chimney
- Strong, smoky smell even when the stove is cold
- Hard, shiny coating on the flue or glass
- Poor draft (fire is slow to start or smoke backs up)
- Visible smoke coming out of the chimney
If you see any of these, it’s time to clean.
Tools And Products For Creosote Removal
Having the right tools makes creosote cleaning safer and easier. Here’s what you’ll need:
- Chimney brush: Choose a size and shape that fits your stovepipe or chimney—either round or square.
- Extension rods: These connect to the brush for reaching deep inside.
- Drop cloths or old sheets: Protects your floor and furniture from soot.
- Dust mask and goggles: Creosote is messy and can irritate your lungs and eyes.
- Stiff wire brush: For scrubbing inside the stove.
- Metal bucket: To collect debris.
- Vacuum (HEPA filter): Optional, but great for fine ash and dust.
- Work gloves: Protects your hands from sharp edges and chemicals.
- Creosote remover (chemical powder or spray): Helps break down stubborn deposits.
- Flashlight: To inspect hard-to-see areas.
| Tool | Main Use | Essential? |
|---|---|---|
| Chimney brush & rods | Scrubbing pipe/chimney walls | Yes |
| Wire brush | Scrubbing firebox & doors | Yes |
| HEPA vacuum | Cleaning fine ash | No (but helpful) |
| Creosote remover | Breaking down hard deposits | Yes for heavy buildup |
Pro tip: Do not use a regular household vacuum. Creosote dust is very fine and can clog or damage the machine.
Credit: cookstoves.net
Preparing To Clean: Safety First
Before you start, make sure your stove and chimney are completely cool. Wear old clothes, gloves, a dust mask, and goggles. Open a window for fresh air, and cover nearby furniture or carpets with cloths.
Clear out all ashes and wood from the stove. Place a metal bucket nearby for waste. Make sure pets and children stay out of the room.
Never clean a hot stove—creosote dust can flare up, and metal parts can burn your skin.
Step-by-step: How To Clean Creosote From Your Wood Stove
1. Inspect The Stove And Chimney
Use a flashlight to check inside your stove, stovepipe, and chimney. Look for black, shiny, or thick deposits. If you see more than 1/8 inch (3 mm) of buildup, a thorough cleaning is needed. Check for loose or cracked parts too.
Non-obvious tip: Take photos before you start. They help you track changes and spot new problems later.
2. Remove Stove Parts
Take out the fire grate, baffle, and any removable bricks or plates. Set them aside on a protected surface. These parts often collect the most creosote.
3. Clean The Firebox
Scrape loose creosote and ash from the firebox walls and floor using a stiff wire brush. Collect debris in your metal bucket. For thick, sticky spots, apply creosote remover powder or spray as directed. Let it sit to break down the tar.
Beginner mistake: Scrubbing too hard can damage firebricks. Go gently on softer surfaces.
4. Brush The Stovepipe
Attach your chimney brush to the first extension rod. Start from inside the house if possible. Run the brush up and down the stovepipe to loosen creosote. Add rods to reach the full length. If you can access the chimney from above, you can also brush from the roof down.
Many prefer the “bottom-up” method for safety. Soot will fall into the stove, not your living room.
5. Remove Loose Debris
Sweep up all fallen soot and creosote. Use a HEPA vacuum to collect fine dust from corners. Be thorough—leftover bits can catch fire later.
6. Clean Stove Parts
Scrub removed parts (grate, baffle, bricks) with a wire brush. For stubborn spots, soak with creosote remover and rinse well. Dry all parts fully before reassembling.
7. Wipe Glass And Door Gaskets
Use a soft cloth and stove glass cleaner to clear any haze from the door. Avoid harsh chemicals that can scratch. Check the door gasket for wear—replace it if it’s brittle or broken.
8. Inspect And Reassemble
Once everything is clean and dry, carefully put the stove back together. Make sure all parts fit tightly. Test that the door seals well.
9. Final Safety Check
Look for leftover soot around the stove, pipe joints, and chimney base. Make sure the area is clean, and vents are clear. Dispose of all waste outside in a metal container.
Pro tip: Wait at least 30 minutes after cleaning before lighting a new fire, to allow any dust to settle.

Credit: www.iamcountryside.com
Dealing With Heavy Or Glazed Creosote
If you find glazed creosote (hard, shiny, almost glass-like), normal brushes won’t work. Here’s what to do:
- Apply a commercial creosote remover (follow product directions). These chemicals turn glazed creosote into a flaky, brushable form.
- Let the remover sit for the recommended time, often 24–48 hours.
- Brush and vacuum the area again.
- Repeat if needed.
Never use sharp tools or metal scrapers on glazed creosote. They can damage the chimney and stove. In severe cases, call a certified chimney sweep.
Non-obvious insight: Glazed creosote often forms when you burn wet wood or let fires smolder overnight. Fixing these habits will reduce future buildup.
How Often Should You Clean?
The best cleaning schedule depends on how often you use your stove and the type of wood burned.
- Light use (weekends only): Once a year
- Moderate use (daily in winter): Twice a year
- Heavy use (all day, every day): Every 2–3 months
Inspect your stove and chimney every month during the burning season. Clean whenever creosote is more than 1/8 inch thick.
Wood Choices And Burning Habits That Reduce Creosote
Choosing the right wood and burning wisely makes cleaning easier. Here’s how:
- Burn seasoned wood—dry for at least 6–12 months, moisture content below 20%. Wet wood makes more creosote.
- Hardwoods like oak, maple, and hickory burn hotter and cleaner than softwoods (pine, fir).
- Keep fires hot. Don’t close air vents too much.
- Avoid burning trash, cardboard, or painted wood. These produce sticky, toxic creosote.
- Use smaller, more frequent loads instead of big, slow-burning fires.
| Wood Type | Heat Output (BTU/cord) | Creosote Risk |
|---|---|---|
| Oak (seasoned) | 24 million | Low |
| Pine (green) | 15 million | High |
| Maple (seasoned) | 20 million | Low |
| Fir (unseasoned) | 17 million | High |
Extra tip: Buy a wood moisture meter (affordable online). This tool helps you check if your wood is dry enough for burning.
Common Mistakes To Avoid
Even experienced owners make errors when cleaning creosote. Watch out for these pitfalls:
- Ignoring the stovepipe: Many clean the firebox but forget the connecting pipe, where creosote often collects.
- Using wet cleaning methods: Water can mix with ash and creosote to make a sticky mess.
- Forgetting the chimney cap: Creosote can block the cap, causing poor draft and more buildup inside.
- Not wearing protection: Creosote dust is toxic and can irritate skin and lungs.
- Reusing old gaskets: Worn door gaskets let smoke leak and reduce stove efficiency.
When To Call A Professional
Sometimes, DIY cleaning isn’t enough. Call a certified chimney sweep if:
- You see thick, hard, or glazed creosote you can’t remove
- The chimney is blocked or draft is very poor
- You find cracked or damaged parts during cleaning
- You smell strong, persistent smoke
- You haven’t cleaned in over a year
Professionals have special tools and cameras to check for hidden problems. Many offer a full inspection and cleaning for $150–$300, depending on location and chimney size.
Storing And Disposing Of Creosote Waste
Creosote is flammable, even after removal. Always:
- Store waste in a metal container with a tight lid
- Keep the container outside, away from buildings or combustibles
- Never mix with regular trash or compost
Wait at least 24 hours before final disposal. Some areas treat creosote as hazardous waste—check your local rules.
Maintaining A Clean Stove Year-round
Regular cleaning and good habits keep your stove safe and efficient:
- Check the firebox and stovepipe monthly during use
- Burn only dry, seasoned wood
- Run the stove hot (500–700°F for most models)
- Clean the glass and door gasket every few weeks
- Have a pro inspect and clean your chimney yearly, even if you do some cleaning yourself
Extra insight: Keep a simple logbook. Record each cleaning, repairs, and any problems. This helps you spot patterns and prove maintenance if you ever sell your home.
Products That Help Reduce Creosote Buildup
Several products can make your cleaning job easier. These include:
- Creosote sweeping logs: These are burned in your stove. Chemicals in the log help dry out creosote, making it easier to brush away later. Not a full substitute for brushing, but a good supplement.
- Chimney cleaning powders: Sprinkle on hot coals during a fire. They help loosen sticky creosote.
- Magnetic thermometers: Attach to your stovepipe to monitor temperature. Keeping the fire in the “safe” zone reduces creosote.
Note: Always use products approved for your stove type. Read the manual and follow safety instructions.
Comparing Diy Vs. Professional Creosote Cleaning
If you’re unsure whether to clean yourself or hire a pro, here’s a quick side-by-side look:
| Factor | DIY Cleaning | Professional Cleaning |
|---|---|---|
| Cost | Low ($20–$100 for tools) | High ($150–$300 per visit) |
| Safety | Good with proper gear | Very high (trained & insured) |
| Time | 2–4 hours | 1–2 hours |
| Effectiveness | Good for mild/moderate buildup | Excellent (all stages) |
| Inspection | Basic (visual only) | Detailed (cameras, repairs) |
DIY cleaning works well for light to moderate creosote if you follow the right steps. For heavy, glazed, or hard-to-reach buildup, a professional is the best choice.
Extra Tips Most People Miss
- Always check the chimney cap after storms—debris can block airflow and increase creosote.
- Keep records: A cleaning log can help with insurance claims or home sales.
- Replace old stovepipe joints: Loose joints leak smoke and draw, adding to creosote problems.
- Monitor draft: If you notice more smoke or harder starts, it’s usually a sign of creosote.
Credit: www.reddit.com
Trusted Resources For Further Reading
If you want to go deeper, the Chimney Safety Institute of America offers detailed guides and safety updates. Visit their site at CSIA for more.
Frequently Asked Questions
How Do I Know If Creosote Is Dangerous?
Creosote is always a fire risk, but especially when it’s thick, hard, or shiny (glazed). Even a thin layer can ignite. If you notice strong odors, visible buildup, or strange sounds when burning wood, it’s time to clean.
Can I Burn Something To Clean Out Creosote?
Creosote sweeping logs and cleaning powders can help reduce buildup, but they don’t replace brushing and manual cleaning. These products work best as part of regular maintenance, not as a standalone solution.
What Happens If I Never Clean My Wood Stove?
If left uncleaned, creosote will keep building up, blocking airflow and reducing heat. Eventually, it can cause chimney fires, smoke damage, carbon monoxide leaks, or even total chimney failure.
Is Creosote Harmful To Breathe?
Yes. Creosote dust contains chemicals that can irritate your lungs, eyes, and skin. Always wear a mask and gloves when cleaning, and keep the area well ventilated.
How Can I Prevent Creosote From Coming Back Quickly?
Burn only dry, seasoned hardwood, keep fires hot, and clean your stove and chimney regularly. Avoid slow, smoldering fires and never burn trash or unseasoned wood.
—
Cleaning creosote from your wood stove isn’t just a chore—it’s an important safety step that protects your family, your home, and your wallet. With the right tools and habits, you can keep your wood stove working at its best and enjoy safe, cozy fires all winter long.
Start today, and you’ll breathe easier knowing your stove is safe and efficient.