Building your own kitchen cabinets from free plans is a smart way to save money while adding a personal touch to your home. Many people think this project is only for professionals, but with the right plan, tools, and patience, almost anyone can do it. Making your own cabinets not only helps your budget but also lets you create custom storage that fits your kitchen perfectly.
This guide explains everything you need to know about building kitchen cabinets using free plans. You will learn how to choose the right design, gather materials, use basic woodworking tools, and assemble cabinets step by step. We’ll also cover finishing touches like painting, installing hardware, and tips for getting a professional look.
Whether you are a beginner or have some DIY experience, you’ll find practical advice, useful comparisons, and answers to common questions.
Let’s dive into the world of building kitchen cabinets with free plans and discover how you can transform your kitchen with your own hands.
Why Build Kitchen Cabinets Yourself?
Building your own kitchen cabinets has several advantages. First, it is often much cheaper than buying pre-made cabinets or hiring a contractor. Custom cabinets from a store can cost $5,000 to $20,000 or more, depending on materials and size. When you build your own, you can often complete a full kitchen for $1,000–$2,000, especially when using free plans.
Second, you can create cabinets that perfectly fit your space. Many older homes have odd-sized walls or unique layouts where store-bought cabinets may not fit well. With free plans, you can adjust the measurements and design to match your kitchen’s needs.
Third, building cabinets yourself lets you choose the materials, finishes, and styles you like. You aren’t limited by what’s on the showroom floor. You can make classic shaker cabinets, modern flat panels, or rustic styles, all tailored to your taste.
Finally, there’s a sense of pride and satisfaction that comes from making something with your own hands. Every time you open a cabinet, you’ll know you built it yourself.
Finding And Choosing Free Kitchen Cabinet Plans
The first step is to find a free cabinet plan that matches your skill level and kitchen needs. There are hundreds of free plans available online, but not all are equal. Some are very detailed, while others are basic and may need more instructions.
Here’s how to pick the best plan:
- Skill Level: If you’re new to woodworking, choose a beginner-friendly plan with clear steps and diagrams. Look for plans that use common tools and materials.
- Cabinet Style: Decide if you want base cabinets (for the floor), wall cabinets (for above the counter), or tall pantry cabinets. Check if the plan includes all types you need.
- Size and Layout: Measure your kitchen carefully. Choose plans that are easy to adjust to your kitchen’s size. Some plans allow you to resize doors, shelves, and drawers.
- Step-by-Step Details: The best plans have step-by-step instructions, a cut list, and 3D diagrams. This helps you avoid mistakes during building.
- Material List: Make sure the plan lists all materials and hardware needed. This lets you price everything before starting.
Non-obvious insight: Many free plans come from woodworking clubs, university extension programs, or DIY bloggers. These are often more tested and reliable than random internet sources.
Pro tip: Download several plans and compare them. Sometimes one plan explains a step better, while another has better diagrams. Combine the best features for your project.
Tools And Materials You Will Need
To build kitchen cabinets, you need some basic woodworking tools and materials. You don’t need a full workshop, but a few key tools make the job much easier.
Essential Tools
- Circular saw or table saw – for cutting plywood and boards
- Drill/driver – for making holes and driving screws
- Measuring tape and square – for accurate measurements
- Clamps – to hold pieces together while you work
- Sander or sandpaper – for smoothing surfaces
- Level – to make sure cabinets are straight
- Hammer and nail set – for finishing touches
Optional but helpful tools include a miter saw (for cutting trim and face frames), pocket hole jig (for strong joints), and a router (for decorative edges).
Materials
Most kitchen cabinets are built from plywood for the main structure and hardwood for face frames and doors. Here’s a common material list for a set of lower cabinets (about 8 feet long):
- 3 sheets of 3/4″ plywood (for sides, bottom, shelves)
- 1 sheet of 1/4″ plywood (for cabinet backs)
- 1×2″ hardwood boards (for face frames)
- Wood glue
- 2″ wood screws or pocket screws
- Hinges and drawer slides
- Cabinet pulls or knobs
- Primer and paint or wood finish
Non-obvious insight: Buy the best plywood you can afford. Cheap plywood can warp or splinter, making your cabinets look less professional.
Tools/materials Comparison
Here is a comparison of some key tools and their alternatives for building cabinets:
| Tool | Best For | Alternative | Comment |
|---|---|---|---|
| Circular Saw | Cutting large sheets | Hand saw | Hand saw is slower and less accurate |
| Pocket Hole Jig | Strong, hidden joints | Wood screws | Screws are visible, but work if budget is tight |
| Miter Saw | Precise trim cuts | Backsaw & miter box | Manual, but good for small jobs |
Practical tip: Many hardware stores will cut plywood for you for free or a small fee. This can save time and help you transport large sheets.
Measuring And Planning Your Kitchen Layout
Before cutting any wood, you need an accurate kitchen layout plan. Good planning ensures your cabinets fit perfectly and function well.
How To Measure Your Kitchen
- Measure the length of each wall where cabinets will go.
- Measure from the floor to the ceiling and to the bottom of windows.
- Mark locations of doors, windows, appliances, and plumbing.
- Check for obstacles like vents, electrical outlets, or radiators.
Draw a simple sketch of your kitchen and write down all measurements. Double-check everything. Even a 1-inch error can cause big problems during installation.
Deciding On Cabinet Sizes
Standard cabinet sizes are:
- Base cabinets: 24″ deep x 34.5″ tall x various widths (usually 12″, 18″, 24″, 30″, 36″)
- Wall cabinets: 12″ deep x 30–42″ tall x various widths
- Tall cabinets (pantry): 24″ deep x 84–96″ tall
You can adjust these sizes to fit your kitchen. Leave space for appliances, like a 30″ gap for a stove or dishwasher.
Common mistake: Forgetting to leave enough space for fillers. Most kitchens need 1–2″ filler strips at the ends of cabinet runs to allow for walls that aren’t perfectly straight.
Layout Example
Suppose your wall is 10 feet long. You might fit:
- 1 x 36″ sink base
- 1 x 24″ drawer base
- 2 x 18″ door bases
- 2″ filler strip
Total: 36 + 24 + 18 + 18 + 2 = 98″ (just over 8 feet), leaving space for trim or slight adjustments.
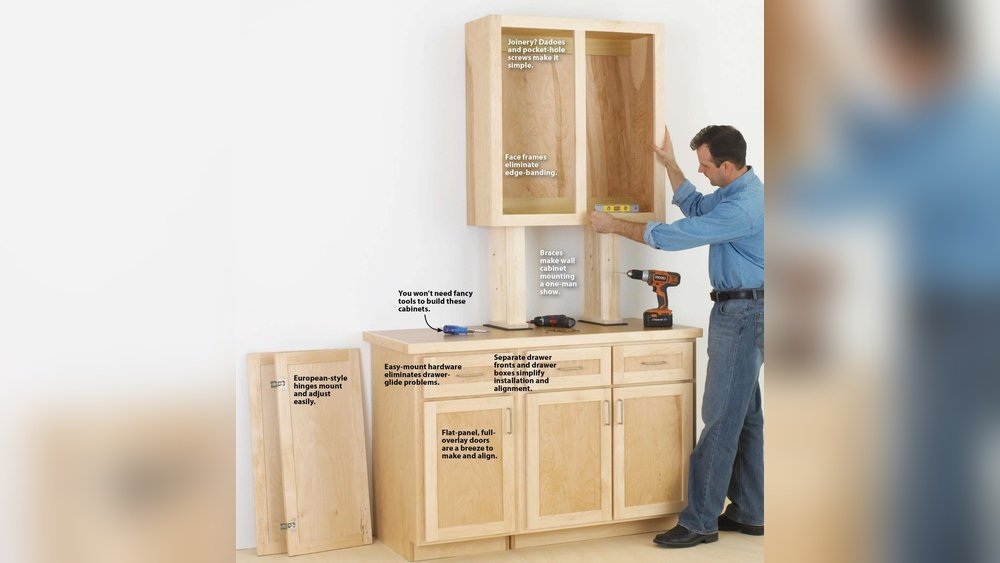
Understanding Cabinet Construction Basics
Kitchen cabinets are basically strong wooden boxes with doors, drawers, and shelves. Understanding the main parts helps you follow any plan.
Main Cabinet Parts
- Carcass: The main box of the cabinet (sides, bottom, top, and back)
- Face frame: The front frame (optional in modern designs)
- Doors and drawers: For access and storage
- Shelves: Inside for organization
- Toe kick: The bottom cutout for your feet
Some plans are frameless (European style), while others use a face frame (traditional American style). Frameless cabinets are a bit easier for beginners.
Joinery Options
- Pocket hole screws: Fast, strong, and hidden
- Wood glue and nails: Simple but less strong
- Dowel joints: More precise, but need special tools
Many free plans use pocket hole screws because they are strong, easy to use, and don’t require advanced skills.
Cabinet Construction Comparison
Here’s a look at two popular types:
| Type | Pros | Cons |
|---|---|---|
| Face Frame | Classic look, easy to align doors | Takes more time, uses more wood |
| Frameless | Modern style, maximizes space | Requires precise cuts, doors must fit well |
Tip: If your kitchen walls are not perfectly straight, face frame cabinets help hide small gaps.
Cutting And Preparing Cabinet Parts
Once your plan and measurements are ready, it’s time to cut the wood for your cabinet boxes.
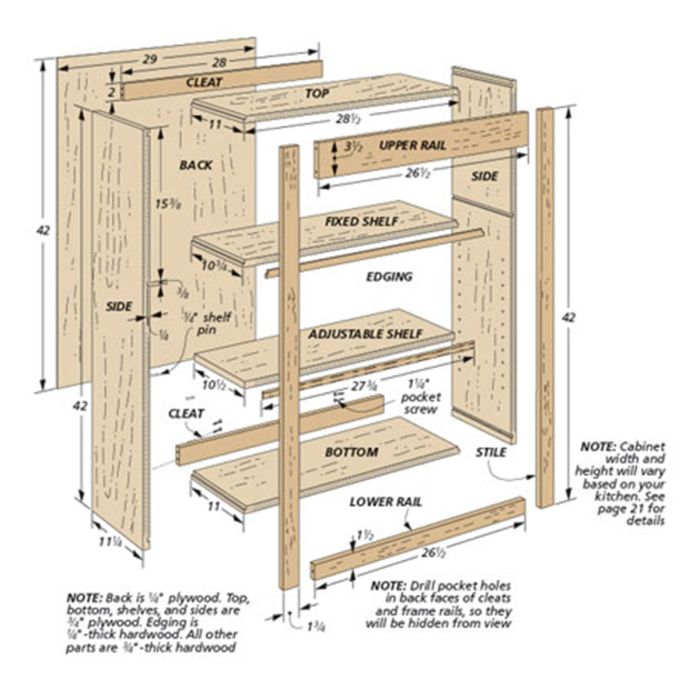
Making A Cut List
A cut list is a table showing all the pieces you need, their sizes, and how many of each. For example, for one base cabinet:
- 2 sides: 34.5″ x 24″
- 1 bottom: 22.5″ x width of cabinet
- 1 top rail: 4″ x width of cabinet (for structure)
- 1 back: 34.5″ x width of cabinet (usually 1/4″ plywood)
- 1 toe kick: 4″ x width of cabinet (optional)
Non-obvious insight: Plan to cut the largest pieces first from each plywood sheet. This reduces waste and ensures you have enough material for all parts.
Cutting Tips
- Use a sharp blade for clean cuts.
- Mark each piece clearly after cutting.
- Sand edges lightly to remove splinters.
Some plans suggest pre-drilling all screw holes before assembly. This makes the assembly process much smoother and helps prevent wood from splitting.
Practical tip: Stack similar pieces together (all sides, all bottoms, etc.) to stay organized during assembly.
Assembling The Cabinet Boxes
Now you can start putting the pieces together.
Step-by-step Assembly
- Lay out the side panels flat.
- Attach the bottom panel between the sides using wood glue and screws or pocket holes.
- Attach the top rail (if included) for stability.
- Attach the back panel using glue and small nails or staples.
- If using a toe kick, attach it to the bottom front.
Double-check that all corners are square using your measuring square. A crooked box will make doors and drawers hard to install.
Non-obvious insight: Build cabinets on a flat, level surface. Even a small slope in your floor can twist the cabinet out of shape.
Adding Face Frames (if Your Plan Uses Them)
- Cut the frame pieces (usually 1×2″ hardwood) to size.
- Attach the rails (horizontal pieces) and stiles (vertical pieces) together with pocket holes or wood glue.
- Clamp the frame to the front of the cabinet and attach with glue and finish nails or screws.
Face frames make the cabinet look finished and help align doors.
Tip: Sand the face frame before attaching it to the cabinet box for a smoother finish.
Building And Installing Cabinet Doors And Drawers
Cabinet doors and drawers are the most visible part of your work.
Simple Door Options
- Slab doors: Flat plywood, easiest for beginners
- Shaker doors: Frame with a flat plywood center, classic style
Cut the doors to size, leaving about 1/8″ gap on all sides for smooth opening. For Shaker doors, use pocket holes to join the frame, then glue in the center panel.
Drawer Construction
Drawers are simple boxes with four sides and a bottom. Use 1/2″ or 3/4″ plywood for strength. For smooth opening, install metal drawer slides according to manufacturer instructions.
Non-obvious insight: Don’t make drawers too wide or they may sag when full. 24″ is usually the maximum practical width for kitchen drawers.
Hinges And Drawer Slides
There are many types of hinges:
- Concealed (Euro) hinges: Hidden when door is closed, adjustable
- Surface-mount hinges: Easier to install, visible when door is closed
Drawer slides come in side-mount or under-mount types. Side-mount is easier for DIY beginners.
Tip: Do a test fit of doors and drawers before painting or finishing. Small adjustments are easier to fix now than later.
Credit: shelfhelpnow.com
Finishing: Sanding, Painting, And Sealing
A good finish is what makes your cabinets look professional.
Sanding
- Start with 100–120 grit sandpaper to smooth all surfaces.
- Finish with 180–220 grit for a silky feel.
- Wipe down all dust with a tack cloth or damp rag.
Painting Or Staining
- Apply a good primer if you are painting. This helps the paint stick and covers wood grain.
- Use a small foam roller or paint sprayer for smooth coats.
- For stain, wipe or brush on, then wipe off excess for an even color.
Non-obvious insight: Use cabinet-grade paint or polyurethane finish. These are more durable and stand up to kitchen moisture and cleaning.
Sealing
- Always seal painted or stained cabinets with a clear topcoat. This protects against water, grease, and scratches.
- Two or three thin coats are better than one thick coat.
Tip: Let each coat dry fully before adding the next. Rushing this step can lead to sticky or uneven surfaces.
Installing Cabinets In Your Kitchen
Once your cabinets are built and finished, you’re ready for installation.
Steps For Installing Base Cabinets
- Mark a level line on the wall where the tops of the cabinets will sit.
- Start in a corner and place the first cabinet. Shim under the base if the floor isn’t level.
- Attach cabinets to the wall using long screws driven into wall studs.
- Add the next cabinet, clamp it to the first, and screw them together through the side panels.
- Continue until all base cabinets are installed.
Installing Wall Cabinets
- Find and mark the wall studs.
- Use a ledger board (temporary wood strip) to hold cabinets in place as you attach them.
- Screw cabinets into studs, starting from a corner.
- Remove the ledger board after installation.
Non-obvious insight: Install wall cabinets before base cabinets. This way, you don’t have to lift heavy cabinets over finished bases.
Leveling And Adjusting
- Check the level and alignment after every cabinet.
- Use shims to adjust for uneven walls or floors.
Tip: If you’re working alone, use T-braces or ask a friend to help lift and hold wall cabinets.
Adding Hardware And Finishing Touches
The final step is to install hardware and add any final details.
Cabinet Pulls And Knobs
- Mark and drill holes for handles and knobs carefully—use a template for consistency.
- Attach hardware with screws provided.
Drawer And Door Alignment
- Adjust hinges for perfect gaps and smooth opening.
- If drawers stick, check for obstructions or sand rough edges.
Baseboard And Crown Molding
- Add baseboard to the bottom of base cabinets for a finished look.
- Crown molding can be added to the top of wall cabinets for style.
Soft-close Hardware (optional)
- Soft-close hinges and slides prevent slamming and make cabinets feel high-end.
- These can be added to most cabinets, even after installation.
Non-obvious insight: Wait until all painting and cleaning is finished before installing hardware. This keeps handles and knobs free of dust and paint.
Common Mistakes To Avoid
Even experienced DIYers make mistakes. Here are some common ones and how to avoid them:
- Measuring once: Always measure twice (or more) before cutting.
- Skipping pre-drilling: This can split wood, especially near edges.
- Not checking for square: A crooked cabinet causes endless problems later.
- Forgetting wall and floor level: Always use a level during installation.
- Choosing the wrong materials: Cheap plywood or thin boards can lead to weak cabinets.
- Rushing the finish: Let all paint and sealers dry fully between coats.
Pro tip: Write down every step before you begin each work session. This keeps you on track and reduces mistakes.

Credit: www.youtube.com
Free Plan Resources And Further Reading
There are many excellent sources for free kitchen cabinet plans online. Some of the most reliable include:
- Ana White (ana-white.com): DIY plans with photos and step-by-step instructions
- Woodsmith Plans (woodsmithplans.com): Detailed woodworking plans
- Family Handyman (familyhandyman.com): Practical advice and cabinet building guides
- University Extension Services: Many universities offer free woodworking PDFs
For a great starting point, check out this Family Handyman kitchen cabinet guide.
Budgeting And Cost Comparison
Building your own cabinets is much cheaper than buying. Here’s a quick cost comparison for a typical 10-foot kitchen run:
| Option | Estimated Cost | Quality | Customization |
|---|---|---|---|
| DIY with free plans | $1,000 – $2,000 | High (if careful) | Unlimited |
| Stock cabinets | $3,000 – $5,000 | Medium | Limited sizes/styles |
| Custom cabinets | $8,000 – $20,000+ | High | Unlimited |
Non-obvious insight: Most of your cost is in materials and hardware. Labor is where you save the most by building yourself.
Credit: www.woodpeck.com
Safety Tips For Diy Cabinet Building
Safety is often overlooked, but woodworking tools can be dangerous.
- Always wear safety glasses when cutting or drilling.
- Use ear protection with loud tools.
- Work in a well-ventilated area, especially when finishing with paint or stain.
- Keep your workspace clean to avoid tripping hazards.
- Unplug power tools when changing blades or making adjustments.
Pro tip: Don’t rush. Most accidents happen when people are tired or in a hurry.
Frequently Asked Questions
How Long Does It Take To Build Kitchen Cabinets From Free Plans?
Most DIYers spend 2–4 weeks building and installing a full set of kitchen cabinets, working evenings and weekends. If you have help or can dedicate full days, it can go faster. Time depends on your skill, the size of your kitchen, and how much finishing you do.
Can Beginners Really Build Quality Kitchen Cabinets?
Yes, with careful measuring, patience, and following detailed free plans, beginners can build strong, attractive cabinets. Start with a small project like a single base or wall cabinet to build confidence before doing a full kitchen.
Do I Need Expensive Tools To Build Cabinets?
You don’t need high-end tools. A circular saw, drill, measuring tape, clamps, and a sander are enough for most free plans. Many home centers will cut plywood for you, so you don’t need a table saw. Borrow or rent specialty tools if needed.
What’s The Best Wood For Diy Kitchen Cabinets?
Cabinet-grade plywood is the best choice for the main boxes due to its strength and stability. Use hardwood for face frames and doors if you want a premium look. Avoid particleboard or MDF for cabinet boxes—they don’t hold screws well and are less durable.
Where Can I Find Reliable, Free Kitchen Cabinet Plans?
Several websites offer high-quality, free plans. Good places to start are Ana White, Family Handyman, and university extension woodworking programs. Always read reviews or check forum feedback before starting a plan to make sure instructions are clear.
Building your own kitchen cabinets with free plans is a big project, but it’s one that brings lasting value, style, and pride to your home. With careful planning, the right materials, and a bit of patience, you can create a kitchen that’s both beautiful and built to last.