Every winter, many people turn to wood stoves to keep their homes warm and cozy. These classic heaters are popular because they are efficient, reliable, and give a special feeling that modern heaters can’t match. But to use a wood stove safely, you need to connect it properly to a stove pipe. This connection is not just about heating efficiency—it’s also about safety. If you make a mistake, you could end up with smoke in your home, poor burning, or even a fire hazard.
This guide is for anyone who wants to learn how to attach stove pipe to wood stove correctly. You don’t need to be an expert. With simple words, clear steps, and a calm approach, you’ll learn everything needed to make a safe and secure connection. We’ll cover what tools and materials you need, how to choose the right pipe, the step-by-step process, safety rules, and common mistakes to avoid. You’ll also find helpful tables to compare pipe types and tips from real experiences. By the end, you’ll feel confident attaching your stove pipe like a pro.
Understanding The Basics
Before you start, it’s important to know what each part does and why the connection matters.
A wood stove burns wood to produce heat. The stove pipe connects the stove to the chimney or vent, carrying smoke and gases out of your home. If this pipe is not attached properly, dangerous gases like carbon monoxide can leak inside, or the fire could spread outside the stove.
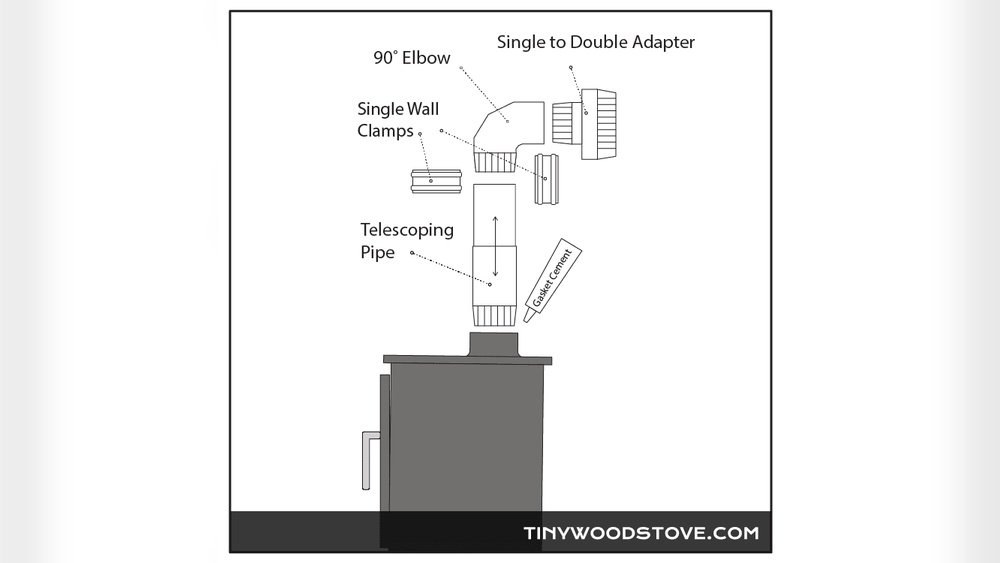
Key Parts Involved
- Wood stove flue collar: The round opening on top or back of your stove where the pipe attaches.
- Stove pipe: The metal tube that connects the stove to the chimney or thimble.
- Elbow: A bent pipe section for turns or angles.
- Damper: A metal flap inside the pipe to control airflow.
- Chimney: The vertical pipe or structure that carries smoke outside.
- Thimble: The part where the stove pipe enters the wall or chimney.
Why A Proper Connection Matters
A good connection prevents leaks, improves burn efficiency, and keeps your family safe. Many house fires start when wood stoves are not installed right. Insurance companies often require proof of a safe installation.
Choosing The Right Stove Pipe
Not all stove pipes are the same. Picking the right one is the first step to a safe and efficient stove.
Types Of Stove Pipe
There are two main types:
- Single-wall stove pipe: One layer of steel. Cheaper and easier to install, but needs more space from walls.
- Double-wall stove pipe: Two layers with insulation in between. Costs more, but can be placed closer to walls.
Here’s a simple comparison:
| Feature | Single-Wall Stove Pipe | Double-Wall Stove Pipe |
|---|---|---|
| Price | Lower | Higher |
| Clearance to Combustibles | 18 inches | 6 inches |
| Heat Loss | More | Less |
| Durability | Good | Very Good |
Pipe Diameter
Most wood stoves use a 6-inch or 8-inch pipe. Always match the pipe size to the flue collar on your stove. Using the wrong diameter reduces efficiency and can cause smoke to leak.
Pipe Material
Look for 24-gauge or thicker black steel for single-wall pipes. Double-wall pipes usually come pre-insulated. Avoid using galvanized pipes inside the living space, as the zinc coating can produce harmful fumes.
How Much Pipe Do You Need?
Measure the distance from your stove’s flue collar to the chimney or wall thimble. Remember to include any turns or elbows. Most codes limit horizontal runs to 75% of the total chimney height.
Tools And Materials Needed
Having the right tools makes the job easier and safer. Prepare these items before you start:
- Stove pipe (enough length, correct diameter)
- Elbows (if needed for turns)
- Stove pipe joints or slip joints
- Screws (self-tapping, 1/2-inch to 3/4-inch)
- Screwdriver or drill
- Work gloves
- Measuring tape
- Metal snips (for cutting pipe, if needed)
- Stove cement or high-temp sealant (optional, for leaks)
- Ladder (if working above floor level)
- Safety goggles
Pro tip: Don’t use regular duct tape or household sealants. Only use products rated for high temperatures.
Preparing For Installation
Before you begin, check these points:
- Read the stove manual. Each stove model may have special instructions. Follow them first.
- Check local codes. Some areas require a permit or inspection for wood stoves. Rules about clearances and materials may be strict.
- Clear the area. Remove flammable items (curtains, papers, furniture) around your stove.
- Lay out your pipe. Make sure all parts fit before cutting or joining.
- Plan the route. The pipe should run as straight up as possible. Avoid extra elbows or long horizontal runs—they reduce draft and can collect creosote.
Many beginners forget to check for obstructions in the chimney or wall. Make sure the path is clear before you start.
Step-by-step: How To Attach Stove Pipe To Wood Stove
Now, let’s walk through the full process. Take your time with each step.
1. Check The Flue Collar
Look at your stove’s flue collar. It might be on the top or the back of the stove. Check for any dirt, rust, or old sealant. Clean it with a brush or cloth.
2. Dry Fit The Pipe
Assemble the pipe pieces without screws first, starting at the stove and working toward the chimney. Make sure the crimped (narrow) end of each pipe points toward the stove. This way, creosote and smoke stay inside and don’t leak out through the joints.
Common mistake: Many people put the crimped end up. This causes leaks at the joints.
3. Cut Pipe To Length (if Needed)
If your pipe is too long, measure the correct length and mark it. Use metal snips to cut. Wear gloves—cut pipe edges are sharp.
4. Connect Pipe To Flue Collar
Slide the crimped end of the first pipe into the flue collar. Push it in until it fits snugly. The pipe should go at least 1. 5 to 2 inches inside the collar.
5. Secure With Screws
Drill three evenly spaced self-tapping screws through the pipe and collar. This keeps the pipe from shifting or coming loose. Tighten the screws, but don’t over-tighten (it can strip the metal).
6. Add Elbows Or Additional Pipe Sections
If your stove pipe needs to turn, add an elbow next. Again, make sure the crimped end faces the stove. Slide the next pipe section into the elbow or previous pipe.
Repeat the process: insert, check fit, then add screws (3 per joint).
7. Check The Slope
Horizontal stove pipe runs must rise at least 1/4 inch per foot toward the chimney. This helps smoke flow out and prevents build-up.
8. Seal Joints (optional But Recommended)
Apply a thin bead of stove cement or high-temp sealant to each joint if you want extra leak protection. Let it dry according to the product instructions.
9. Connect To Chimney Or Thimble
Attach the last pipe section to the chimney pipe or wall thimble. Again, use screws to secure the connection. Some thimbles have a locking band—tighten it as needed.
10. Final Inspection
Look at the whole pipe run. Check for gaps, loose screws, or places where the pipe might touch the wall or ceiling. The pipe should never touch combustible materials (wood, drywall, fabric, etc.).
Bonus tip: Shine a flashlight through the pipe to check for obstructions or loose debris.
Example: Installing A Stove Pipe In A Typical Living Room
Let’s look at a real-world scenario—a wood stove installed in a living room with the pipe going straight up through the ceiling.
- The stove’s flue collar is 6 inches in diameter, top-exit.
- The homeowner uses double-wall pipe for safety and can place the stove 8 inches from the wall.
- The pipe goes up 4 feet to the ceiling, then connects to a chimney thimble.
Steps:
- Lay out four 1-foot pipe sections and one elbow.
- Dry fit the pipes, making sure each crimped end faces down.
- Cut the last pipe if needed for a snug fit.
- Attach the first pipe to the flue collar with three screws.
- Attach the next pipes and elbow, screwing each joint.
- Use a high-temp sealant at each joint for extra protection.
- Check the vertical run for a slight upward slope.
- Connect the last pipe to the thimble, secure with screws.
- Inspect all joints, clearances, and the path to the chimney.

Credit: diy.stackexchange.com
Essential Safety Considerations
Safety is the most important part of installing a stove pipe. Here are key points to follow:
Clearances
Keep the pipe the correct distance from any combustible surfaces. This is usually:
- Single-wall pipe: 18 inches
- Double-wall pipe: 6 inches
Never reduce these clearances unless your local code or the pipe manufacturer says it’s safe.
Smoke And Carbon Monoxide Detectors
Always install smoke alarms and carbon monoxide detectors near your wood stove. Test them monthly.
Fire Extinguisher
Keep a fire extinguisher rated for wood and paper nearby. Make sure everyone in your home knows how to use it.
Regular Inspection
Check your stove pipe every month during burning season. Look for rust, loose joints, or creosote buildup.
Annual Chimney Cleaning
Clean your chimney at least once a year to remove creosote. Creosote is a sticky, flammable substance that builds up inside the pipe and chimney.
Common Mistakes And How To Avoid Them
Even experienced DIYers can make errors. Here are mistakes beginners often make—and how to avoid them:
- Wrong pipe direction: Always point the crimped end toward the stove. This keeps smoke and creosote inside.
- Not enough screws: Every pipe joint needs three screws. Fewer screws make the pipe unstable.
- Using the wrong sealant: Only use high-temp sealant or stove cement on pipe joints.
- Not checking clearances: Too-close pipes can overheat walls or furniture.
- Skipping chimney cleaning: This leads to dangerous creosote fires.
- Ignoring local codes: Every area is different. Some require inspections or special parts.
- Not using the right pipe type: Don’t use dryer vent or HVAC pipe for wood stoves. Only use UL-listed stove pipe.
- Improper support: Long runs may need wall brackets or supports to prevent sagging.
Advanced Tips For A Safer, More Efficient Setup
If you want your stove to run at its best, consider these expert tips:
- Add a damper: Install a damper in the first section of stove pipe above the stove. This helps control the fire and saves wood.
- Install a thermometer: Place a stovepipe thermometer 18 inches above the stove. It shows if your fire is burning too hot or too cool.
- Use telescoping pipe sections: These make fine adjustments easier and avoid cutting.
- Seal with furnace cement: For extra peace of mind, seal the flue collar connection with furnace cement.
- Check for negative pressure: If your fire smokes when you open the door, you may need to add outside air or improve room ventilation.
Comparing Stove Pipe Brands And Models
Not all pipes are created equal. Here’s a look at some top stove pipe brands and what sets them apart.
| Brand | Type | Warranty | Special Features |
|---|---|---|---|
| DuraVent | Single & Double Wall | Limited Lifetime | Easy twist-lock system |
| Selkirk | Single & Double Wall | Limited Lifetime | Snap-together connections |
| SuperVent | Double Wall | Lifetime | High insulation value |
When choosing a brand, look for UL-listing or other safety certifications. These prove the pipe meets safety standards.

Credit: cookstoves.net
Maintenance After Installation
A safe installation is just the start. Regular care keeps your stove running well for years.
Monthly Maintenance
- Check all screws and joints for tightness.
- Wipe the pipe to check for soot leaks.
- Watch for signs of rust or corrosion.
Yearly Maintenance
- Disassemble the pipe (if possible) and inspect inside for creosote.
- Clean the chimney using a brush sized for your pipe.
- Replace any damaged or rusted pipe sections.
Signs You Need Repairs
- Smoke leaks at pipe joints.
- Soot streaks on the pipe or wall.
- Pipe feels loose or wobbly.
- Burning smell outside the stove.
Pro insight: Many people forget to check behind the stove or in hard-to-see places. Use a mirror or camera to look for hidden leaks or rust.
When To Call A Professional
Some jobs are best left to experts. Call a pro if:
- You’re not sure about local codes or permits.
- Your chimney is old, damaged, or dirty.
- The pipe run is complex (lots of turns or long distances).
- You smell smoke in the house after lighting the stove.
A professional installer can make sure everything is safe and up to code. This can also help with home insurance.
Real-world Example: The Impact Of A Proper Connection
In a survey by the National Fire Protection Association (NFPA), over 25% of home heating fires involved wood stoves or stove pipes. Most of these were due to improper installation or maintenance. One family in Minnesota saw smoke stains on their wall and found a loose pipe joint that was leaking gases. After reattaching the pipe with the correct screws and sealant, the problem stopped.
This shows how a small mistake can lead to big problems—and how a careful, correct installation keeps your home safe.
Additional Resources
For even more detail, you can check the U.S. Fire Administration’s official guidelines for wood stove safety at USFA Wood Stove Safety.
Credit: www.youtube.com
Frequently Asked Questions
How Do I Know What Size Stove Pipe To Use?
Always match the stove pipe diameter to the flue collar on your wood stove. Most stoves use 6-inch or 8-inch pipes. Never reduce the pipe size, as this can cause poor draft or dangerous backflow of smoke.
Can I Use Regular Hvac Pipe For My Wood Stove?
No. Regular HVAC or dryer vent pipes are not safe for wood stoves. Only use UL-listed stove pipe made for high temperatures and wood-burning appliances.
How Close Can My Stove Pipe Be To The Wall Or Ceiling?
For single-wall pipe, keep at least 18 inches from combustibles. For double-wall pipe, the minimum is 6 inches. Always check the pipe manufacturer’s instructions and local codes.
What Is The Best Way To Seal Stove Pipe Joints?
Use stove cement or high-temp sealant rated for wood stoves. Apply a thin bead at each joint after screwing the pipes together. Don’t use regular caulk or duct tape.
Why Does Smoke Leak From My Stove Pipe Joints?
This usually means the crimped ends are facing the wrong way, not enough screws were used, or the joints are not sealed well. Disassemble the pipe, check the direction, add screws, and use the right sealant.
Attaching a stove pipe to your wood stove is a job you can do yourself with the right tools, careful planning, and attention to detail. By following these steps and tips, you’ll have a safe, efficient wood stove that keeps your home warm all winter long.