Adding shelves to a cabinet is one of the best ways to increase your storage space and organize your home. Whether you have a kitchen cabinet overflowing with dishes, a bathroom cabinet with little room for toiletries, or a living room bookshelf that needs an extra layer, learning how to add shelves can solve these problems.
Many people think this is a complicated project, but with the right approach and tools, almost anyone can do it—even if you have little DIY experience.
In this guide, you’ll find practical advice, step-by-step instructions, tips for choosing the right materials, and solutions for common mistakes. You’ll also discover clever insights that most beginners miss, so you can avoid frustration and get professional-looking results. From measuring your space correctly to installing adjustable shelf supports, everything you need to know about adding shelves to cabinets is here.
Why Add Shelves To Cabinets?
Cabinets often come with fixed shelves, which can waste space. By adding shelves, you can:
- Make full use of vertical space
- Store more items in the same cabinet
- Create separate zones for different items
- Easily see and reach what you need
This upgrade is also affordable. Instead of buying new furniture, you can modify what you already own. For renters, adding removable or adjustable shelves is a smart way to customize your space without permanent changes.
Planning Your Shelf Project
Jumping in without a plan can lead to poor results. A little preparation will save you time and stress later.
Assess Your Cabinet
First, check the cabinet you want to improve. Is it wood, particleboard, or metal? Are there already holes for shelf pins, or will you need to make new ones? Note any obstacles like hinges, pipes, or electrical outlets.
Open the doors and look at the inside dimensions. Remove any items and existing shelves. Clean the surfaces so you can see clearly.
Decide What To Store
Think about what you want to place on each new shelf. Are these heavy pots, light towels, or maybe books? This will affect the material and thickness you need.
Heavier items need thicker shelves (usually 3/4 inch plywood or solid wood). Lighter items can go on thinner shelves. Knowing your storage needs will help you avoid sagging or weak shelves later.
Measure Carefully
Accurate measurements are crucial. Use a tape measure and note:
- Cabinet width (side to side, inside)
- Cabinet depth (front to back, inside)
- Cabinet height (top to bottom, inside)
Measure in more than one spot—cabinets are not always perfectly square. Write down the smallest measurements so your shelf will fit easily.
Example Measurement
Suppose your kitchen cabinet interior is 27 inches wide, 11 inches deep, and 28 inches high. You want three shelves. Plan for at least 10 inches between each shelf, leaving a little extra space for easy access.
Sketch Your Plan
Draw a simple sketch showing where each shelf will go. Mark the heights and label each shelf. Decide if you want fixed or adjustable shelves.
- Fixed shelves: Screwed or nailed in place, strong but not flexible.
- Adjustable shelves: Rest on pins or brackets that you can move up or down.
Adjustable shelves are better for changing needs, but fixed shelves can support more weight.
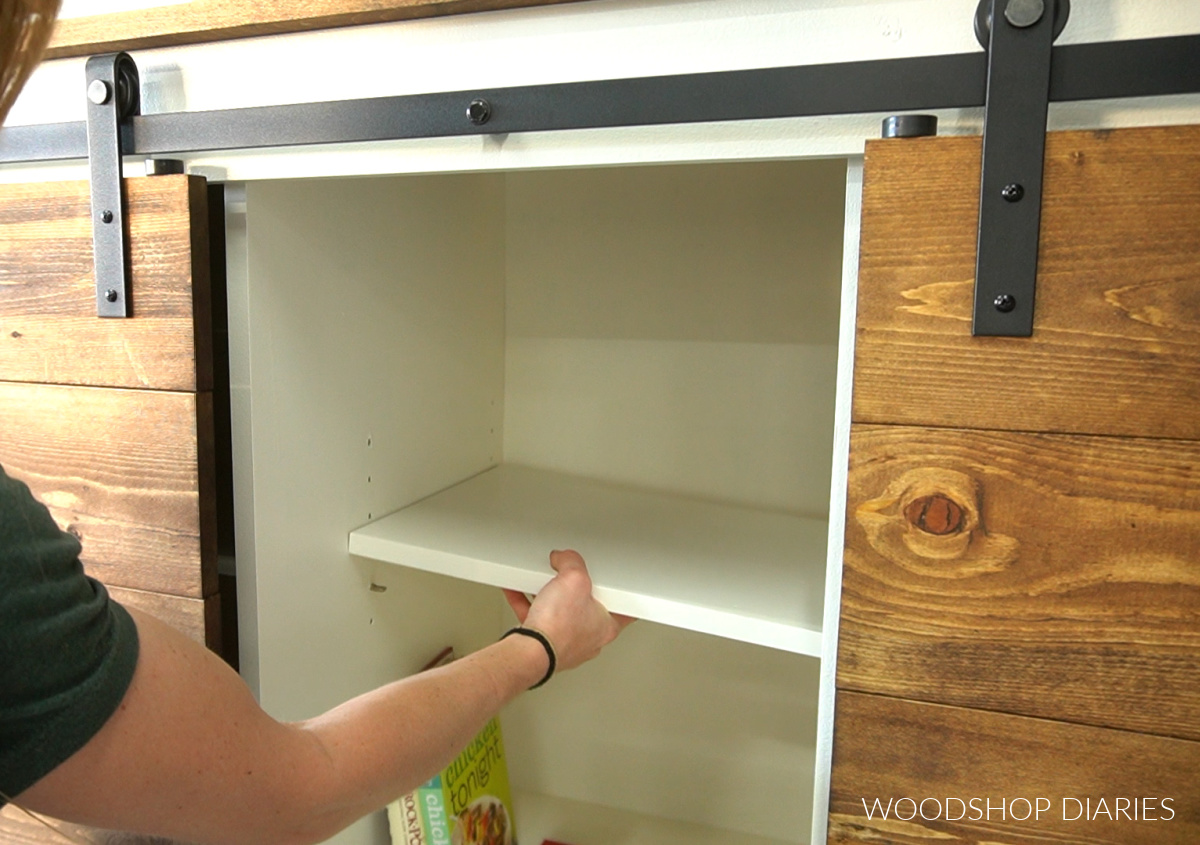
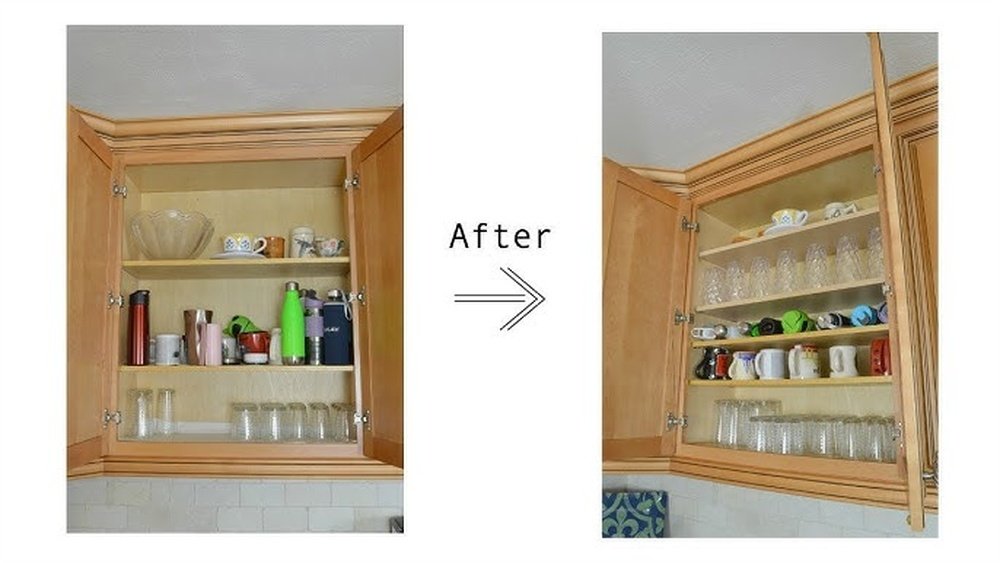
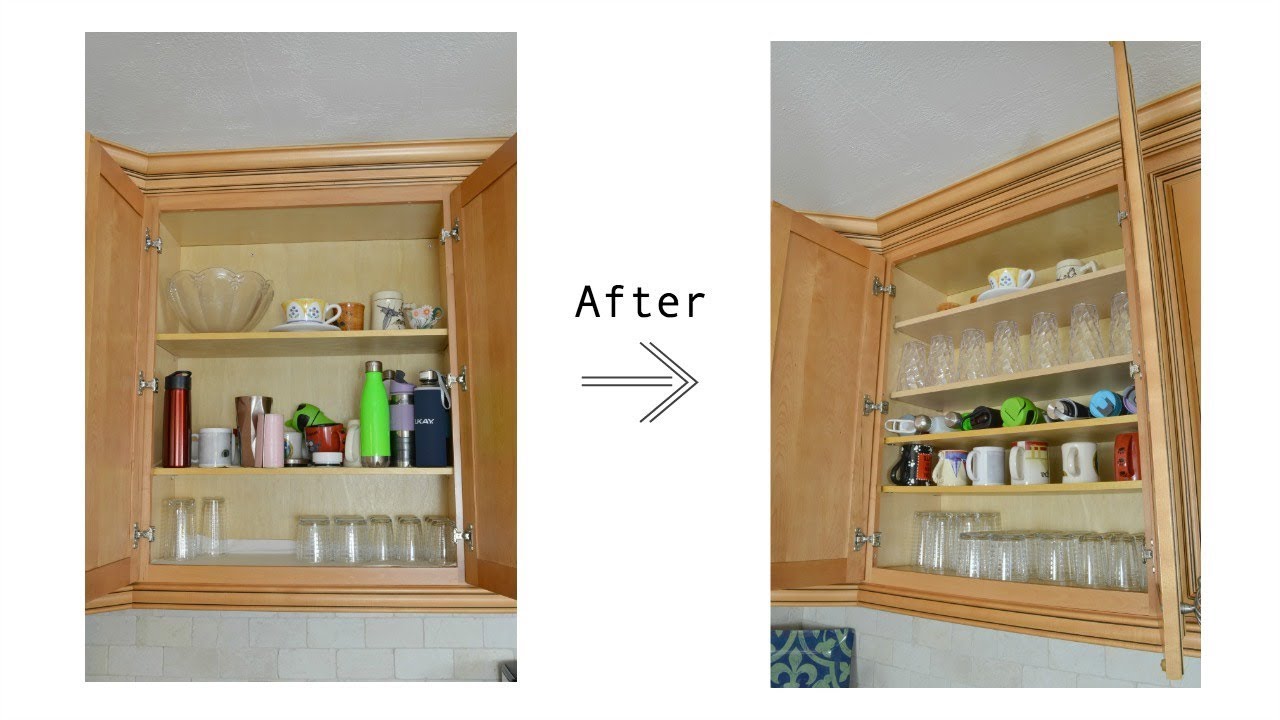
Credit: www.woodshopdiaries.com
Choosing The Right Shelf Material
Not all materials are equal. Your choice affects strength, durability, and appearance.
Common Materials Compared
Here’s a look at popular options:
| Material | Strength | Cost | Finish | Best For |
|---|---|---|---|---|
| Solid wood | High | $$$ | Paint/stain | Visible shelves, heavy items |
| Plywood | High | $$ | Paint/veneer | Kitchens, garages |
| MDF (Medium-density fiberboard) | Medium | $ | Paint | Light items, hidden shelves |
| Melamine | Medium | $$ | Pre-finished (white, wood look) | Closets, pantries |
| Wire shelving | Medium | $$ | White/metal | Closets, easy cleaning |
Non-obvious Insight
Many beginners choose MDF because it’s cheap, but it sags easily with weight or humidity. If you plan to store anything heavy, avoid MDF or use a thicker piece with extra supports.
Shelf Thickness
For most cabinets:
- 3/4 inch (19mm) thick plywood or solid wood is ideal for strength.
- 5/8 inch (16mm) is okay for light loads.
- Thinner shelves may bend, even if they look fine at first.
Tools And Hardware You’ll Need
Having the right tools makes the job much easier. Here’s a basic list:
- Tape measure
- Pencil and notepad
- Drill and bits
- Level (bubble or laser)
- Saw (circular, jig, or hand saw)
- Screwdriver
- Wood glue (optional)
- Sandpaper (medium/fine)
- Shelf pins, brackets, or cleats (see below)
- Screws or nails
- Safety gear (glasses, dust mask)
If you don’t own some tools, many home improvement stores rent them.
Shelf Support Types
You need something to hold up the shelves. Main options are:
- Shelf pins: Small metal or plastic pegs that fit in holes in the cabinet sides. Great for adjustable shelves.
- Brackets: L-shaped metal pieces screwed to the cabinet wall. Very strong.
- Cleats: Wood strips attached along the cabinet sides and back. Distribute weight well for heavy loads.
- Corner blocks: Triangular wood pieces in corners for extra support.
Pro Tip
If you want adjustable shelves but your cabinet has no holes, you can buy a shelf pin jig. This tool helps drill straight, evenly spaced holes for pins.
Step-by-step Guide To Adding Shelves
Let’s walk through the process, from preparation to finishing touches.
1. Prepare The Cabinet
- Remove everything from inside.
- Clean surfaces to remove dust and grease.
- Take out any existing shelves if possible.
- Fill old holes with wood filler if you don’t want to reuse them.
- Let dry and sand smooth.
2. Mark Shelf Positions
- Use your sketch to decide shelf heights.
- With a pencil, mark the position for each shelf on both cabinet sides.
- Use a level to draw straight lines. Check both sides are at the same height—crooked shelves are a common mistake!
3. Install Shelf Supports
For Adjustable Shelves (shelf Pins)
- Use a shelf pin jig or a template (a piece of cardboard with spaced holes).
- Mark where you want pin holes—usually 2 inches from the front and back, and 1 inch apart vertically.
- Drill holes straight and to the right depth (use tape on the drill bit as a depth stop).
- Insert shelf pins at the desired height.
For Fixed Shelves (brackets Or Cleats)
- Hold the bracket or cleat on your pencil line.
- Drill pilot holes for screws (this prevents splitting).
- Attach with screws. For cleats, use wood glue for extra strength.
- Repeat for the other side and back if needed.
For Corner Blocks
- Place blocks in the corners under the shelf spot.
- Screw in place.
4. Cut The Shelves
- Measure inside the cabinet again—walls are rarely perfectly straight.
- Transfer measurements to your shelf material.
- Use a saw to cut to size. Cut slowly for clean edges.
- Sand rough edges smooth.
Non-obvious Insight
Label your shelf pieces (A, B, C…) as you cut, especially if you have more than one. Small differences can cause a shelf to fit in one spot but not another.
5. Test Fit And Adjust
- Place each shelf on its supports or pins.
- Check fit—should be snug but not tight.
- If it’s too large, sand the edges a little more.
- If you want a finished look, round the front edge with sandpaper.
6. Secure Fixed Shelves
For fixed shelves:
- Place the shelf on its supports.
- Screw through the cleats or brackets into the shelf, or use wood glue and clamps.
- Wipe off any glue squeeze-out.
7. Finishing Touches
- Paint or stain shelves as desired.
- Let dry fully before placing items.
- For melamine or pre-finished shelves, wipe clean.
Special Cases: Cabinets With Doors, Sinks, Or Obstacles
Not every cabinet is simple. Here’s how to handle common problems.
Working Around Doors
If your cabinet has center stiles (vertical pieces between doors), measure the shelf in two pieces and join inside. Or, use L-shaped brackets to support two halves.
Under-sink Cabinets
Pipes can block shelf placement. Cut a notch or hole in the shelf to fit around pipes. Use cardboard to make a template first.
Lighting, Outlets, Or Odd Shapes
For custom fits, measure carefully and use a jigsaw for detailed cuts. If you have a power outlet inside, leave space for cords.
Credit: www.youtube.com
How To Make Shelves Adjustable
Adjustable shelves give you flexibility for changing storage needs. Most store-bought cabinets use shelf pins in a series of holes.
Steps For Adding Adjustable Shelf Holes
- Choose a spacing—1 inch apart vertically is common.
- Mark lines with a level on both sides.
- Use a shelf pin jig for accurate, straight holes.
- Drill holes the same depth (usually 1/4 inch or 5mm diameter).
- Insert pins at your chosen height.
Table: Pin Hole Drill Sizes
| Shelf Pin Diameter | Common Drill Bit Size |
|---|---|
| 1/4 inch | 1/4 inch |
| 5mm | 5mm |
If you want a professional look, buy a set of metal shelf pins—they’re much stronger than plastic.
Tips For Strong, Sag-free Shelves
- Use thicker material for longer spans (over 30 inches wide).
- Add a center support for wide shelves.
- Keep shelf depth under 16 inches for most uses.
- For heavy loads (books, tools), use plywood or solid wood.
- Avoid MDF in humid areas—it swells and weakens.
- Add a wood strip (“edge band”) to the front for extra strength and style.
Common Mistakes And How To Avoid Them
Many beginners make avoidable errors. Here’s what to watch for:
- Skipping the level check: Always use a level before attaching supports.
- Not accounting for door swing: Shelves too deep or close to the door can block closing.
- Poor measuring: Double-check all dimensions before cutting.
- Using weak materials: Thin MDF or particleboard sags quickly.
- Overloading adjustable shelves: Even strong pins can fail if overloaded.
Creative Shelf Ideas For Cabinets
Shelves are not just for storage—they can also make your cabinet look better and work smarter.
Pull-out Shelves
Install sliding rails so the shelf pulls out like a drawer. Great for deep cabinets and lower shelves.
Corner Shelves
Maximize blind corner cabinets with L-shaped or kidney-shaped shelves.
Glass Shelves
Use tempered glass for a modern look in display cabinets. Make sure the supports are designed for glass.
Lighting
Add LED strip lights under shelves for better visibility.
Shelf Liners
Protect your shelves and make cleaning easier with removable liners.

Credit: kitchencabinetkings.com
Cost And Time Estimates
Adding shelves is not expensive or time-consuming for most cabinets.
| Project Size | Material Cost | Time Needed |
|---|---|---|
| Small cabinet (1-2 shelves) | $20-$40 | 1-2 hours |
| Medium cabinet (3-4 shelves) | $40-$80 | 2-3 hours |
| Large or custom (5+ shelves) | $80-$150+ | Half day |
Actual cost depends on material and tool choices. If you already own tools, it’s much cheaper.
Safety Tips
- Always wear safety glasses when cutting or drilling.
- Clamp wood before cutting for stability.
- Unplug power tools when changing blades or bits.
- Keep fingers away from saw blades.
- Work in a well-ventilated area, especially when painting or staining.
When To Call A Professional
Most people can add basic shelves to cabinets. But consider hiring help if:
- Your cabinet is part of a rental or historic home (to avoid damage).
- You need heavy-duty shelves for large appliances.
- The cabinet material is metal or glass.
- You want built-in lighting, electrical, or plumbing changes.
A professional carpenter can tackle complex jobs and give you perfect results, but for most kitchen, bathroom, or closet cabinets, DIY works well.
Where To Buy Materials
Shelf supplies are widely available:
- Home improvement stores (Lowe’s, Home Depot)
- Online retailers (Amazon, specialty woodworking sites)
- Local lumberyards (for custom sizes or higher quality wood)
- Hardware stores (for pins, brackets, and cleats)
If you want to learn more about wood types and shelf hardware, check out this helpful resource: Family Handyman.
Frequently Asked Questions
How Do I Stop Shelves From Sagging?
Use thicker materials (like 3/4 inch plywood), add a center support, or limit the shelf width to 30 inches or less. Edge banding (a wood strip along the front) also helps. Avoid placing heavy items on thin or unsupported shelves.
What Is The Best Way To Make Shelves Adjustable?
Drill a series of holes on each cabinet side using a shelf pin jig. Insert metal shelf pins at your desired height. Adjustable brackets are another good option, especially for heavier loads.
Can I Add Shelves To Cabinets With Doors?
Yes. Measure carefully so the shelf fits inside the opening and doesn’t block the doors. For cabinets with a center stile, cut the shelf in two and install each piece separately, or use brackets for support.
What Tools Are Essential For This Project?
At minimum, you need a tape measure, drill, level, saw, and screwdriver. A shelf pin jig is very helpful for adjustable shelves. Sandpaper and safety gear are also important.
Is It Cheaper To Add Shelves Or Buy New Cabinets?
It’s almost always cheaper to add shelves to your existing cabinets. Materials for one shelf usually cost $10-$25, while new cabinets can cost hundreds or thousands of dollars. Adding shelves is a smart upgrade, especially for renters or budget-conscious homeowners.
Adding shelves to your cabinet can transform the way you organize and use your space. With careful planning, the right materials, and a little patience, this simple project can give you years of added storage and convenience. Start small, take your time, and you’ll be surprised by how much you can improve your home with just a few shelves.