
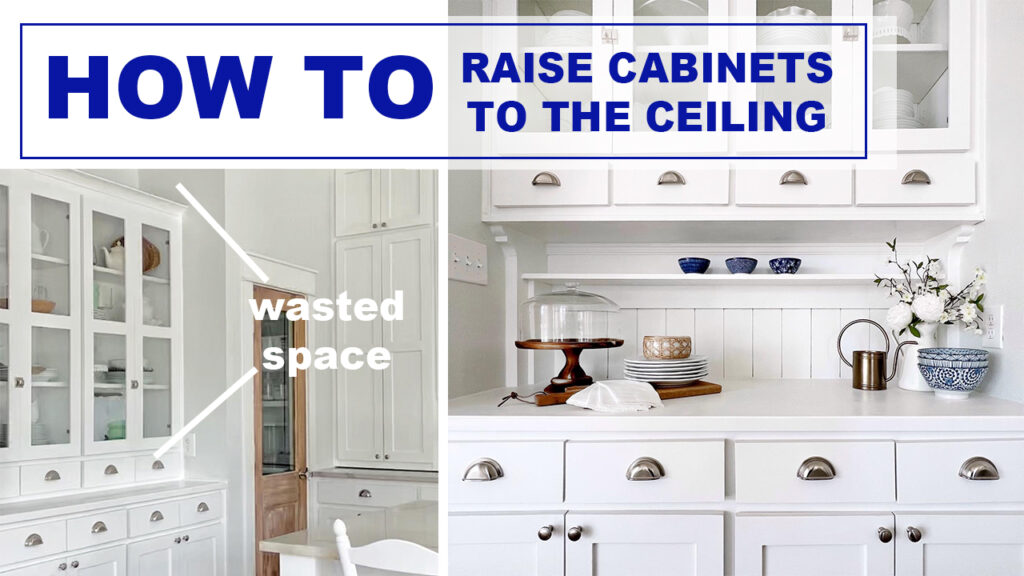
Raising kitchen cabinets is a smart way to create more space, improve the look of your kitchen, and even boost your home’s value. Many homeowners want taller cabinets, but don’t know how to do it safely or what steps are involved.
If you feel your cabinets are too low, or you want to fit a bigger fridge, add a backsplash, or just modernize your kitchen, this guide will help you understand every detail. You’ll learn how to plan, what tools you need, which mistakes to avoid, and how raising cabinets can change your kitchen’s function and feel.
This article covers everything about how to raise kitchen cabinets—from the first measurement to the final touch. You’ll see how to handle old cabinets, what materials work best, and how to ensure a professional finish. Whether you’re doing it yourself or hiring help, you’ll find clear steps and expert advice. Let’s explore the process and help you make your kitchen taller, smarter, and more beautiful.
Why Raise Kitchen Cabinets?
Homeowners often want more space or a fresh look, but raising cabinets has more benefits than you might expect. Here are the main reasons people choose to raise their kitchen cabinets:
- Increase storage space: Raising cabinets lets you add a shelf or more storage underneath. This is ideal for small kitchens or when you need extra room for appliances.
- Fit larger appliances: Sometimes, old cabinets block space for a new fridge, oven, or dishwasher. Raising them solves this problem.
- Improve kitchen design: Higher cabinets look modern and sleek. They make your kitchen feel bigger and less crowded.
- Add a backsplash: If you want a tall backsplash or decorative tile, raising cabinets gives you more wall space.
- Boost home value: Updated cabinets attract buyers. Kitchens are key rooms in any home sale, so a fresh design can increase your property’s value.
- Better lighting: With more wall space, you can add under-cabinet lights or brighter fixtures.
- Easier cleaning: Raised cabinets make it simpler to clean behind and below them.
Many homeowners miss the point that raising cabinets can also help with ventilation and electrical upgrades. When cabinets sit higher, you can add a range hood, extra outlets, or even smart kitchen devices. These features often go unnoticed in older kitchens.
Planning Your Cabinet Raising Project
Before you start, careful planning is crucial. Rushing into the process can lead to mistakes, wasted money, or even damage. Here are the key steps to plan your project:
Measure Your Space
Start by measuring your kitchen carefully. Measure the height between the countertop and the ceiling, the width of each cabinet, and the depth. Make sure you note:
- The current cabinet height
- Desired new height
- Space for appliances
- Space for lighting and backsplash
Most US kitchens have upper cabinets mounted about 18 inches above the countertop. If you want more space, aim for 20–24 inches between the countertop and cabinet base.
Check For Obstacles
Look for pipes, wires, vents, or other obstacles behind and above the cabinets. If you find electrical outlets or plumbing, you may need to move them. This step is vital, as missing hidden obstacles can turn a simple job into a complex repair.
Decide On The Look
Think about the final design. Will you add new shelves underneath? Do you want a taller backsplash? Will the cabinets need new trim or moldings? Sketch a plan or use a free online tool to visualize the finished kitchen.
Budget For Materials And Labor
Raising cabinets is cheaper than replacing them, but costs can add up. Consider:
- Extra wood or filler strips
- New mounting hardware
- Paint or finish touch-ups
- Labor (if hiring a professional)
A DIY project often costs between $150–$500, depending on materials and tools. Professional services may range from $500–$1,500, especially if you need electrical work.
Get Permits If Needed
Some cities require a permit for kitchen renovations. Check local rules before you start, especially if moving electrical or plumbing.
Tools And Materials You’ll Need
To raise your kitchen cabinets safely and efficiently, gather the right tools and materials. Having everything ready makes the job much smoother.
- Screwdriver (electric or manual)
- Drill and drill bits
- Level (24-inch recommended)
- Tape measure
- Stud finder
- Utility knife
- Wood shims or filler strips
- Wood screws
- Pry bar
- Safety goggles and gloves
- Painter’s tape
- Touch-up paint or finish
- Caulk (for gaps)
- Putty (for filling holes)
For most kitchens, you’ll also need some extra mounting brackets or cabinet hangers. If you plan to add new shelves or a backsplash, get those materials ahead of time.
Many beginners forget about protective sheets for countertops and floors. It’s easy to scratch surfaces or drop screws, so cover everything before you begin.
Step-by-step Guide: How To Raise Kitchen Cabinets
Let’s break down the process into clear steps. Follow these instructions carefully to raise your kitchen cabinets without damage or mistakes.
1. Prepare Your Kitchen
Clear out the kitchen. Remove items from cabinets, cover countertops and floors, and turn off power to any nearby outlets. Take down any hanging lights or decorations.
2. Remove Cabinet Trim And Molding
Carefully remove any trim or molding attached to the cabinets. Use a utility knife to cut paint lines, then gently pry off the trim. Set aside for reinstallation or replacement.
3. Loosen The Cabinets
Using a screwdriver or drill, remove the screws holding the cabinet to the wall. Cabinets are usually attached at the top and bottom. Have a helper hold the cabinet as you loosen it to prevent it from falling.
4. Mark New Mounting Points
Use your tape measure and level to mark the new mounting height on the wall. Make sure the lines are straight and at your desired height. Mark the stud locations for secure mounting.
5. Fill Old Holes
After removing the cabinets, fill old screw holes with wood putty. Sand smooth once dry. This prevents weak spots and makes painting easier.
6. Add Filler Strips Or Shims
If you need extra height, install filler strips or wood shims between the cabinet and wall. This helps level the cabinet and fills any gaps caused by raising them.
7. Reattach Cabinets At New Height
Lift the cabinets to the new mounting marks. Use a level to make sure they’re straight. Drill new pilot holes into the studs and attach the cabinets with wood screws. Double-check alignment before tightening all screws.
8. Reinstall Trim And Molding
Reattach the trim or molding you removed earlier. If gaps appear, fill with caulk and smooth for a neat finish.
9. Paint And Touch Up
Paint over any exposed areas, filled holes, or scuffs. Match the cabinet color for a seamless look.
10. Add New Features
If you plan to add a backsplash, shelf, or lighting, now is the time. With cabinets raised, you have more space for new designs.
11. Clean Up
Remove protective sheets, clean dust and debris, and reinstall cabinet contents.
Common Mistakes To Avoid
Many homeowners make errors when raising cabinets. Here are mistakes to watch out for:
- Skipping measurements: Not measuring properly leads to uneven cabinets and wasted materials.
- Ignoring obstacles: Failing to check for pipes or wires can cause damage or danger.
- Using wrong screws: Cheap or short screws may not hold heavy cabinets securely.
- Forgetting shims: Cabinets often need shims to sit level after raising.
- Rushing paint touch-ups: Skipping finish work leaves the kitchen looking unfinished.
- Not checking for permits: Legal problems can arise if you skip permits in some areas.
A less obvious mistake is forgetting to check cabinet depth. If you raise cabinets too high, they might block ceiling fans, lighting, or ventilation systems.
Comparing Cabinet Raising Vs. Replacement
Many people wonder if it’s better to raise their old cabinets or replace them with new ones. Here’s a side-by-side comparison to help you decide.
| Feature | Raising Cabinets | Replacing Cabinets |
|---|---|---|
| Cost | $150–$500 (DIY) | $3,000–$10,000 |
| Time | 1–2 days | 1–2 weeks |
| Skill Needed | Intermediate | Advanced/professional |
| Customization | Limited | Unlimited |
| Waste/Disposal | Low | High |
| Impact on Home Value | Moderate | High |
Raising cabinets is faster, cheaper, and less wasteful. But if your cabinets are damaged or outdated, full replacement may be better.
Choosing The Right Height For Raised Cabinets
The perfect height depends on your needs. Here are some guidelines:
- Standard height: 18 inches above countertop is normal in the US.
- Modern kitchens: 20–24 inches gives space for a tall backsplash and bigger appliances.
- Tall ceilings: If your ceiling is higher than 9 feet, raise cabinets even more for a grand look.
- Accessibility: Make sure raised cabinets are not too high for daily use. If you’re shorter or have family members with mobility issues, keep cabinets within easy reach.
A little-known tip: Install adjustable shelves inside cabinets when raising them. This lets you customize storage for different items.
Credit: oldbarncompany.com
Materials For Filler Strips, Shims, And Mounting
Choosing the right material is important for a secure and neat result. Here’s a comparison of common options:
| Material | Strength | Cost | Finish | Best Use |
|---|---|---|---|---|
| Solid wood | High | $$ | Stain/Paint | Visible filler strips |
| Plywood | Medium | $ | Paint | Hidden shims |
| Composite boards | Low–Medium | $ | Paint only | Non-load areas |
| Metal brackets | High | $$$ | Not visible | Heavy cabinets |
Choose solid wood for visible areas, and plywood or metal for hidden supports.
Adding A New Backsplash After Raising Cabinets
With extra space, many homeowners add a backsplash for style and protection. Here’s how to do it:
- Choose your material: Tile, glass, metal, or stone are popular. Tile is easiest for DIY.
- Measure the area: Calculate square footage between countertop and cabinet base.
- Prepare the wall: Clean, patch holes, and sand the area.
- Install the backsplash: Follow manufacturer instructions. Most tiles need adhesive and grout.
- Seal edges: Use caulk at the countertop and cabinet edges for a waterproof finish.
A useful tip: Choose light-colored backsplash for small kitchens. It reflects more light and makes the space feel bigger.

Credit: www.youtube.com
Upgrading Lighting And Electrical Features
Raising cabinets opens up new options for lighting and outlets. Consider these upgrades:
- Under-cabinet lights: LED strips or puck lights are easy to install and energy-efficient.
- Extra outlets: With more wall space, add outlets for small appliances.
- Smart devices: Install smart switches or USB charging ports for modern convenience.
If you’re unsure about electrical work, hire a licensed electrician. Safety is always the top priority.
How To Handle Old Cabinets And Hardware
If your cabinets are old, check for damage before raising them. Here’s what to inspect:
- Water damage: Look for swelling, stains, or rot.
- Loose joints: Tighten or repair before remounting.
- Peeling finish: Touch up paint or replace doors if needed.
- Worn hardware: Replace screws, hinges, and handles for a fresh look.
Many beginners overlook the importance of upgrading hinges. New hinges can make cabinets open and close smoothly, and support the extra weight if you add shelves.
Professional Vs. Diy: Which Is Better?
Should you raise cabinets yourself or hire a pro? It depends on your skill, time, and budget.
- DIY: Cheaper, but requires skill and patience. Great for handy homeowners.
- Professional: Faster, safer, and usually higher quality. Ideal if you have complex obstacles or want a flawless finish.
A hidden insight: Most professionals use cabinet lifting jigs to make the job easier and safer. If you plan to do it yourself, consider renting one.
Safety Tips For Raising Kitchen Cabinets
Safety should never be ignored. Here are important safety tips:
- Work with a partner: Cabinets are heavy. Always have help when lifting or mounting.
- Use safety gear: Wear goggles, gloves, and closed shoes.
- Turn off power: Shut off electrical circuits before working near outlets.
- Secure cabinets: Double-check screws and brackets.
- Avoid standing on counters: Use a sturdy ladder or step stool.
A less obvious tip: Check ceiling clearance. Cabinets raised too high may hit ceiling fans or light fixtures.
Cleaning And Maintenance After Raising Cabinets
After your cabinets are raised, keep them clean and well-maintained:
- Dust regularly: Raised cabinets collect dust on top. Wipe with a soft cloth.
- Check for loose screws: Inspect every six months.
- Touch up paint: Keep extra paint for quick fixes.
- Clean backsplash: Use mild soap and water.
A practical idea: Place decorative baskets or storage bins on top of raised cabinets for added style and extra storage.
Real-life Examples: Success Stories
Many homeowners have transformed their kitchens by raising cabinets. Here are two examples:
Example 1: Small Kitchen Upgrade
A homeowner in Ohio wanted to fit a new fridge and add a backsplash. By raising cabinets 4 inches, she created enough space for both. The project cost $220 and took two days. She also installed LED lighting under the cabinets for brighter work areas.
Example 2: Modernizing An Older Home
In Texas, a family raised their cabinets 6 inches to match new appliances. They added a stone tile backsplash and extra outlets. The project increased their home’s value by $3,500 according to a local realtor. The job was done by a professional for $1,200.
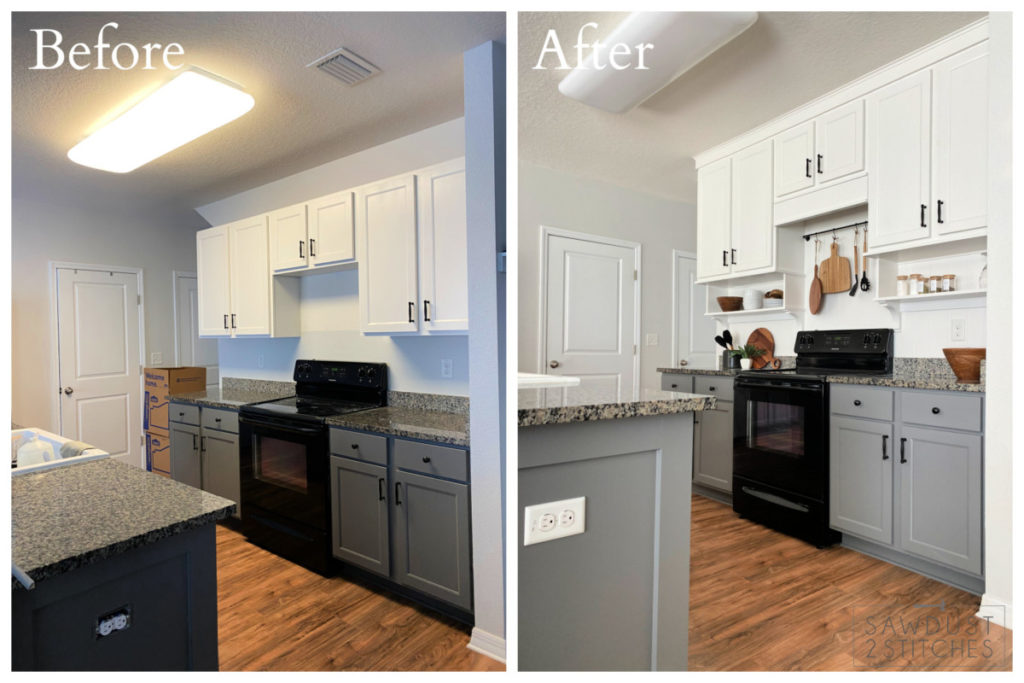
Credit: sawdust2stitches.com
Environmental Impact: Why Raising Is Greener
Replacing cabinets creates waste and uses lots of resources. Raising cabinets is more eco-friendly:
- Less waste: No need to throw away old cabinets.
- Fewer materials: Only filler strips and hardware needed.
- Less energy: Raising takes less time and energy than full renovation.
- Preserves wood: Keeps original wood and finish intact.
According to the EPA, home renovations create over 600 million tons of waste yearly. Raising cabinets instead of replacing them is a small but meaningful step toward sustainability.
When Not To Raise Cabinets
Sometimes, raising cabinets isn’t the best choice. Avoid raising cabinets if:
- Cabinets are damaged: Severe water damage or rot means they need replacing.
- Ceiling is too low: If you have less than 8 feet of height, raised cabinets may look cramped.
- Appliances won’t fit: If new appliances require a full layout change, consider a larger renovation.
- Budget allows for full upgrade: If you can afford new cabinets, you may get a better result.
A smart tip: If you plan to sell your home soon, check with a realtor to see if buyers in your area prefer raised or replaced cabinets.
Frequently Asked Questions
How Much Does It Cost To Raise Kitchen Cabinets?
Most DIY projects cost $150–$500 for materials and tools. Hiring a professional may cost $500–$1,500 depending on kitchen size and complexity. Adding extras like lighting or a backsplash increases costs.
Is It Easy To Raise Kitchen Cabinets Myself?
Raising cabinets is an intermediate DIY project. You’ll need basic tools, careful measurements, and some help lifting cabinets. If you’re comfortable with home repairs, you can do it. If not, hire a pro.
Will Raising Cabinets Damage My Walls?
If you follow proper steps—using a stud finder, filling old holes, and mounting securely—your walls should be safe. Avoid over-tightening screws, and check for hidden pipes or wires before drilling.
Can I Add New Shelves Or Lighting After Raising Cabinets?
Yes. Raising cabinets gives you extra wall space for shelves, lighting, or outlets. Many people add LED strips or open shelves below the cabinets. Always use safe installation methods.
How Do I Make Sure Cabinets Are Level After Raising?
Use a level and mark new mounting lines carefully. Install shims or filler strips if needed. Double-check alignment before tightening screws. Uneven cabinets can cause problems with doors and shelves.
Raising kitchen cabinets is a practical, stylish, and eco-friendly way to update your kitchen. By following the steps above, planning carefully, and using the right tools, you can transform your space in just a few days. Whether you do it yourself or hire a professional, you’ll enjoy more room, better design, and a kitchen that feels brand new. For more details and expert advice, check out This Old House for extra tips and guidance.