A loose kitchen faucet base can be more than just annoying—it can lead to leaks, water damage, and even mold under your sink. If you notice your faucet wobbles when you turn it or water is seeping at the base, it’s time to tighten things up.
Many homeowners put off this task, thinking it’s difficult or requires a plumber. But with the right approach, you can fix it yourself and save money.
This guide will show you exactly how to tighten a kitchen faucet base, step by step. You’ll learn what tools you need, how to prepare, and the best way to work safely and cleanly. We’ll also cover common mistakes, troubleshooting tips, and when it’s smarter to call in a professional.
Whether you’re a DIY beginner or have some experience, you’ll find answers to all your questions here. Let’s get your kitchen faucet sturdy again.
Why Does A Kitchen Faucet Base Get Loose?
Understanding why your faucet base loosens can help you prevent future problems. Here are the most common reasons:
- Regular Use: Every time you turn the faucet, especially with single-handle designs, you add a small amount of force to the base. Over time, this can loosen the nuts holding the faucet.
- Vibration: Running water and the vibration from the pipes can shake the base gently, causing the mounting hardware to loosen.
- Improper Installation: If the faucet wasn’t tightened enough during installation, or the wrong tools were used, it may come loose more quickly.
- Worn Parts: The rubber or plastic washers under the base can degrade, making it harder for the nuts to stay tight.
- Water Leaks: Leaks can corrode the mounting hardware, making it easier for the base to shift or wobble.
A loose base may seem like a small issue, but it can lead to bigger problems. Water can seep under the sink, encouraging mold or damaging your cabinets. Fixing it soon is always the best idea.
Tools And Materials You Will Need
Having the right tools makes the job much faster and safer. Most of these are easy to find at any hardware store.
- Basin wrench: This specialty tool is designed for tight spaces under the sink.
- Adjustable wrench: For tightening nuts and bolts.
- Screwdriver: Depending on your faucet, you may need a Phillips or flathead.
- Flashlight or headlamp: It’s dark under the sink; good light is essential.
- Towel or sponge: Useful for wiping up any drips.
- Bucket: To catch any water if you accidentally loosen a hose.
- Plumber’s putty (optional): For resealing the base if you need extra leak protection.
- Safety gloves: Protect your hands from sharp edges or hot pipes.
If you’re missing a basin wrench, you can sometimes use a regular adjustable wrench, but it will be much harder in the cramped space under a kitchen sink.

Credit: www.reddit.com
Preparing Your Workspace
Preparation is crucial for a smooth repair. Many beginners skip these steps and end up frustrated or make a mess. Here’s how to get ready:
- Clear out everything under the sink. Remove cleaners, bins, or supplies so you have room to work.
- Shut off the water supply. Find the hot and cold shutoff valves under the sink and turn them clockwise. Test the faucet to make sure the water is off.
- Place a bucket under the faucet. Even with the water off, some water may drip from the hoses.
- Dry the area. Use a towel to wipe down under the sink and around the faucet base. This helps you spot leaks later.
- Check your tools. Make sure everything is within easy reach before you crawl under the sink.
Non-obvious tip: Take a photo of your faucet and the area under your sink before you start. If you need to visit the hardware store or put parts back in place, this will help you remember where everything goes.
Identifying Your Faucet Type
Not all kitchen faucets attach the same way. Knowing your faucet type will help you understand what to look for and how to tighten it properly.
Common Faucet Types
| Faucet Type | Mounting Method | Common Tightening Method |
|---|---|---|
| Single-handle | Single hole or three holes | Usually a single mounting nut under the sink |
| Double-handle | Three holes | Two mounting nuts, one under each handle |
| Pulldown/Pull-out sprayer | Single or three holes | Same as single-handle, but may have extra hose connections |
Look under your sink with a flashlight and match what you see to the table above. Most kitchen faucets will have a large nut (sometimes two) holding them tight to the countertop. If you have a commercial-style or wall-mounted faucet, the steps may be a bit different.
Beginner’s insight: Some modern faucets use a plastic mounting bracket instead of a metal nut. These can crack or strip over time. If your bracket looks damaged, you may need a replacement part.
Step-by-step: How To Tighten A Kitchen Faucet Base
Let’s walk through the process from start to finish. Take your time, and don’t rush—working under the sink can be awkward, but patience is key.
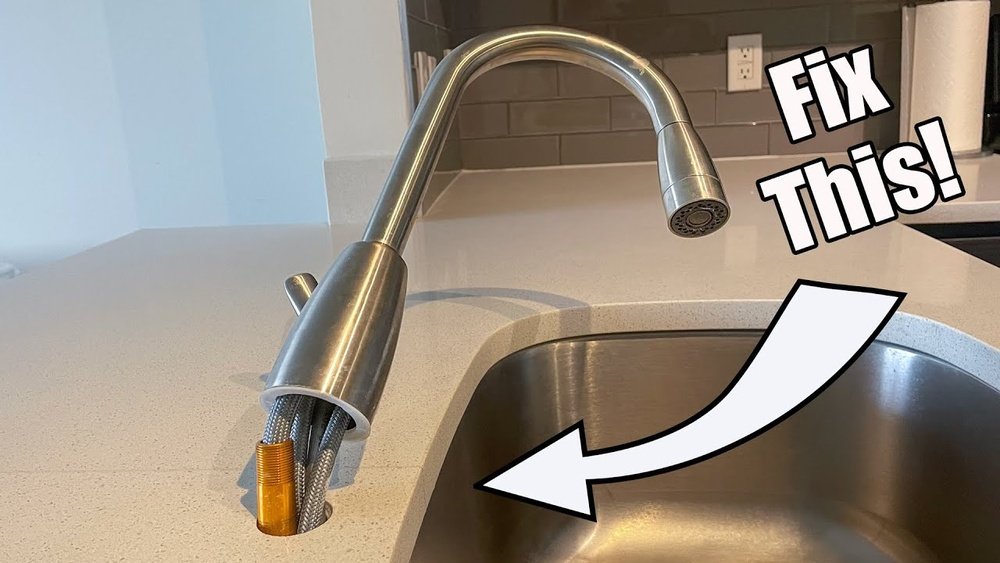
Step 1: Get Under The Sink
Lay down an old towel for comfort. Slide yourself under the sink with your flashlight and basin wrench. Check to see if you can reach the mounting nut easily. Most nuts are at the base of the faucet, near the back wall.
Step 2: Locate The Mounting Nut
Feel around the underside of the countertop where the faucet comes through. You should find a large nut (metal or plastic) securing the faucet. If you have a double-handle faucet, there will be a nut under each handle.
Step 3: Check For Leaks Or Damage
Before tightening, look for signs of corrosion, rust, or cracked plastic. If you find any, tightening may not solve your problem, and you may need to replace the mounting hardware.
Step 4: Tighten The Nut
- Fit your basin wrench around the nut. Turn it clockwise to tighten.
- If you’re using an adjustable wrench, be careful not to strip the nut or damage the supply lines.
- Tighten until the faucet base on top of the counter no longer moves. Do not overtighten—you could crack the sink or the faucet base.
Non-obvious tip: If the nut is very loose, tighten it slowly in stages. This helps avoid misaligning the faucet or pinching the supply lines.
Step 5: Check Alignment
Once the nut is snug, go back above the sink. Make sure the faucet is straight and the handle(s) move freely. If it’s not aligned, loosen the nut slightly, adjust the faucet, and retighten.
Step 6: Turn On The Water And Test
Open the shutoff valves under the sink. Run both hot and cold water for a minute. Watch for leaks under the sink and at the base. If you see drips, tighten the nut a little more.
Step 7: Clean Up
Wipe down any water and put your supplies back under the sink. If you used plumber’s putty, clean any excess from around the base.
When To Use Plumber’s Putty Or Sealant
Most kitchen faucets have a rubber or plastic gasket under the base to prevent leaks. Sometimes, especially with older faucets or granite countertops, you may want extra protection.
- Plumber’s putty is good for sealing small gaps between the faucet base and the sink. Roll a small amount into a rope and press it under the base before tightening.
- Silicone sealant works better on stone or uneven surfaces. Apply a thin bead before installing the faucet.
Caution: Do not use plumber’s putty on plastic or stone sinks unless the manufacturer says it is safe. Some materials can be stained or damaged.
What If The Mounting Nut Is Stuck?
Sometimes, the mounting nut is corroded or stuck. Here’s how to handle it:
- Spray with penetrating oil. Let it soak for 10-15 minutes.
- Use a basin wrench for extra leverage.
- Tap gently with a small hammer to loosen corrosion.
- If the nut won’t move, you may need to cut it off with a hacksaw blade or call a plumber.
Never force the nut too hard—if the supply lines break, you could cause a big leak.
Troubleshooting Common Problems
Even with careful work, you might run into challenges. Here’s how to solve them:
Faucet Still Feels Loose After Tightening
- Check if the mounting nut is stripped or damaged.
- Make sure the gasket under the base isn’t worn out.
- If the countertop is thin or damaged, you may need a bigger washer for support.
Leaking At The Base
- Make sure the gasket or sealant is in good condition.
- Tighten the nut a bit more, but not so much that the gasket squeezes out.
- If leaks continue, you may need to replace the gasket or use silicone sealant.
Faucet Won’t Stay Aligned
- Tighten the nut slowly in stages.
- Hold the faucet straight from above while tightening.
- If it keeps shifting, check for debris under the base or a broken bracket.
Nut Or Bolt Is Stripped
- Replace the nut with a new one from the hardware store.
- Bring the old nut for an exact match.
- If the bolt is damaged, you may need a new mounting kit.
Tips For Working In Tight Spaces
Under-sink repairs can be uncomfortable. Here’s how to make it easier:
- Use a headlamp to keep both hands free.
- Place foam or a folded towel under your back for comfort.
- Take breaks if your arms get tired or cramped.
- Use extendable tools like a telescoping basin wrench.
Pro insight: Many people tighten from awkward angles and slip, scraping their hands. Wearing gloves and working slowly reduces injuries.
How Tight Should The Faucet Base Be?
This is a common question, and the answer is important. The base should be:
- Snug enough that the faucet doesn’t move when you use it.
- Not so tight that you risk cracking the sink, warping the base, or stripping the nut.
If you’re unsure, stop tightening when the faucet feels sturdy but before you need to use a lot of force.
Tightening Torque Comparison
Here’s a look at typical recommended torque values for faucet mounting nuts:
| Faucet Type | Recommended Torque (in-lbs) | Hand Tightening Acceptable? |
|---|---|---|
| Standard kitchen faucet | 20–35 in-lbs | Yes, usually sufficient |
| Pull-down/pull-out faucet | 30–40 in-lbs | Hand tight, finish with wrench |
| Heavy-duty/commercial | 40–50 in-lbs | No, always use wrench |
Most people don’t have a torque wrench for plumbing, but this shows you don’t need to crank it down as hard as possible.
Maintaining A Tight Faucet Base
Once you’ve fixed your faucet, a little maintenance will keep it tight for years.
- Check the base every 6 months for looseness.
- Wipe up water around the base after use to prevent leaks and corrosion.
- Avoid using the faucet as a handle to push heavy pots or pans; this stresses the mounting hardware.
- If you notice movement, tighten the nut before it gets worse.
Pro insight: Many people forget to check the faucet base during kitchen cleaning. A quick check can prevent expensive water damage.
When To Call A Plumber
Most loose faucet bases are easy to fix, but sometimes it’s better to get help:
- If you can’t access the mounting nut due to cramped or unusual plumbing.
- If the mounting hardware is rusted solid or the sink is cracked.
- If you see ongoing leaks even after tightening.
- If you feel unsure at any point—plumbers have special tools and can prevent costly mistakes.
A professional repair usually costs between $100 and $200. Compare this to the cost of water damage, and it’s often worth it if you’re not comfortable with DIY.
Cost Comparison: Diy Vs. Professional Repair
To help you decide, here’s a quick breakdown of typical costs:
| Option | Estimated Cost | Time Needed | Pros | Cons |
|---|---|---|---|---|
| DIY | $10–$30 (tools & supplies) | 30–60 minutes | Saves money; learn new skill | Can be awkward; risk of mistakes |
| Professional plumber | $100–$200 | 30–60 minutes | Fast; guaranteed work | More expensive |
If you already have the tools, DIY is usually the best value. If you’re missing tools or are nervous about working under the sink, hiring a plumber may be less stressful.
Preventing Faucet Base Loosening In The Future
Prevention is better than repair. Here’s how to keep your faucet base tight and trouble-free:
- Install correctly: Follow the manufacturer’s instructions and use all washers and gaskets.
- Check every 6 months: Give the faucet a gentle wiggle to see if it moves.
- Don’t overtighten: Too much force can damage the sink or faucet.
- Wipe up spills: Water left around the base leads to corrosion and looseness.
- Avoid using faucet for leverage: Don’t push or pull heavy items with the faucet spout.
- Replace worn parts: Old gaskets and mounting brackets should be replaced during repairs.
With good installation and care, your faucet base should stay tight for many years.

Credit: www.youtube.com
Safety Reminders
- Always shut off the water before working on plumbing.
- Use safety gloves to protect your hands from sharp metal or hot pipes.
- Keep tools and small parts away from children and pets.
- If you smell gas or see sparks, stop and call a professional immediately.
Important: Even small leaks can cause mold and wood rot under your sink. Always check for moisture after a repair.
Expert Tips For A Professional-looking Result
- Use a small bead of clear silicone around the faucet base on stone countertops for a neat look and extra leak prevention.
- Tighten the nut in small increments and check the faucet’s alignment from above as you go.
- If you have a helper, have them hold the faucet straight while you work underneath.
- For hard-to-reach nuts, a flexible basin wrench or a socket wrench with a long extension can make the job much easier.

Credit: www.wowowfaucet.com
Where To Find Replacement Parts
If you discover a cracked bracket, stripped nut, or worn gasket, you’ll need replacements. Most hardware stores carry universal faucet mounting kits. For brand-specific parts, check the manufacturer’s website or a plumbing supply store.
Pro tip: Bring your old part to the store for an exact match. Some faucets use unique sizes or shapes.
You can also find detailed diagrams and part numbers on sites like The Home Depot.
Frequently Asked Questions
Why Does My Kitchen Faucet Base Keep Getting Loose?
Repeated use, vibration, and water leaks can cause the mounting nut or bracket to loosen over time. If the gasket is old or the faucet wasn’t installed tightly enough, it will loosen faster. Regular checks and proper installation help prevent this.
Do I Need Special Tools To Tighten My Kitchen Faucet Base?
A basin wrench is the best tool for this job. It’s designed for tight spaces under the sink. In some cases, you can use an adjustable wrench or pliers, but they may not fit or provide enough leverage.
Is It Safe To Use Plumber’s Putty On All Sinks?
Plumber’s putty is safe on most metal sinks but can stain or damage some stone or plastic surfaces. Always check the manufacturer’s instructions for your faucet and sink before using putty or sealant.
How Long Does It Take To Tighten A Faucet Base?
Most people can tighten a loose faucet base in 30 to 60 minutes, depending on how easy the nut is to reach. If you need to replace parts or deal with corrosion, it may take longer.
When Should I Call A Professional Plumber?
If you can’t reach the mounting nut, the hardware is rusted, or leaks continue after tightening, call a plumber. Also, if you’re not comfortable working with plumbing, a professional can prevent damage and ensure a long-lasting repair.
Keeping your kitchen faucet base tight is a simple but important task. With careful work, the right tools, and regular checks, you can prevent leaks and keep your kitchen looking great. If you’re ever unsure, don’t hesitate to get expert help—protecting your home from water damage is always worth it.