Making your refrigerator flush with cabinets is more than just a design trend—it’s a way to achieve a sleek, modern kitchen that looks custom-built and high-end. Many homeowners want their fridge to blend in with cabinetry, but often find that most standard refrigerators stick out, breaking the visual flow. Achieving a truly flush look takes careful planning, the right materials, and sometimes a bit of creative problem-solving. This guide will walk you through every step, from understanding what “flush” really means to practical installation tips that even professionals use. If you’ve ever wondered how designers create those seamless kitchen lines or if you can do it yourself, you’re in the right place.
What Does “flush With Cabinets” Mean?
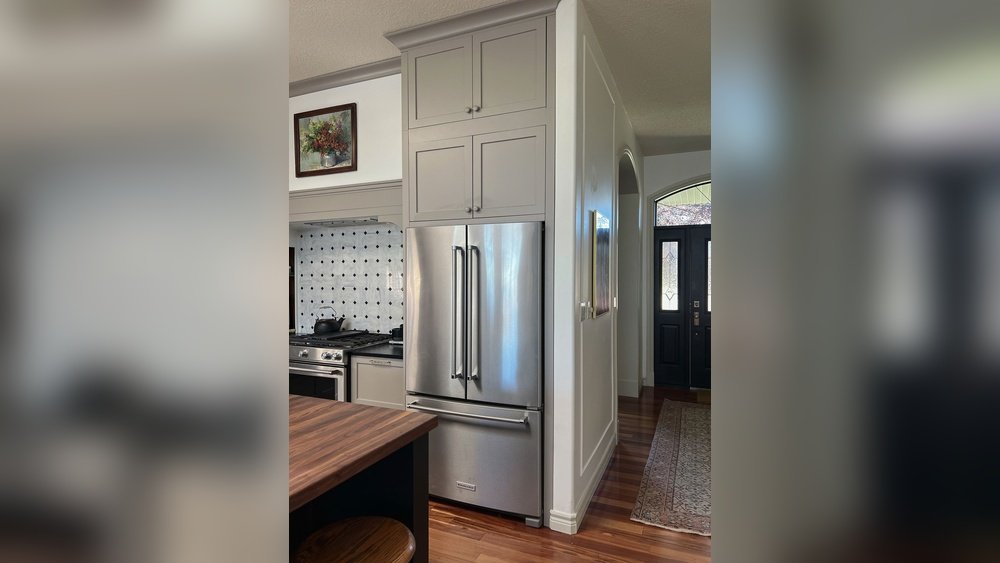
When we say a refrigerator is “flush with cabinets,” we mean the front face of the refrigerator aligns perfectly with the front of the adjacent cabinets. There’s no bumping out, no awkward edges—just a smooth, continuous line from cabinet to fridge. Achieving this isn’t just about sliding the refrigerator back as far as possible. Standard refrigerators are usually deeper than cabinets, so the average fridge will always stick out unless you take extra steps.
Cabinet depth in most US kitchens is about 24 inches, while refrigerators can be 30 inches or more deep. This difference is why most kitchens have a fridge that juts out several inches. To get the flush look, you need to plan around these dimensions.
Why A Flush Refrigerator Matters
A flush refrigerator isn’t just about looks—although the visual effect is impressive. There are practical benefits, too:
- Easier cleaning: Fewer gaps for dust and crumbs to collect.
- Improved traffic flow: No appliance sticking out into walkways.
- Increased home value: Custom kitchen details attract buyers.
- Better use of space: Maximizing every inch in smaller kitchens.
But perhaps the biggest reason is the visual impact. A flush fridge can make even a basic kitchen look professionally designed.
Credit: erinzubotdesign.com
Key Types Of Refrigerators For A Flush Look
Not all refrigerators can sit flush with cabinets. Understanding the main types helps you choose the right model for your project.
| Type | Depth | Typical Features |
|---|---|---|
| Standard-depth | 30–36 inches | Large capacity, affordable, sticks out |
| Counter-depth | 24–30 inches | Shallower, sleeker, more expensive |
| Built-in | 24–25 inches | True flush fit, high-end, customizable panels |
- Standard-depth refrigerators: These are the most common and affordable. They hold a lot but almost always stick out past cabinets.
- Counter-depth refrigerators: Designed to align better with cabinetry, usually 24–30 inches deep. They hold less than standard models but give a more integrated look.
- Built-in refrigerators: The gold standard for flush fit. These are made to sit perfectly with cabinets, often with custom door panels for a seamless look. They are more expensive and sometimes require professional installation.
Planning: Measuring For A Flush Fit
Getting the flush look starts with precise measurements. Even a small mistake can leave you with a gap or a fridge that won’t open fully.
Key Measurements To Take
- Cabinet depth: Usually 24 inches, but measure to be sure.
- Fridge depth (without doors/handles): Some brands list depth with doors, others without.
- Door clearance: Doors need to open wide enough to pull out drawers or shelves.
- Height and width: Ensure the fridge fits the opening with a little space for air circulation.
Tip: Always check the manufacturer’s installation guide. Some fridges need extra clearance for hinges or ventilation.
Example: Measuring Your Space
Suppose your cabinets are 24 inches deep. You find a counter-depth fridge that’s 27 inches deep with doors, but 24 inches without doors. If your doors are thick, your fridge might still stick out. Some brands allow you to recess the fridge further into the wall, but not all spaces permit this.
Cabinet Modifications For A Flush Look
Sometimes, even a counter-depth refrigerator won’t sit flush. In these cases, cabinet modifications can help.
Recessing The Refrigerator Into The Wall
One effective method is to create a recessed niche in the wall behind the fridge. This involves cutting into the drywall and sometimes moving plumbing or electrical lines.
Steps:
- Check for pipes, wires, or vents in the wall behind your fridge.
- Frame a cavity between the wall studs.
- Finish the cavity so it matches your kitchen.
- Slide the fridge into the niche.
Important: This approach isn’t possible if the wall is load-bearing or contains major utilities. Always consult a professional if you’re unsure.
Extending The Side Cabinets
Another trick is to use deeper side panels or build out the cabinetry around the fridge. For example, install 27-inch-deep panels on either side of the refrigerator space, then set standard cabinets in front. This creates the illusion that the fridge is flush, even if it sticks out a bit behind.
Raising The Toe Kick
The toe kick is the space beneath your cabinets. If your fridge sits lower than the cabinets, raising the toe kick or adding a platform can bring the fridge and cabinets into alignment.
Tip: Use matching trim to cover any gaps at the floor for a more custom look.
Panel-ready And Custom Panel Refrigerators
For a truly seamless appearance, consider a panel-ready refrigerator. These models are designed to accept custom cabinet panels on the doors, making the refrigerator almost invisible.
How Panel-ready Models Work
Panel-ready fridges come with unfinished doors. A cabinet maker builds custom panels that match your cabinet faces, attaching them to the fridge. The result: a refrigerator that looks like another cabinet.
Pros:
- Ultimate seamless look
- Works well in luxury kitchens
Cons:
- Expensive
- Requires precise panel construction
Important Details
- Handle style: Some panel-ready fridges use cabinet pulls, while others have hidden handles.
- Hinge type: Integrated hinges allow doors to open fully without bumping adjacent cabinets.
Diy Vs. Professional Installation
Achieving a flush refrigerator look can be a DIY project, but it’s not for everyone. Let’s compare both approaches.
| Factor | DIY | Professional |
|---|---|---|
| Skill level | Intermediate to advanced | Expert |
| Cost | Lower, but risk of mistakes | Higher, but quality and warranty |
| Time | Longer, especially for wall/cabinet mods | Faster, more efficient |
| Customization | Limited by tools and experience | Full range of custom options |
When Diy Works
- You’re only swapping to a counter-depth fridge.
- You have some carpentry experience.
- No major wall or utility changes needed.
When To Hire A Pro
- You want a built-in or panel-ready fridge.
- Wall recessing or electrical/plumbing work is needed.
- You want a perfect, warranty-backed finish.
Installation Steps: Making A Refrigerator Flush With Cabinets
Let’s get practical. Here’s a step-by-step guide to achieving a flush refrigerator look in your kitchen.
1. Choose The Right Refrigerator
- Decide if you need a counter-depth, built-in, or panel-ready model.
- Measure your space and compare with fridge specs.
- Consider door swing—French door models often work best in tight spaces.
2. Prepare The Cabinet Opening
- Remove existing cabinets or panels in the fridge space.
- If needed, adjust or rebuild side panels to match the fridge’s depth.
- Check floor level and reinforce if necessary.
3. Handle Electrical And Plumbing
- Ensure there is a dedicated outlet for the fridge, ideally on its own circuit.
- If your fridge has a water dispenser or ice maker, run a water line behind the unit.
- Move outlets or water lines if they block the fridge from sitting back fully.
Important: Turn off electricity and water before making any changes.
4. Modify The Wall (if Required)
- Mark the area to recess, usually between studs.
- Cut drywall carefully, avoiding wires or pipes.
- Frame and finish the cavity to match the rest of your wall.
- Ensure ventilation space per manufacturer’s requirements.
5. Install Side Panels And Trim
- Fit deeper side panels if the fridge is deeper than cabinets.
- Secure panels to floor and wall for stability.
- Install matching trim to cover any small gaps.
6. Slide In The Refrigerator
- Move the fridge carefully into place.
- Leave at least 0.5 to 1 inch behind for air circulation.
- Adjust leveling feet so the fridge sits perfectly flush with cabinets.
7. Attach Custom Panels (for Panel-ready Models)
- Have custom panels made by a cabinet shop.
- Attach per manufacturer’s instructions, aligning perfectly with adjacent cabinet doors.
- Test that doors open and close smoothly.
8. Add Finishing Touches
- Install matching cabinet hardware or fridge handles.
- Add trim or filler strips as needed.
- Clean up and admire your new flush look.
Ventilation And Safety Considerations
It’s tempting to squeeze your refrigerator into the tightest space possible, but ventilation is critical. Compressors generate heat, and without airflow, your fridge will work harder and may fail early.
- Leave gaps: Most manufacturers recommend at least 0.5 inch at the sides, 1 inch at the top, and 1–2 inches at the back.
- Check vents: Don’t block any vent grilles.
- Read the manual: Each model has different requirements.
Pro tip: If you’re building a wall recess, add vents in the side panel or above the fridge to allow hot air to escape.
Common Mistakes To Avoid
Many homeowners make the same errors when trying for a flush look. Here’s what to watch out for:
- Ignoring door clearance: If the fridge doors can’t open fully, you’ll struggle to remove shelves or drawers.
- Forgetting about ventilation: Too tight a fit can shorten the life of your refrigerator.
- Not leveling the fridge: An uneven fridge can cause doors to swing open or not seal properly.
- Choosing the wrong fridge type: Not all counter-depth models sit perfectly flush—always check the full specs.
- Skipping professional help on complex jobs: Moving plumbing or wiring is best left to an expert.

Credit: www.youtube.com
Real-life Example: Before And After
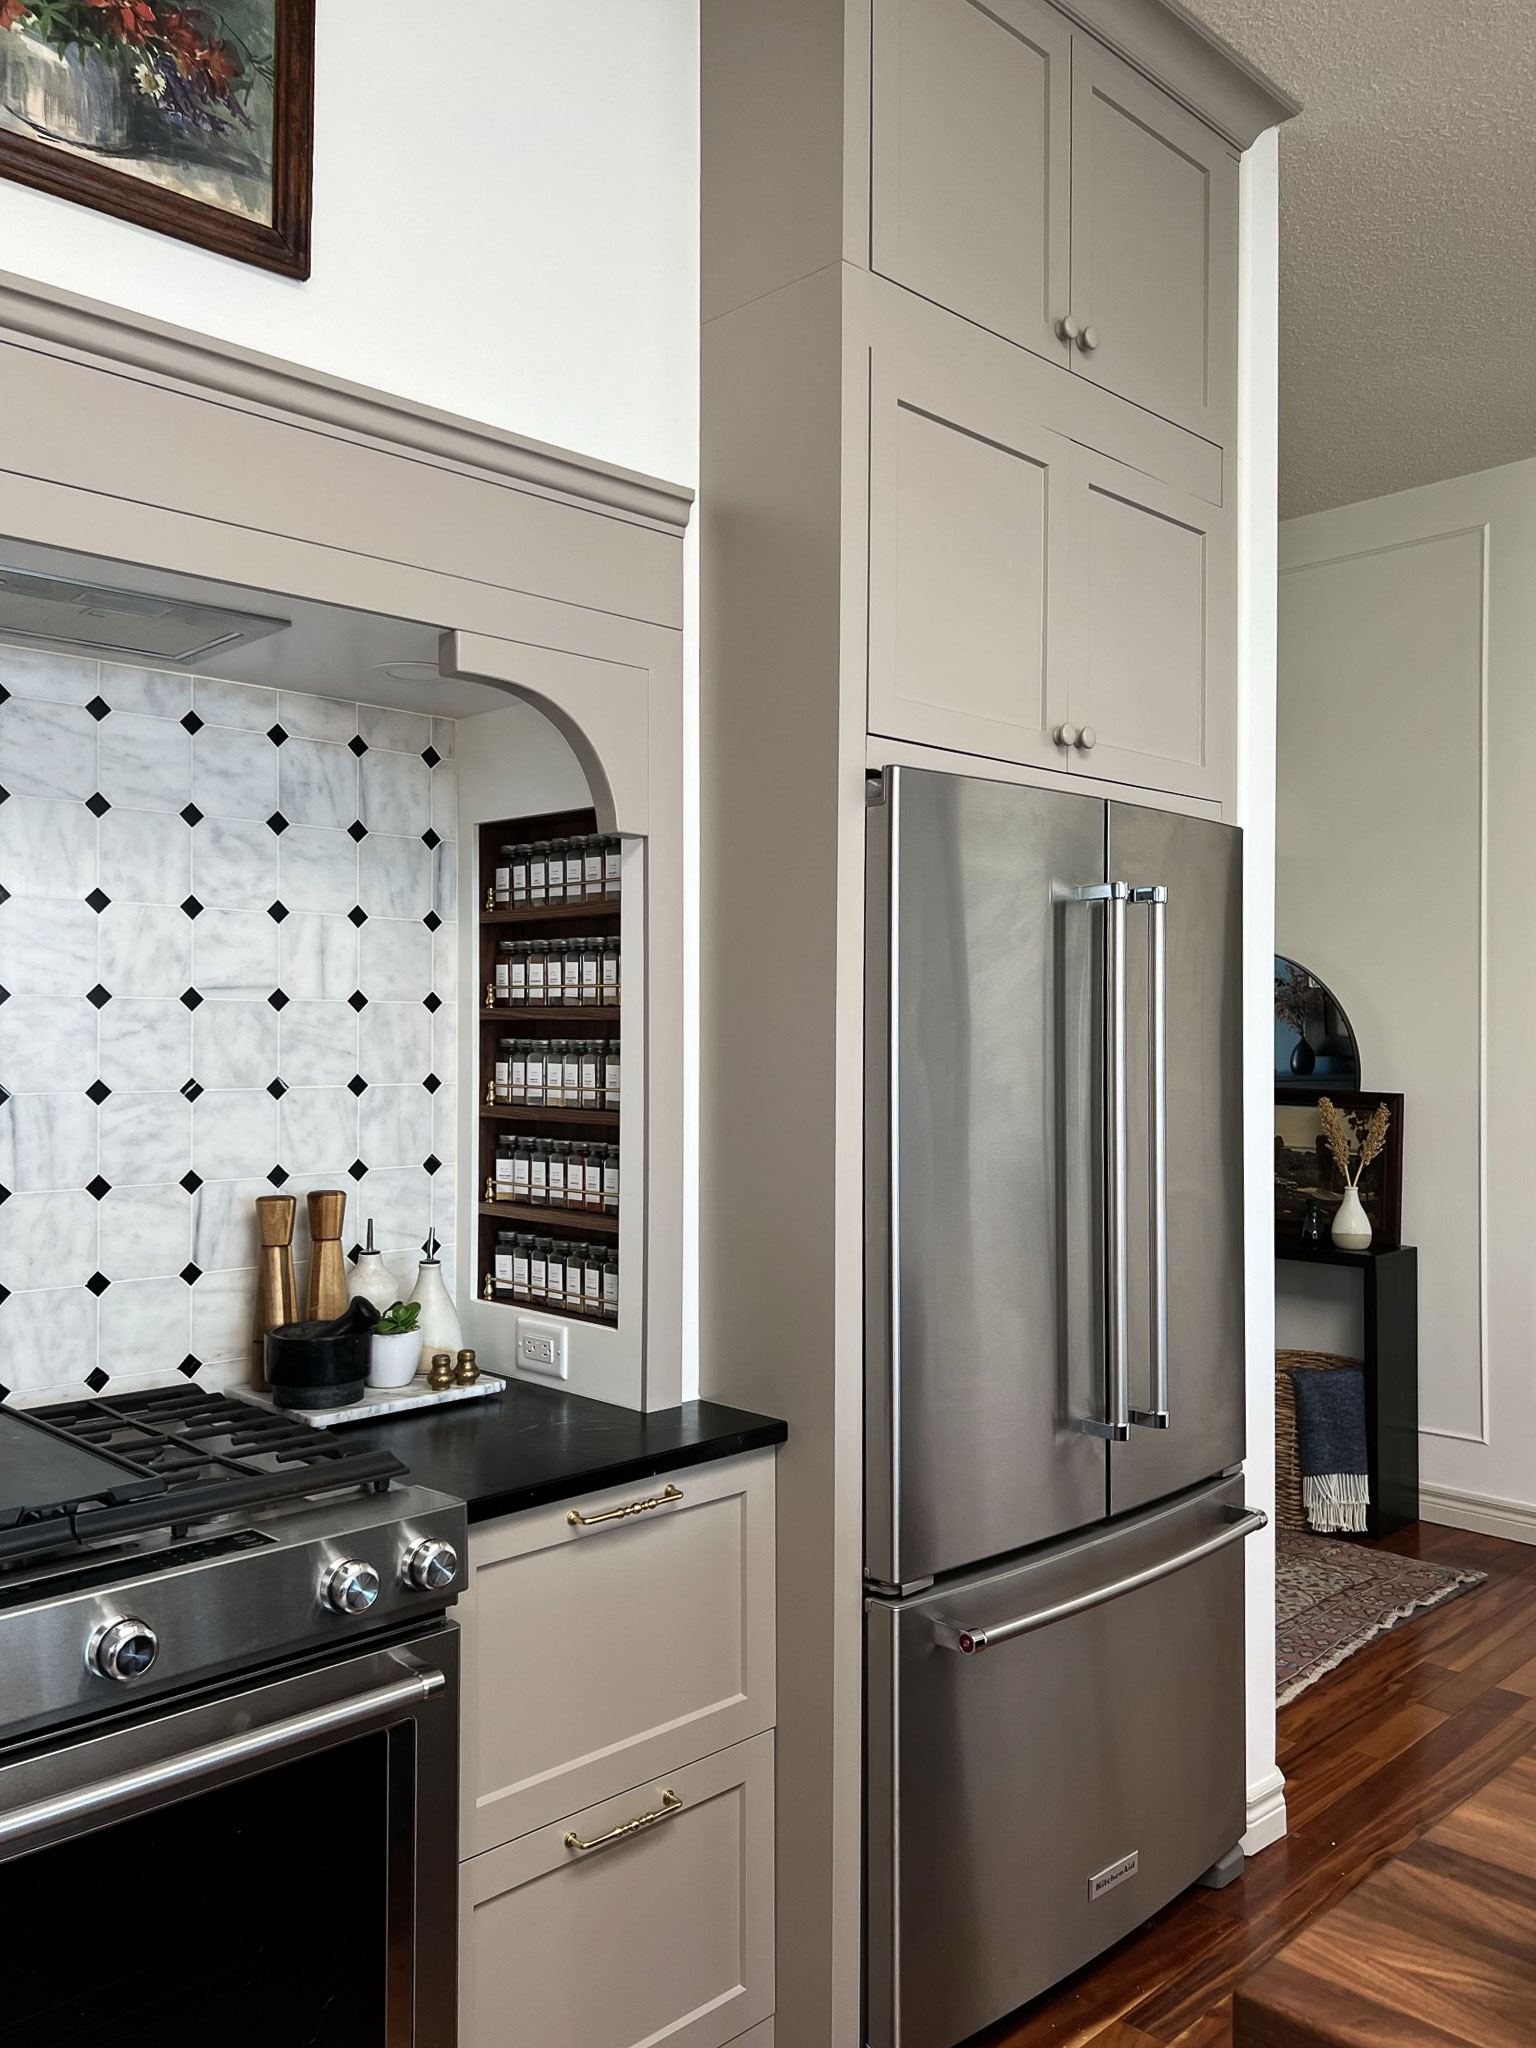
Imagine a kitchen remodel where the old standard-depth fridge stuck out 6 inches from the cabinets. The owners chose a counter-depth fridge (27 inches deep with doors) and recessed the back wall 3 inches. New 27-inch-deep side panels and a custom top cabinet completed the look.
The result? A refrigerator that sits perfectly flush, with no obvious gaps and a smooth transition between all surfaces. The space feels larger and more organized.
Cost Breakdown: What To Expect
Making your refrigerator flush with cabinets can be done on different budgets. Here’s a rough cost comparison:
| Project Type | DIY Cost | Professional Cost |
|---|---|---|
| Counter-depth fridge swap | $1,400–$2,500 | $1,800–$3,200 |
| Wall recessing | $200–$600 (materials only) | $900–$2,500 (with labor) |
| Panel-ready built-in | $5,000+ (panels extra) | $7,000–$12,000 |
Note: These numbers are averages. Custom projects, premium materials, or high-end appliances can cost much more.
Non-obvious Insights And Pro Tips
Most beginners focus only on depth, but two other factors are just as important:
- Cabinet face alignment: Sometimes, the face frame of cabinets (the front trim) sticks out past the box. Make sure the fridge aligns with the frame, not just the box.
- Flooring thickness: If you install new flooring after cabinets, the fridge opening may shrink. Always plan for the final finished floor height.
Another tip: If your kitchen is small, consider a narrower fridge or a column-style fridge/freezer. These are easier to flush and maximize walkway space.
Maintenance And Long-term Care
Once your refrigerator is flush, keeping it that way means regular upkeep:
- Clean side gaps: Dust can build up between the fridge and side panels.
- Check ventilation: Every few months, vacuum the coils and check that vents aren’t blocked.
- Inspect trim and panels: Make sure panels stay tight and handles don’t loosen over time.
- Be careful with spills: In a flush setup, leaks can run under cabinets or panels—clean up spills quickly.
When A Flush Refrigerator Isn’t Possible
Some kitchens can’t accommodate a truly flush fridge because of walls, plumbing, or budget. If so, don’t worry—you can still make the fridge less noticeable:
- Use side panels and a custom top cabinet to “frame” the fridge.
- Choose a fridge in the same color as your cabinets.
- Add decor elements, like plants or open shelves, to draw the eye away.
A nearly flush fridge still looks much better than one sticking out a foot or more.
Sustainability And Energy Efficiency
Flush refrigerators, especially built-in and counter-depth types, are often more energy efficient than older, standard-depth models. New fridges use better insulation and improved compressors, saving money in the long run. Look for ENERGY STAR ratings and check annual energy use in kilowatt-hours (kWh) on the label.
If you’re removing walls or cabinets, recycle old materials where possible. Some cities offer rebates for upgrading to energy-efficient appliances.
Resources And Where To Learn More
If you want to see examples, detailed guides, or get professional help, sites like Houzz offer hundreds of real kitchen projects with flush refrigerators. You can also find manufacturer guides and local kitchen designers for hands-on advice.
Frequently Asked Questions
What Is The Difference Between Counter-depth And Built-in Refrigerators?
Counter-depth refrigerators are designed to be shallower than standard fridges, so they align better with cabinets. However, they may still stick out a bit, especially at the doors. Built-in refrigerators are made to fit perfectly flush with cabinets, and often accept custom panels for a seamless look. Built-ins are generally more expensive and require precise installation.
Can I Make My Existing Fridge Flush With Cabinets?
In most cases, standard-depth fridges cannot be made truly flush, because they are too deep. However, you can improve the look by adding side panels, a top cabinet, or by recessing the wall behind the fridge if possible. If you want a perfect flush look, you’ll likely need to buy a counter-depth or built-in model.
How Much Space Should I Leave Around My Refrigerator For Ventilation?
Most manufacturers recommend at least 0.5 inch on the sides, 1 inch at the top, and 1 to 2 inches at the back for proper airflow. Always check your refrigerator’s manual for specific requirements. Insufficient ventilation can lead to overheating and reduced appliance lifespan.
Are Panel-ready Refrigerators Worth The Extra Cost?
Panel-ready refrigerators offer the most seamless, custom look possible in a kitchen. They are worth it if you want your appliances to blend in completely with your cabinetry and if your budget allows. However, they are more expensive and require custom panels, which adds to the total project cost.
What Is The Best Way To Measure For A New Refrigerator?
First, measure the height, width, and depth of your refrigerator opening. Be sure to measure from the finished floor and consider any countertop overhang. Measure the door swing area to ensure full access. Finally, check that you have enough clearance for ventilation, and always compare your measurements with the manufacturer’s installation guide.
A flush refrigerator is a mark of thoughtful design and smart planning. With the right approach, tools, and attention to detail, you can achieve a kitchen that is as beautiful as it is functional—without the fridge sticking out and disrupting the flow. Whether you go DIY or hire a pro, remember: the best kitchens are built on solid measurements, careful planning, and a little creativity.

Credit: www.reddit.com