
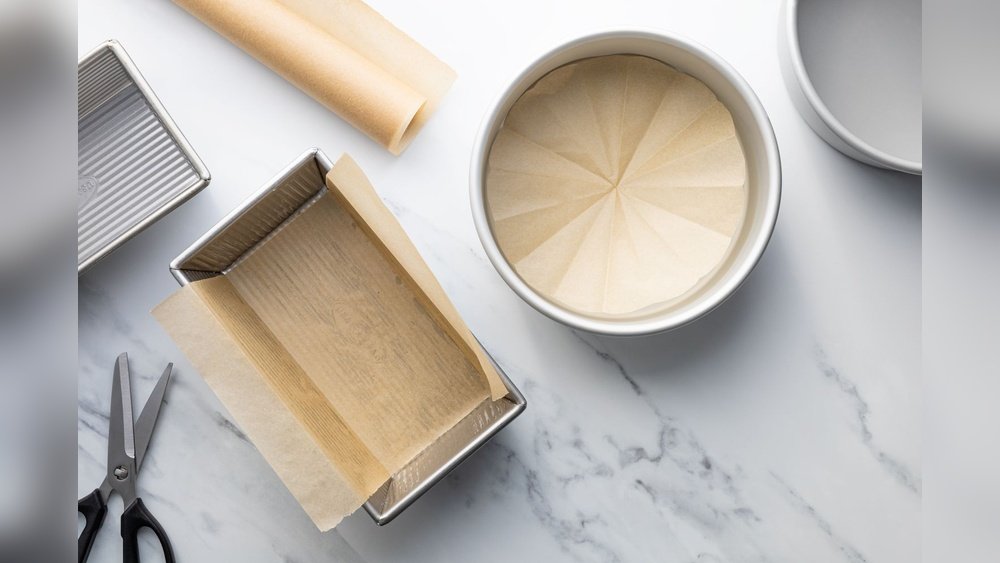
Lining a loaf pan with parchment paper sounds simple, but it’s a kitchen skill that can make a big difference. If you have ever struggled to get banana bread or meatloaf out of a pan, you know the frustration. Stuck edges, torn sides, or half the cake left behind—these problems can ruin your baking.
The good news? Learning how to line a loaf pan with parchment paper solves these issues and brings your baking to the next level.
Many home bakers skip this step or don’t do it correctly. Some try to press a sheet of parchment into the pan, hoping for the best. Others cut a piece that’s too short or too wide, which leads to wrinkled or uneven results.
In this guide, you’ll learn not just the basics, but also the tips that experienced bakers use. You’ll find out how to measure and cut parchment for a perfect fit, how to prevent it from moving, and why corners are more important than you might think.
Even if you’ve lined a pan before, you’ll discover details that most beginners miss.
Whether you are making bread, pound cake, brownies, or even savory dishes, a properly lined loaf pan makes cleanup easier and produces a better-looking result. We’ll also cover common mistakes, how to choose the right kind of parchment, and why using oil or butter with parchment is sometimes helpful.
By the end, you’ll be able to line any loaf pan with confidence—no more stuck cakes, and no more wasted effort.
Why Line A Loaf Pan With Parchment Paper?
Lining a loaf pan with parchment paper is more than a small detail. It protects your baked goods and makes the whole process smoother.
- Easy Release: The main reason bakers use parchment paper is to make baked goods easy to remove. Without it, cakes and breads often stick to the pan, breaking apart when you try to lift them out.
- Prevents Burning: Parchment adds a thin layer that can protect the edges and bottom from burning, especially if your oven runs hot or you’re making something with a lot of sugar.
- Even Cooking: The paper helps distribute heat a little more evenly. This is helpful for thick batters or recipes that need a longer baking time.
- Simplifies Cleanup: Washing a loaf pan with baked-on residue is never fun. Parchment keeps the pan cleaner, so you spend less time scrubbing.
- Professional Appearance: Lined pans create smoother sides and edges, so your finished loaf looks cleaner and more appealing.
- Versatility: With parchment, you can lift out brownies, meatloaf, or even fudge quickly. This makes slicing easier and presentation better.
Some people ask if parchment is really necessary. For some recipes, you might get by with just oil or butter. But for sticky batters, delicate cakes, or anything you want to look neat, parchment paper is the secret ingredient. Even experienced bakers don’t skip this step.
Tools And Materials You Need
Before starting, gather the right tools. Having everything ready makes the process faster and gives better results.
- Loaf pan: Standard sizes are 8.5 x 4.5 inches or 9 x 5 inches. Always check your recipe for the correct size.
- Parchment paper: Regular, unbleached parchment is best. Avoid wax paper—it can smoke or melt in the oven.
- Scissors: For cutting the parchment to the right size.
- Ruler or measuring tape: For accurate sizing.
- Pencil: Optional, for marking cutting lines.
- Non-stick spray, butter, or oil: Optional, to help parchment stick to the pan.
Many people think they can just tear parchment by hand or guess the size. Using scissors and a ruler gives a much cleaner fit. If you bake often, keep these items in a kitchen drawer for easy access.

Credit: www.youtube.com
Step-by-step: How To Line A Loaf Pan With Parchment Paper
Let’s get practical. Here’s a detailed, experience-based method for lining a loaf pan. These steps work for both sweet and savory dishes.
Step 1: Measure The Pan
Set your loaf pan upside down on the parchment paper. With a ruler, measure the length, width, and height of the pan. Most loaf pans have straight sides, but some are slightly angled—measure the top edges for best results.
- For an 8.5 x 4.5 x 2.75 inch pan:
- Length: 8.5 inches
- Width: 4.5 inches
- Height: 2.75 inches
Write these numbers down or keep them in mind.
Step 2: Cut A Base Strip
Cut a strip of parchment that matches the width of the pan’s bottom, but long enough to cover the bottom and up the two long sides with some overhang.
- Example: For a pan 8.5 inches long and 4.5 inches wide, cut a strip about 4.5 inches wide and 14 inches long.
- The overhang (extra paper at each end) should be at least 2 inches. This helps you lift the finished loaf out.
Use a pencil and ruler for accuracy. Crooked strips can cause wrinkles and uneven sides.
Step 3: Cut A Crosswise Strip
Now, cut a second strip for the short sides. This piece should cover the bottom plus the two short sides, with overhang.
- For the same pan, cut a strip about 8.5 inches wide and 10-12 inches long.
- Again, 2 inches of overhang on each side is helpful.
This “cross” method covers every surface and makes lifting simple.
Step 4: Grease The Pan Lightly (optional)
Some bakers skip this, but a light layer of oil or butter helps the parchment stay in place and stick to the pan, preventing it from slipping while you pour in batter.
- Use a paper towel to spread a thin layer of butter, oil, or non-stick spray.
- Avoid using too much—just enough for the parchment to adhere.
This step is especially useful for recipes with thin batters or for pans with tall sides.
Step 5: Press In The Base Strip
Lay the first strip (long piece) into the pan, pressing it down so it fits the bottom and comes up both long sides. The overhang should hang over the edges.
- Press into the corners with your fingers or the flat side of a spatula.
- Try to make the paper as flat as possible, with no wrinkles.
Step 6: Add The Crosswise Strip
Place the second strip (short piece) across the pan, so it covers the bottom and rises up the short sides, also with overhang.
- The two strips should cross at the center, covering the bottom completely.
- Smooth out wrinkles, especially in the corners.
The double-strip method creates “handles” for easy lifting later.
Step 7: Secure The Parchment (if Needed)
For thicker batters, the weight will hold the parchment in place. For thin batters, or if the paper keeps popping up, use a little oil or butter between the parchment and pan, or even a dab in the corners.
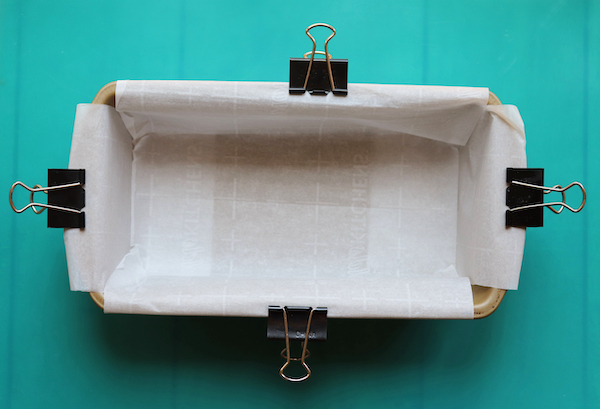
- You can also use metal binder clips on the sides to hold the paper down (remove before baking).
Step 8: Fill And Bake
Pour in your batter, smoothing it into the corners. Bake as directed. The parchment will stay in place and protect the sides.
Step 9: Lift Out The Finished Loaf
Once baked, let the pan cool briefly. Use the parchment overhangs to lift the loaf out gently. Peel away the paper for clean edges.
This method works for most loaf pans and batters. For extra-sticky recipes (like caramel brownies), double-lining with two layers of parchment can help.
Types Of Parchment Paper: Which One To Choose?
Not all parchment papers are the same. Choosing the right one can affect baking results.
| Type | Heat Resistance | Surface | Best Use |
|---|---|---|---|
| Unbleached Parchment | Up to 450°F | Natural, slightly rough | Breads, cakes, cookies |
| Bleached Parchment | Up to 420°F | White, smooth | Light-colored cakes, most baking |
| Silicone-Coated | Up to 500°F | Very smooth, non-stick | Sticky recipes, candy |
| Wax Paper | Not oven-safe | Wax-coated | Food wrapping, cold use |
- Unbleached parchment is the most common for baking. It’s safe, reusable for a few batches, and environmentally friendly.
- Bleached parchment is white, looks clean, and works for most recipes.
- Silicone-coated parchment is very non-stick and best for gooey or sugary recipes.
- Wax paper should never go in the oven. It can melt or catch fire.
One thing beginners miss: Always check the package for the maximum temperature. Some cheaper parchment brands start to brown or curl at high heat.
What Size Of Parchment Paper Do You Need?
Baking results are better when the parchment fits well. If the piece is too short, batter leaks under it. If it’s too big, you get folds and creases.
Here’s a quick guide for common loaf pan sizes:
| Pan Size (inches) | Base Strip (inches) | Crosswise Strip (inches) |
|---|---|---|
| 8.5 x 4.5 | 4.5 x 14 | 8.5 x 12 |
| 9 x 5 | 5 x 16 | 9 x 14 |
| 10 x 5 | 5 x 18 | 10 x 16 |
- Base strip should match the width and cover the bottom plus two sides with overhang.
- Crosswise strip should match the length and cover the bottom plus both short sides.
If your pan is a different size, measure carefully and add 2-3 inches to each dimension for overhang.
Lining Loaf Pans With Odd Shapes Or Sizes
Not all loaf pans are standard. Some are taller, shorter, or even made of silicone or glass. Here’s what to do:
- Mini Loaf Pans: Use the same method, but cut smaller strips. Sometimes a single piece of parchment is enough for pans under 4 inches long.
- Extra-Deep Pans: Add extra length to your strips to cover the tall sides.
- Wide or Angled Pans: Measure the top edge, not the bottom. Cut the parchment to fit the widest part.
- Glass and Silicone Pans: Parchment works the same way, but you may need less overhang because these pans are often more flexible.
A key tip: If your pan has rounded corners, snip the parchment at the corners so it folds neatly without bulging.
One-piece Method: When And How To Use It
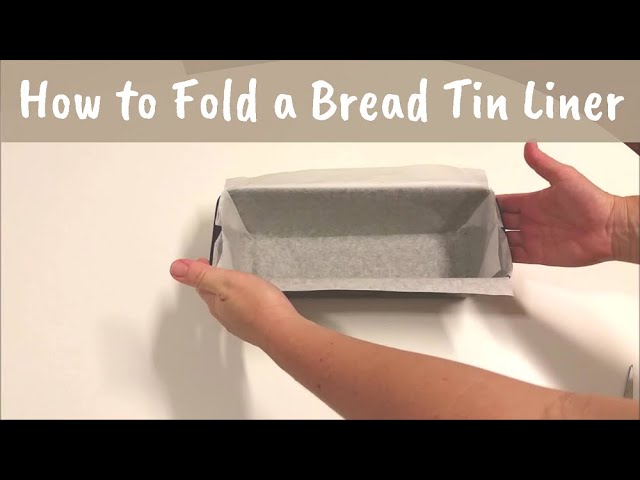
Some bakers prefer a one-piece method for lining loaf pans. Instead of two strips, you use a single piece of parchment and cut slits in the corners so it folds neatly.
How it works:
- Place the loaf pan upside down on the parchment.
- Trace around the base with a pencil.
- Add 2-3 inches on all sides for overhang, then cut out the larger rectangle.
- On each corner, cut a slit from the edge to the traced rectangle.
- Flip the pan, fit the parchment inside, and fold the corners so the paper sits flat.
When to use this method:
- For very sticky cakes (like fruitcake or gingerbread).
- When you want fewer seams or cleaner edges.
- For pans with rounded corners.
This method takes a bit more time but gives a very neat finish. Most professional bakeries use it for high-end cakes.
Common Mistakes When Lining Loaf Pans
Even experienced bakers make mistakes that can ruin a perfect loaf. Here are the most common—and how to avoid them.
- Using Wax Paper Instead of Parchment: Wax paper is not oven-safe. It can smoke, melt, or even catch fire.
- Cutting Parchment Too Small: If the paper doesn’t reach up the sides, batter can leak under, causing sticking.
- Not Enough Overhang: Without extra paper at the top, it’s hard to lift the loaf out. Always add at least 2 inches.
- Too Much Paper: If you cut a piece that’s much larger than the pan, it causes folds and creases, which can affect the shape.
- Skipping Grease: If you don’t grease the pan lightly, parchment can slide or lift up when pouring batter.
- Folding Instead of Cutting Corners: Trying to fold thick parchment into corners without cutting leads to bunched-up paper and uneven loaves.
- Not Smoothing the Paper: Wrinkles in parchment become wrinkles in your bread or cake. Press the paper flat before adding batter.
- Leaving Clips on During Baking: Binder clips are great for holding parchment in place, but they must be removed before going in the oven—they’re not heat-safe.
A non-obvious mistake: Some bakers reuse parchment paper too many times. After a couple of uses, parchment loses its non-stick quality.
How To Line Non-stick, Metal, Or Glass Loaf Pans
Does the type of pan matter? Yes, and here’s why:
- Non-Stick Metal Pans: Still use parchment. Non-stick coatings wear out over time, and some sticky batters can glue themselves to the sides.
- Regular Metal Pans: Always use parchment, especially for high-sugar recipes.
- Glass Pans: Glass can get very hot, and baked goods often stick more than with metal. Parchment helps with release and prevents burning.
- Ceramic and Silicone: These are less likely to stick, but parchment still helps with clean removal and protects the pan.
Some bakers think they don’t need parchment if they have a “non-stick” pan. In reality, even the best non-stick pans can fail, especially if scratched or old.
Should You Grease Parchment Paper?
This is a common question, and the answer depends on your recipe.
- Most batters: No need to grease parchment. It is non-stick by design.
- Very sticky recipes: For fruitcakes, meringues, or recipes with caramel, a light spray of oil or butter on the parchment can help.
- For a shiny crust: Greasing parchment can give a shinier, slightly crispier bottom.
If you do grease the paper, use a very light hand. Too much oil can soak through the paper and change your loaf’s texture.
Lining A Loaf Pan For Different Recipes
Different baked goods need different lining techniques. Here’s how to adapt:
For Bread
Most breads, especially yeast breads, don’t need a lot of parchment. A simple base strip with overhang on the long sides is enough. Bread dough is less sticky and easier to remove.
For Cakes And Quick Breads
Banana bread, pound cake, or zucchini bread have sticky batters. Use the full two-strip method for best results.
For Brownies And Bars
Brownies and dessert bars can be hard to remove. Use parchment to cover all four sides, with large overhangs. This makes it easy to lift and cut clean pieces.
For Meatloaf
Meatloaf can stick to pans, especially with sugar-based glazes. Parchment makes cleanup simple. Use a wide strip on the long sides and enough overhang to lift out the loaf.
For Fudge Or Sticky Candy
Double-line the pan with parchment and lightly grease the paper. This prevents sticking and helps you lift out soft, sticky treats.
Advanced Tips For Perfect Results
Here are some advanced, experience-based tips that most beginners don’t know:
- Wrinkle-Free Finish: Warm your parchment in the oven for 1-2 minutes before fitting it into the pan. This makes it softer and easier to press into corners.
- Reusable Parchment: If you bake several loaves in a row, reuse parchment up to two times (unless it’s torn or very oily).
- Custom Shapes: For decorative loaves (like a holiday tree or heart), make a template from regular paper first. Adjust the template until it fits, then trace onto parchment.
- Numbering Your Strips: If you bake multiple loaves, write a number on each piece of parchment to match it to the correct pan size.
- Avoiding Paper Flare-Up: Trim excess overhang so it doesn’t flop onto the oven’s heating element. This prevents burning.
- For Tall Cakes: If your loaf rises above the pan, make a “collar” from parchment that extends above the rim. This keeps the cake from spilling over.
How Lining A Pan Affects Baking Time And Quality
Some people worry that parchment paper changes how a loaf bakes. Here’s what to expect:
- Baking Time: Parchment doesn’t change baking time much—maybe 1-2 minutes longer in some ovens, but not enough to require major changes.
- Texture: The sides and bottom are usually smoother and less browned, which is good for most cakes.
- Moisture: Parchment can help keep the loaf moister by preventing direct contact with the hot pan.
- Crust: If you want a very crisp crust (for artisan bread), you may want to skip parchment for the last 10 minutes.
A non-obvious insight: In humid climates, parchment can help keep the bottom from getting soggy, especially for quick breads.
Eco-friendly Options And Reusing Parchment
If you bake often, you might wonder about waste. Here’s how to bake responsibly:
- Unbleached parchment is less processed and more eco-friendly.
- Some brands offer compostable parchment (check the package).
- Reuse parchment sheets if they’re not too greasy or torn—good for up to two more bakes.
- For very clean recipes (like plain bread), wipe parchment with a damp towel and reuse.
- Avoid using aluminum foil as a replacement—it sticks more and is not compostable.
Credit: www.youtube.com
When Not To Use Parchment Paper
There are a few rare cases where parchment isn’t the best choice:
- For very high-heat recipes: If baking above 450°F, parchment can brown or even burn.
- For ultra-crisp crust: Some artisan bread recipes benefit from direct contact with a metal pan.
- For roasting: For fatty meats, use foil instead; parchment can get soggy.
For almost all baking, though, parchment is your best friend.
Expert Troubleshooting: What To Do If Things Go Wrong
Even with good technique, problems can happen. Here’s how to fix common issues:
- Parchment curls up: Warm it in the oven for a minute, or fold along the edges to make it more flexible.
- Paper tears when lifting loaf: Use two strips next time for more support, or thicker parchment.
- Edges burn: Trim excess paper, or lower your oven rack.
- Loaf sticks to the paper: Use a higher-quality, silicone-coated parchment, or grease the paper lightly.
If your finished loaf breaks or sticks, don’t panic. Let it cool fully before removing. Some cakes release better when completely cool.
Comparing Parchment With Other Pan Liners
How Does Parchment Stack Up Against Other Options?
| Liner Type | Non-Stick Quality | Heat Resistance | Reuse | Eco-Friendliness |
|---|---|---|---|---|
| Parchment Paper | Excellent | Up to 450°F | 2-3 times | Good (unbleached) |
| Wax Paper | Good (cold only) | Not oven-safe | Single use | OK |
| Aluminum Foil | Moderate | Very high | Reusable | Poor |
| Silicone Mats | Excellent | Up to 480°F | Many times | Excellent |
For most loaf pan recipes, parchment paper offers the best mix of non-stick quality, ease of use, and eco-friendliness.
Frequently Asked Questions
How Do I Keep Parchment Paper From Curling In The Pan?
Parchment curls because it’s rolled tightly in the box. To fix this, crumple the sheet in your hands, then flatten it out. Or, warm it in the oven for a minute to make it softer. Pressing the parchment into a lightly greased pan also helps it stay put.
Can I Reuse Parchment Paper For Baking?
Yes, you can reuse parchment paper if it’s not too greasy or torn. For most breads and cakes, two to three uses are fine. Avoid reusing for sticky or sugary recipes, as the non-stick coating breaks down.
What’s The Difference Between Parchment Paper And Wax Paper?
The main difference: parchment paper is oven-safe and non-stick; wax paper has a waxy coating and will melt or burn in the oven. Only use wax paper for cold tasks, like wrapping food or lining the counter for rolling dough.
Do I Need To Grease The Pan If I’m Using Parchment Paper?
Usually, you don’t need to grease the pan when using parchment. For very sticky recipes, a light spray or a thin layer of oil on the parchment can help. Greasing under the parchment can also help it stay in place.
Where Can I Learn More About Baking With Parchment Paper?
For more in-depth information on parchment paper, its uses, and baking science, visit this King Arthur Baking resource.
—
Lining a loaf pan with parchment paper might seem like a small step, but it has a big impact on your baking success. With the right tools, careful measuring, and a few pro tips, you’ll avoid sticking, tearing, and cleanup hassles.
Next time you bake, take a few extra minutes to line your pan properly—the result is a loaf that looks as good as it tastes.
Credit: www.jennycancook.com