
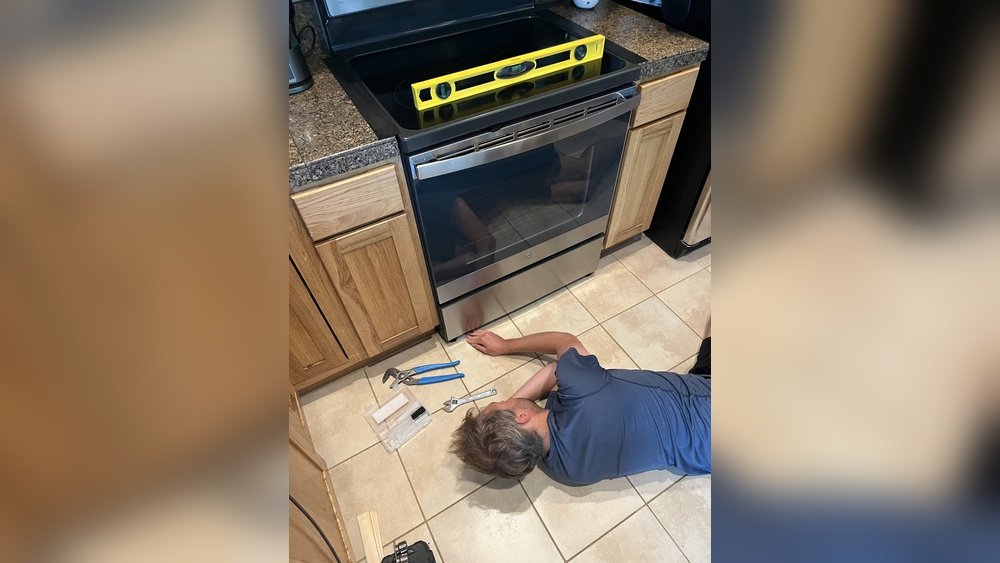
Leveling a stove might seem like a small detail, but it has a big impact on your cooking results and your kitchen’s safety. When your stove is not level, pans slide, oil pools to one side, and baked goods turn out unevenly cooked.
You might even notice strange noises or problems with the burners. These issues can frustrate anyone, from beginners to experienced home cooks. Yet, many people do not realize how simple it is to fix these problems by leveling their stove.
This guide will walk you through everything you need to know about how to level a stove. You will learn why leveling matters, what tools you need, how to check if your stove is actually uneven, and step-by-step instructions for different stove types. We will cover common mistakes, troubleshooting tips, and even how to deal with tricky situations like uneven floors. By the end, you will feel confident that your stove is stable, safe, and ready for perfect cooking results.
Why Leveling A Stove Matters
A level stove is more than just a detail. It affects your kitchen in many ways:
- Cooking performance: When your stove is not level, food and liquids shift to one side of the pan. This can burn one area and leave another raw.
- Safety: Pans sliding on the grates or cooktop can cause spills or burns.
- Appliance life: An uneven stove can put stress on parts, especially the oven door and burners, causing them to wear out faster.
- Appearance: A level stove looks better and makes your kitchen feel more professional.
Many people ignore these signs, thinking their stove or pans are the problem. In reality, taking a few minutes to level your stove can solve most of these issues.
Tools And Supplies Needed
You do not need special skills, but having the right tools makes the process easier and safer. Here is what you should have:
- Bubble level (also called a spirit level): A small, inexpensive tool that shows if a surface is flat.
- Adjustable wrench or pliers: For turning the legs or feet under your stove.
- Screwdriver: Some stoves may require this for panels or adjustments.
- Measuring tape: For checking the distance between the stove and cabinets.
- Flashlight: Helps you see under the stove, especially in tight spaces.
- Work gloves: Protect your hands, especially if you need to move the stove.
- Wooden shims (optional): For uneven floors where the stove’s legs do not adjust enough.
Most of these tools are found in a basic home toolkit. If you do not have a bubble level, you can buy one for just a few dollars at any hardware store.
How To Tell If Your Stove Is Not Level
Before you start adjusting anything, you need to check if your stove is actually uneven. Sometimes, a wobbly pan or uneven cooking is caused by the pan itself, not the stove.
Signs Your Stove Is Not Level
- Oil or liquids pool on one side of a pan, even when the pan is flat.
- Baked goods cook unevenly—one side burns or rises more.
- Pans slide or tilt when placed on the stove.
- Oven racks look slanted or food inside the oven slides.
- Doors do not close properly or the stove rocks when pressed.
How To Check With A Bubble Level
- Place the bubble level on the cooktop—first front-to-back, then side-to-side.
- Check the oven rack with the level, if possible.
- Note which side is higher or lower. The bubble will move toward the high side.
- For ovens, place the level on the middle rack to see if it is slanted.
If you do not have a bubble level, try the “water test”: Place a pan of water on the stove and see if the water pools to one side. This is less precise but can help spot big problems.
Preparing To Level Your Stove
Before making any adjustments, take a few important safety steps.
- Turn off the stove and let it cool completely.
- If your stove is gas-powered, turn off the gas supply at the shutoff valve.
- For electric stoves, unplug the appliance or switch off the circuit breaker.
- Remove any pots, pans, or racks from the stove.
- Clear the area around the stove so you can move and adjust it easily.
- If your stove is built into a countertop, check that there is enough space to move it forward a few inches.
These steps help prevent accidents or damage during the leveling process.

Credit: www.youtube.com
Types Of Stoves And Leveling Differences
Not every stove is the same. The way you adjust it depends on the type you have. The most common types are:
- Freestanding ranges: These have finished sides and can stand alone. Most have adjustable legs.
- Slide-in ranges: These fit between cabinets, with controls at the front.
- Drop-in ranges: These are set into a cutout in the counter and may have less accessible legs.
- Wall ovens: Usually installed in a cabinet; leveling is different.
Most home kitchens have freestanding or slide-in stoves. The steps below focus on these, but we will cover special cases too.
Table: Common Stove Types And Leveling Features
| Stove Type | Common Leveling Mechanism | Difficulty |
|---|---|---|
| Freestanding Range | Adjustable front and rear legs | Easy |
| Slide-In Range | Adjustable front legs, sometimes rear legs | Moderate |
| Drop-In Range | May require shims; limited adjustment | Challenging |
| Wall Oven | Cabinet shims or screws | Moderate |
Step-by-step Guide: How To Level A Stove
These steps cover most home stoves. If your stove is built in or wall-mounted, some steps will be different.
1. Move The Stove (if Needed)
Slide the stove a few inches forward so you can reach the legs underneath. For heavy stoves, ask someone to help or use a dolly. Always pull gently to avoid damaging the floor.
If your stove is connected to a gas line, do not pull too far—only enough to access the legs. If you need more space, turn off the gas and disconnect, but this is rarely required for simple leveling.
2. Locate The Leveling Legs Or Feet
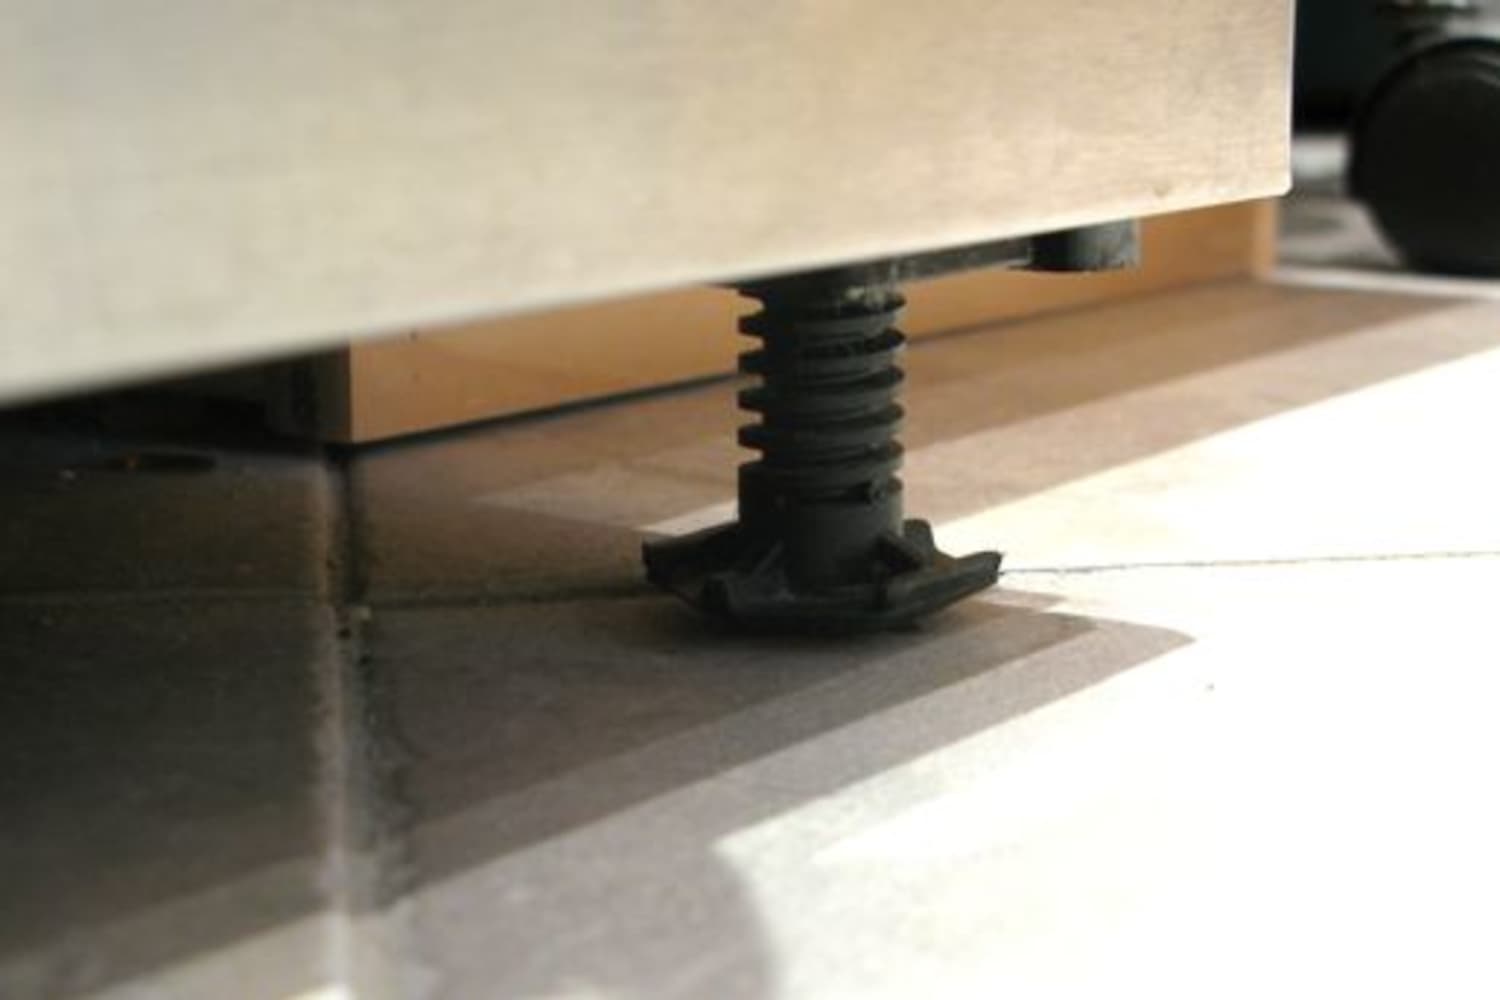
Most stoves have adjustable legs in each corner. These may be plastic, metal, or rubber-tipped. They can usually be turned by hand, with a wrench, or with pliers.
For some slide-in or drop-in stoves, the back legs are not accessible unless you remove a drawer or panel.
3. Place The Bubble Level
Place your bubble level on the stove top, not on the grates or burners. Check both the front-to-back and side-to-side direction.
4. Adjust The Legs
- If the stove tilts forward, lower the front legs or raise the back legs.
- If the stove tilts to one side, adjust the legs on that side.
- Turn the legs clockwise to lower, counterclockwise to raise. (Some brands are the opposite—check your manual if unsure.)
- Make small adjustments, about a quarter turn at a time.
After each adjustment, check with the bubble level. Repeat until the bubble is centered in both directions.
5. Fine-tune And Test
Push the stove back into place. Place the level on the stove again to confirm it is still even. If you have a slide-in model, check that the cooktop is flush with the countertop.
Test with a pan of water to see if it now sits flat and the water spreads evenly. Open and close the oven door to make sure it lines up and does not swing open or shut on its own.
Table: Leveling Leg Adjustment Directions
| Problem | Which Leg to Adjust | Which Way to Turn |
|---|---|---|
| Stove tilts forward | Front legs | Counterclockwise (raise) |
| Stove tilts backward | Back legs | Counterclockwise (raise) |
| Stove tilts left | Left legs | Counterclockwise (raise) |
| Stove tilts right | Right legs | Counterclockwise (raise) |
*Note: Some stoves have legs that move the opposite way. If turning one way lowers instead of raises, reverse the direction.*
6. Reconnect And Final Checks
If you unplugged the stove or turned off the gas, reconnect everything securely. Double-check for gas leaks by smelling or using a soapy water solution on the connection (bubbles mean a leak—tighten and test again).
Wipe away any dust or debris under the stove before sliding it back into place. Replace any removed drawers or panels.
Leveling A Stove On An Uneven Floor
Older homes or kitchens may have floors that are not flat. If your stove’s legs do not adjust enough, or if the floor dips, use shims.
- Wooden shims are wedges that fit under the legs to add height.
- Slide the shim under the low corner, then trim the excess with a knife.
- Avoid using cardboard or soft materials—they compress and become unstable.
- For severe slopes, consider a professional installer.
Always check the level after adding shims, as you may need to adjust the other legs to compensate.
Special Cases: Wall Ovens And Built-in Ranges
Wall ovens and drop-in ranges often do not have adjustable legs. Instead, you may need to:
- Add shims under the oven or cabinet base.
- Adjust mounting screws if possible.
- Check the level of the cabinet itself—sometimes the problem is the installation, not the oven.
If you are not comfortable removing an oven or adjusting cabinets, contact a professional installer.
Credit: www.thekitchn.com
Common Mistakes And How To Avoid Them
Many people make simple errors when trying to level a stove. Here are the most common mistakes:
- Not turning off power/gas: Always disconnect power or turn off the gas before moving your stove.
- Forgetting to check both directions: Level front-to-back and side-to-side.
- Over-tightening legs: Forcing the adjustment can strip threads or break plastic parts.
- Using the wrong tool: Use a wrench or pliers that fit the leg. Do not use tools that slip.
- Ignoring the countertop: For slide-in stoves, check that the cooktop is flush and even with the counter.
- Leaving the stove unstable: If it rocks after adjusting, check all four legs or add shims.
- Not rechecking after moving: Always recheck the level after sliding the stove back into place.
Avoiding these mistakes will save you time and prevent damage.
Troubleshooting: If Your Stove Will Not Level
Sometimes, the stove does not level even after adjusting the legs. Here are steps you can take:
- Legs are stuck or broken: Spray with a little lubricant, wait, and try again. If still stuck, you may need to replace the leg.
- Stove rocks on one leg: Add a shim under the short leg.
- Floor is damaged or sloped: Use thicker shims or consult a contractor if the floor needs repair.
- Cabinet is not square: If your stove sits between two cabinets, uneven cabinets can cause the stove to twist. Adjust the cabinet or call a professional.
- Oven door does not close properly: Check if leveling fixed the problem. If not, the hinges may be bent or damaged.
If you still have problems, check your stove’s manual or contact the manufacturer for advice.
How Often Should You Check Your Stove’s Level?
It is a good idea to check your stove’s level:
- When you install a new stove
- After moving the stove for cleaning or repairs
- If you notice uneven cooking or sliding pans
- Every 6-12 months in older homes, as floors can shift
Regular checks will help keep your stove performing well and avoid surprises.
Non-obvious Insights: What Most People Miss
Many guides stop at basic steps, but here are two insights often overlooked:
- Oven calibration depends on being level: Modern ovens use sensors to control temperature. If the stove is not level, these sensors can misread, causing baking problems.
- Leveling affects ventilation: For gas stoves, a slant can change how gas burns, sometimes making a burner noisy or smoky. Leveling can improve air flow and safety.
What To Do If Your Stove Has No Adjustable Legs
Some very old or budget models do not have adjustable legs. In this case:
- Use sturdy wooden or plastic shims under the corners.
- Stack shims if needed, but always test for stability.
- If the stove wobbles, try to secure it with adhesive pads or call a handyman for a more permanent solution.
Leveling A Stove: Safety Tips
- Never tip the stove too far—it can fall and cause injury.
- Do not block air vents or gas lines with shims.
- Check for gas leaks after moving a gas stove.
- Wear gloves to protect your hands from sharp edges or hot surfaces.
Cost And Time Required
Leveling a stove is usually free if you already have basic tools. If you need to buy a bubble level or shims, you will spend less than $15.
- Time required: 20–40 minutes for most stoves.
- Professional help cost: $75–$150 if you hire someone.
Most people can complete the job in less than an hour.
When To Call A Professional
You should call an appliance technician or installer if:
- The stove cannot be leveled with standard adjustments.
- The gas connection is damaged or leaking.
- The floor is severely uneven or damaged.
- The stove is built-in and requires cabinet modifications.
A professional will ensure both your safety and the correct installation.
Credit: danmarcappliance.com
Other Reasons Your Stove Might Seem Uneven
If you have leveled your stove but still notice problems, consider these possibilities:
- Warped pans: Test with a new or known flat pan.
- Uneven grates: Some stoves have grates that can bend or shift.
- Cabinet settling: If your cabinets are old, they may have shifted over time.
- Appliance damage: Dropping or moving the stove roughly can bend the frame.
Eliminate these possibilities before making further adjustments.
Table: Bubble Level Vs. Water Test
Comparing two common ways to check if your stove is level:
| Method | Accuracy | Ease of Use | Cost |
|---|---|---|---|
| Bubble Level | High | Easy | Low ($3–$10) |
| Water Test | Moderate | Very Easy | Free |
Maintenance Tips To Keep Your Stove Level
- Check the level every few months, especially if your floor is soft or old.
- Tighten the legs if they become loose.
- Clean under the stove to avoid dust buildup, which can cause unevenness.
- Avoid standing or sitting on the open oven door; this can bend the frame.
- Replace worn or broken leveling legs immediately.
A little maintenance keeps your stove safe and helps it last longer.
Where To Find More Help
If you need more detailed instructions, your stove’s user manual will have model-specific advice. Many manufacturers also have online videos or guides. For general home improvement advice, Family Handyman is a reliable source.
Frequently Asked Questions
How Do I Know If My Stove Is Level Without A Bubble Level?
You can use the water test. Place a flat pan with a little water on the stove. If the water gathers to one side, your stove is not level. A bubble level is more accurate, but the water test works in a pinch.
Is It Safe To Level My Stove Myself?
Yes, for most stoves, it is safe if you turn off the power or gas first and move the stove carefully. If the stove is heavy, built-in, or you are unsure, ask for help or call a professional.
Can Leveling A Stove Fix Uneven Baking In My Oven?
Often, yes. If your oven is not level, cakes and casseroles can cook unevenly. Leveling the stove helps food cook more evenly. If problems continue, your oven may need calibration or repair.
What If My Stove Legs Are Missing Or Broken?
You can buy replacement legs from the manufacturer or a hardware store. In the meantime, use sturdy shims under the corners. Do not use soft materials like folded paper.
Why Does My Stove Become Uneven Over Time?
Floors can shift, especially in older homes. The legs may loosen, or moving the stove for cleaning can cause it to become uneven. Regular checks and simple adjustments keep your stove level and safe.
Leveling your stove is a simple project that brings big benefits to your kitchen. With these steps, you can enjoy safer, more reliable cooking and a better-looking kitchen.