When you look inside your oven, you’ll often see metal racks and the shelf supports holding them in place. Over time, these supports can get greasy, rusted, or even damaged. Sometimes, you need to remove them to clean your oven properly, replace them, or make repairs. But for many, taking out oven shelf supports is confusing and even a bit scary, especially if you’ve never done it before. Worry not—removing shelf supports is usually simple, but there are important steps you need to follow to avoid damage or injury.
This guide walks you through everything: the tools you need, safety tips, step-by-step instructions for different oven types, and how to solve common problems. You’ll also learn how to keep your oven in top shape after you remove and re-install the supports. Whether your oven is brand new or a few years old, you’ll find advice that fits your situation. By the end, you’ll feel confident taking on this task yourself.
Why Remove Oven Shelf Supports?
Many people wonder if it’s even necessary to remove oven shelf supports. There are several reasons why you might need to do this:
- Deep Cleaning: Grease and food can build up behind shelf supports, causing smoke or smells during baking.
- Replacing Damaged Supports: Bent or rusty supports can make your racks unstable.
- Access for Repairs: If you need to replace heating elements or repair the oven cavity, supports are often in the way.
- Upgrading or Customizing: Some ovens let you switch to different rack styles, but only if you remove the old supports.
Removing shelf supports is also a good way to inspect your oven for hidden problems like rust, broken insulation, or electrical issues.
Understanding Oven Shelf Supports
Before you start, it’s helpful to know what oven shelf supports are and how they’re attached. These supports are the metal rails fixed on the oven’s sides where racks slide in and out. Depending on your oven, they can be:
- Fixed rails: Screwed or clipped directly to the oven wall.
- Removable frames: Slide in and out as a single piece.
- Wire racks with hooks: Hooked into slots or holes.
Each type requires a slightly different removal method. Check your oven’s manual if you’re unsure, or look carefully at how your supports are attached.

Credit: www.youtube.com
What Tools And Supplies Do You Need?
Gathering the right tools before you start makes the job faster and safer. For most ovens, you’ll need:
- Work gloves: Protect your hands from sharp edges.
- Screwdrivers: Usually Phillips or flat-head, depending on your oven.
- Flashlight: Helps you see screws and clips in dark corners.
- Non-abrasive cleaner: For cleaning supports and the oven wall.
- Towel or drop cloth: To protect the floor and catch falling screws.
- Pliers: Sometimes useful for stubborn clips or wire supports.
Not all ovens need every tool, but having these ready will cover most situations.
Safety Precautions Before Starting
Working inside an oven involves some risks. To keep yourself safe:
- Unplug the oven or turn off power at the circuit breaker. Even if you’re not working on electrical parts, this prevents accidents.
- Make sure the oven is completely cool. Wait at least an hour after using it.
- Wear gloves. Oven parts can be sharp or greasy.
- Clear the area. Remove racks, trays, and anything else inside the oven.
- Have a stable light source. Ovens are dark, and you need to see clearly.
Never skip these steps. Many accidents happen when people rush or ignore safety basics.
Step-by-step Guide: Removing Oven Shelf Supports
The actual removal process depends on your oven’s design. Below, you’ll find instructions for the most common types.
1. Removing Fixed Rail Supports
These are the most common in standard ovens. They’re usually attached with screws or clips.
Steps:
- Open the oven door fully. This gives you more space to work.
- Locate the screws or clips. Look along the length of the support—there are usually two or three.
- Use a screwdriver to remove the screws. Hold the support with one hand as you work, so it doesn’t fall.
- For clip-type supports, use pliers to gently unhook the clips. Sometimes you need to press or squeeze the clip to release.
- Slide the support out carefully. Watch for any sharp edges.
- Set the support aside on a towel.
Example:
On a typical Whirlpool or GE oven, you’ll find Phillips screws at the top and bottom of each rail. Remove these, and the support will come free.
2. Removing Removable Frame Supports
These are common in newer or high-end ovens. The support is a full frame that slides out as one piece.
Steps:
- Lift the rack out of the support. Remove all racks first.
- Find the locking tabs or catches. These are usually near the front or back.
- Push or pull the tab to release the support. You might hear a small click.
- Slide the entire frame forward or upward, depending on your oven model.
- Remove the support carefully. Don’t force it—it should come out smoothly.
Example:
Many Bosch or Siemens ovens use this system. If you feel resistance, check for hidden tabs or a release button.
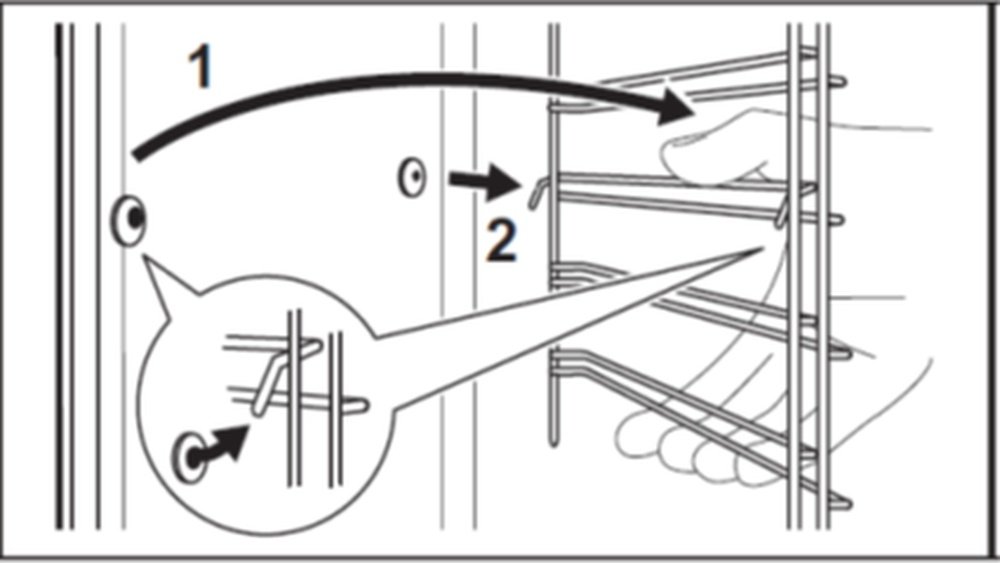
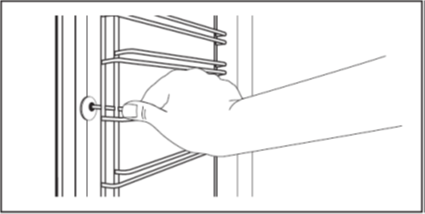
3. Removing Wire Racks With Hooks
Some ovens, especially older or compact models, use simple hooked wire racks as supports.
Steps:
- Examine where the wire hooks into the oven wall. There are usually slots or holes.
- Lift the wire support slightly to unhook it.
- Tilt the support and slide it out.
- If stuck, gently wiggle the support—don’t use excessive force.
Example:
In small ovens or older Frigidaire models, these supports are common. Dirt and grease can make them hard to remove, so clean around the hooks first.
Troubleshooting Common Problems
Sometimes, removing shelf supports doesn’t go smoothly. Here’s how to fix common issues.
Support Won’t Budge
If a support is stuck, it’s usually because of baked-on grease or rust.
- Spray a non-abrasive cleaner around the attachment points and let it sit for 15-20 minutes.
- Gently tap the support with the handle of your screwdriver to loosen it.
- Try both hands. Sometimes, twisting gently side to side helps.
Screw Is Stripped Or Rusted
A rusted or stripped screw can be frustrating.
- Use a screw extractor if you have one.
- Apply penetrating oil (like WD-40) and wait 10 minutes.
- Try a different screwdriver. Sometimes, the right size makes all the difference.
- If the screw is completely stuck, don’t force it—call a professional to avoid damaging the oven wall.
Clip Or Tab Won’t Release
Some tabs are hidden or need to be pressed in a specific way.
- Check the manual or look for a small arrow or symbol.
- Use a flashlight to see the mechanism clearly.
- Don’t pry with excessive force. Plastic clips can break easily.
Support Falls Apart During Removal
If a support breaks or comes apart, don’t try to reuse it.
- Replace it with an exact match from the manufacturer.
- Don’t use makeshift repairs (like wire or tape), which can be dangerous.
How To Clean Oven Shelf Supports
Once you’ve removed the supports, it’s the perfect time to clean them. Clean supports last longer and keep your oven working efficiently.
Cleaning Process:
- Soak the supports in warm, soapy water for at least 30 minutes.
- Use a non-scratch sponge or brush to scrub off grease and debris.
- For stubborn spots, use baking soda and a little vinegar.
- Rinse thoroughly and dry with a towel before reinstalling.
Avoid steel wool or harsh cleaners, which can scratch the metal and cause rust.
Cleaning The Oven Walls
With supports out, clean the oven cavity, especially where the supports sit. Use a damp cloth and gentle cleaner to wipe away crumbs and grease.
Tip: Never spray cleaner directly onto electrical components.
Reinstalling Oven Shelf Supports
After cleaning or replacement, reinstalling supports is usually the reverse of removal. But there are a few tips to make sure everything is secure.
Steps:
- Align the support with its original holes or slots. Check for bent parts.
- Insert screws or hooks carefully. Don’t overtighten screws—just snug is enough.
- Test the support by sliding a rack in and out. It should move smoothly and not wobble.
- Double-check both sides. Uneven supports can cause racks to tip or jam.
If you have a manual, refer to it for your oven’s specific order of operations.
Credit: support.electrolux.co.uk
Table: Different Oven Support Types And Removal Difficulty
Here’s a comparison of common support types and how easy they are to remove.
| Support Type | Attachment Method | Removal Difficulty (1-5) | Special Tools Needed |
|---|---|---|---|
| Fixed Rail | Screws or clips | 3 | Screwdriver, pliers |
| Removable Frame | Tabs/catches | 2 | None |
| Wire with Hooks | Hooks/slots | 1 | None |
| Hidden Rail | Behind oven wall | 5 | Screwdriver, patience |
Note: Difficulty is rated from 1 (easiest) to 5 (most difficult).
Oven Models And Their Shelf Support Designs
Not all ovens use the same support system. Here are examples of popular brands and their typical support types.
| Brand | Support Type | Unique Features |
|---|---|---|
| Whirlpool | Fixed rail | Standard screws, easy access |
| Bosch | Removable frame | Quick-release tabs |
| Frigidaire | Wire with hooks | Simple slot system |
| Samsung | Removable frame | Child-safe locking tab |
| GE | Fixed rail | Multiple attachment points |
Knowing your oven’s brand can help you find the right instructions and replacement parts.

Credit: www.youtube.com
What To Do If You Can’t Remove Shelf Supports
Sometimes, supports won’t come out due to damage, rust, or unusual design. Here’s what to do:
- Don’t force it. Forcing can bend the support or damage the oven wall.
- Check the manual. Many companies post manuals online if you lost yours.
- Contact customer support. Brands like Whirlpool and Bosch have helplines.
- Hire a professional. If supports are welded or badly rusted, a technician can help.
Some older or commercial ovens use supports that are not designed to be removed by the user. In these cases, cleaning around them may be your only option.
Hidden Dangers And Non-obvious Insights
Here are a few things most beginners don’t realize:
- Supports can hide electrical wiring or insulation. Never poke or pry with metal tools if you’re not sure what’s behind the support.
- Oven enamel can chip easily. Avoid using metal tools directly against the oven wall to prevent damage.
- Supports might look symmetrical, but left and right are sometimes different. Take a photo before removal to remember how everything fits together.
- Replacement screws must be heat-resistant. Don’t use hardware store screws unless they’re rated for oven use.
- Supports must be fully seated before use. Even a small gap can cause racks to tip, which is dangerous with hot pans.
How To Maintain Oven Shelf Supports
After you’ve cleaned or replaced the supports, regular care makes future maintenance easier:
- Wipe supports after spills. Don’t let food or grease harden.
- Inspect for rust every few months. Early rust can be removed with baking soda.
- Lubricate lightly with cooking oil if racks squeak, but don’t overdo it—excess oil can burn.
- Replace bent or loose supports promptly to avoid accidents.
When To Replace Rather Than Clean
Cleaning is usually enough, but sometimes replacement is the safer choice. Replace supports if you see:
- Visible rust or pitting
- Cracks or bent sections
- Loose or missing screws
- Supports no longer hold racks level
Replacement parts are usually available from the oven’s manufacturer website or authorized dealers. Always use the exact model number to order the correct part.
Table: Signs You Need To Replace Shelf Supports
Here’s a quick reference for when to repair or replace.
| Sign | Clean or Replace? | Reason |
|---|---|---|
| Light grease or crumbs | Clean | Normal maintenance |
| Surface rust | Clean if minor | Rust remover works for small spots |
| Deep rust or pitting | Replace | Weakens support |
| Bent or warped metal | Replace | Can’t safely hold racks |
| Loose attachment | Replace or tighten | Check screws; replace if damage remains |
Special Considerations For Self-cleaning Ovens
If your oven has a self-cleaning feature, supports must often be removed before starting the cleaning cycle. Self-clean mode reaches very high temperatures that can discolor or warp supports if left inside.
- Check your manual—some supports are self-clean safe, others are not.
- Remove and clean supports separately.
- Never use oven cleaner on supports if your manual warns against it.
This step is often skipped, leading to ruined supports and expensive repairs.
Tips To Make Re-installation Easy
A few smart habits can make the next removal or cleaning much simpler:
- Photograph the supports before taking them out. This helps you remember the correct position.
- Label screws and small parts. Use a small bag or cup.
- Note any unique left/right or top/bottom fittings.
- Apply a light coat of oil before reinstalling to make future removal easier.
- Test the racks after reinstalling to make sure they slide evenly and don’t rock.
When To Call A Professional
Most shelf supports can be removed with basic tools. But you should call a pro if:
- Supports are welded or riveted.
- You see exposed wiring or insulation.
- You’re unsure about the process and don’t want to risk damage.
- The oven is under warranty and you don’t want to void it.
A technician can remove supports safely and check for deeper problems.
Where To Find Replacement Parts
If you need new supports, always use genuine parts for your oven brand. Search your oven’s model number online or visit the manufacturer’s website. Many brands have official parts stores. Some reliable resources include:
- Oven manufacturer’s website
- Authorized appliance parts dealers
- Large online retailers like Amazon or Home Depot
Never use parts that aren’t rated for your oven model—they may not fit correctly and could cause safety issues.
For more information on household appliance repair, visit the Appliance Repair Wikipedia page.
Frequently Asked Questions
How Often Should I Remove And Clean Oven Shelf Supports?
Most people clean supports once or twice a year, during deep cleaning. If you bake often or spill food, check them every few months.
Can I Put Oven Shelf Supports In The Dishwasher?
Some supports are dishwasher safe, but others can rust or discolor. Check your manual first. If in doubt, hand wash with warm, soapy water.
What If I Lose A Screw During Removal?
Try to recover it from the oven base or floor first. If lost, buy an exact replacement from the manufacturer—using the wrong screw can be unsafe.
Is It Safe To Use The Oven Without Shelf Supports?
No. Racks need supports to stay level. Never bake without properly installed supports—it’s a fire and burn hazard.
Can I Spray Oven Cleaner On Shelf Supports?
Yes, but avoid harsh or caustic cleaners on chrome or coated supports. Rinse thoroughly before reinstalling.
—
Removing oven shelf supports isn’t difficult if you follow the right steps. It’s a chance to keep your oven clean, safe, and working like new. With the information above, you’ll be able to tackle this job confidently, knowing you’re doing it safely and correctly.
Whether you need a deep clean or a full replacement, the right approach makes all the difference.