Removing a wall oven can feel intimidating, especially if you have never tackled a big kitchen project before. But with the right approach, basic tools, and a clear understanding of the steps, you can remove your wall oven safely and efficiently.
Doing this yourself can save you hundreds of dollars in labor costs and give you the confidence to handle similar tasks in the future. This guide will walk you through everything you need to know—from preparation and safety to disconnecting electrical wires and what to do with your old oven.
Many people believe that removing a wall oven is as simple as unscrewing a few bolts. In reality, it involves several careful steps, especially since wall ovens are hardwired into your home’s electrical system. Overlooking safety or missing a detail can lead to injury, property damage, or electrical hazards.
Here, you’ll learn not just the basic steps but also the practical tips and common mistakes most beginners miss. Whether you plan to upgrade your kitchen, make space for a new appliance, or deal with a broken oven, this article will help you achieve a smooth, safe removal.
Understanding Wall Ovens And Their Installation
A wall oven is a kitchen appliance built into your cabinetry rather than placed on the floor. It’s often set at chest height for easy access. Wall ovens are typically electric, but some use gas. Most modern wall ovens are hardwired directly into your electrical system and are supported by a cabinet frame. Knowing how your oven is installed is the first step in planning its removal.
Types Of Wall Ovens
Wall ovens come in different configurations:
- Single ovens: One cooking compartment, standard for many homes.
- Double ovens: Two stacked compartments, useful for larger families or frequent cooks.
- Combination ovens: Often paired with a microwave or warming drawer.
Each type may have slightly different removal steps, but the overall process is similar.
Common Reasons For Removal
- Upgrading to a newer model
- Repairing or replacing damaged units
- Renovating your kitchen
- Switching from electric to gas or vice versa
Understanding the reason behind your removal can help you plan for what comes next, such as cabinet modifications or electrical changes.
Tools And Materials You’ll Need
Before you begin, gather all necessary tools and materials. Having everything ready prevents delays and keeps the process organized.
Essential Tools:
- Phillips and flathead screwdrivers
- Cordless drill (optional, for faster screw removal)
- Socket wrench set
- Voltage tester or multimeter
- Work gloves
- Safety goggles
- Pry bar (for stubborn units)
- Flashlight or headlamp
- Heavy-duty extension cord (if using power tools)
- Painter’s tape and marker
Materials:
- Drop cloth or old blanket (to protect floors)
- Zip ties or electrical tape (for securing wires)
- Small container (for screws and small parts)
- Step stool (if your oven is mounted high)
Helpful Extras:
- Partner or helper (wall ovens are heavy)
- Appliance dolly or sturdy cart
Non-obvious Tools That Help
Many first-timers forget to use a voltage tester to confirm the oven is fully disconnected from power. Also, a simple drop cloth can prevent scratches on flooring, which is easy to overlook in the excitement of a kitchen project.
Safety Precautions You Must Follow
Electrical appliances can be dangerous if handled incorrectly. Here are key safety steps:
- Disconnect Power: Never trust the oven’s controls—always turn off power at the circuit breaker.
- Confirm Power is Off: Use a voltage tester or multimeter on the oven’s wiring before touching anything.
- Wear Protective Gear: Gloves and goggles protect you from sharp edges and debris.
- Have a Helper: Wall ovens are heavy (often over 100 lbs) and awkward to move alone.
- Clear the Area: Remove rugs, chairs, and other obstacles. Make a clear path to the exit.
Missing any of these steps can lead to serious injury. Do not rush, and always double-check before proceeding.
Step-by-step Guide To Removing A Wall Oven
The process for removing a wall oven includes several stages. Each step requires care and attention to detail.
1. Prepare The Work Area
Clear your kitchen of obstacles. Lay down a drop cloth or blanket in front of the oven to protect your floor. If your oven is high, set up a sturdy step stool. Open nearby cabinet doors to provide more working space.
2. Turn Off Power At The Circuit Breaker
Find your home’s main electrical panel. Wall ovens often have dedicated breakers labeled “oven,” “kitchen oven,” or similar. Flip the correct breaker to the OFF position. If you are unsure, turn off the main power for extra safety.
Use a voltage tester at the oven to confirm the power is off. This is essential—even experienced DIYers can make mistakes here.
3. Remove Oven Doors (optional But Helpful)
Many wall ovens allow you to remove the doors easily. This reduces weight and makes the unit easier to handle.
- Open the oven door fully.
- Locate the hinge locks (usually small metal tabs).
- Flip the locks forward and gently lift the door off the hinges.
Place the door on a soft surface to avoid damage.
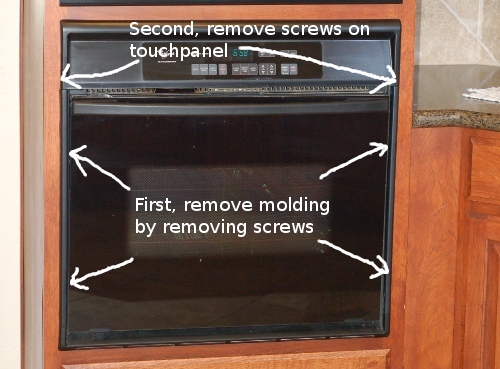
4. Unscrew The Oven From The Cabinet
Open the oven door (or the space where it was). Look along the oven frame for mounting screws. These are usually on the sides or bottom front.
- Use a Phillips screwdriver or drill to remove all visible screws.
- Place screws in your container for safekeeping.
Some ovens have hidden screws beneath trim pieces. Pry these off gently with a flathead screwdriver if needed.
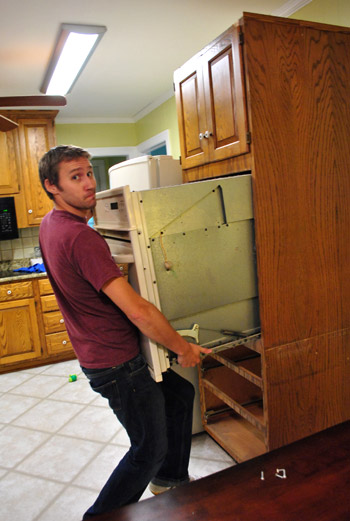
5. Slide The Oven Out From The Wall
With all screws removed, the oven should be free from the cabinet. This is a two-person job. Grasp both sides and gently wiggle the oven forward. If it sticks, check for missed screws or caulk along the edges.
Slowly slide the oven out until you can access the electrical wiring behind it. Do not pull it all the way out yet—leave enough space to work safely.
6. Disconnect Electrical Wiring
Most wall ovens are hardwired to your home’s electrical circuit. Here’s how to disconnect them safely:
- Locate the junction box (usually behind or above the oven).
- Remove the cover with a screwdriver.
- Use your voltage tester again to confirm power is off.
- Identify the wire connections: Typically, black (hot), white (neutral), and green or bare copper (ground).
- Unscrew the wire nuts, gently separate the wires, and secure the house wires with electrical tape or wire nuts to prevent accidental contact.
If your oven has a plug, simply unplug it from the outlet. However, most built-in units are hardwired.
7. Remove Any Gas Connection (if Applicable)
If your wall oven is gas-powered, you must disconnect the gas line:
- Turn off the gas valve (usually a quarter-turn handle).
- Use a wrench to disconnect the flexible supply line.
- Cap the gas line with a pipe cap and check for leaks with soapy water.
Do not skip capping the gas line, as open lines can be hazardous.
8. Remove The Oven Fully
With all connections detached, carefully slide the oven out completely. Place it on your dolly or cart for easier transport. Watch for sharp edges and avoid tilting the oven, as internal glass can break easily.
9. Clean Up And Secure The Area
Check the cabinet opening for loose wires, debris, or damage. Clean the space with a vacuum and damp cloth. Secure any exposed electrical or gas lines. If you plan to install a new oven, leave the connections accessible but safe.

Credit: www.youtube.com
What To Do With Your Old Wall Oven
Once the oven is out, you need to decide how to handle the old appliance.
Disposal Options
- Appliance Recycling: Many cities offer recycling programs for old appliances.
- Donation: If the oven works, consider donating it to a charity or local shelter.
- Haul-Away Services: Some retailers offer removal when you buy a new oven.
- Sell or Give Away: List the oven online if it’s in good condition.
Environmental Considerations
Wall ovens contain metal, glass, and sometimes hazardous materials. Never dump them in a landfill. Responsible disposal protects the environment and may be required by local law. Check your city’s website for disposal rules.
Comparing Wall Oven Removal Vs. Professional Service
If you’re unsure whether to DIY or hire a pro, consider the following comparison:
| Factor | DIY Removal | Professional Removal |
|---|---|---|
| Cost | Typically $0-$50 (tools and materials) | $150-$300 (labor fees) |
| Time Required | 2-4 hours | 1-2 hours |
| Safety | Depends on skill and caution | Very high (licensed and insured) |
| Disposal | Must arrange yourself | Often included |
| Warranty Impact | May void if damage occurs | Protected by service warranty |
Common Mistakes And How To Avoid Them
Even careful DIYers can make errors. Here are frequent mistakes and how to prevent them:
- Forgetting to Cut Power: Skipping this step can cause electric shock.
- Not Testing for Live Wires: Always use a voltage tester before touching wires.
- Missing Hidden Screws: Check all around the oven frame, including under trim.
- Moving the Oven Alone: These appliances are heavy—use a helper.
- Damaging Cabinets: Use a drop cloth and remove trim gently.
- Leaving Wires Exposed: Always cover and secure wires after disconnecting.
Preparing For A New Wall Oven Installation
If you plan to install a new oven, now is the time to check a few things:
- Cabinet Measurements: Ensure the opening matches your new oven’s specifications.
- Electrical Requirements: New ovens may require different wiring or breakers.
- Ventilation: Some ovens have special venting needs.
- Cabinet Condition: Repair any damage to the cabinet before installing the new oven.
Pro Tip: Take photos of the wiring and cabinet before removing the old oven. This can help during installation of the new unit.
Safety Codes And Electrical Regulations
Most regions have electrical codes that affect oven removal and installation. Some key points:
- Dedicated Circuit: Wall ovens require a dedicated breaker.
- Wire Gauge: The thickness of the wire must match the oven’s power needs.
- Grounding: All connections must be properly grounded.
If you’re unsure, check with a licensed electrician or consult the National Electrical Code (NEC). This ensures your kitchen remains safe and up to code.
When You Should Call A Professional
DIY removal is practical for many homeowners, but in some cases, hiring a professional makes sense:
- Complex Electrical Work: If your wiring is old or confusing.
- Gas Connections: If you are not comfortable with gas lines.
- Physical Limitations: If you cannot safely lift or move heavy objects.
- Renovations: If you plan major cabinet or electrical changes.
A licensed pro can handle these safely and quickly, reducing risk and stress.
Real-world Example: Removing A Double Wall Oven
Let’s look at a practical example. Jane wanted to replace her 15-year-old double wall oven. She followed the correct steps but ran into two issues:
- Hidden Screws Under Trim: Jane missed four screws hidden under a metal trim piece. The oven would not budge until she removed the trim with a flathead screwdriver.
- Short Wiring: The electrical wires were very short, making it hard to disconnect safely. She used a helper to gently pull the oven while she accessed the wiring.
Jane’s experience shows the importance of patience and checking every detail. Taking photos, labeling wires, and working slowly made her project successful.
Sample Timeline For Wall Oven Removal
Planning your time is important. Here’s a typical timeline for DIY removal:
| Task | Estimated Time |
|---|---|
| Gather tools and prepare area | 20-30 minutes |
| Shut off power and verify | 10 minutes |
| Remove oven doors and screws | 20-30 minutes |
| Slide out oven | 15-20 minutes |
| Disconnect electrical/gas | 20-30 minutes |
| Remove oven fully and clean up | 20-30 minutes |
| Total | 2–2.5 hours |
If you are slower or encounter problems, it’s normal for the job to take up to 4 hours.
Credit: www.younghouselove.com
Important Tips Most Guides Miss
- Label All Wires: Use painter’s tape and a marker to label wires as you disconnect them. This makes reinstallation easier.
- Take Photos Before Disconnecting: Even if you think you’ll remember, photos are invaluable if you get confused later.
- Check for Wall Damage: Ovens can trap moisture and cause wood rot. Inspect the area and repair as needed before installing a new appliance.
- Secure Children and Pets: Keep pets and kids out of the kitchen during removal to avoid accidents.
- Review Manufacturer’s Manual: Some ovens have unique removal steps—check the manual if you still have it.
After Removing Your Oven: What Next?
With the oven out, you may want to:
- Repair Cabinets: Patch holes, repaint, or reinforce shelves if needed.
- Upgrade Electrical Outlets: If your new oven has different power needs, now is the time to upgrade wiring or breakers.
- Deep Clean: Use the opportunity to clean areas that are usually hidden.
- Measure for New Appliances: Double-check dimensions before buying a new oven.
Many kitchen remodels start with oven removal, so this is a perfect time to plan further upgrades.
Credit: blog.fixyourboard.com
Environmental And Legal Considerations
Improper disposal of wall ovens can violate local laws. Many states require recycling of appliances, especially those with electronic components. Some ovens may contain materials that require special handling.
To find out your options, visit your city’s official website or contact waste management. For more about appliance recycling, see the official EPA recycling guide.
Frequently Asked Questions
Can I Remove A Wall Oven By Myself?
It is possible to remove a wall oven by yourself, especially if it’s a single unit and you are comfortable with electrical work. However, wall ovens are heavy and awkward to move. Having a helper is strongly recommended. If you have a double oven or gas connections, professional help is safer.
How Do I Know If My Wall Oven Is Hardwired Or Plugged In?
Look behind the oven where it connects to the wall. Most built-in ovens are hardwired directly into an electrical box, meaning wires are connected with wire nuts. Some newer or smaller models plug into a standard outlet. The user manual or a quick inspection can confirm your oven type.
Do I Need A Permit To Remove A Wall Oven?
In most areas, you do not need a permit just to remove an old oven. However, if you plan to install a new oven, especially if it requires electrical or gas changes, a permit may be required. Check with your local building department for specific rules.
What Should I Do With The Electrical Wires After Removal?
After disconnecting your oven, cover the exposed house wires with wire nuts or electrical tape for safety. Tuck them into the junction box and replace the cover. Never leave wires exposed—this is a fire hazard.
Can I Reuse The Old Wall Oven Elsewhere?
If your old wall oven is still working and fits in another location, you can reuse it. However, it must be installed according to electrical and safety codes. Reusing is more common for ovens that plug in, not hardwired units.
Always consult an electrician for safe relocation.
Removing a wall oven is a big but manageable project for a careful DIYer. With good planning, the right tools, and attention to safety, you can complete the job and prepare your kitchen for the next stage. Take your time, and when in doubt, ask a professional.
Your kitchen—and your safety—are worth it.