Your dishwasher works hard to keep your dishes clean, but how often do you think about cleaning the machine itself? Many people don’t realize that the small holes in the dishwasher spray arms can become clogged with food particles, hard water deposits, or even soap scum. When this happens, your dishwasher can’t clean as well as it should. Plates may come out dirty, glasses can have spots, and you might even notice an unpleasant smell.
Cleaning the dishwasher arms is an important part of home maintenance. It’s not difficult, but it does require a bit of care and attention to detail. If you’ve never done this before, you might be surprised at how much difference this simple step makes. Your machine will run more efficiently, use less energy, and last longer. Plus, you’ll get cleaner dishes every time.
This article will guide you through everything you need to know about how to clean dishwasher arms. You’ll learn why it’s important, how often it should be done, what tools and cleaners to use, and step-by-step instructions. We’ll also cover common mistakes, troubleshooting, and answer the questions that most people have.
By the end, you’ll be ready to tackle this task with confidence—even if you’re not a “handy” person.
Why Cleaning Dishwasher Arms Matters
Most people assume that because the dishwasher uses hot water and soap, it stays clean on its own. This is a common misunderstanding. The spray arms have tiny holes that push high-pressure water around your dishes. Over time, these holes can become blocked by bits of food, mineral deposits (like calcium and lime), and even fragments of glass or plastic. When this happens, water can’t flow properly.
Blocked spray arms can cause:
- Dishes that don’t get clean
- Unpleasant odors inside the machine
- Longer wash cycles
- Higher energy and water bills
- Extra wear on your dishwasher’s pump
According to the U.S. Department of Energy, dishwashers with clogged spray arms can use up to 15% more energy due to longer cycles and repeated washes. If you notice that your dishes are coming out with food still stuck on, or your glasses look cloudy, your spray arms may need attention.
How Often Should You Clean Dishwasher Arms?
There’s no single answer, but most experts recommend cleaning the spray arms every 3-4 months. If you live in an area with hard water, you may need to do it more often. Signs that your spray arms need cleaning include:
- Dishes are not coming out clean
- There’s a white or chalky buildup inside the dishwasher
- You notice a strange smell after a cycle
- Water is pooling at the bottom after use
If you use your dishwasher daily, check the spray arms monthly and clean as needed. For occasional users, every 4-6 months may be enough.
Tools And Materials Needed
Before you start, gather the right tools. Having everything ready will make the process faster and easier.
You’ll need:
- A Phillips or flathead screwdriver (depending on your dishwasher model)
- A straightened paper clip, toothpick, or small needle
- An old toothbrush
- White vinegar
- Baking soda (optional)
- A soft towel or sponge
- A small bowl or container for soaking
- Warm water
For tough mineral deposits, you may also want a bottle of dishwasher-safe descaler (usually available at hardware stores).
Tip: Check your dishwasher’s manual for any special instructions. Some models have unique spray arm designs or require a special tool.
Step-by-step: How To Clean Dishwasher Arms
Cleaning your dishwasher arms isn’t hard, but it does require patience and the right method. Here’s how to do it effectively:
1. Turn Off And Unplug The Dishwasher
Before you start, make sure the machine is off and unplugged. If your dishwasher is hard-wired (no visible plug), switch off the circuit breaker. This prevents any risk of electric shock or injury.
2. Remove The Lower Rack
Slide out the bottom rack and set it aside. This gives you clear access to the spray arms.
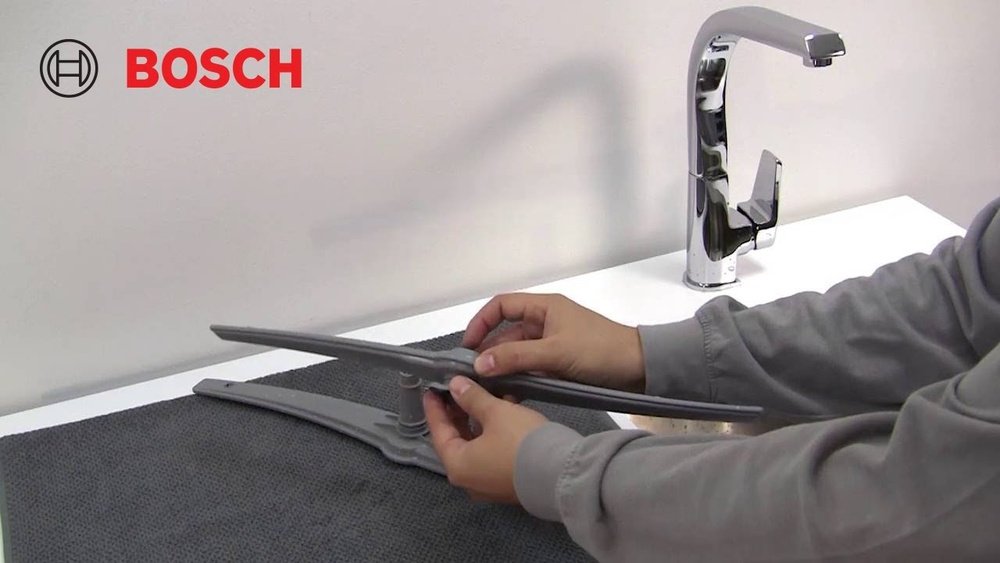
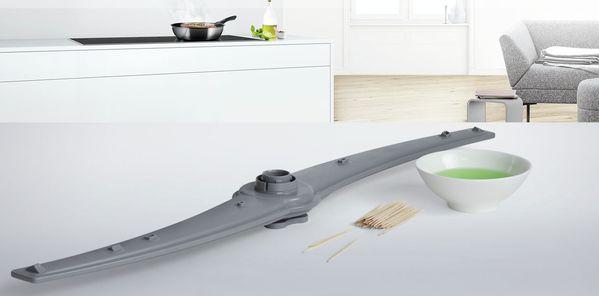
3. Locate And Remove The Spray Arms
Most dishwashers have two spray arms—one at the bottom and one under the top rack. Some models have a third, smaller spray arm at the top.
- Bottom Spray Arm: Usually clips or screws into place. Look for a central nut or cap. Use your hand or a screwdriver to unscrew it.
- Upper Spray Arm: May be attached with a screw or a simple snap-in bracket. Check for clips or a plastic nut.
- Third Spray Arm (if present): Often twists out or is held by a single screw.
Keep all screws and small parts in a safe place.
4. Inspect For Clogs And Damage
Hold each spray arm up to the light and look through the small holes. If you see any blockages, take note of where they are. Also, check for cracks or damage. A broken spray arm should be replaced (you can order a replacement from the manufacturer).
5. Clean Out The Holes
Use a straightened paper clip, toothpick, or needle to gently poke out any blockages from each hole. Do not use anything too sharp that could widen or damage the holes. Be patient—sometimes mineral deposits are stubborn.
6. Soak The Spray Arms
Fill a bowl or sink with warm water and add 1 cup of white vinegar. Soak the spray arms for 15-30 minutes. Vinegar helps break down mineral deposits and removes odors.
For extra cleaning power, sprinkle some baking soda over the spray arms before soaking.
7. Scrub Away Build-up
After soaking, use an old toothbrush to scrub around the holes and along the length of each spray arm. This helps remove stubborn grime.
8. Rinse And Dry
Rinse the spray arms under running water to wash away loosened debris. Shake them gently to remove excess water. Dry with a soft towel.
9. Clean The Mounting Area
Before reinstalling, wipe down the area where the spray arms attach. If you see buildup or gunk, clean it with a damp sponge and a bit of vinegar.
10. Reinstall The Spray Arms
Carefully reattach the spray arms in the correct position. Tighten any screws or nuts, but do not overtighten—you could crack the plastic.
11. Run A Short Wash Cycle
Once everything is back in place, run a short, empty wash cycle with a cup of vinegar in the bottom of the dishwasher. This flushes out any remaining debris and freshens the interior.
Common Mistakes To Avoid
Even though cleaning dishwasher arms is straightforward, there are a few mistakes to watch out for:
- Forcing sharp objects into the holes. This can damage the spray arms and make holes larger, reducing water pressure.
- Using harsh chemicals. Stick to vinegar and baking soda. Bleach or strong cleaners can corrode the arms and void your warranty.
- Skipping regular checks. Waiting too long between cleanings can allow buildup to harden, making it much harder to remove.
- Not drying parts before reassembly. Wet parts can attract new debris quickly.
- Losing screws or small pieces. Always keep track of hardware when disassembling the spray arms.
Types Of Dishwasher Spray Arms
Not all dishwashers are the same. Understanding what type you have helps you clean more effectively. Here’s a quick comparison of common types:
| Spray Arm Type | Location | Attachment Method | Cleaning Difficulty |
|---|---|---|---|
| Rotating (Standard) | Bottom, Middle | Central Nut/Screw | Easy |
| Oscillating | Top, Bottom | Clip/Snap-in | Medium |
| Direct Feed | Back Wall | Slide/Lock | Medium |
| Third Rack Arm | Top (Ceiling) | Twist/Screw | Hard |
Tip: If you’re unsure, check your dishwasher’s model number and look up a diagram online or consult your manual.
How Mineral Deposits Affect Dishwasher Arms
Hard water is a common problem in many homes. It contains minerals like calcium and magnesium, which can build up inside your dishwasher. Over time, these minerals can block the spray arm holes, reducing cleaning power.
According to the U. S. Geological Survey, about 85% of U. S. homes have hard water. Even if you don’t see white spots on your glasses, these deposits could be building up inside your machine.
Here’s how mineral buildup compares to clean spray arms:
| Condition | Water Flow | Cleaning Power | Energy Use |
|---|---|---|---|
| Clean Spray Arms | Strong | High | Normal |
| Mineral-Built-Up | Weak | Low | High |
Non-obvious insight: Even a few blocked holes can cut cleaning performance by 20-30%. If you live in a hard water area, consider using a water softener or running a monthly vinegar rinse.
Signs Your Dishwasher Arms Need Cleaning
You don’t have to wait until your dishes are dirty to clean the spray arms. Watch for these signs:
- Water isn’t spraying evenly. Open the door during a cycle (after pausing the machine) and check if both arms are moving and spraying water.
- Odd noises during cycles. Blocked arms can cause rattling or humming.
- Unusual smells. Trapped food or buildup can make your dishwasher smell musty or sour.
- Dishes have spots or are still dirty. This is often the first sign.
If you notice any of these issues, check the spray arms before calling a repair technician.
Deep Cleaning: When To Go Further
Sometimes, regular cleaning isn’t enough. If you see thick, crusty deposits or persistent odors, you may need a deeper clean.
Deep Cleaning Steps
- Remove all racks and spray arms. Get as much access as possible.
- Soak spray arms overnight in a mix of 2 cups vinegar and warm water.
- Clean the filter and drain area. Food particles can collect here and cause smells.
- Check the pump area. Some dishwashers have a removable cover. Clean out any debris.
- Run a special cleaning cycle with a dishwasher-safe descaler.
For especially stubborn problems, you can find professional cleaning products designed for dishwashers. Always follow the manufacturer’s instructions.
Preventing Future Buildup
Cleaning is easier if you prevent problems before they start. Here’s how to keep your spray arms working their best:
- Scrape, don’t rinse. Remove large food pieces from dishes before loading, but don’t over-rinse. Modern dishwashers work better with a little food for enzymes to break down.
- Use the right detergent. Cheap or wrong detergent can leave residue. Choose a high-quality brand recommended for your water type.
- Run hot water before starting. Turn on the kitchen sink until the water runs hot, then start your dishwasher. This helps dissolve grease and soap better.
- Run a monthly vinegar rinse. Place a cup of vinegar in the bottom and run a hot cycle with no dishes.
- Check for recalls or service updates. Some dishwashers have known issues with spray arm design. Check the manufacturer’s website.
Little-known tip: If your dishwasher has a “sanitize” or “extra hot” cycle, use it once a month. High heat kills bacteria and helps dissolve buildup.

Credit: www.youtube.com
Troubleshooting: When Cleaning Isn’t Enough
If you’ve cleaned the spray arms and still have problems, there may be other issues:
- Water pressure is low. Check if your home’s water pressure is at least 20 psi (most dishwashers need this minimum).
- Pump or motor is failing. If you hear grinding or your dishwasher is especially noisy, the pump may be worn out.
- Filter is blocked. Even clean spray arms can’t help if the filter is full of food.
- Inlet valve is clogged. Hard water can block the valve that lets water into your dishwasher.
If you’re not sure, check your manual or call a professional for help.
Comparing Diy Vs. Professional Cleaning
Is it better to clean your spray arms yourself, or hire a pro? Here’s a quick look:
| Method | Cost | Time Needed | Effectiveness | Best For |
|---|---|---|---|---|
| DIY Cleaning | Low (usually $0-$5) | 30-60 minutes | High (for regular buildup) | Most homeowners |
| Professional Service | $75-$150 | 1-2 hours (plus wait time) | Very High (for severe buildup or repairs) | Severe issues, warranty service |
Most people can handle regular cleaning themselves. If you have ongoing problems, or your dishwasher is under warranty, a professional cleaning may be worth it.
Credit: www.bosch-home.com
How To Make Spray Arm Cleaning Part Of Your Routine
The best way to avoid problems is to add spray arm cleaning to your regular home maintenance schedule. Try these ideas:
- Put a reminder on your phone for every three months.
- Combine with other tasks. Clean the spray arms when you change your furnace filter or check your smoke alarm.
- Keep tools handy. Store a cleaning needle and vinegar near your dishwasher so you’re ready to go.
Uncommon insight: If you have kids, make cleaning the dishwasher a family task. It teaches them about caring for appliances and makes the job go faster.
Real-life Example: Dishwasher Not Cleaning Well
Let’s look at a practical example. Sarah, a homeowner in Texas, noticed her dishes were coming out dirty and her glasses had white spots. She had hard water, but never thought to clean her dishwasher’s spray arms.
After removing the lower arm, she found several holes clogged with white buildup. She soaked the arm in vinegar overnight, cleaned each hole with a toothpick, and ran a vinegar rinse cycle. The next day, her dishwasher was back to normal—dishes sparkled and there was no smell.
Lesson: Even a simple cleaning can make a big difference, and it doesn’t require special skills.
Environmental Impact: Why Regular Cleaning Helps
A clean dishwasher uses less water and energy. According to the EPA, efficient dishwashers can save up to 3,870 gallons of water over their lifetime. But this only works if the spray arms are free of blockages.
Regular cleaning means:
- Fewer repeat washes (saving water and energy)
- Longer appliance life (less landfill waste)
- Lower utility bills
Want to learn more about water and energy savings? Visit the ENERGY STAR website for facts and tips.
Frequently Asked Questions
How Do I Know If My Dishwasher Spray Arms Are Clogged?
You may notice that your dishes are not coming out clean, glasses have white spots, or the dishwasher smells strange. Another sign is if the spray arms don’t spin freely or water doesn’t spray evenly during a cycle. You can also remove the spray arms and look for visible blockages in the holes.
Can I Use Bleach To Clean My Dishwasher Spray Arms?
It’s best to avoid bleach unless your manufacturer recommends it. Bleach can damage some dishwasher parts, especially if they are plastic or have a protective coating. Stick with white vinegar and baking soda—they are safe, effective, and non-corrosive.
What Should I Do If The Spray Arm Holes Are Too Small For A Toothpick?
Try using a straightened paper clip, a thin needle, or even a piece of fine wire. Be gentle so you don’t scratch or widen the holes. Some people use an old interdental brush, which is small and soft.
How Long Does It Take To Clean Dishwasher Spray Arms?
For a regular cleaning, expect to spend about 30 to 45 minutes from start to finish. If the spray arms are very dirty or mineral-encrusted, soaking overnight may be needed. Most of the time is spent soaking, not scrubbing.
Do All Dishwashers Have Removable Spray Arms?
Most do, but some older or basic models have fixed spray arms that don’t come off easily. Check your manual or look online for your model number. If you can’t remove the spray arms, you can still clean the holes using a needle and a vinegar rinse, but it may be more challenging.
Keeping your dishwasher spray arms clean isn’t just about sparkling dishes—it’s about saving money, energy, and hassle in the long run. With regular care, your dishwasher will run better and last years longer. Give your machine the attention it deserves, and it will keep your kitchen running smoothly.
Credit: www.reddit.com