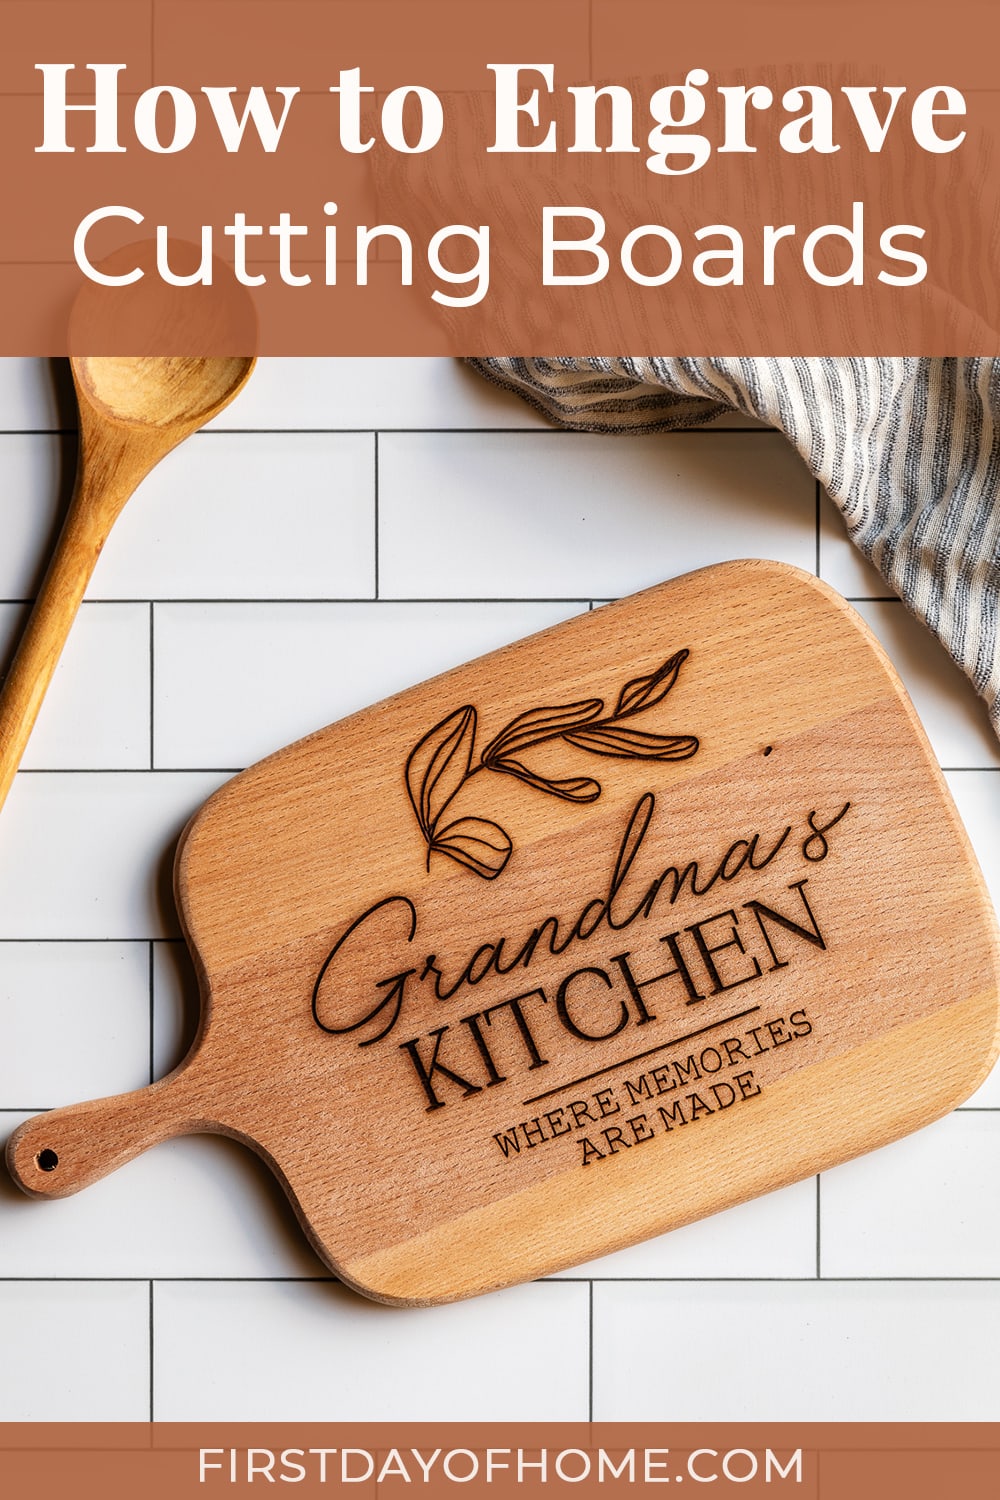
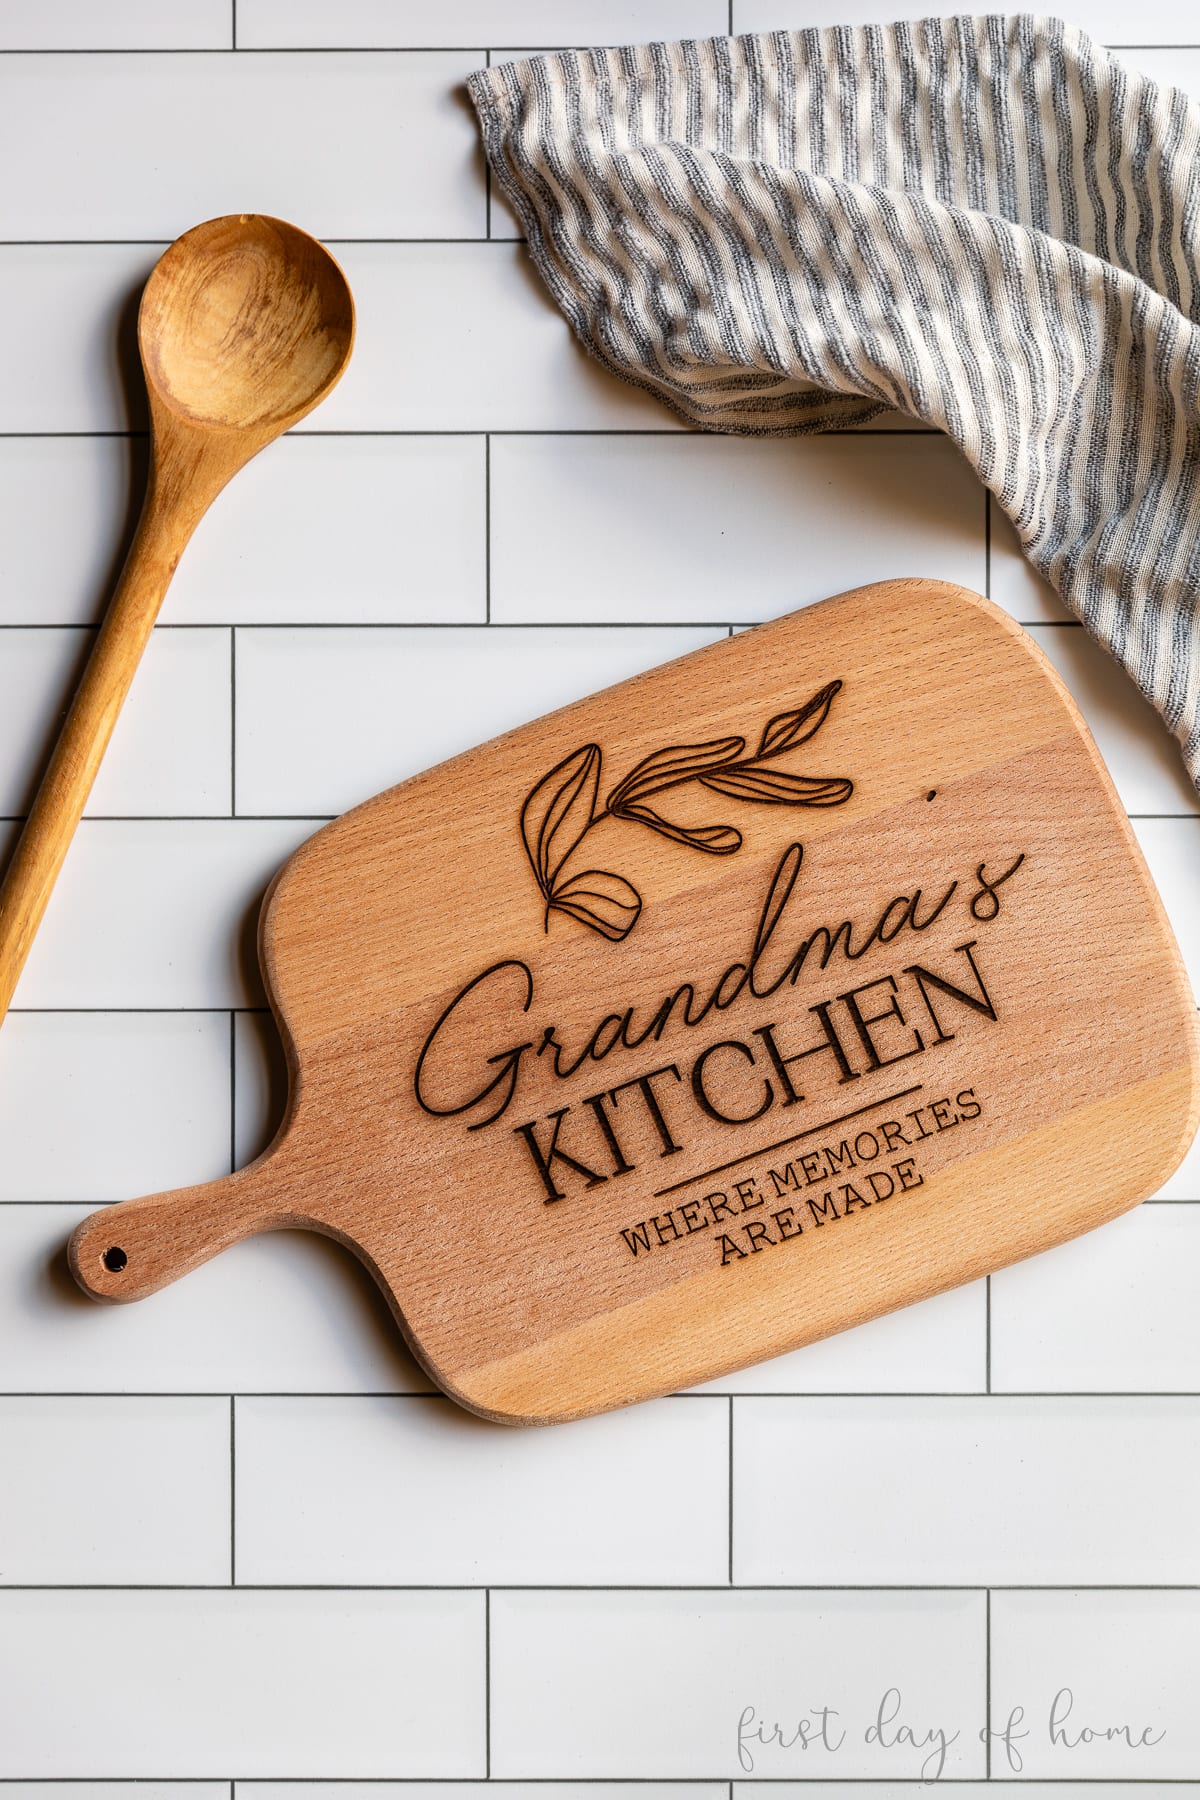
Engraving a cutting board can turn a simple kitchen item into a meaningful gift, a stylish piece of home decor, or a branded tool for your business. Many people want to personalize their cutting boards but feel nervous about making mistakes or not knowing where to start.
The good news is, you don’t need to be a woodworking expert to engrave a cutting board successfully. With the right tools, planning, and a bit of patience, you can create beautiful, lasting designs that will impress anyone who sees them.
This guide will walk you through the entire process of how to engrave a cutting board. You’ll learn which tools and materials to use, how to plan your design, different engraving techniques, and important safety tips. You’ll also discover common mistakes to avoid, get practical advice for both beginners and those with some experience, and see how different woods and finishes can impact your results. Whether you want to create a personalized wedding gift or just add a special touch to your own kitchen, you’ll find everything you need to know right here.
Understanding Cutting Board Engraving
Before you begin, it’s helpful to understand what engraving means in the context of cutting boards. Engraving is the process of carving or etching a design into the surface of the wood. This design could be a name, a logo, a quote, or a simple pattern. There are different methods to engrave wood, such as by hand, using electric tools, or with a laser. Each method gives a different look and requires different skills and tools.
The main reasons people engrave cutting boards are:
- Personalization: Make a unique, thoughtful gift.
- Branding: Add your business logo to sell or promote your products.
- Decoration: Create a decorative piece for your kitchen or dining room.
- Organization: Label boards for different uses (meat, vegetables, bread, etc. ).
Engraving adds value and character to an otherwise ordinary kitchen item. But to do it well, you need to plan ahead, choose the right materials, and use proper techniques.
Choosing The Right Cutting Board
Not all cutting boards are ideal for engraving. The type, size, and grain of the wood all affect how your design will look and how easy the process will be.
Best Woods For Engraving
Some woods are better for engraving because they have a tighter grain and are less likely to chip or splinter. Here’s a comparison of popular cutting board woods:
| Wood Type | Grain | Hardness (Janka Rating) | Engraving Quality |
|---|---|---|---|
| Maple | Fine, even | 1450 | Excellent |
| Walnut | Straight, medium | 1010 | Very Good |
| Cherry | Straight, fine | 950 | Very Good |
| Bamboo | Coarse, uniform | 1380 | Good, but can splinter |
| Teak | Straight, coarse | 1070 | Fair, can dull tools |
Maple, walnut, and cherry are the most popular choices for engraving because they are hard enough to last but soft enough for clean carving. Bamboo is affordable but can be tricky because it sometimes splinters. Teak is durable but can wear out your tools quickly.
Board Size And Surface
Pick a board that is large enough for your design but not so big that it’s hard to handle. A smooth, flat surface is best for even engraving. Avoid boards with deep grooves, uneven grain, or heavy oiling, as these can make your design look messy.
New Vs. Used Boards
It’s best to use a new or lightly used board. Old boards may have knife marks or stains that interfere with engraving.
Insight: Many beginners forget to check for hidden cracks in the board. These cracks can grow during engraving and ruin your design. Hold the board up to the light and look closely before starting.

Credit: www.creativeramblingsblog.com
Tools And Materials Needed
Your tool choice depends on the engraving method you want to use. Here are the most common tools and materials:
Manual Engraving Tools
- Wood carving knives: Sharp, small blades for detail work.
- Chisels: For straight lines and larger cuts.
- Mallet (optional): To tap chisels gently.
- Sandpaper: For smoothing the surface and edges.
Electric Engraving Tools
- Rotary tool (like Dremel): Comes with different bits for carving, etching, and sanding.
- Woodburning (pyrography) pen: Uses heat to burn designs into wood. Good for thin lines and shading.
Laser Engraving Machine
- Desktop laser engraver: Precise, quick, and excellent for detailed designs. More expensive, but many makerspaces have one you can use.
Other Supplies
- Pencil or transfer paper: To sketch your design on the wood before engraving.
- Ruler and templates: For straight lines and repeating shapes.
- Clamps: To hold the board steady while you work.
- Safety gear: Safety glasses, dust mask, and gloves.
- Finishing oil: Food-grade mineral oil or beeswax to seal the wood after engraving.
- Masking tape: Optional, to protect areas of the board you don’t want to engrave.
Non-obvious insight: Some people skip dust masks when using electric tools, but wood dust can be harmful, especially with exotic woods. Always protect your lungs.
Planning Your Design
A strong design makes engraving easier and the finished result more beautiful.
Finding Inspiration
Look online for engraving ideas. Pinterest, Instagram, and woodworking forums have thousands of examples. Choose a design that fits the size of your board and your skill level.
Sketching And Layout
- Draw your design in pencil on paper first.
- Use carbon or transfer paper to trace it onto the board if needed.
- For text, print out your words in the font you like, then transfer them onto the wood.
- Double-check spacing and alignment. A ruler helps keep everything straight.
Design Tips
- Keep it simple, especially for your first project.
- Avoid designs with tiny details if you’re using hand tools.
- Try to place the design away from the main cutting area, so it lasts longer and does not collect food debris.
- Consider symmetry and balance; a design that is too close to the edge can chip.
Helpful tip: If you plan to engrave a name or date, ask someone else to check your spelling and numbers before you start. Fixing mistakes in wood is difficult!
Credit: www.firstdayofhome.com
Methods Of Engraving A Cutting Board
There are three main ways to engrave a cutting board: by hand, with electric tools, or using a laser. Each has its pros and cons, which are outlined below.
1. Hand Engraving
This is the traditional method using carving knives, chisels, or gouges.
Steps:
- Clamp the board securely to your work surface.
- Trace or sketch your design onto the board.
- Start with shallow cuts, following the outline.
- Gradually make deeper cuts, being careful not to slip.
- Use smaller tools for details and larger ones for background.
- Sand the edges and surface gently to remove splinters.
Pros:
- Inexpensive tools
- Quiet and safe
- Authentic, hand-made look
Cons:
- Requires patience and practice
- Takes more time
- Hard to make complex designs
Beginner mistake: Pressing too hard at first. Let the tool do the work—too much pressure can split the wood.
2. Rotary Tool Engraving
A rotary tool like a Dremel, fitted with engraving bits, can speed up the process and allow for more detail.
Steps:
- Clamp the board in place.
- Fit the rotary tool with a fine engraving bit.
- Trace your design lightly at first.
- Go over the lines multiple times, making them deeper and wider as needed.
- Change bits for different effects (e.g., round for lines, flat for shading).
- Clean up rough edges with a sanding attachment.
Pros:
- Faster than hand tools
- Good for curves and shading
- Many bits available for different effects
Cons:
- Can be noisy and dusty
- Takes some practice for smooth lines
- Must be careful not to slip
Non-obvious insight: Use a slow speed for better control and less burning. Many beginners set the tool too fast, which can scorch the wood.
3. Laser Engraving
Laser engraving gives the most precise and professional results. It is the method used for mass production and high-detail work.
Steps:
- Prepare your design in a digital format (vector or image).
- Secure the board in the laser machine.
- Adjust settings for wood type and depth.
- Run a test on scrap wood first.
- Start the engraving process.
- Clean the board with a damp cloth after engraving.
Pros:
- Extremely precise
- Can engrave photos, logos, and fine text
- Fast
Cons:
- Expensive equipment
- Needs digital skills
- Risk of burning or over-cutting if settings are wrong
Note: Many local makerspaces or print shops offer laser engraving services if you don’t own a machine.
Comparing Engraving Methods
Here’s a quick look at how the three main methods compare:
| Method | Cost | Skill Level | Detail Level | Speed |
|---|---|---|---|---|
| Hand Engraving | Low | Beginner to Expert | Medium | Slow |
| Rotary Tool | Medium | Beginner to Intermediate | High | Medium |
| Laser Engraving | High | Intermediate (digital skills) | Very High | Fast |
Step-by-step Engraving Process
No matter which method you choose, the engraving process follows some basic steps. Here’s a detailed guide to ensure you get the best results.
1. Prepare Your Workspace
- Clean your work area. Remove clutter and ensure good lighting.
- Set up clamps to hold your cutting board steady.
- Gather all tools and safety equipment.
2. Prepare The Cutting Board
- If the board is new, wipe it down with a damp cloth and let it dry.
- Sand the surface lightly with fine sandpaper (220 grit) for a smooth finish.
- Remove all dust with a tack cloth or damp paper towel.
3. Transfer Or Draw Your Design
- Use a pencil to lightly sketch your design directly onto the wood.
- For complex designs, use carbon or transfer paper.
- Check that the design is centered and straight.
4. Engrave The Design
Depending on your chosen method:
- Hand tools: Start with outline, then deepen and shape the lines.
- Rotary tool: Use a light touch, start slow, and go over lines as needed.
- Laser: Double-check your settings and test on scrap before starting.
5. Clean Up The Engraving
- Use a small brush or compressed air to remove dust from the grooves.
- Sand any rough edges gently.
- Wipe the board clean.
6. Finish The Board
- Apply a food-safe finish like mineral oil or beeswax. This protects the wood and makes the engraving stand out.
- Let the oil soak in for several hours or overnight, then wipe off excess.
7. Final Inspection
- Check for any missed spots or rough areas.
- Run your hand over the surface. It should feel smooth, with no sharp edges.
- Correct any small mistakes with a detail knife or extra sanding.
Practical tip: Do not use vegetable or olive oil as a finish. These can go rancid and spoil the board.
Decorating Ideas And Advanced Techniques
Once you master the basics, you can try more advanced techniques to make your engraved cutting board even more special.
Adding Color
You can add color to your engraving by:
- Using food-safe wood stain in the grooves
- Filling letters with colored wax or resin (make sure it’s food-safe if the board will be used for food)
- Burning the wood with a woodburning pen for a dark, high-contrast look
Layered Designs
Some engravers like to make designs that have different depths for a 3D effect. This takes more time and skill but can make your board stand out.
Combining Engraving With Inlays
For a premium look, you can fill engraved areas with materials like crushed stone, metal powder, or colored resin. Make sure to seal well and avoid toxic materials.
Advanced insight: If you plan to sell engraved boards, always test your finishing method on a scrap piece first. Some finishes can bleed into the wood and blur your design.
Safety Tips
Woodworking and engraving are safe if you follow simple rules.
- Always wear safety glasses to protect your eyes from dust and chips.
- Use a dust mask when sanding or using electric tools.
- Clamp your board securely to prevent slips.
- Keep your hands behind the cutting edge at all times.
- Work in a well-ventilated area, especially when using finishes.
- Unplug electric tools before changing bits or cleaning.
Common mistake: Rushing the process or ignoring safety gear. Injuries often happen when people get comfortable and skip these steps.
Caring For An Engraved Cutting Board
Proper care will keep your engraved board looking great for years.
- Wash by hand with warm, soapy water. Never put it in the dishwasher.
- Dry immediately with a towel.
- Oil the board every few weeks to keep the wood from drying out.
- Avoid soaking the board or letting water sit on the engraving.
- If the board gets scratched, sand gently and re-oil.
Non-obvious insight: Engraved areas can trap crumbs and bacteria if not cleaned well. Use a soft brush to clean grooves after each use.
Troubleshooting Common Problems
Even experienced engravers make mistakes. Here’s how to fix some common issues:
- Lines are uneven or too deep: Sand down lightly and re-engrave.
- Splinters in the design: Use finer sandpaper and slow down your cutting.
- Burn marks from electric tools: Sand the area gently and reduce tool speed.
- Design is off-center: Embrace it as “rustic” or add more decoration to balance the look.
- Finish bleeds into engraving: Test all finishes on scrap wood first.
If a mistake is too big to fix, you can sometimes sand down the surface and try again, but only if the board is thick enough.
Credit: www.firstdayofhome.com
Using A Professional Engraving Service
If you want a perfect result or need to engrave many boards, consider a professional service. Many local print shops and online stores offer laser engraving. You supply the board and the design, and they do the work. This is a good option for businesses, special gifts, or if you don’t have the right tools at home.
Pro tip: Always check that the service uses food-safe finishes and ask for a sample if possible.
For more on professional engraving and wood types, see the Wikipedia page on woodworking.
Cost Breakdown Of Engraving Methods
How much does it cost to engrave a cutting board? Here’s a simple breakdown.
| Engraving Method | Tool Cost (USD) | Time Needed | Skill Required |
|---|---|---|---|
| Hand Tools | $20 – $50 | 2-5 hours | Low to medium |
| Rotary Tool | $50 – $150 | 1-3 hours | Medium |
| Laser Engraver | $300 – $3000+ | 10-30 minutes | Medium to high |
| Professional Service | $20 – $100 per board | Varies | None |
The best method for you depends on your budget, how often you want to engrave, and the look you want.
Creative Project Ideas
If you’re looking for inspiration, here are some popular engraving projects for cutting boards:
- Family name and established date: A classic wedding or housewarming gift.
- Favorite recipe or quote: Personal and useful.
- Custom kitchen rules: Fun for families.
- Holiday-themed boards: For Christmas, Thanksgiving, etc.
- Cartoon or animal designs: Great for kids or playful kitchens.
- Company logo: For corporate gifts or branding.
- Map or location coordinates: Celebrate a special place.
- Monograms: Simple but elegant.
- Artistic patterns or borders: Add style without too much detail.
- Gift messages: “Happy Birthday,” “Thank You,” etc.
Frequently Asked Questions
How Deep Should The Engraving Be?
For most cutting boards, 1-2 millimeters deep is enough. This is deep enough to see and feel but not so deep that it weakens the board. If using a rotary tool or laser, check the settings to avoid cutting too deeply.
Is It Safe To Use An Engraved Cutting Board For Food?
Yes, as long as you use food-safe finishes (like mineral oil or beeswax) and keep the board clean. Avoid using paints or resins unless they are labeled food-safe. Always clean the engraved areas well after use.
Can I Engrave A Board That Is Already Finished Or Oiled?
You can, but it’s harder. The finish can make the wood slippery and dull your tools. It’s best to engrave first, then finish. If the board is already finished, sand the area lightly before engraving.
Will The Engraving Fade Or Wear Out With Use?
Deep engravings last a long time, but surface-level designs may fade with heavy cutting and washing. To extend the life of your design, place it on a part of the board not used for cutting, or use the reverse side for food prep.
What If I Make A Mistake In My Engraving?
Small mistakes can often be fixed by sanding or deepening the lines. For big errors, you may be able to sand down and start over if the board is thick enough. Otherwise, try to incorporate the mistake into your design.
Bringing It All Together
Engraving a cutting board is a rewarding project that combines creativity and craftsmanship. By choosing the right board, planning your design carefully, using the best tools for your skill level, and finishing properly, you can make a unique piece that stands out.
Remember, every engraving is a learning experience—don’t be afraid to practice on scrap wood first and take your time.
With the guidance in this article, you now have the confidence to start your own project. Whether you’re making a heartfelt gift or a custom item for your kitchen, your engraved cutting board will be both beautiful and practical for years to come.