
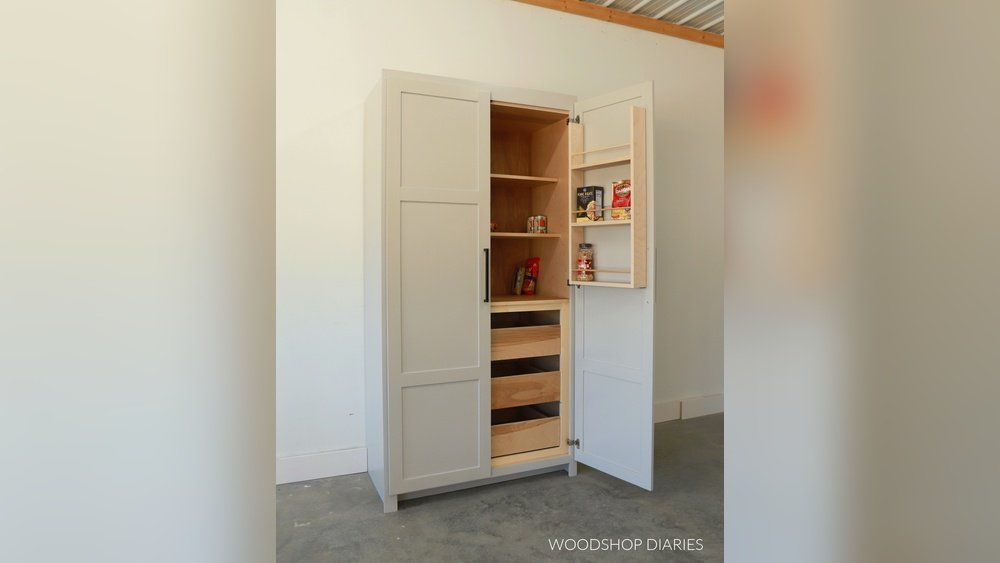
Building your own kitchen pantry cabinet can be a rewarding project. It not only gives you custom storage but also helps you organize your kitchen the way you want. Many homeowners struggle with cluttered shelves and wasted space. A well-built pantry cabinet solves these problems, keeps food fresh, and makes meal prep easier. If you have basic DIY skills and are ready to invest some time, you can create a pantry that matches your needs and style. This guide will walk you through every step, from planning to finishing touches, so you end up with a professional-looking result—even if it’s your first time.
Why Build Your Own Kitchen Pantry Cabinet?
People choose to build their own kitchen pantry cabinets for many reasons. Custom cabinets are often expensive to buy, especially if you want a certain size or style. By making your own, you save money and get exactly what you want. You can use quality materials, choose your favorite hardware, and design the interior to fit your groceries and appliances.
Another benefit is that you can build a pantry cabinet to fit any space—whether you have a small kitchen corner or an entire empty wall. This flexibility is hard to find with store-bought furniture. Plus, building something yourself brings a sense of satisfaction that store-bought items never match.
Planning Your Kitchen Pantry Cabinet
The success of your project depends on planning. Take time to think about your needs, budget, and space.
Measure Your Space
Start by measuring the area where you want to place your pantry cabinet. Record the width, height, and depth. Remember to check for nearby doors, windows, or appliances that could block the cabinet or make it hard to open.
A good pantry is at least 12 inches deep, but not much more than 24 inches, or items in the back are hard to reach. The height depends on your ceiling, but many people choose a cabinet about 84 to 96 inches tall.
Decide On Storage Features
Think about what you need to store:
- Canned goods: Need short, strong shelves.
- Small appliances: Require deeper, taller spaces.
- Baskets or bins: Need shelves with enough height.
- Bulk items: Need wide, sturdy shelves.
Sketch a rough design. Will you want pull-out drawers, adjustable shelves, or doors with racks? Even a simple drawing helps you plan materials and cut lists.
Choose Materials
The most common materials for pantry cabinets are:
- Plywood (3/4″ thick): Strong, affordable, and easy to paint.
- MDF (Medium Density Fiberboard): Smooth for painting, but heavier.
- Solid wood: Durable and attractive, but more expensive.
For most kitchens, 3/4″ plywood is a good choice for structure, with 1/4″ plywood for the back panel. Doors can be solid or framed with plywood inserts.
Set Your Budget
Material costs can add up. A typical pantry cabinet with plywood, hardware, paint, and handles may cost between $200 and $600, depending on size and finish. Compare this with the cost of pre-built cabinets—often $800 or more for a similar size.

Credit: www.reddit.com
Tools And Materials Needed
Having the right tools makes your work easier and safer. Here’s what you’ll need for most pantry cabinet builds:
Tools
- Measuring tape
- Pencil and square
- Circular saw (or table saw for straight cuts)
- Drill/driver
- Level
- Clamps
- Sander (or sanding block)
- Hammer
- Screws and nails
- Wood glue
- Paintbrush or roller
If you plan to install special features like pull-out shelves, you may also need a router or jig saw.
Materials
- 3/4″ plywood (for sides, top, bottom, shelves, doors)
- 1/4″ plywood (for back panel)
- Edge banding (for plywood edges)
- Shelf pins or cleats (for adjustable shelves)
- Hinges (if using doors)
- Handles or knobs
- Paint or stain
- Primer (if painting)
Always buy a bit extra to allow for mistakes or changes.
Designing Your Pantry Cabinet: Styles And Layouts
There is no single best design for a kitchen pantry cabinet. Your choice depends on your kitchen’s size and your storage needs.
Popular Styles
- Tall free-standing pantry: A single, tall cabinet with doors and shelves inside. Great for unused corners.
- Built-in pantry: Fitted between walls or next to appliances. Looks seamless and can add value to your kitchen.
- Open shelving: No doors, making everything visible. Easy access but needs tidy organization.
- Pull-out pantry: Shelves or baskets slide out for easy reach. Good for narrow spaces.
Layout Tips
- Adjustable shelves give flexibility for changing needs.
- Divide tall shelves into smaller sections to avoid wasted space.
- Leave space at the bottom for heavy items.
- Include a drawer or two for small packets or utensils.
Here is a simple comparison of common pantry types:
| Type | Best For | Pros | Cons |
|---|---|---|---|
| Tall Free-standing | Most kitchens | Easy to move, flexible | Takes floor space |
| Built-in | Custom kitchens | Seamless look, adds value | Harder to change later |
| Open Shelving | Small spaces | Easy access, airy | Needs neatness |
| Pull-out Pantry | Narrow spots | Max storage, easy reach | Complex build |
Step-by-step Guide To Building A Kitchen Pantry Cabinet
Here is a detailed process for building a tall, free-standing pantry with adjustable shelves and doors. Adapt these steps for your own design.
1. Make A Cut List
A cut list helps you organize and avoid mistakes. Based on your measurements, write down all the pieces you need:
- Two side panels (height x depth)
- Top and bottom panels (width x depth)
- Shelves (width x depth)
- Back panel (height x width)
- Door panels (height x width, usually slightly less than cabinet to allow clearance)
Label each piece and double-check measurements before cutting.
2. Cut The Panels
Lay your plywood on a flat surface. Use a circular saw with a straight edge or a table saw for precise cuts. Cut slowly to avoid chipping, especially if using plywood. Sand the edges smooth.
Tip: If you don’t have a large saw, most hardware stores will cut plywood sheets for you.
3. Attach Edge Banding
The edges of plywood can look rough. Use edge banding (thin strips of wood or plastic) to cover exposed edges. Iron-on edge banding is easy to apply. Trim any extra with a sharp knife.
This step is often skipped by beginners, but it makes your pantry look like a real cabinet.
4. Assemble The Box
Lay the side panels flat. Attach the top and bottom panels between them using wood glue and screws. Drill pilot holes to avoid splitting the wood. Use clamps to hold parts in place while you work.
Check that the box is square by measuring the diagonals—they should be equal.
5. Attach The Back Panel
Lay the box face-down. Attach the 1/4″ plywood back panel with nails or a staple gun. Make sure the box stays square as you secure the back. The back panel strengthens the cabinet.
6. Install Shelving Supports
For adjustable shelves, drill holes for shelf pins in the side panels. Use a template or a special shelf pin jig for evenly spaced holes. For fixed shelves, screw wood strips (cleats) to the sides at the desired heights.
Tip: Place at least one fixed shelf for extra stability, especially in tall cabinets.
7. Build And Attach The Doors
Measure the cabinet opening. Doors should be about 1/8″ smaller in height and width to allow for easy opening. Cut from plywood or build a frame-and-panel door.
Attach hinges to the doors, then screw them to the cabinet. Check that the doors open and close smoothly. Adjust hinges if needed.
8. Add Shelves
Cut shelves to fit inside the cabinet. Sand edges and apply edge banding if desired. Set them in place on the shelf pins or cleats.
9. Install Handles And Hardware
Mark positions for handles or knobs. Drill holes and attach hardware. Choose handles that match your kitchen style and feel comfortable in your hand.
10. Paint Or Finish
Remove all shelves and doors before painting or staining. Apply a coat of primer if painting, then two coats of high-quality paint. Let each coat dry fully. For stain, apply according to the wood type.
Paint or finish in a well-ventilated area. Reinstall shelves and doors after everything is dry.
11. Secure The Cabinet
Tall cabinets can tip, especially if children are in the home. Use L-brackets or safety straps to anchor the pantry to the wall studs.
Practical Tips For A Professional Finish
Even simple projects look better with attention to detail. Here are tips to improve your results:
- Sand all surfaces and edges before finishing.
- Use a level for every step—crooked cabinets look bad and work poorly.
- Fill screw holes with wood filler before painting.
- Use cabinet feet or shims to level on uneven floors.
- Label each piece as you cut to avoid confusion during assembly.

Credit: www.youtube.com
Customizing Your Pantry Cabinet
Your pantry doesn’t have to be basic. Here are ways to add custom features:
Pull-out Drawers
Install metal slides and build shallow drawers for storing cans or snacks. Pull-outs make it easy to reach items at the back.
Door Racks
Attach slim racks to the inside of doors for spices or small bottles. Use short screws to avoid poking through the door.
Lighting
Add LED strip lights inside the cabinet. Motion-activated lights are convenient and make it easier to find items.
Chalkboard Or Whiteboard
Mount a chalkboard or whiteboard on the door for grocery lists and reminders.
Soft-close Hinges
Upgrade to soft-close hinges for a quiet, smooth action. They prevent slamming and extend cabinet life.
Mistakes To Avoid When Building A Kitchen Pantry Cabinet
DIY projects often come with surprises. Here are common mistakes and how to avoid them:
- Skipping planning: Rushing into building without a plan leads to wasted materials.
- Ignoring wall anchors: A pantry cabinet not fixed to the wall can fall over.
- Wrong measurements: Small errors add up—measure twice, cut once.
- Cheap hardware: Low-quality hinges or slides wear out fast.
- Poor finishing: Skipping sanding or paint makes cabinets look unfinished.
Pay attention to these details to create a pantry you’ll enjoy for years.
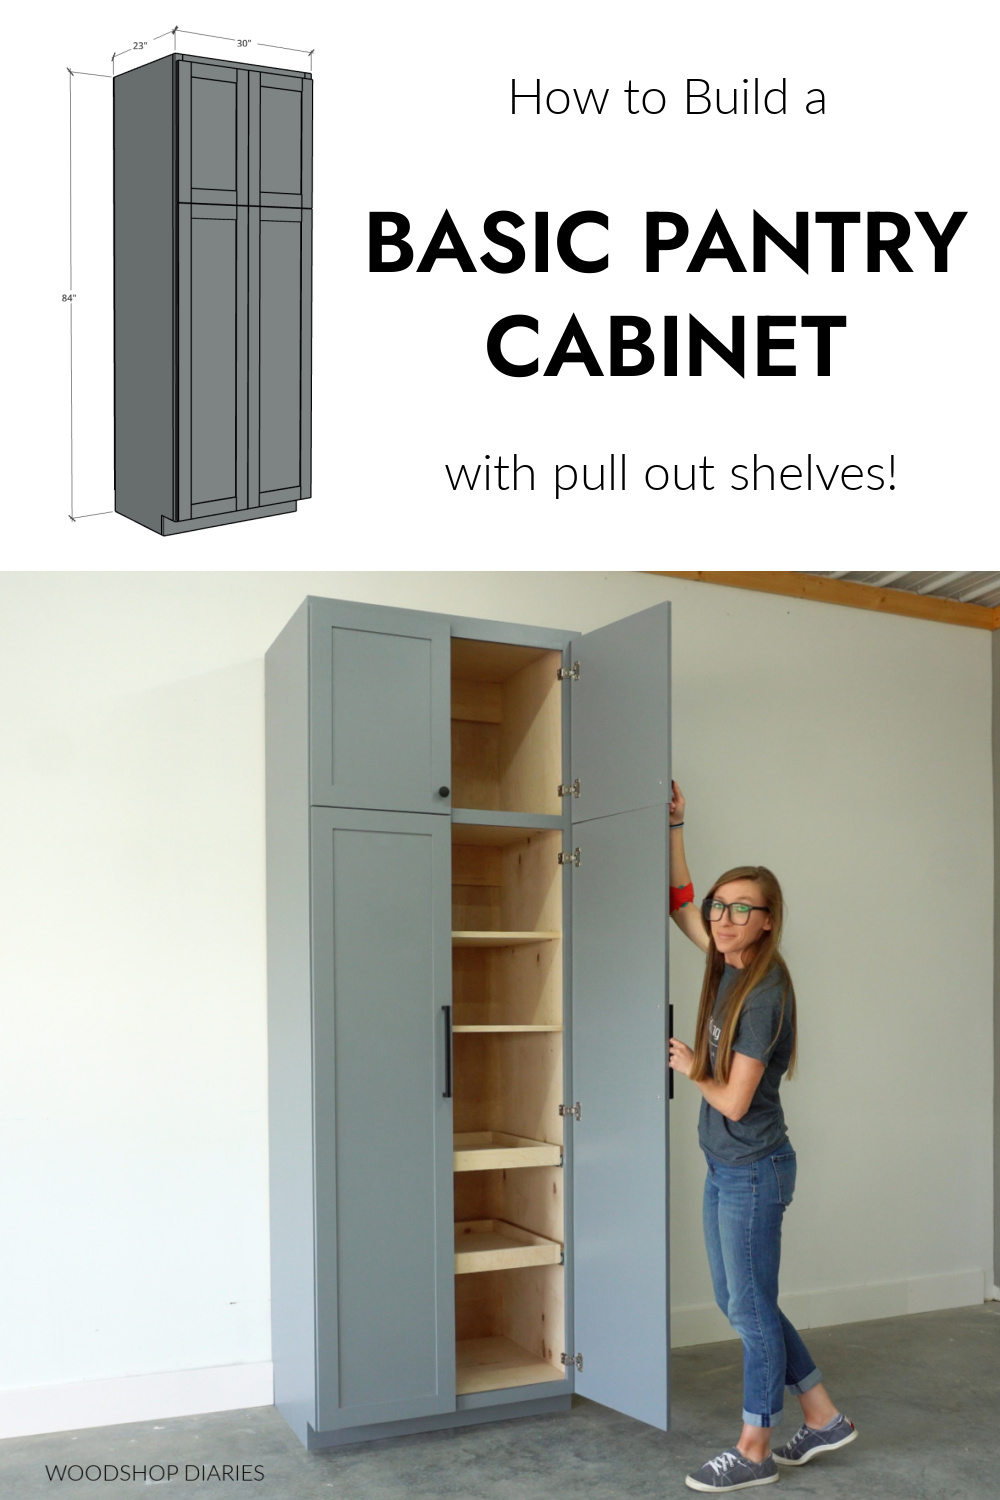
Credit: www.woodshopdiaries.com
How To Organize Your New Kitchen Pantry Cabinet
After building your pantry, organizing it well is key to making the most of your space.
- Group similar items: Keep baking supplies, snacks, and cans in separate zones.
- Label shelves: Helps everyone in the house find things quickly.
- Use bins and baskets: Contain small items and make shelves look tidy.
- First in, first out: Put new groceries at the back to use older items first.
- Keep heavy items low: Store flour, rice, and appliances near the bottom.
Here is a quick look at how different shelf heights can help organize common pantry items:
| Item Type | Recommended Shelf Height | Why |
|---|---|---|
| Canned Goods | 6-8 inches | Easy stacking, fits most cans |
| Spices | 4-5 inches | Small containers, easy access |
| Appliances | 12-18 inches | Fits tall items like blenders |
| Baskets/Bins | 10-12 inches | Room for bulk or bagged items |
Cost And Time Estimates
Building a pantry cabinet is usually cheaper than buying one. Here’s what to expect.
Typical Costs
- Plywood (3-4 sheets): $60–$150 each depending on quality
- Hardware (hinges, handles, shelf pins): $30–$80
- Paint or stain: $30–$70
- Miscellaneous (screws, glue, sandpaper): $20–$50
A basic pantry costs about $250–$400 in materials. Larger or more detailed cabinets can cost up to $600.
Time Required
- Planning and design: 2–3 hours
- Cutting and prep: 3–4 hours
- Assembly: 3–5 hours
- Painting/finishing: 4–8 hours (including drying time)
- Installation and organizing: 2–3 hours
Most people finish their pantry in one weekend. Adding custom features or a special finish can take longer.
Safety And Quality Considerations
Building a pantry cabinet is safe for most DIYers, but keep these points in mind:
- Wear safety glasses when cutting wood.
- Use a mask when sanding or painting.
- Secure the cabinet to the wall to prevent tipping.
- Choose low-VOC paint if you have allergies or children.
For extra tips on kitchen cabinet safety, the Consumer Product Safety Commission provides helpful guidelines.
Real-life Example: Building A Family Pantry
Consider the example of Maria, who built a 7-foot tall pantry for her family’s busy kitchen. She used three sheets of 3/4″ birch plywood, installed five adjustable shelves, and added pull-out baskets for snacks. She painted the cabinet white to match her kitchen.
The total cost was about $380, and she finished in two weekends.
Maria says the hardest part was drilling the shelf pin holes evenly, but using a simple homemade jig helped. She now stores canned goods, baking supplies, and even her stand mixer in the pantry. The pull-out baskets are her kids’ favorite feature.
Two months later, Maria’s kitchen is less cluttered, and meal prep is faster because everything is easy to find.
Advanced Pantry Cabinet Features
If you want to go beyond basic, consider these advanced options:
- Soft-close pull-out trays for heavy appliances or mixers.
- Divided drawers for snacks or baking sheets.
- Integrated lighting with motion sensors.
- Custom paint or wallpaper inside the cabinet for a personal touch.
- Glass doors for a high-end look.
These extras add time and cost but make your pantry unique and even more useful.
Environmental Impact And Sustainability
Building your own pantry lets you choose eco-friendly materials. Many home centers now offer sustainably sourced plywood or formaldehyde-free MDF. You can also reuse hardware or paint to reduce waste.
Another idea is to use reclaimed wood for a rustic look. This not only saves money but also gives new life to old materials.
When To Call A Professional
Some projects are best left to professionals. If your pantry will be built into a wall, includes electrical work (like outlets or lighting), or you want a high-end finish, consider hiring a carpenter. This is also a good idea if you have uneven floors or walls.
However, for most free-standing pantry cabinets, a determined DIYer can get great results.
Frequently Asked Questions
How Deep Should A Kitchen Pantry Cabinet Be?
Most pantry cabinets are 12 to 24 inches deep. Shallower cabinets (about 16 inches) make it easy to see and reach everything. Deeper cabinets can store larger items, but things may get lost in the back.
What Is The Best Material For A Pantry Cabinet?
3/4″ plywood is strong, affordable, and easy to finish. MDF is also smooth and good for painting but is heavier and not as strong for shelves. Solid wood is attractive but costs more.
How Do I Keep My Pantry Shelves From Sagging?
Use thicker shelves (at least 3/4″) and add support if shelves are over 30 inches wide. Fixed shelves are stronger than adjustable ones. For heavy items, add a center support or use metal shelf brackets.
Can I Build A Pantry Cabinet Without Doors?
Yes, open shelving is popular and easy to build. It makes items easy to grab and can look modern. However, you’ll need to keep shelves tidy, as everything is visible.
How Do I Make My Pantry Cabinet Match My Kitchen?
Paint or finish the cabinet with the same color and style as your existing cabinets. Use similar handles and hardware. For a built-in look, add trim or molding to the top and sides.
Building a kitchen pantry cabinet is a smart way to add storage, style, and value to your home. With careful planning, the right tools, and attention to detail, you’ll enjoy a pantry that works perfectly for your family. Take your time, measure carefully, and don’t be afraid to customize—your dream pantry is within reach.