Lighting can completely change the look and feel of a kitchen. With the right plan, your kitchen becomes warm, bright, and functional. One of the most popular ways to light a kitchen is by using recessed lighting. These small, ceiling-mounted lights create a clean, modern look while offering strong and even illumination. But getting the layout right is not always simple. If you place lights in the wrong spots, you might end up with shadows, uneven light, or glare that makes cooking and cleaning uncomfortable.
Most people want their kitchen to be both beautiful and practical. Good lighting helps you see when chopping vegetables or reading recipes. It also makes your kitchen feel bigger and more open. But how do you know where to put each light? How many do you need? And what mistakes should you avoid? This guide will walk you through everything you need to know to design the best recessed lighting layout for your kitchen, whether you are renovating or starting fresh. You’ll get clear steps, practical examples, and expert tips so your kitchen will shine in the best way possible.
Understanding Recessed Lighting Basics
Before you start planning, it’s important to understand what recessed lighting is and why it’s so popular in kitchens. Recessed lights are fixtures installed into the ceiling, so only the trim and lens are visible. They are sometimes called “can lights” or “downlights.”
Why Choose Recessed Lighting?
- Sleek Appearance: Recessed lights sit flush with the ceiling, giving a clean look that fits modern and classic kitchens.
- Even Illumination: They spread light across the space, reducing dark corners and shadows.
- Flexibility: You can place them to highlight countertops, islands, and other key areas.
- Space Saving: No hanging fixtures means more headroom and less clutter, perfect for kitchens with lower ceilings.
Key Components
- Housing: The main body that sits inside the ceiling.
- Trim: The visible part, which can be simple or decorative.
- Bulb/LED Module: Provides the light. LED is the most energy-efficient choice.
- Baffle/Reflector: Helps direct the light and reduce glare.
Basic Types
- New Construction Cans: Used when building or doing major renovations.
- Remodel Cans: For adding lights to an existing ceiling.
- IC Rated Housings: Safe for use with insulation.
- Non-IC Rated: For ceilings without insulation.
Many beginners miss the importance of IC rating. If you place a non-IC rated light in an insulated ceiling, it can overheat, which is a fire risk. Always check the housing type before buying.
Steps To Plan Your Kitchen Recessed Lighting Layout
A good layout doesn’t happen by accident. You need to consider the kitchen’s size, shape, and how you use it. Let’s walk through the steps to create a smart plan.
1. Measure Your Kitchen
Start by measuring the length and width of your kitchen in feet. Make a simple sketch or use a phone app to create a floor plan. Mark the location of counters, islands, appliances, windows, and doors. This helps you see where light is most needed.
2. Identify Key Areas
Think about the main zones in your kitchen:
- General Lighting (Ambient): For overall brightness.
- Task Lighting: Over counters, stove, and sink for food prep.
- Accent Lighting: To highlight features like a backsplash or open shelves.
Kitchens are not all the same, so consider how you use yours. For example, if you bake a lot, you might want extra light near your mixer.
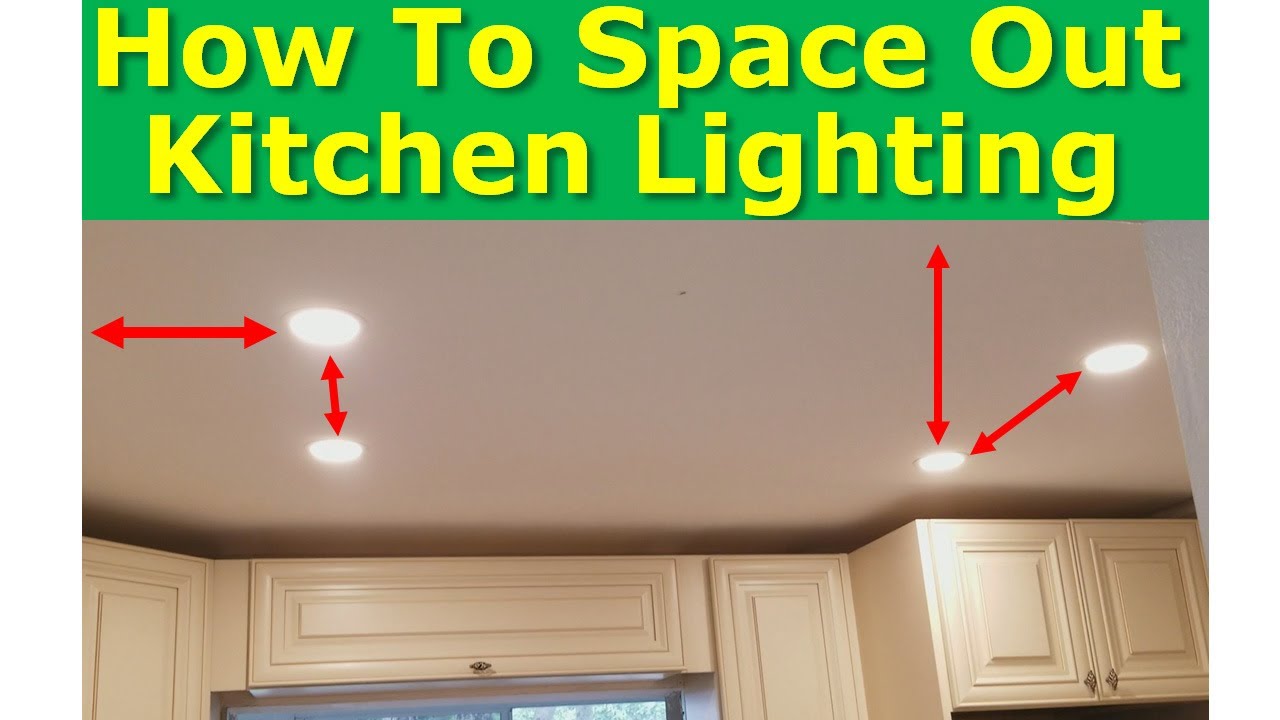
3. Decide On The Number Of Lights
A good rule of thumb is to space recessed lights 4 to 6 feet apart for 6-inch fixtures, or 3 to 4 feet for 4-inch fixtures. But the total number depends on your ceiling height and the amount of natural light.
Estimating The Right Number
- Find your kitchen’s square footage (length x width).
- Multiply by 1.5 to get the total wattage needed (using LED bulbs, divide by the wattage of each bulb to get the number of lights).
Example:
A 12×15 ft kitchen = 180 sq ft.
180 x 1. 5 = 270 watts needed.
If using 10-watt LEDs, you’d need about 27 bulbs. But that’s too many for a kitchen, because recessed lights are usually brighter. Most kitchens use 6-12 recessed lights, depending on layout.
Common Mistake
Some people add too many lights, making the kitchen feel harsh. Others use too few, leaving dark spots. Always test your plan with a lighting calculator or consult a lighting designer if unsure.
4. Choose The Right Size And Type
- 4-inch lights: Good for small kitchens or accent lighting.
- 5-6 inch lights: Better for main lighting in larger kitchens.
- Gimbals/Adjustable lights: Useful for highlighting specific areas, like a sink or artwork.
5. Create A Lighting Grid
Draw your kitchen on graph paper or use design software. Mark where each recessed light will go, keeping the following in mind:
- Start about 18–24 inches from the wall or the edge of the counter.
- Space lights evenly for general lighting, but use extra fixtures over islands, sinks, and workspaces.
If you have an island, a row of recessed lights centered over it works well. For L-shaped or galley kitchens, follow the shape with your layout.
6. Consider Ceiling Height
- 8-foot ceilings: Place lights 4 feet apart.
- 9–10-foot ceilings: Space 5–6 feet apart and consider higher-wattage bulbs.
7. Decide On Light Direction
Most recessed lights point straight down, but you can use eyeball trims or adjustable heads to aim light at the backsplash or cabinets.
8. Plan For Dimmers
Install dimmer switches so you can adjust brightness for cooking, cleaning, or entertaining. This is a detail many homeowners forget, but it makes a big difference in comfort.
9. Confirm Electrical Requirements
Check if your kitchen’s wiring can support the extra load. Large numbers of lights may need additional circuits. Consult an electrician to be safe.

Credit: www.houzz.com
Common Kitchen Layout Types And Lighting Strategies
Every kitchen is unique, but most fall into a few basic shapes. Here’s how to approach recessed lighting for each.
Galley Kitchen
This layout is long and narrow, with two rows of cabinets facing each other. Place a row of recessed lights centered between the counters. Space them 3–4 feet apart for a small kitchen, or 4–5 feet for a larger one.
Tip: Add adjustable lights over the sink or stove for more focused task lighting.
L-shaped Kitchen
Lights should follow the shape. Use a main row down the long side, and another along the shorter leg. Place extra fixtures where the two sides meet, which is often a busy prep area.
U-shaped Kitchen
Three walls mean more counters and more shadows. Use rows of lights along each wall, keeping them 18–24 inches from the cabinets. Place a light above the sink and stove.
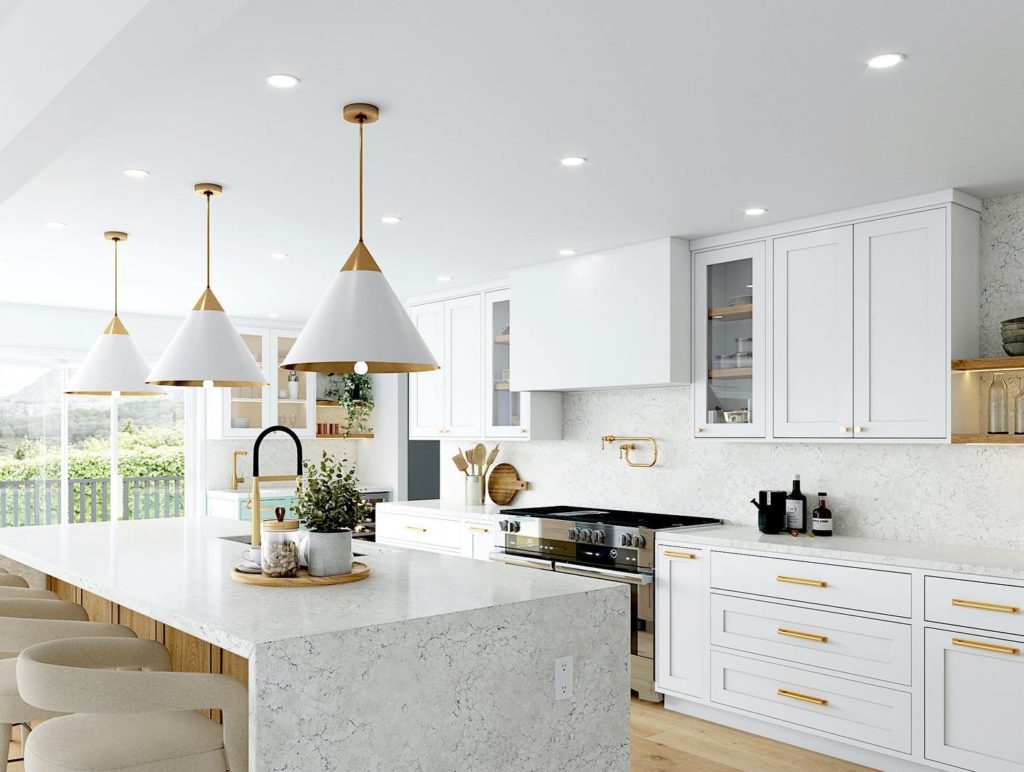
Island Kitchen
Put a row of lights centered over the island, spaced 2–3 feet apart. For large islands, use two rows. Combine with pendant lights for more style.
Open Plan Kitchen
Blend kitchen lighting with the dining and living areas. Use dimmers to adjust the kitchen lights independently. You may need more lights to make the kitchen stand out in an open space.
How To Avoid Shadows And Glare
One of the biggest challenges is avoiding shadows where you prepare food or glare that makes the kitchen uncomfortable. Here’s how to solve these problems.
Avoiding Shadows
- Place lights in front of work surfaces, not directly above or behind. This prevents your body from blocking the light.
- Use extra lights above the sink, stove, and main prep areas.
- If you have tall cabinets, use under-cabinet lighting to fill in dark spots.
Preventing Glare
- Choose baffle trims to cut down on glare.
- Avoid placing lights too close to shiny surfaces like granite or stainless steel.
- Use lower-wattage bulbs if your kitchen is small or has a lot of reflective surfaces.
Smart Placement Example
If your main prep area is under a cabinet, a recessed light 18 inches in front of the counter will light your hands and food, not just the cabinet doors.
Credit: www.youtube.com
Comparing Recessed Lighting To Other Kitchen Lighting Types
Choosing the right lighting isn’t just about looks. Here’s a comparison to show when recessed lighting is best, and when other options might help.
| Lighting Type | Best For | Pros | Cons |
|---|---|---|---|
| Recessed Lights | General/Task Lighting | Clean look, even light, flexible placement | May need many fixtures, can create glare if poorly placed |
| Pendant Lights | Islands, Dining Areas | Decorative, focused light, adds style | Can block views, not for general lighting alone |
| Under-Cabinet Lights | Task Lighting | No shadows, highlights counters, easy to install | Limited to counter area, not for general light |
| Track Lighting | Accent Lighting | Movable heads, flexible aiming | Can look cluttered, not as subtle as recessed |
Key Factors When Choosing Your Recessed Lighting Layout
Planning the layout is more than just spacing the fixtures. Here are some key factors to consider.
Kitchen Size And Shape
Larger kitchens need more lights, but spacing is just as important. Odd shapes (like kitchens with peninsulas) may need custom placement.
Ceiling Height
Higher ceilings require more powerful lights or closer spacing. For ceilings over 10 feet, consider using 6-inch or adjustable recessed lights.
Counter And Island Placement
Don’t center all lights in the room—focus on where you’ll work most. Place lights over sinks, islands, and main prep spaces.
Reflective Surfaces
High-gloss counters, backsplashes, or appliances can reflect light. This can cause glare or “hot spots. ” Test sample bulbs and trims to see how the light looks before installing everything.
Style Preferences
Some people prefer minimal lighting for a softer look; others want a bright, vibrant kitchen. Match your layout to your cooking style and how you use the space.
Credit: www.1800lighting.com
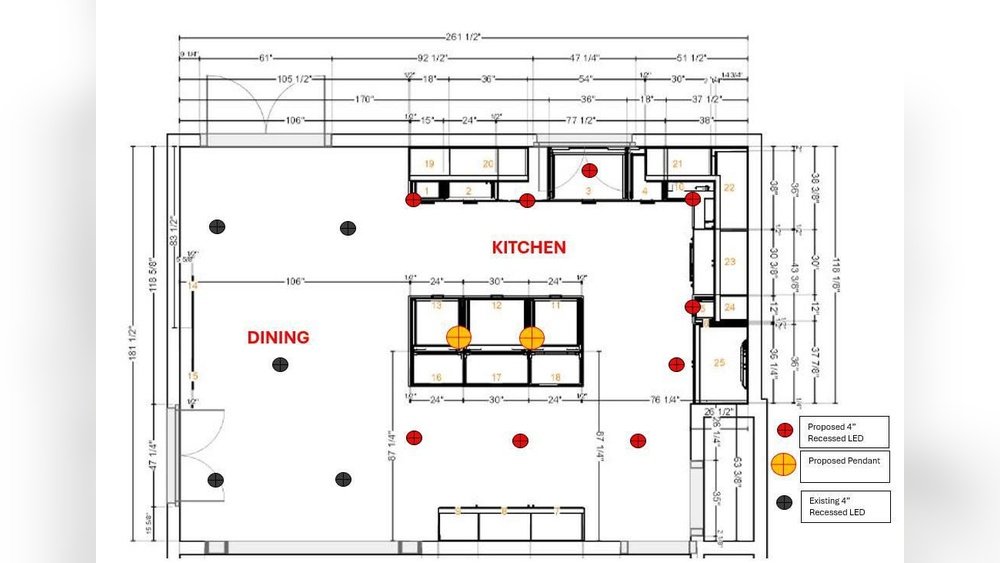
Step-by-step Example: Laying Out Recessed Lights For A Real Kitchen
Let’s walk through a realistic example so you can see the process in action.
The Kitchen
- Size: 12 x 15 feet, 8-foot ceiling
- Features: Island (3 x 6 feet), sink under a window, stove on one wall
- Main tasks: Cooking, baking, entertaining
1. Outline Key Work Areas
- Main counter (next to stove)
- Island (prep and eating)
- Sink (washing, food prep)
2. Draw The Grid
- Start 24 inches from each wall. Mark a rectangle where the main lights will go.
- Plan for two rows of recessed lights down the length of the kitchen, spaced 4 feet apart.
- Add two more lights centered over the island.
3. Check Coverage
- Lights are spaced so no part of the kitchen is more than 4 feet from a light.
- One light is directly above the sink for clear visibility.
4. Adjust For Obstacles
- Move lights slightly to avoid ceiling joists or vents.
- Aim island lights straight down for best coverage.
5. Plan Switches And Dimmers
- One switch for general lights, one for island, and one for the sink area.
- Install dimmers for all three zones.
6. Review And Test
- Use a lighting app or simulation to check for shadows.
- Make final adjustments before installing.
Mistakes To Avoid When Laying Out Recessed Lighting
Even experienced remodelers make errors. Here are some common mistakes and how to avoid them.
- Placing lights too close to cabinets or walls: This creates bright spots on the vertical surfaces and shadows on counters.
- Over-lighting the space: Too many fixtures can make the kitchen feel harsh and waste energy.
- Using the wrong trim type: Shiny trims reflect too much light; baffle trims are usually best.
- Ignoring task areas: Don’t put all the lights in the center. Focus on where you’ll actually work.
- Not planning for dimmers: Fixed brightness can be uncomfortable for relaxing or entertaining.
- Forgetting future changes: Leave room for extra lights or upgrades later.
Technical Tips For A Perfect Install
A few details can make your recessed lighting more effective and last longer.
Use High-quality Leds
Modern LED bulbs last up to 25,000 hours and use much less energy than older bulbs. Choose bulbs with a color temperature of 2700K–3000K for a warm, inviting kitchen. A CRI (Color Rendering Index) of 80 or higher will make food and surfaces look their best.
Seal Air Leaks
Recessed lights can let air leak into the attic, raising energy bills. Use airtight housings and add insulation around the fixtures if allowed.
Safe Installation
- Turn off power at the breaker before starting.
- Use IC-rated housings if touching insulation.
- Hire a licensed electrician if you’re not comfortable with wiring.
Add Other Layers
Recessed lighting is great for general and task lighting, but combine it with under-cabinet or pendant lights for the best result.
Comparing Led Vs. Traditional Recessed Lighting
Choosing the right bulb technology is just as important as layout. Here’s a quick comparison.
| Feature | LED | Halogen/Incandescent |
|---|---|---|
| Energy Use | 8–12W per bulb | 50–75W per bulb |
| Lifespan | 15,000–25,000 hours | 1,000–2,000 hours |
| Heat Output | Very Low | High |
| Color Options | Wide Range | Mostly Warm |
| Cost | Higher upfront, lower long-term | Lower upfront, higher energy bills |
LEDs are the best choice for almost all kitchens today. They save money in the long run and are safer for insulated ceilings.
Real-world Examples And Pro Tips
Example 1: Small Galley Kitchen
A 10×12 foot galley kitchen with 8-foot ceilings can use two rows of 4-inch recessed lights, spaced 3 feet apart. Add an adjustable light above the sink. Use under-cabinet LEDs to fill in shadows.
Example 2: Large Open Kitchen
A 15×20 foot open kitchen with an island needs three rows of 6-inch recessed lights, spaced 5 feet apart. Place extra lights over the island and stove. Combine with pendant lights for style.
Pro Tips
- Test before cutting: Use painter’s tape to mark the ceiling and check light coverage before installing.
- Layer your lights: Don’t rely on recessed lights alone. Add pendants or under-cabinet strips for best results.
- Use smart controls: Smart switches and bulbs let you adjust lights from your phone or voice assistant.
Energy Efficiency And Codes
Modern building codes often require energy-efficient lighting in kitchens. In the US, California’s Title 24 and similar standards require high-efficacy bulbs (LEDs or CFLs), airtight housings, and sometimes motion sensors or timers.
Saving Money
- Use ENERGY STAR rated fixtures and bulbs.
- Install fewer, more efficient lights instead of many cheap ones.
- Add dimmers to reduce energy use when full brightness isn’t needed.
Cost Of Installing Kitchen Recessed Lighting
The price depends on many factors: the number of lights, wiring complexity, and whether you hire a pro.
- Materials: $20–$70 per fixture (including housing, trim, bulb)
- Labor: $100–$250 per light installed (varies by region)
- Total for a medium kitchen: $1,000–$2,500
DIY can save money, but electrical work can be risky. Always follow local codes and safety rules.
When To Call A Pro Vs. Diy
If your kitchen is new construction or you’re comfortable with electrical work, you might install recessed lighting yourself. But call a licensed electrician if:
- Your ceiling has insulation (needs IC-rated cans)
- You need to add or move circuits
- You’re not sure about local codes
A professional can help you avoid common mistakes and ensure a safe, code-compliant installation.
Where To Find More Information
For in-depth guides on wiring, energy codes, and lighting design, the US Department of Energy provides reliable resources. See their official site for more.
Frequently Asked Questions
How Far Apart Should I Space Recessed Lights In My Kitchen?
For 6-inch recessed lights, space them 4 to 6 feet apart. For 4-inch lights, use 3 to 4 feet. Start 18–24 inches from the wall or cabinets. Adjust based on ceiling height and kitchen size.
Do I Need Recessed Lights Over My Kitchen Island?
Yes, it’s best to have dedicated lights over the island for task lighting. Place them 2–3 feet apart, centered over the island. You can combine with pendant lights for style and extra brightness.
What Color Temperature Is Best For Kitchen Recessed Lights?
A color temperature of 2700K–3000K (warm white) is comfortable and makes food look appetizing. Higher temperatures (4000K+) can look harsh and are better for garages or workrooms.
Can I Install Recessed Lighting In An Existing Ceiling?
Yes, use remodel cans designed for old ceilings. You’ll need to cut holes and run wiring, which may be easier with attic access. Always turn off power before starting.
How Many Recessed Lights Do I Need For My Kitchen?
Most kitchens use 6–12 recessed lights, depending on size and layout. Calculate your kitchen’s square footage, then use the “1. 5 watts per sq ft” rule to estimate, but adjust based on task areas and ceiling height.
Your kitchen is the heart of your home. With the right recessed lighting layout, you’ll get a space that’s bright, safe, and beautiful for years to come. Take your time to plan, test, and adjust—your effort will pay off every time you cook, clean, or gather with friends and family.