A garbage disposal and dishwasher can transform your kitchen experience. These appliances make cleaning up faster and more hygienic. Many homeowners think installation is too complex, but with the right steps and some basic tools, it’s possible to handle it yourself.
Whether you’re upgrading your kitchen or replacing old units, understanding how to install a garbage disposal and dishwasher will save you money and give you a sense of accomplishment.
This guide breaks down every part of the installation process. You’ll learn what tools and materials you need, how to prepare your kitchen, and exactly what steps to follow. You’ll also learn safety tips, common mistakes to avoid, and how to test your installation.
Even if you’re not an expert, you’ll be able to install these appliances with confidence. Let’s get started and make your kitchen smarter and more efficient.
Understanding Garbage Disposals And Dishwashers
Before you begin, it helps to understand what these appliances do and how they connect to your home’s plumbing and electrical systems.
A garbage disposal is an electric device installed under your kitchen sink. It shreds food waste into small pieces, which are washed away with water through the plumbing. This reduces kitchen trash and helps keep your sink clean.
A dishwasher is a machine that cleans dishes, glasses, and utensils automatically. It uses water and detergent, and it needs to connect to both your water supply and your drain system. Most dishwashers are installed next to the kitchen sink for easy access to plumbing.
Both appliances need power, water, and a way to send dirty water to the drain. If you’re installing both at the same time, you’ll see how they work together.
Tools And Materials Needed
Gather all your tools and materials before starting. Having everything ready makes the job smoother and helps prevent delays.
Essential Tools
- Screwdrivers (flathead and Phillips)
- Adjustable wrench
- Pipe wrench
- Needle-nose pliers
- Hammer
- Hacksaw (for cutting pipes if needed)
- Tape measure
- Plumber’s putty
- Wire stripper/cutter
- Voltage tester (for electrical safety)
- Bucket and towels
Materials
- Garbage disposal unit (new or replacement)
- Dishwasher (make sure it fits your space)
- Mounting ring and hardware (usually included with disposal)
- Disposal power cord kit (if not prewired)
- Dishwasher installation kit (includes water line, drain hose, clamps, and fittings)
- Plumbing tape (Teflon tape)
- Flexible water supply line (for dishwasher)
- Discharge tube (for disposal)
- Electrical wire nuts
- Wire connectors
- Hose clamps
- Drain tee or branch tailpiece (if needed)
Pro tip: Double-check the instructions for both appliances. Some models need special adapters or parts.
Planning Your Installation
Proper planning is essential. A little preparation prevents major headaches.
Check Space And Power
Measure the area under your sink. Make sure there’s enough room for both the garbage disposal and dishwasher. Most disposals fit standard sinks, but some large models need extra space.
Check for a power outlet under the sink. Both appliances may need separate outlets. Dishwashers often require a dedicated circuit.
Inspect Plumbing
Look at your existing plumbing. Most kitchen sinks have a drainpipe and a hot water supply line nearby. If you’re replacing old appliances, see how they’re connected. If this is a new installation, you may need to add a branch for the dishwasher drain.
Local Codes And Permits
Some cities require a permit for new installations. Check your local building codes. If you’re unsure, call your city’s permit office or consult a licensed plumber.
Removing Old Appliances
If you’re replacing an old garbage disposal or dishwasher, you’ll need to remove them first.
Removing The Old Garbage Disposal
- Turn off power at the circuit breaker.
- Unplug the disposal or disconnect the hardwired connection.
- Place a bucket under the sink to catch water.
- Disconnect the drain pipe using a wrench.
- If a dishwasher is connected, disconnect the dishwasher drain hose from the disposal.
- Loosen the mounting ring (usually turns counterclockwise) and carefully lower the disposal unit.
- Remove the mounting assembly if you plan to install a new one.
Removing The Old Dishwasher
- Turn off power and shut off the water supply.
- Open the access panel at the bottom front of the dishwasher.
- Disconnect the power wires and water supply line.
- Remove the drain hose from the sink drain or garbage disposal.
- Unscrew the mounting brackets and gently slide the dishwasher out.
Non-obvious tip: Take photos before disconnecting anything. This will help you remember where wires and hoses go.
Installing The Garbage Disposal
Now that the old unit is out, it’s time to install the new garbage disposal.
Step 1: Install The Mounting Assembly
- Apply a ring of plumber’s putty under the sink flange.
- Place the sink flange into the drain opening.
- From under the sink, slide on the backup ring, mounting ring, and snap ring (follow the disposal’s manual for order).
- Tighten the mounting assembly until the flange is secure and excess putty squeezes out. Wipe away extra putty.
Insider advice: Some people skip using putty or use silicone. Plumber’s putty is better for removability and a watertight seal.
Step 2: Prepare The Disposal Unit
- If you’re connecting a dishwasher, knock out the dishwasher plug on the disposal inlet with a screwdriver and hammer. Remove the metal disk inside.
- If your disposal doesn’t have a power cord, attach the cord to the bottom of the unit. Follow the wiring diagram. Connect black to black (hot), white to white (neutral), and green to ground.
Step 3: Mount The Disposal
- Lift the disposal into place, aligning it with the mounting ring.
- Turn the lower mounting ring until the unit is secure.
- Tighten with the included wrench or a screwdriver.
Important: Support the disposal with one hand until it’s fully locked in place.
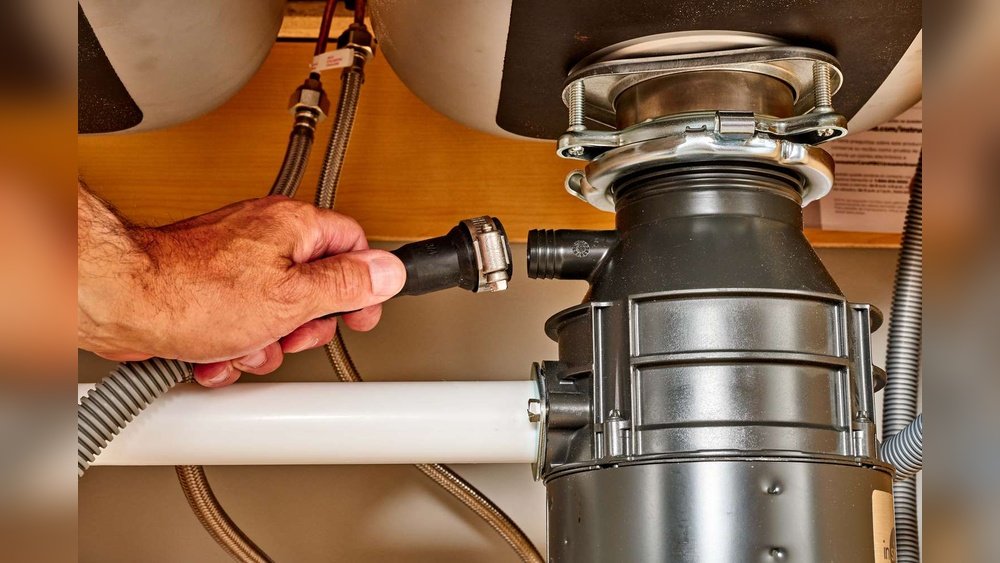
Step 4: Connect The Discharge Tube And Dishwasher Hose
- Attach the discharge tube to the disposal outlet using a gasket and bolts.
- Connect the dishwasher drain hose to the disposal’s inlet (if your dishwasher will use the disposal for drainage).
- Secure all connections with hose clamps.
Step 5: Connect The Drain Pipes
- Reconnect the trap and drain pipes to the discharge tube.
- Make sure all connections are tight and properly aligned.
- Use Teflon tape on threaded connections for a watertight seal.
Step 6: Test For Leaks
- Plug in the disposal or turn the power back on at the breaker.
- Run water and turn on the disposal briefly.
- Check all connections for leaks.
Pro tip: Use a flashlight to check for drips while the unit is running.
Installing The Dishwasher
With the garbage disposal ready, move on to the dishwasher.
Step 1: Prepare The Dishwasher
- Remove all packaging and manuals.
- Lay the dishwasher on its back to access the connections.
- Locate the water inlet, drain outlet, and electrical box.
Step 2: Connect The Water Supply
- Attach the dishwasher water supply line to the water inlet. Tighten with a wrench, but don’t overtighten.
- Run the other end to the hot water shutoff valve under the sink.
- Use Teflon tape on threaded fittings to prevent leaks.
Non-obvious insight: Dishwashers use hot water only—never connect to cold.
Step 3: Connect The Drain Hose
- Attach the drain hose to the outlet on the dishwasher.
- Run the hose up to the sink area and connect it to either the garbage disposal inlet or a drain tee.
- Secure with a hose clamp.
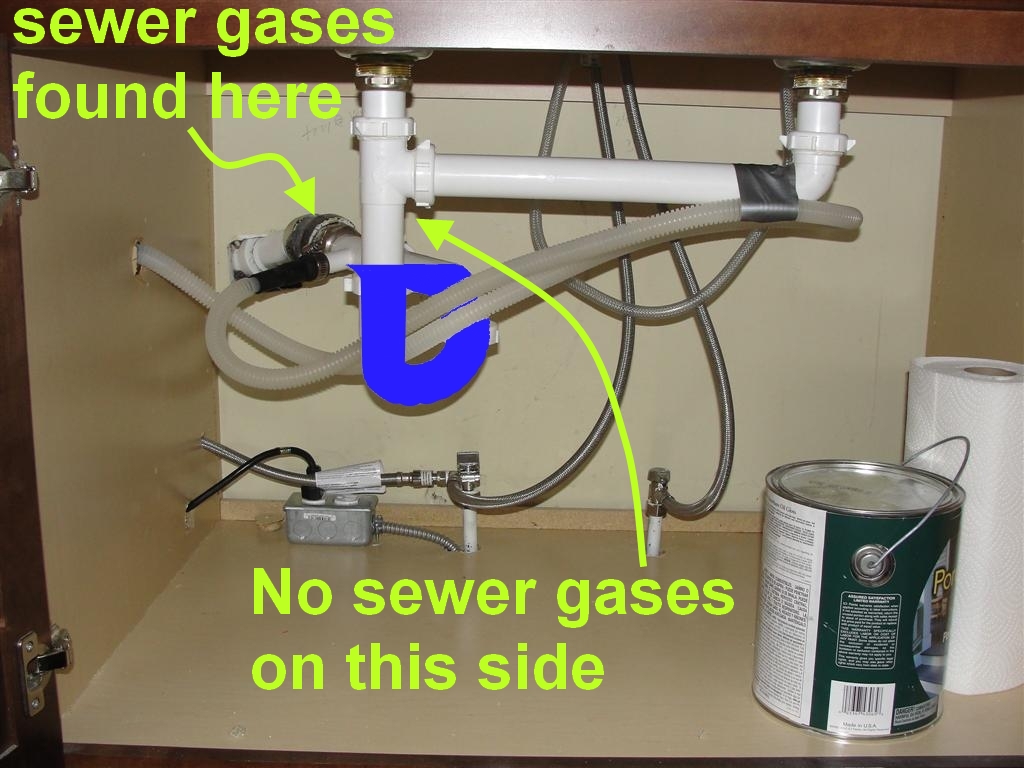
Insider tip: Make a high loop with the drain hose under the sink. This prevents dirty water from backing up into the dishwasher.
Step 4: Make Electrical Connections
- Turn off the power at the breaker.
- Open the electrical junction box on the dishwasher.
- Feed the electrical cable through the strain relief connector.
- Connect black to black (hot), white to white (neutral), and green to ground.
- Secure with wire nuts and close the box.
Step 5: Position And Level The Dishwasher
- Carefully slide the dishwasher into the cabinet opening.
- Make sure the drain hose and water line are not kinked or pinched.
- Adjust the leveling legs so the dishwasher is stable and flush with the countertop.
- Attach the mounting brackets to the underside of the counter.
Step 6: Turn On Water And Power
- Slowly open the water supply valve and check for leaks.
- Restore power at the breaker.
Step 7: Test The Dishwasher
- Run a short wash cycle with no dishes.
- Check all connections for leaks.
- Listen for unusual noises.
Extra advice: Leave the access panel off during the first test so you can spot leaks right away.
:max_bytes(150000):strip_icc()/garbage-disposal-installation-1824830-hero-1dcd7b5b05d44a2cb367e31692500c8c.jpg)
Credit: www.thespruce.com
How Garbage Disposal And Dishwasher Work Together
A common setup is to have the dishwasher drain through the garbage disposal. This lets the disposal catch any food particles from the dishwasher before they enter the drain pipes. Most disposals have a dedicated dishwasher inlet for this reason.
Key points to remember:
- If you don’t knock out the plug in the disposal’s dishwasher inlet, the dishwasher will not drain properly.
- The high loop in the drain hose stops dirty water from flowing back into the dishwasher.
- Always check that all connections are tight, but avoid overtightening plastic parts, which may crack.
Safety Tips And Common Mistakes
Safety Tips
- Turn off power and water before starting any work.
- Use a voltage tester to confirm wires are not live.
- Wear gloves to protect your hands from sharp edges.
- Follow the manufacturer’s instructions for each appliance.
Common Mistakes
- Forgetting to knock out the dishwasher plug in the disposal’s inlet.
- Not making a high loop in the dishwasher drain hose.
- Cross-threading pipe connections or overtightening plastic fittings.
- Mixing up electrical wires—always match black to black, white to white, and green to ground.
- Skipping leak tests after installation.

Credit: www.youtube.com
Troubleshooting Common Problems
Even with careful installation, issues can arise. Here’s how to handle some frequent problems:
Garbage Disposal Won’t Turn On
- Check if the unit is plugged in.
- Press the reset button on the bottom of the disposal.
- Make sure the breaker hasn’t tripped.
Dishwasher Doesn’t Drain
- Confirm the knockout plug was removed from the disposal inlet.
- Check for kinks in the drain hose.
- Clean the filter inside the dishwasher.
Leaks Under The Sink
- Tighten connections gently.
- Replace old or cracked hoses.
- Apply plumber’s putty or Teflon tape where needed.
Strange Noises
- Remove any utensils or debris stuck in the disposal.
- Run cold water while using the disposal.
Example Installation Timeline
Installing both appliances usually takes 3–5 hours if you have all tools and parts ready. Here’s a sample timeline:
| Task | Estimated Time |
|---|---|
| Remove old appliances | 45 minutes |
| Install garbage disposal | 1 hour |
| Install dishwasher | 1.5 hours |
| Test and troubleshoot | 30 minutes |
| Total | 3.75 hours |
If you’re working alone or it’s your first time, add extra time for careful work.
Credit: structuretech.com
Key Differences: Professional Vs Diy Installation
Some people prefer to hire a pro, while others do it themselves. Here’s a quick comparison:
| Aspect | Professional Installation | DIY Installation |
|---|---|---|
| Cost | Higher (labor fees) | Lower (just materials) |
| Time | Faster (experienced) | Longer (learning curve) |
| Warranty | Often included | May void if errors |
| Tools Needed | Brought by pro | You must provide |
| Learning Experience | None | High |
For many people, doing the installation themselves is rewarding and saves money.
Upgrading Older Kitchens: Special Considerations
If your home is older or the kitchen has never had a disposal or dishwasher, you may need extra work:
- Electrical upgrades: Older homes may lack grounded outlets or circuits.
- Plumbing changes: You might need to add a branch for the dishwasher drain.
- Cabinet modifications: Some cabinets may need trimming to fit modern appliances.
Non-obvious insight: In older homes, you may discover galvanized pipes or outdated wiring. These can slow down your project and may require a professional’s help.
Maintenance Tips For Long Life
Once your appliances are installed, regular care keeps them working well.
Garbage Disposal
- Run cold water while using the disposal.
- Avoid putting in bones, grease, or fibrous foods (like celery).
- Clean with ice cubes and citrus peels monthly to reduce odors.
Dishwasher
- Clean the filter every few weeks.
- Run an empty cycle with vinegar once a month to prevent buildup.
- Check the drain hose every six months for leaks or blockages.
Consistent maintenance prevents most problems and extends the life of your appliances.
When To Call A Professional
Some issues are best left to experts:
- Major leaks or water damage
- Electrical problems you can’t identify
- Broken or missing parts in the installation kits
- Permitting requirements in your city
If you’re not sure, it’s safer to call a licensed plumber or electrician.
Environmental Impact And Efficiency
Modern garbage disposals and dishwashers use less water and energy than older models. Dishwashers made after 2013 use less than 5 gallons of water per cycle, compared to 10–15 gallons for hand washing the same amount of dishes.
Garbage disposals help reduce landfill waste but should not be used for all types of food scraps. Composting is still a better option for fruit and vegetable waste.
For more information on water-efficient appliances, you can visit the EPA WaterSense page.
Frequently Asked Questions
How Much Does It Cost To Install A Garbage Disposal And Dishwasher?
The cost depends on whether you do it yourself or hire a pro. DIY installation usually costs between $200 and $600 for both appliances, depending on the models you choose. Professional installation can add $300–$500 in labor fees.
Do I Need A Special Outlet For These Appliances?
Most dishwashers need a dedicated 120V outlet. Garbage disposals can often use a regular outlet under the sink, but check your local codes and the appliance manuals. Never share a dishwasher outlet with other kitchen devices.
Why Is My Dishwasher Not Draining After Installation?
The most common reasons are a blocked drain hose, forgetting to remove the knockout plug in the garbage disposal, or a kinked hose. Double-check all connections and make sure the drain hose has a high loop.
Can I Install Both Appliances If I Have A Double Sink?
Yes, you can. Most double sink setups allow for both a garbage disposal and dishwasher. You may need a special drain adapter or a second trap. Measure the space and check your plumbing before buying appliances.
How Long Do Garbage Disposals And Dishwashers Last?
Most garbage disposals last 8–15 years with proper care. Dishwashers usually last 8–12 years. Regular cleaning and maintenance can extend their lifespan.
Installing a garbage disposal and dishwasher is a smart upgrade for any kitchen. With the right preparation, tools, and attention to detail, you can complete the project yourself—even if you’re not a professional. Remember to follow safety tips, check for leaks, and enjoy the convenience these appliances bring to your daily routine.