Many homeowners want a new look for their kitchen but worry about the cost and mess of a total remodel. If your cabinets are still strong but look old, you have a smart option: refacing laminate cabinets. This process updates your kitchen’s style without replacing everything, making it a favorite for budget-conscious renovators. Let’s walk through everything you need to know, from planning and materials to the right steps and expert tips. You’ll finish with cabinets that look like new—without the high price tag.
What Is Cabinet Refacing?
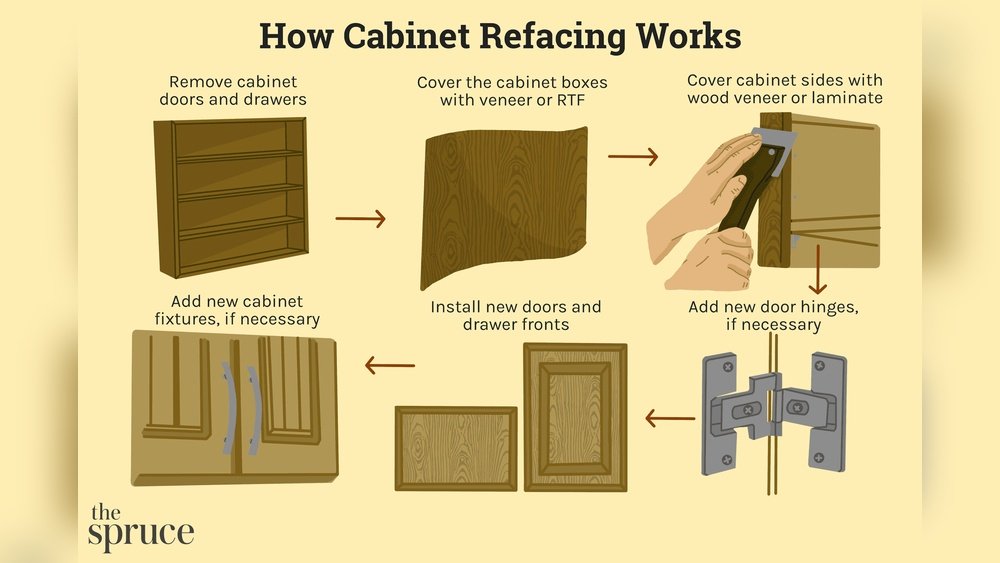
Refacing means you keep your existing cabinet boxes but change the outside parts people see. For laminate cabinets, this usually involves replacing the doors and drawer fronts, adding a new veneer or laminate to the cabinet boxes, and updating hardware like handles and hinges.
It’s not just painting or adding stickers. Refacing provides a real transformation—one that can make your cabinets look like they just came from the store. The process is faster, cleaner, and much less expensive than a full replacement.
Why Choose To Reface Laminate Cabinets?
Refacing is not the answer for every kitchen, but it’s a great fit for many. Here’s why:
- Cost Savings: Refacing costs 30–50% less than replacing cabinets.
- Time Efficient: Most projects finish in 3–5 days, not weeks.
- Less Mess: No demolition means less dust and disruption.
- Eco-Friendly: You reuse your cabinet boxes, creating less waste.
- Custom Look: Choose from many colors, finishes, and hardware styles.
- Value Boost: Refacing can increase your home’s resale value.
But here’s what many people miss: refacing only works if your cabinet boxes are in good shape. If they are water damaged, sagging, or moldy, replacement may be the better option.
How To Know If Your Laminate Cabinets Can Be Refaced
Before you start, check if your cabinets are good candidates for refacing. Here’s what to look for:
- Box Structure: The cabinet frames and sides (boxes) must be solid with no soft spots or warping.
- Laminate Condition: Loose or peeling laminate can be fixed, but widespread damage or swelling often means you need new cabinets.
- Door and Drawer Fit: Doors and drawers should open and close smoothly.
- Layout Satisfaction: If you want to change your kitchen’s layout, refacing is not enough.
If your cabinets pass these checks, you’re ready to start planning.
Tools And Materials You’ll Need
Having the right tools and materials will make your project smoother. Here’s a list of what you’ll need for a typical refacing job:
Tools
- Screwdriver set (Phillips and flathead)
- Cordless drill (with bits)
- Hammer
- Putty knife
- Utility knife
- Level
- Tape measure
- Fine sandpaper (150–220 grit)
- Clamps
- Pry bar (for stubborn trim)
- Caulk gun
- Sanding block
- Rubber mallet
Materials
- New laminate sheets or wood veneer for cabinet boxes
- New cabinet doors and drawer fronts (pre-finished or paintable)
- Contact cement or laminate adhesive
- Wood glue
- Wood filler (for repairs)
- Edge banding (to match doors/laminate)
- New handles, knobs, and hinges
- Paint or stain (if finishing yourself)
- Painter’s tape
- Drop cloths
- Cleaning supplies
For a typical 10×10 kitchen, you’ll need about 100–150 square feet of laminate or veneer material.
Planning Your Project: Budget, Timeline, And Design
Budget
Refacing can cost anywhere from $1,000 to $4,000 for DIY jobs, depending on kitchen size and materials. Hiring a pro can raise costs to $4,000–$9,000. The main expenses are:
- Doors and drawer fronts: 40–60% of cost
- Laminate or veneer: 20–30%
- Hardware and glue: 10–15%
- Tools and extras: 5–10%
Timeline
- Preparation: 1–2 days
- Refacing: 2–4 days
- Finishing touches: 1 day
Most DIYers complete everything in a week or less.
Design Choices
- Laminate finish: Glossy, matte, or textured
- Color: White, gray, woodgrain, or bold colors
- Hardware style: Modern, traditional, or minimalist
- Door style: Slab, shaker, raised panel
Consider bringing home samples before you buy. Lighting can change how colors look.
Step-by-step: How To Reface Laminate Cabinets
Refacing is not difficult, but it does require patience and attention to detail. Follow these steps for a professional finish.
1. Remove Cabinet Doors And Hardware
Start by emptying your cabinets. Use a screwdriver or drill to remove all doors, drawers, handles, hinges, and any other hardware. Place all screws and small parts in labeled bags so nothing gets lost.
Tip: Number your doors and drawers to remember where each one belongs.
2. Clean All Surfaces
Laminate attracts grease and dust. Wash all cabinet exteriors with a degreaser or a mix of warm water and mild dish soap. Rinse and let everything dry completely.
This step is more important than it seems. Adhesives won’t stick well to dirty surfaces.
3. Repair Damaged Areas
Inspect the cabinet boxes for chips, scratches, or peeling laminate. Use wood filler for small holes or cracks. For loose laminate, glue it down and clamp until dry. Sand smooth once repairs are done.
Non-obvious tip: Even small bumps will show through new laminate. Take your time here.
4. Sand And Prepare The Surface
Lightly sand all cabinet faces and sides with fine sandpaper. This roughens the surface so the new laminate or veneer sticks better. Wipe with a damp cloth to remove dust.
Do not over-sand. You only want to take off the shine, not wear through the laminate.
5. Measure And Cut New Laminate Or Veneer
Measure each area to be covered—sides, frames, and any exposed parts. Cut your laminate sheets or veneer about 1/2 inch larger than needed; you’ll trim the excess later.
Use a sharp utility knife and a straightedge for clean cuts. Lay pieces flat to prevent curling.
6. Apply Adhesive
For most laminates, use contact cement. Brush adhesive onto the cabinet surface and the back of the laminate. Wait until both are tacky (usually 10–20 minutes).
Be sure to work in a well-ventilated area. Contact cement fumes can be strong.
7. Attach The Laminate
Carefully place the laminate onto the cabinet. Once it touches, it sticks fast—so align it before pressing down. Use a roller or block of wood to press and smooth out air bubbles.
Trim excess with a sharp utility knife. Repeat for each panel.
8. Attach Edge Banding
For a finished look, add edge banding to the cabinet front edges. Most edge banding is iron-on or adhesive-backed. Trim the banding flush with a sharp blade.
For corners, use a file to smooth sharp edges.
9. Install New Doors And Drawer Fronts
Attach new doors and drawer fronts to the cabinet boxes. Use your old ones as a template for hinge and handle placement. Drill pilot holes before screwing in hinges to avoid splitting.
Check that all doors and drawers open and close smoothly.
10. Install Hardware
Attach new handles, knobs, and pulls. This is a small touch that makes a big difference. If your new hardware uses different holes, fill the old ones with wood filler and touch up the finish.
11. Clean Up And Inspect
Remove all tape and drop cloths. Clean the new surfaces with a damp, soft cloth. Inspect your work for any loose edges or air bubbles. Touch up as needed.
12. Enjoy Your New Kitchen
Step back and admire your transformed cabinets! You’ve saved money and added value to your home.
Comparing Refacing To Other Cabinet Updates
Many people wonder if they should repaint, reface, or replace their laminate cabinets. Here’s a simple comparison:
| Option | Cost (10×10 kitchen) | Time | Result | Best If… |
|---|---|---|---|---|
| Repaint | $200–$600 | 2–4 days | Good, not like new | Budget is very tight, surface is in good shape |
| Reface | $1,000–$4,000 | 3–5 days | Like new | Boxes are sturdy, want a new style |
| Replace | $4,000–$12,000+ | 2–4 weeks | Brand new, full layout change | Boxes are damaged or want a new layout |
Refacing is often the best middle ground—fresh look, less cost, and less disruption.
Choosing Between Laminate, Veneer, Or Real Wood For Refacing
You have several options for the outer layer:
| Material | Pros | Cons | Typical Cost (per sq. ft.) |
|---|---|---|---|
| Laminate | Durable, easy to clean, lots of colors | Can chip, hard to repair | $1–$2 |
| Wood Veneer | Real wood look, can be stained | Needs sealing, can scratch | $2–$4 |
| Solid Wood | Highest quality, lasts longest | Most expensive, can warp | $5–$10 |
Laminate is the most common choice for refacing laminate cabinets. It’s affordable and comes in many styles, from matte white to faux woodgrain.
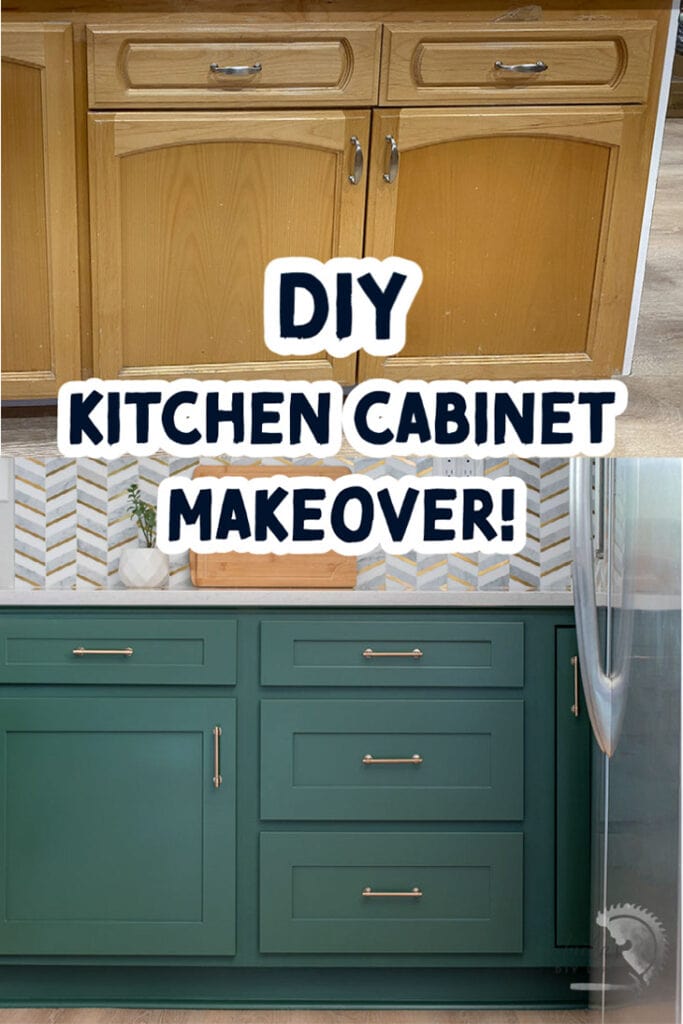
Credit: www.anikasdiylife.com
Common Mistakes And How To Avoid Them
Refacing is straightforward, but there are mistakes that can ruin the final look or shorten the lifespan of your cabinets. Here are the most common errors and how to avoid them:
- Skipping the cleaning step: Dirt and grease prevent adhesives from sticking. Always clean thoroughly.
- Not sanding enough: A slick surface will not hold new veneer or laminate well.
- Rushing measurements: Measure twice, cut once. Mistakes here waste money and materials.
- Using the wrong adhesive: Laminate needs contact cement, not white glue or wood glue.
- Ignoring air bubbles: Use a roller to push out all bubbles as you apply new laminate.
- Not matching edge banding: Use banding that matches your doors and sides, or the mismatch will stand out.
- Forgetting hardware templates: Use a template for drilling new holes to keep handles lined up.
- Skipping hinge adjustments: After installing doors, adjust hinges so doors hang straight.
- Not sealing wood veneer: If using wood veneer, seal it with a clear finish to prevent moisture damage.
- Over-tightening screws: This can crack laminate or strip wood. Tighten gently.
A non-obvious tip: Let adhesives cure fully before putting items back in cabinets. This prevents shifting or bubbling.
Practical Tips For A Professional Finish
- Test fit each piece before gluing.
- Work in small sections to avoid adhesive drying too soon.
- Invest in a good roller for pressing laminate.
- Store doors flat after painting or veneering to prevent warping.
- Use painter’s tape to protect areas you’re not working on.
If you want a factory look, consider ordering pre-finished doors and drawer fronts. Many companies offer custom sizes.
:max_bytes(150000):strip_icc()/Refinish20Cab20B26Ax_0-a43a186091ef4ff182ebe7457e1cd359.jpg)
Credit: www.woodmagazine.com
When To Hire A Professional
DIY cabinet refacing saves money, but it’s not for everyone. Hire a pro if:
- You don’t have tools or time to finish in a week.
- Your cabinets have lots of curves, corners, or crown molding.
- You want a warranty on materials and labor.
- You want a very high-end finish.
Professionals can match difficult colors and handle tricky installations.
How Long Does Refaced Laminate Last?
With good materials and careful installation, refaced cabinets last 10–20 years. Laminate is durable, but it can chip if hit hard. Avoid dragging heavy items against cabinet sides.
Some refacing companies offer warranties of 5–10 years on materials and labor. DIY jobs last longest when you clean gently and avoid harsh chemicals.
How To Care For Refaced Laminate Cabinets
Keeping your cabinets looking new is easy:
- Wipe spills immediately with a damp cloth.
- Avoid abrasive cleaners—use mild soap and water.
- Don’t hang wet towels on cabinet doors.
- Check hardware screws every 6 months and tighten if loose.
Never use steel wool or scouring pads, which can scratch laminate.
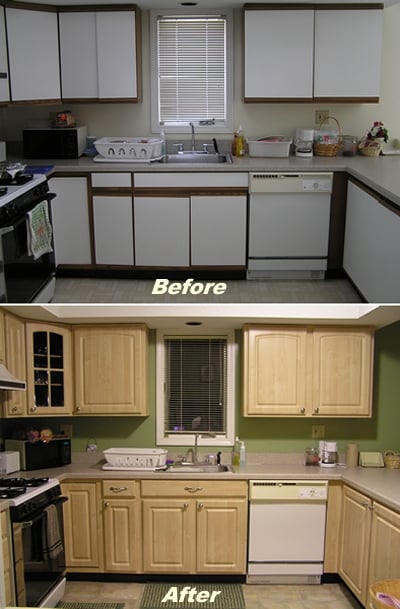
Realistic Before And After: What To Expect
Most kitchens see a dramatic change after refacing. For example, a dated oak laminate kitchen from 1995 can look like a modern white shaker kitchen in just a week.
Before: Yellowed laminate, gold hardware, raised panel doors.
After: Crisp white matte laminate, brushed nickel handles, shaker-style doors.
The room feels brighter, cleaner, and more valuable. Many realtors say refaced kitchens sell homes faster.
Cost Breakdown Example
Let’s look at a typical 10×10 kitchen:
- New doors/drawer fronts: $1,200
- Laminate sheets: $350
- Edge banding: $60
- Adhesive/glue: $50
- Handles/knobs: $120
- Hinges: $70
- Sundries (tape, sandpaper, etc. ): $50
Total DIY Cost: $1,900
Hiring a pro would likely double this to $3,500–$4,500.
Environmental Benefits
Refacing is a green choice. You keep existing cabinet boxes out of the landfill. Most laminate is now made with low-VOC adhesives and recycled content. If you choose wood veneer, look for FSC-certified options for sustainability.
According to the Environmental Protection Agency, kitchen remodeling sends millions of tons of waste to landfills each year. Refacing helps reduce that impact.
Where To Buy Materials
You can find refacing materials at:
- Home improvement stores (Home Depot, Lowe’s)
- Cabinet specialty shops
- Online retailers (CabinetNow, Barker Doors)
- Local woodworking shops (for custom veneer)
Ordering samples first is wise. This lets you see the color and finish in your space.
Diy Vs. Professional: At-a-glance
Here’s a final side-by-side look:
| Factor | DIY Refacing | Professional Refacing |
|---|---|---|
| Cost | Lower ($1,000–$4,000) | Higher ($4,000–$9,000) |
| Time | 3–7 days | 2–5 days |
| Skill Needed | Moderate–High | Low (for homeowner) |
| Customization | High (if sourcing materials) | High (more finish options) |
| Warranty | None | 5–10 years |
Credit: www.kitchencabinetdepot.com
Frequently Asked Questions
How Long Does It Take To Reface Laminate Cabinets?
Most DIYers complete the project in 3–7 days, depending on kitchen size and their skill level. Professionals usually finish in 2–5 days.
Can I Reface Cabinets That Have Peeling Or Damaged Laminate?
Small areas of peeling can be glued and clamped. But if much of the laminate is swollen or falling off, refacing may not last. In that case, replacing the boxes is safer.
What’s The Difference Between Refacing And Resurfacing?
Refacing means adding new doors and covering the outside with new laminate or veneer. Resurfacing often means just painting or adding a new thin surface, but not changing doors. Refacing is a bigger, longer-lasting change.
How Much Money Can I Save By Refacing Instead Of Replacing?
You can save 30–50% or more by refacing. For example, replacing cabinets in a medium kitchen could cost $8,000–$12,000. Refacing the same kitchen might cost $3,000–$4,000.
Where Can I Find More Information About Cabinet Refacing?
For more details and inspiration, see the guide from This Old House.
Upgrading your kitchen doesn’t have to mean tearing everything out. With refacing, you can enjoy a fresh, modern space on a budget and with less mess. If you measure carefully and take your time, your refaced laminate cabinets will look and perform like new for years to come.