Installing a dishwasher can change the way you handle kitchen chores, but there’s a small detail that many homeowners miss: the air gap. If you want your dishwasher to run safely and meet plumbing codes, understanding and installing an air gap is essential. The process might sound complicated, but with the right steps and knowledge, you can do it yourself—even if you’re not an experienced plumber.
This guide walks you through everything you need to know about how to install an air gap for a dishwasher. You’ll learn what an air gap is, why it matters, how to pick the right one, and how to install it step by step.
Along the way, you’ll find practical tips, common mistakes to avoid, and answers to questions that often confuse first-timers. By the end, you’ll have the confidence and information needed to protect your dishwasher and your home’s water supply.
What Is A Dishwasher Air Gap?
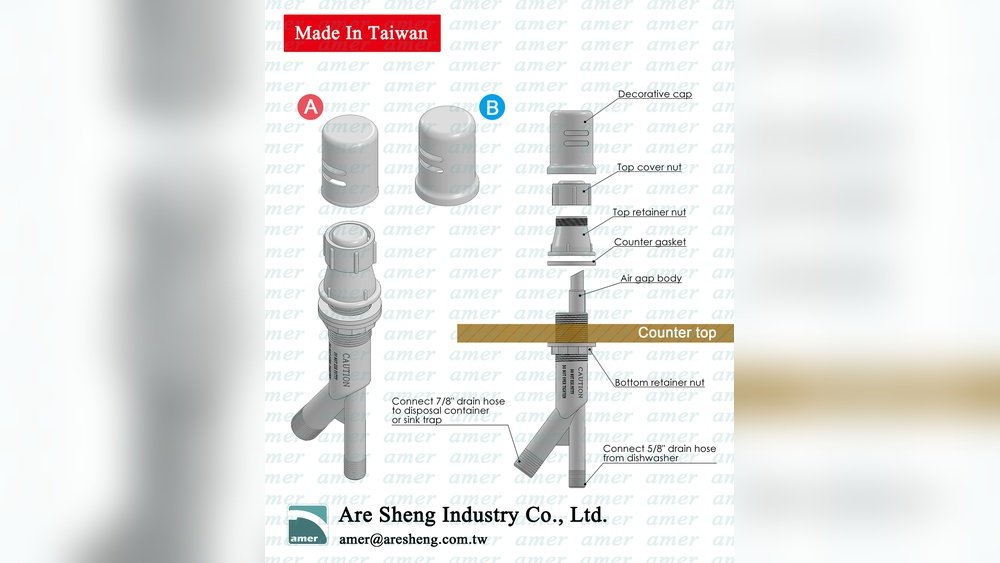
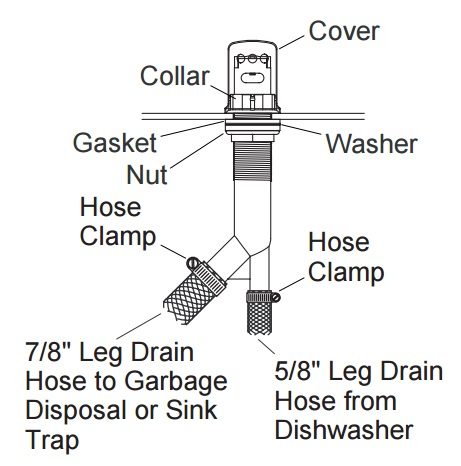
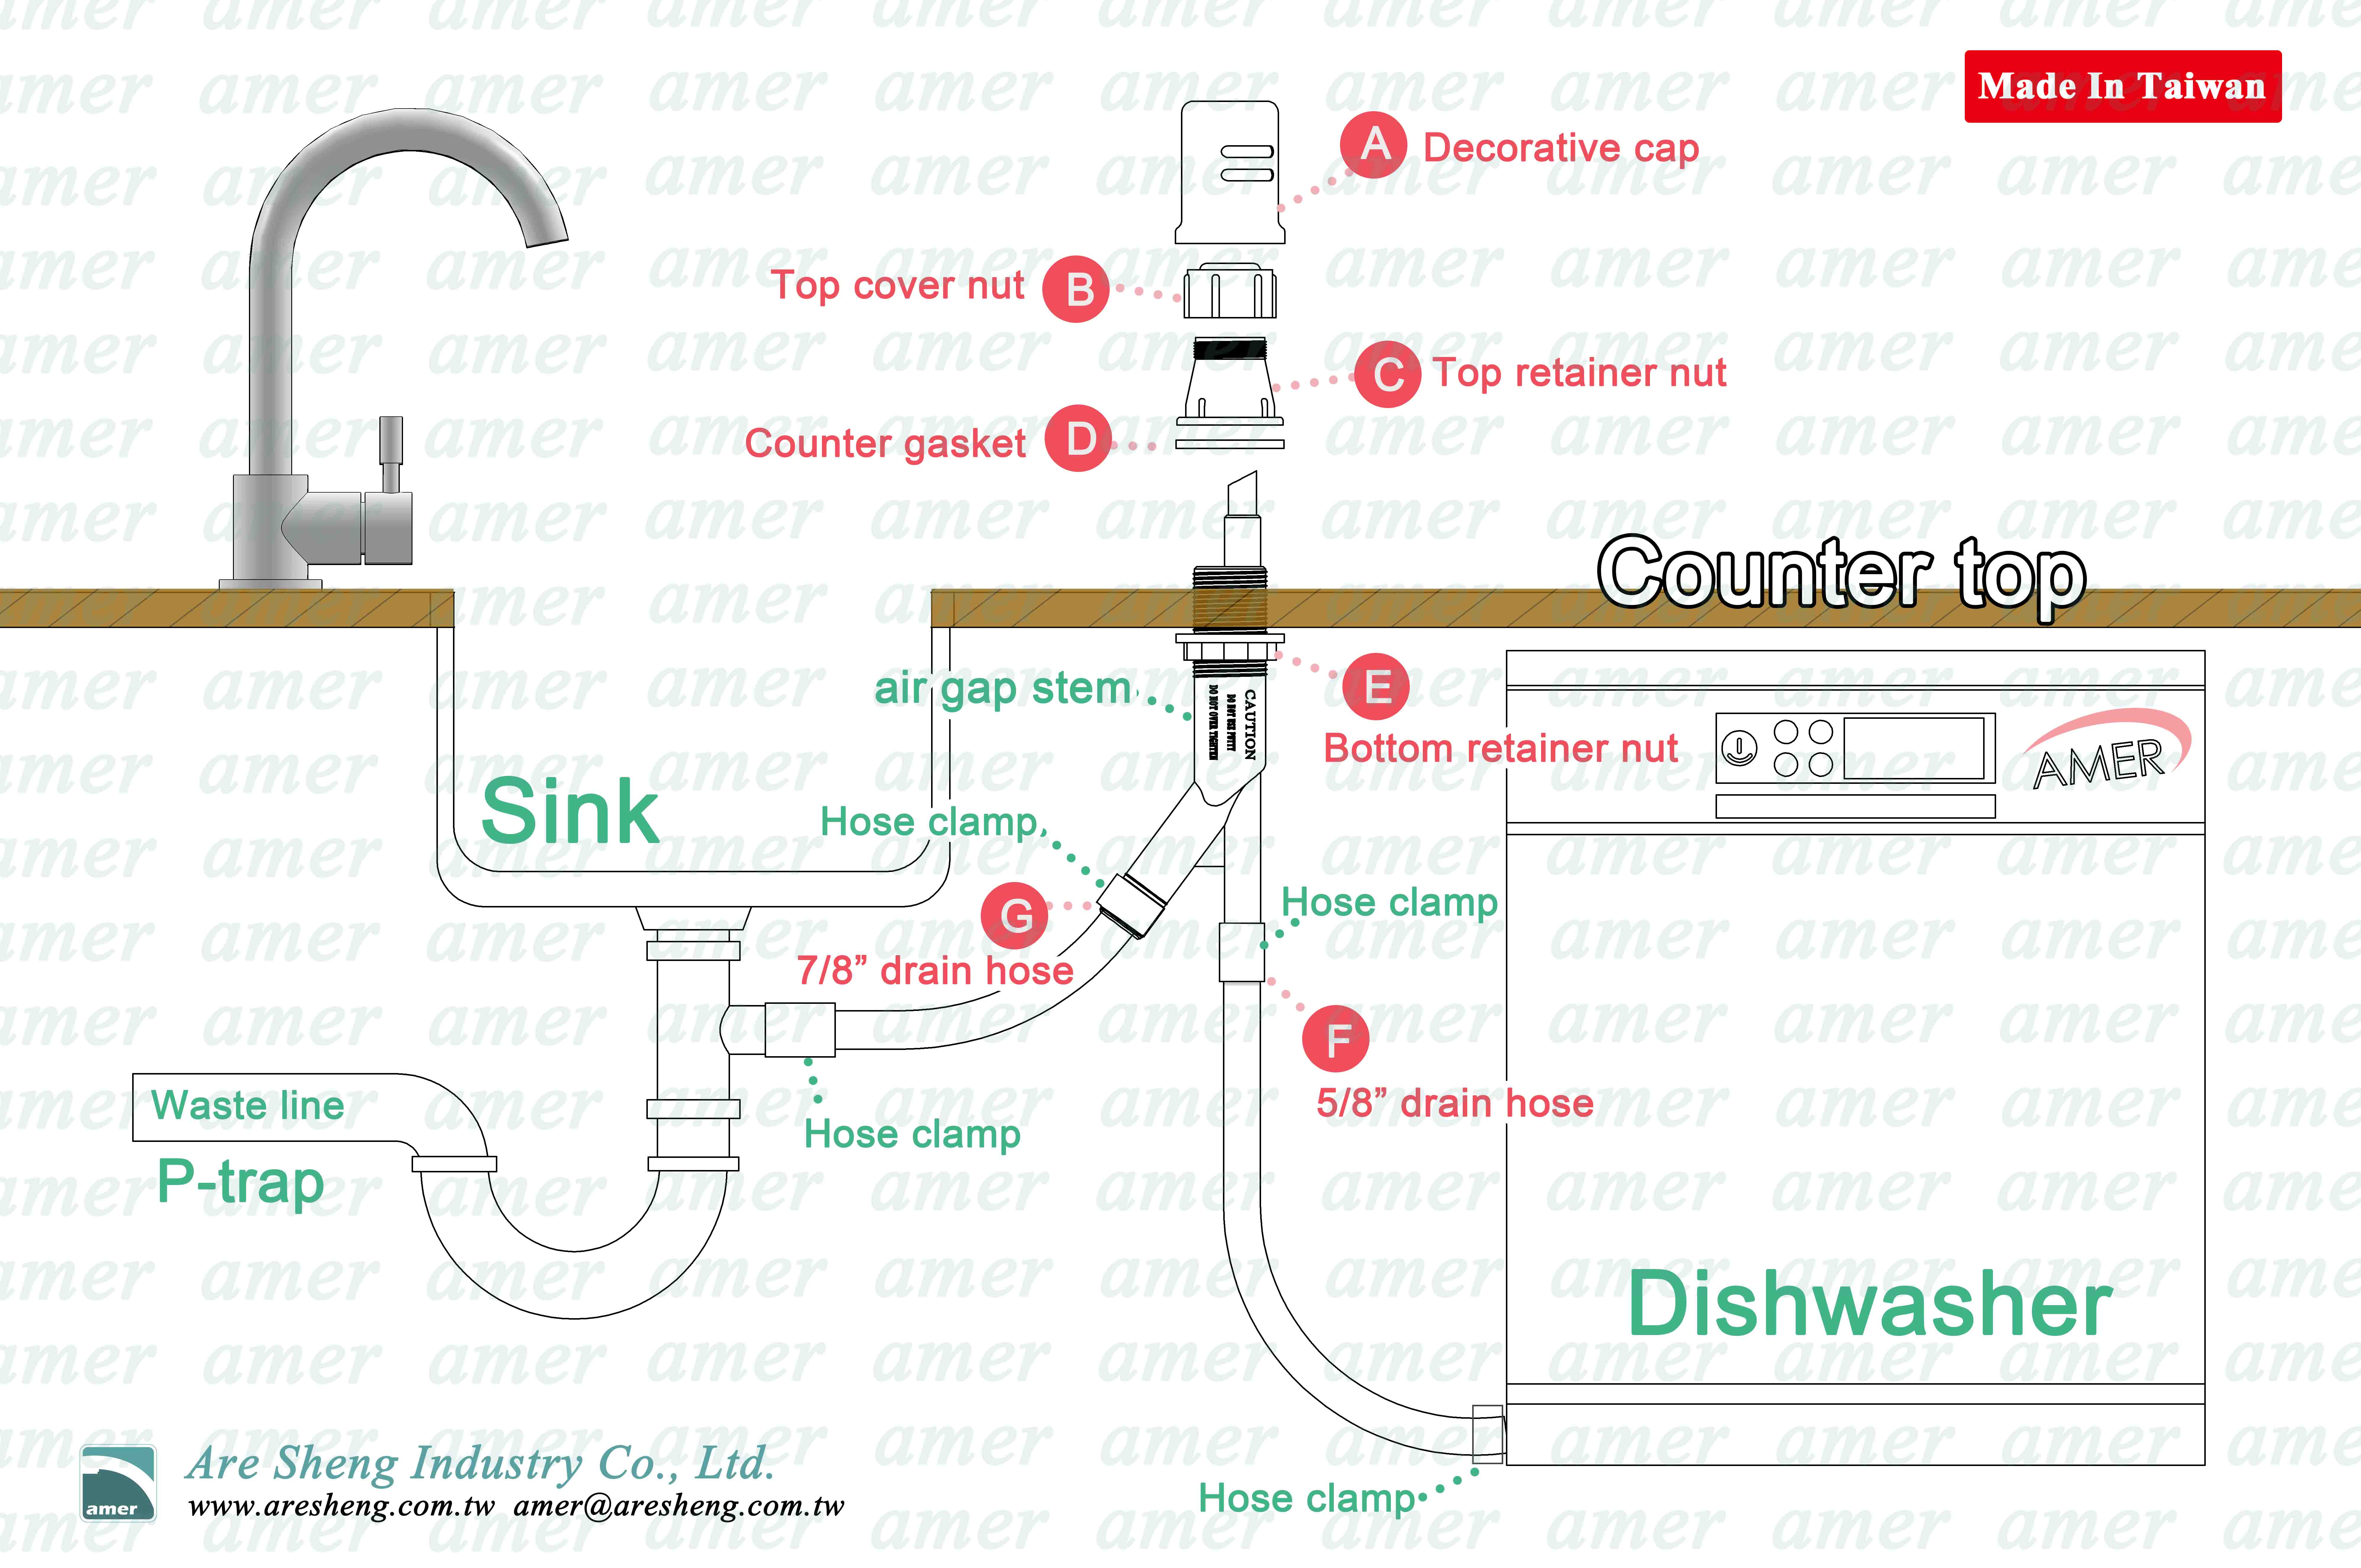
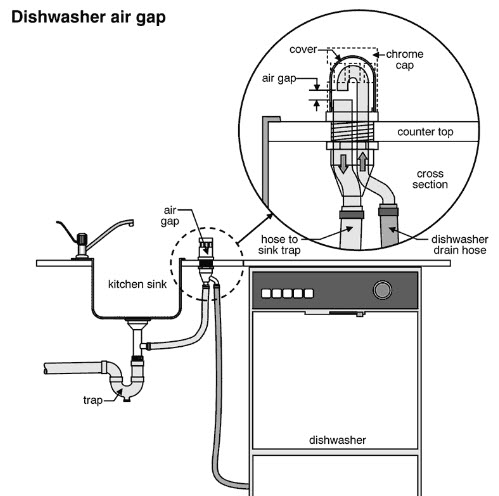
A dishwasher air gap is a small, cylindrical device that sits above your kitchen sink, usually next to the faucet. Its main job is to stop dirty water from your sink or garbage disposal from flowing back into your dishwasher. This simple device protects your clean dishes and the drinking water in your home.
Inside, the air gap has two separate pipes: one connects to your dishwasher’s drain hose, and the other runs to your kitchen sink’s drain or garbage disposal. Water from the dishwasher flows up to the air gap, then down into the drain. If a blockage happens, water escapes through the air gap and spills into the sink, not back into your dishwasher.
Why An Air Gap Is Important
The main reason for installing an air gap is health and safety. If dirty water gets sucked back into your dishwasher, it can contaminate your clean dishes and water supply. Air gaps are also required by plumbing codes in many US states and cities.
Some people believe a “high loop” (where the drain hose is attached high under the sink) is enough. However, a high loop does not give the same protection as an air gap and is not always legal. Air gaps provide a physical break in the water flow, which a hose loop does not.
Common Air Gap Myths
- Myth: “Modern dishwashers don’t need air gaps.”
- Fact: Many new dishwashers are still required to use air gaps by local codes.
- Myth: “A high drain loop is just as good.”
- Fact: A high loop can help, but it’s not as reliable or code-approved as an air gap.
- Myth: “Air gaps always cause leaks or noise.”
- Fact: A properly installed air gap rarely leaks or makes noise.
Understanding these facts helps you avoid costly mistakes and failed home inspections.
Tools And Materials Needed
Before you start, gather everything you need. Having the right tools and materials makes the job easier and avoids last-minute trips to the hardware store.
Tools
- Adjustable wrench
- Pipe wrench (optional, for tough fittings)
- Phillips and flathead screwdrivers
- Hole saw or step drill bit (if your sink doesn’t have a pre-drilled hole)
- Measuring tape
- Utility knife
- Pliers
Materials
- Air gap kit (includes air gap body, cover, and mounting nut)
- Dishwasher drain hose (often included with your dishwasher)
- Air gap to drain hose (usually 7/8-inch inner diameter)
- Hose clamps (stainless steel, 2–4 needed)
- Plumber’s putty or silicone caulk (for waterproofing the base)
- Teflon tape (for threaded connections, if needed)
- Bucket or towels (to catch water during installation)
Choosing The Right Air Gap
Not all air gaps are the same. There are different styles, colors, and sizes. Most standard air gaps fit in a 1-3/8 inch hole and connect to 5/8-inch (dishwasher side) and 7/8-inch (drain side) hoses. Some dishwashers, especially European models, may need adapters.
Tip: Always check your dishwasher’s manual for recommended air gap specifications.
Preparing For Installation
Good preparation prevents leaks and frustration. Follow these steps before starting:
Turn Off Power And Water
Unplug your dishwasher or turn off the circuit breaker. Shut off the water supply to the dishwasher. This keeps you safe while working.
Check For An Existing Air Gap Hole
Most sinks have a pre-drilled hole for accessories (like a soap dispenser or sprayer). If your sink does not have an extra hole, you’ll need to drill one. Make sure the location is close to the dishwasher and the drain.
Drilling a Hole:
- Mark the spot on the sink or countertop.
- Use a 1-3/8 inch hole saw or step drill bit.
- File sharp edges smooth to avoid cutting the hoses.
Measure Hose Lengths
Measure the distance from the dishwasher drain outlet to the planned air gap location, and from the air gap to the drain or garbage disposal. Cut hoses to length using a utility knife, but leave a little extra for adjustments.
Insight: Leave enough slack in the hoses to prevent kinks, but not so much that they sag.
Step-by-step: How To Install An Air Gap For Dishwasher
Now, let’s break down the installation into clear steps. Take your time, and double-check each connection.
1. Install The Air Gap Body
- Insert the air gap body through the hole in your sink or countertop.
- If the hole is larger than needed, use a washer or grommet to center the air gap.
- Apply a bead of plumber’s putty or silicone caulk around the base to seal out water.
- From underneath, screw on the mounting nut until the air gap is tight and upright. Do not overtighten—this can crack the sink or countertop.
2. Connect The Dishwasher Drain Hose
- Slide one end of the dishwasher drain hose onto the smaller (5/8-inch) air gap inlet. This is usually marked “D/W” or “dishwasher.”
- Secure with a hose clamp. Tighten firmly but do not crush the hose.
- Route the hose from the dishwasher to the air gap. Avoid sharp bends or kinks.
3. Connect The Air Gap To The Drain Or Garbage Disposal
- Attach the air gap to drain hose (usually 7/8-inch) to the larger air gap outlet. This side is often labeled “drain.”
- Secure with a hose clamp.
- Route this hose downward to the dishwasher tailpiece on the sink drain or to the garbage disposal inlet. Make sure it runs downhill with no loops that could trap water.
- If connecting to a garbage disposal, remove the knockout plug inside the inlet with a screwdriver before attaching the hose. Many people forget this step and end up with water backflow.
4. Attach Hose To Drain Or Disposal
- Slide the hose onto the barbed fitting on the disposal or sink drain tailpiece.
- Secure with a hose clamp.
- Check that all connections are tight and the hoses are not twisted.
5. Install The Air Gap Cover
- Snap or screw the decorative cover onto the air gap body.
- Make sure the vent holes face the sink, so if overflow happens, water spills into the sink—not behind the counter.
6. Test The Installation
- Restore power and water to the dishwasher.
- Run a short wash or rinse cycle.
- Watch the air gap during draining. You may see a little water spit out—this is normal during initial tests.
- Check for leaks at all hose connections.
- If water floods from the air gap, there is likely a clog downstream in the drain or a kinked hose.
Typical Installation Scenarios
Every kitchen is different. Here are three common setups and how the air gap fits in:
Standard Sink With Disposal
- Air gap sits next to faucet.
- Drain hose from air gap connects to disposal inlet.
- Knockout plug must be removed from disposal.
Sink Without Disposal
- Air gap connects to a branch tailpiece on the sink drain.
- No need to worry about a knockout plug.
Multiple Accessories (soap Dispenser, Sprayer)
- Choose which accessory to remove if no spare hole is available.
- Some people replace the sprayer with an air gap.
Air Gap Vs. High Loop: A Quick Comparison
Many homeowners wonder if a high loop is enough. Here’s a simple comparison:
| Feature | Air Gap | High Loop |
|---|---|---|
| Backflow Protection | Physical barrier, best protection | Reduces risk, not guaranteed |
| Meets Plumbing Codes | Yes (in most areas) | No (often not accepted) |
| Required for New Installs | Usually required | Rarely accepted |
| Installation Difficulty | Moderate | Easy |
| Visible on Sink | Yes | No |
Key insight: Even if a high loop seems easier, an air gap is safer and almost always required by inspectors.
Credit: structuretech.com
Common Mistakes To Avoid
Installing an air gap is simple, but some mistakes can cause leaks, noise, or code violations.
- Not removing the garbage disposal knockout plug.
- If left in, water will flood from the air gap during every wash cycle.
- Loose hose clamps.
- Hoses can pop off under pressure, causing messy leaks.
- Kinked or sagging hoses.
- Blocks water flow, leading to poor drainage or air gap overflow.
- Incorrect hose sizing.
- Using the wrong diameter hose causes leaks or poor fit.
- No caulk or putty under the air gap base.
- Water can seep under the sink and cause damage.
- Mounting air gap in a hard-to-reach spot.
- Makes cleaning and inspection difficult.
- Forgetting local plumbing codes.
- Some regions have special requirements. Always check before starting.
Non-obvious tip: After installation, run a cup of white vinegar through the dishwasher every few months. This helps dissolve grease and keeps the air gap from clogging.
Troubleshooting Air Gap Problems
Sometimes, even with careful installation, you might face issues. Here’s how to fix the most common ones:
Water Leaks From Air Gap
- Possible causes: Clogged drain hose, kinked hose, or blocked garbage disposal inlet.
- Solution: Remove hoses, check for food debris or clogs, and clear them. Run water through the hoses before reconnecting.
Noisy Air Gap
- Possible causes: Hoses too short or too long, or air gap not fully seated.
- Solution: Adjust hose lengths and make sure air gap is tightly mounted.
Dishwasher Not Draining
- Possible causes: Knockout plug still in place or blocked air gap.
- Solution: Remove and check the knockout plug. Clean out the air gap with a small brush.
Air Gap Spitting Water
- Possible causes: Slight spitting is normal, but heavy flow means a drain problem.
- Solution: Inspect and clear blockages in the drain line.
Extra insight: Some homeowners install a small “splash guard” under the air gap to catch any minor spills and direct them into the sink.
Cleaning And Maintenance
Air gaps require little maintenance, but regular checks prevent problems.
- Inspect monthly: Remove the cover and look for debris or buildup.
- Clean as needed: Use a bottle brush and hot water to clear out any gunk.
- Check for leaks: Make sure all connections are tight.
Tip: If you notice slow draining or odors, clean both the air gap and the hoses.
Professional Installation Vs. Diy
Most homeowners can install an air gap with basic tools. However, you might want to call a plumber if:
- You need to drill into a stone or solid surface countertop.
- Your plumbing layout is unusual or tight.
- You’re not comfortable working with water or electrical connections.
Cost Comparison:
| Option | Approximate Cost | Time Required |
|---|---|---|
| DIY Installation | $20–$60 (air gap and hoses) | 1–2 hours |
| Professional Plumber | $100–$250 | 30–60 minutes |
Non-obvious insight: If your area requires a home inspection for selling your house, a missing or incorrect air gap can delay your sale and cost you extra fees.
Local Plumbing Codes And Inspections
Before you finish your project, check your local plumbing codes. In some states like California and Washington, air gaps are mandatory for all new dishwashers. Other places may accept high loops, but this is becoming less common.
Ask your city’s building department or check their website for the latest rules. If you’re remodeling or selling your home, an inspector will check for a visible and working air gap.
For more code details, you can check resources like the International Association of Plumbing and Mechanical Officials.
When To Replace An Air Gap
Most air gaps last for years, but there are times when you should replace one:
- Cracked or leaking air gap body
- Persistent odor, even after cleaning
- Air gap cover won’t stay on
- You’re replacing your sink or countertop
Replacement is simple: remove the old air gap, clean the area, and follow the installation steps above for the new one.
Credit: www.aresheng.com.tw
Eco-friendly Tips
If you want to reduce water waste or keep your kitchen “green,” consider these tips:
- Run full loads in your dishwasher to minimize water use.
- Clean the air gap regularly to avoid blockages that cause leaks.
- Choose metal or BPA-free plastic air gaps for safety and durability.
Frequently Asked Questions
What Does A Dishwasher Air Gap Actually Do?
A dishwasher air gap creates a physical break in the drain line between your dishwasher and your sink’s plumbing. This prevents dirty sink water from flowing back into your dishwasher, protecting your dishes and your home’s drinking water.
Is An Air Gap Required For All Dishwashers?
In many US locations, a dishwasher air gap is required by plumbing codes, especially for new installations. Some areas allow a high drain loop instead, but air gaps offer better protection and are often required for passing inspections.
Can I Install An Air Gap Myself, Or Do I Need A Plumber?
Most homeowners can install an air gap with basic tools and some patience. However, if you need to drill into stone countertops or have a complicated plumbing layout, it’s wise to hire a plumber.
Why Is Water Coming Out Of My Air Gap?
A small amount of water during dishwasher draining is normal. If a lot of water comes out or it happens every cycle, there’s likely a blockage in the drain hose or garbage disposal inlet. Check and clear these blockages.
How Often Should I Clean The Air Gap?
Check and clean your air gap every 1–2 months, or sooner if you notice slow drainage or odors. Remove the cover and rinse out any debris or buildup with hot water and a brush.
Installing an air gap is a simple but important step for any dishwasher. With the right tools, clear steps, and a little care, you can protect your kitchen, pass inspections, and keep your dishes truly clean.
Credit: www.subzero-wolf.com