
Using a sandwich maker seems simple, but getting the best results involves more than just placing bread inside and closing the lid. Whether you want a quick breakfast, a creative snack, or a hot lunch, a sandwich maker can help.
But many people do not realize how much they can do with this small kitchen appliance. They may not know the best way to use it, how to avoid problems, or how to clean it properly. This guide will show you how to use a sandwich maker step by step, highlight expert tips, and explain what beginners usually miss.
You will also learn how to make your sandwiches tastier, safer, and more interesting every day.
What Is A Sandwich Maker?
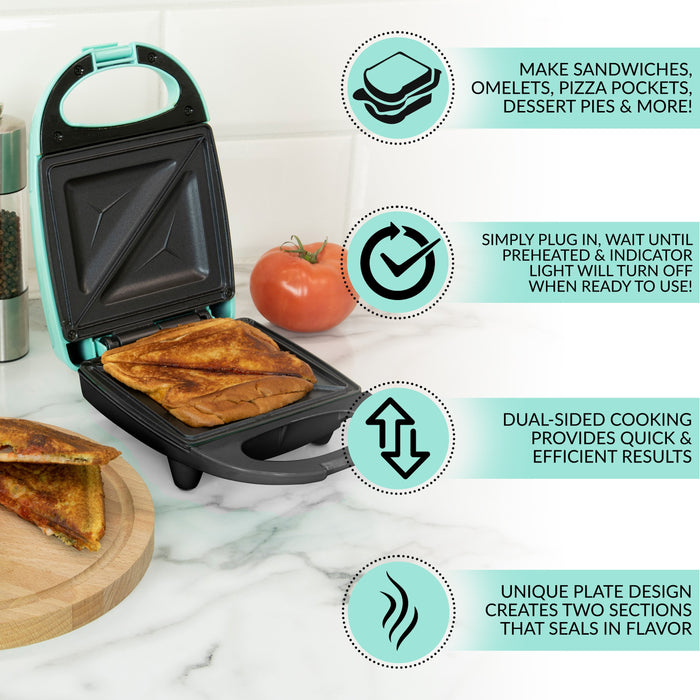
A sandwich maker is a small kitchen device that cooks sandwiches quickly. It uses heat and pressure to toast bread and melt fillings. Most models have two hot plates, often with triangle-shaped grooves. You place your sandwich inside, close the lid, and in a few minutes, you have a hot, crispy snack.
Sandwich makers are popular because they are:
- Fast (usually 3–5 minutes per sandwich)
- Easy to use
- Safe for most ages with supervision
- Good for many types of bread and fillings
Some people confuse a sandwich maker with a panini press or a waffle maker. While they may look similar, each has a different design and use. A sandwich maker seals the edges and often cuts the sandwich into triangles. A panini press presses flat sandwiches and does not seal the edges. A waffle maker has deep grooves for making waffles, not sandwiches.
Types Of Sandwich Makers
Choosing the right sandwich maker depends on your needs. There are three main types:
| Type | Features | Best For |
|---|---|---|
| Basic Sandwich Maker | Seals and cuts sandwiches; simple controls | Everyday use, classic toasties |
| Multifunction Sandwich Maker | Interchangeable plates for grilling, waffles | Variety, small kitchens |
| Panini Press | Flat plates, adjustable height | Large sandwiches, artisan bread |
Most homes use the basic sandwich maker. Multifunction models are good if you want more options but have limited space. If you love thick sandwiches with lots of filling, a panini press might be better.
Credit: nostalgiaproducts.com
How A Sandwich Maker Works
A sandwich maker uses electric heating elements inside the top and bottom plates. When you plug it in and close the lid, both sides heat up. The plates press the sandwich, toasting the bread and warming the filling evenly. Most models have a small light that shows when it is ready to use.
The grooves in the plates usually seal the edges and divide the sandwich. This helps keep cheese and fillings inside, making your sandwich less messy.
Preparing To Use Your Sandwich Maker
Before using your sandwich maker, there are some important steps. Doing these steps can make your sandwich safer, tastier, and easier to clean up.
- Read the Manual: Each model has small differences. Read the manual so you know about safety, cleaning, and how to avoid damage.
- Clean Before First Use: Wipe the plates with a damp cloth. Do not use soap or water directly on the plates unless the manual allows it.
- Find a Good Spot: Place the sandwich maker on a flat, heat-resistant surface. Keep it away from water and other appliances.
- Check Power Supply: Make sure the cord is not damaged. Plug the device into a suitable outlet.
Non-obvious insight: Many beginners forget to check if the plates are removable. If yours are, you can clean them more easily. If not, be careful not to get water in the electrical parts.
How To Make A Sandwich In A Sandwich Maker
Using a sandwich maker is simple if you follow these steps:
Step 1: Preheat The Sandwich Maker
Plug in your sandwich maker and close the lid. Wait until the indicator light shows it is hot enough. Most models need 3–5 minutes to preheat. If you skip preheating, your sandwich may not cook evenly.
Step 2: Prepare Your Bread And Fillings
Choose your bread. Most people use white, whole wheat, or multigrain bread. You can also use sourdough, rye, or gluten-free bread for different flavors.
Add your favorite fillings. Popular choices include:
- Sliced cheese
- Cooked ham or chicken
- Tomato slices
- Cooked vegetables
- Peanut butter and jelly
Spread butter or margarine on the outside of each slice. This makes the bread crisp and prevents sticking. Some people use mayonnaise for a richer flavor.
Non-obvious tip: Do not overfill your sandwich. Too much filling can leak out and make a mess.
Step 3: Place The Sandwich In The Maker
Open the lid. Place your sandwich on the bottom plate. Align the bread with the grooves if your model has them. Close the lid gently but firmly. Some sandwich makers have a latch to keep the lid closed; use it if available.
Step 4: Cooking
Let the sandwich cook for about 3–5 minutes. Most sandwich makers do not have a timer. You may need to check after 3 minutes to see if the bread is golden brown and crispy. If not, close the lid and cook for 1–2 more minutes.
Step 5: Remove The Sandwich
Use a wooden or silicone spatula to take the sandwich out. Do not use metal tools; they can scratch the nonstick surface.
Place the sandwich on a plate and let it cool for a minute. The filling will be very hot.
Step 6: Unplug And Clean
Turn off and unplug the sandwich maker. Let it cool completely before cleaning. Wipe the plates with a damp cloth. For stuck-on cheese, use a soft brush.
Creative Sandwich Ideas
A sandwich maker is not just for basic cheese toasties. You can try many creative recipes:
- Pizza Sandwich: Fill with tomato sauce, mozzarella, and pepperoni.
- Breakfast Sandwich: Scrambled egg, cooked bacon, and cheese.
- Vegetarian Delight: Spinach, mushroom, and feta cheese.
- Sweet Treat: Nutella and sliced banana or strawberries.
- Spicy Paneer: Indian paneer with chili and spices for a different taste.
Expert tip: Use leftover curry, roasted vegetables, or cooked meats for quick, tasty fillings. A sandwich maker is a great way to use leftovers.
Common Mistakes To Avoid
Many users make small mistakes that ruin their sandwiches or damage the appliance. Here’s what to watch out for:
- Overfilling: Too much filling leaks out, causing a mess and making cleanup harder.
- Using Wet Fillings: Very wet ingredients can make bread soggy and leak into the heating plates.
- No Butter or Oil: Skipping butter makes bread dry and more likely to stick.
- Metal Utensils: Never use metal on nonstick plates.
- Not Preheating: Cold plates cause uneven cooking and soggy bread.
- Cleaning While Hot: Wait for the plates to cool. Cleaning hot plates is dangerous.
Beginner’s insight: If your sandwich sticks often, try brushing a little oil on the plates before cooking.
Cleaning And Maintenance
Taking care of your sandwich maker makes it last longer and keeps your sandwiches tasting great.
Daily Cleaning
- Unplug and let the appliance cool completely.
- Wipe the plates with a damp, soft cloth.
- Remove crumbs with a pastry brush or paper towel.
- For stuck cheese, use a plastic spatula or a non-abrasive sponge.
Deep Cleaning
- If your model has removable plates, take them out and wash with warm, soapy water.
- Rinse and dry plates before putting them back.
- Wipe the outside of the device with a damp cloth.
What Not To Do
- Do not put the whole sandwich maker in water.
- Never use sharp or metal tools to clean.
- Do not use harsh cleaning chemicals.
Expert advice: Clean the sandwich maker after each use. If you leave cheese or sauce, it hardens and is much harder to remove.

Credit: www.innoteck.co.uk
Safety Precautions
A sandwich maker is safe if used correctly, but it gets very hot. Here are important safety tips:
- Keep away from children unless supervised.
- Always place on a stable, heat-proof surface.
- Do not touch the hot plates or lid while in use.
- Unplug the device when finished.
- Let it cool before cleaning or moving.
Non-obvious tip: If you smell burning, unplug the sandwich maker immediately. Check for trapped crumbs or food inside the device.
Comparing Sandwich Makers
Buying a sandwich maker can be confusing. Here’s a comparison to help you choose:
| Feature | Basic Model | Multifunction | Panini Press |
|---|---|---|---|
| Plates | Fixed, triangle grooves | Removable, multiple types | Flat or ribbed |
| Cleaning | Wipe only | Dishwasher safe plates | Wipe only |
| Bread Types | Standard slices | Any | Any, thicker slices |
| Special Features | Low | High (waffle, grill, etc.) | Adjustable height |
| Price | Low | Medium to High | Medium |
If you want simple, quick sandwiches, a basic model is enough. If you want more variety, try a multifunction model.
Troubleshooting Common Problems
Even with good care, problems can happen. Here’s how to solve them:
Sandwich Sticks To The Plate
- Make sure to use enough butter or oil on the bread.
- Do not overfill.
- Clean plates after each use.
Bread Burns Before Filling Heats
- Use medium-thickness bread. Thin bread burns quickly.
- Lower the filling temperature; use pre-cooked meats and vegetables.
- Open the lid and check after 2 minutes.
Filling Leaks Out
- Do not use watery fillings.
- Leave a small space at the edge of the bread (do not fill to the very edge).
- Use thicker sauces or cheese slices instead of shredded cheese.
Sandwich Is Soggy
- Preheat the sandwich maker.
- Use less sauce or wet ingredients.
- Try toasting the bread slightly before making the sandwich.
Indicator Light Not Working
- Check the power cord and outlet.
- If the light never comes on, the device may need repair.
Pro tip: If you see smoke or hear strange noises, stop using the device and check for problems.
Advanced Tips For Better Sandwiches
Once you know the basics, try these expert tips:
- Layer Fillings Properly: Place cheese next to the bread. It melts and helps seal the sandwich.
- Use Flavored Butters: Mix herbs or garlic with the butter for more taste.
- Try Different Breads: Rye, brioche, and even pita can be used for new flavors.
- Cut Ingredients Evenly: Small, even pieces cook better and are less likely to leak.
- Add Crunch: Try adding thin apple slices, nuts, or crispy onions for texture.
Extra insight: If you want a crispier sandwich, open the lid for a few seconds after cooking, then close it again for 30 seconds. This removes steam and makes the bread crunchier.
Fun Sandwich Maker Recipes
You can make more than just sandwiches. Try these ideas:
Omelet In A Sandwich Maker
- Beat 2 eggs, salt, pepper, and your favorite vegetables.
- Pour into the greased, hot sandwich maker (no bread).
- Close the lid and cook for 3–4 minutes.
French Toast
- Dip bread in a mixture of egg, milk, and cinnamon.
- Place in a greased, hot sandwich maker.
- Cook for 3 minutes, flip, and cook 1 more minute.
Samosa-style Pockets
- Fill bread with spiced potatoes and peas.
- Seal and toast for a crispy, spicy snack.
Sandwich makers are very flexible. You can experiment with many recipes.
How To Choose The Right Sandwich Maker
When buying a sandwich maker, think about these factors:
- Size: How many sandwiches do you want to make at once?
- Plate Type: Removable plates are easier to clean.
- Power: Higher wattage means faster cooking.
- Nonstick Coating: Makes cleaning easier.
- Extra Features: Some models grill meat, make waffles, or have temperature controls.
- Budget: Decide how much you want to spend.
Beginner’s mistake: Buying a large, fancy model but only making one sandwich a week. Choose what suits your actual needs.
Caring For Your Sandwich Maker Long-term
To keep your sandwich maker working well:
- Store it in a dry place.
- Do not wrap the cord tightly; this can damage it.
- Clean after every use.
- Check for damage to the plug or cord regularly.
- If the nonstick coating is peeling, replace the device.
Non-obvious advice: Leave the lid slightly open when storing, so smells do not build up inside.
Energy Use And Efficiency
A sandwich maker uses about 700–1200 watts per use. If you make one sandwich per day, it adds only a few dollars per month to your electric bill. It is much more energy efficient than using an oven for a small snack.
Tip: Preheat only as long as necessary. Unplug as soon as you finish cooking.
Sandwich Maker Vs. Other Kitchen Appliances
Here’s how a sandwich maker compares to other common kitchen tools:
| Appliance | Best For | Time to Cook | Ease of Cleaning |
|---|---|---|---|
| Sandwich Maker | Sealed, hot sandwiches | 3–5 minutes | Easy |
| Panini Press | Thick, flat sandwiches | 4–7 minutes | Moderate |
| Toaster Oven | Open-faced melts, reheating | 6–12 minutes | Moderate |
| Stovetop Pan | Grilled cheese, variety | 5–8 minutes | Depends |
A sandwich maker is best for quick, sealed sandwiches with melted cheese and hot fillings. For bigger, open sandwiches, use a toaster oven or panini press.
Health And Nutrition
Sandwich makers can help you eat healthier if you choose the right ingredients. Use whole grain bread, lots of vegetables, and lean meats. Try low-fat cheese, or go vegan with tofu or beans. You control the amount of oil, salt, and sugar.
Non-obvious tip: Use the sandwich maker to make healthy snacks like veggie omelets or sweet potato toast.
If you want more information on nutrition, the USDA ChooseMyPlate website has good resources.

Credit: www.youtube.com
Frequently Asked Questions
How Do I Keep Sandwiches From Sticking To The Plates?
Use a small amount of butter or oil on the outside of the bread. Do not overfill your sandwich, and wipe the plates clean after each use.
Can I Use Any Type Of Bread In A Sandwich Maker?
Most types of sliced bread work well. Avoid very thick or very hard breads, as they may not fit or cook evenly. Experiment to find what you like best.
Is It Safe For Children To Use A Sandwich Maker?
Children should always have adult supervision. The plates and steam can cause burns. Show children how to use the device safely and never leave them alone with it.
Can I Cook Things Other Than Sandwiches?
Yes, you can make omelets, French toast, quesadillas, and even desserts. Just make sure not to overfill and to clean the plates after each use.
How Often Should I Clean My Sandwich Maker?
Wipe the plates after every use. Do a deeper clean (with removable plates, if possible) once a week or if you see stuck-on food or stains.
A sandwich maker is a simple tool, but with the right knowledge, it can be a powerful part of your kitchen. You can create quick, delicious, and even healthy meals in just a few minutes. With proper care, your sandwich maker will last for many years, and you’ll keep discovering new recipes to enjoy.