Painting cherry cabinets is a smart way to transform your kitchen or bathroom without the high cost of new cabinetry. Cherry wood is known for its rich, red tones and smooth grain, but not everyone loves the look—especially when trying to brighten or modernize a space.
Painting cherry cabinets can seem tricky because the wood’s natural oils and color can bleed through paint, leading to uneven or disappointing results if not done right. However, with the right approach, tools, and products, you can achieve a beautiful, durable finish that lasts for years.
This guide will take you through every step, from preparation to finishing touches, and reveal what most beginners overlook.
Why Paint Cherry Cabinets?
Cherry cabinets are a classic feature in many homes. They’re durable and have a luxurious appearance, but their dark, reddish hue can make rooms look smaller or outdated. Many homeowners want a lighter, fresher look—often white, light gray, or navy blue.
Painting is a cost-effective way to refresh your space compared to replacing cabinets, which can cost $10,000 or more.
Painted cabinets are also easier to clean and repair. If you change your mind, you can repaint them in a different color. This flexibility makes painting cherry cabinets appealing for those who want to update their home’s style without a major renovation.
Challenges Of Painting Cherry Cabinets
Cherry wood presents unique challenges for painters:
- Tannins and natural oils: These can bleed through paint, causing stains or discoloration.
- Smooth grain: Paint may not stick well without proper prep.
- Strong color: The red hue may show through lighter paint if not properly blocked.
Understanding these issues is key to getting a long-lasting, flawless finish.
Supplies You’ll Need
Having the right supplies is half the battle. Here’s what you should gather:
- Screwdriver or drill: For removing cabinet doors and hardware
- Degreaser or TSP (trisodium phosphate): For deep cleaning
- Medium and fine-grit sandpaper (120 and 220 grit)
- Tack cloths
- Painter’s tape
- Drop cloths or plastic sheeting
- High-quality primer (stain-blocking, shellac-based is best)
- Cabinet paint (acrylic enamel or alkyd)
- High-density foam rollers
- Angled paint brushes
- Paint sprayer (optional, for the smoothest finish)
- New hardware (optional)
Choosing the right primer is essential. Shellac-based primers (like Zinsser B-I-N) are best for cherry wood because they block tannin bleed. Water-based primers usually don’t provide enough coverage.
Step-by-step Guide To Painting Cherry Cabinets
Let’s break down the process into clear, manageable steps. Skipping any of these can lead to peeling, chipping, or bleeding—so take your time.
1. Remove Cabinet Doors, Drawers, And Hardware
First, take off all the doors, drawers, and hardware (handles, knobs, hinges). Number each door and drawer with painter’s tape so you remember where they go. Place screws and hardware in labeled bags.
This step is important for two reasons:
- You’ll get a smoother finish without obstructions.
- You’ll avoid getting paint on hardware.
2. Clean Surfaces Thoroughly
Cherry cabinets often have a build-up of grease and oil, especially in kitchens. Use a degreaser or TSP mixed with water and scrub all surfaces. Pay special attention to corners and edges. Rinse with clean water and let everything dry completely.
Non-obvious insight: Even small amounts of grease can ruin paint adhesion, leading to peeling later. Don’t rush this step.
3. Sand All Surfaces
Use medium-grit sandpaper (120 grit) to scuff up the cabinet surfaces. You don’t need to remove all the existing finish—just rough up the surface so primer can stick. After sanding, switch to fine-grit (220) for a smooth finish. Wipe away all dust with a tack cloth.
Tip: Use a sanding sponge or block for flat surfaces, and folded sandpaper for corners and grooves.
4. Repair Any Damage
Fill any dents, scratches, or old hardware holes with wood filler. Let it dry, then sand smooth with 220-grit sandpaper. Clean off any dust.
5. Protect Surrounding Areas
Lay drop cloths on the floor and tape off countertops, walls, and inside cabinet boxes. If you’re not painting inside the cabinets, cover the openings with plastic.
6. Apply Primer
Stir your primer and pour it into a paint tray. Use an angled brush for corners and edges, then a foam roller for flat surfaces. Apply a thin, even coat to all cabinet frames, doors, and drawer fronts.
Wait at least 1 hour (or as recommended by the primer manufacturer) before applying a second coat. Two coats are usually needed to fully block cherry’s natural color and oils.
Common mistake: Using a latex primer or skipping the second coat. This often leads to red or yellow stains bleeding through your paint.
7. Sand Between Coats
After the primer dries, lightly sand all surfaces with 220-grit sandpaper. Wipe clean with a tack cloth. This step ensures a super-smooth finish and removes any dust or brush marks.
8. Apply Paint
Choose a high-quality cabinet paint—acrylic enamel or hybrid alkyd paints work best for durability and smoothness. Stir your paint thoroughly. Use a clean brush for edges and details, then a foam roller for flat areas. Apply thin coats for even coverage.
Let each coat dry according to the manufacturer’s instructions (usually 4–6 hours). Sand lightly between coats for a flawless finish. Two coats are usually enough, but dark colors may need three.
Pro tip: If you want a factory-smooth look, use a paint sprayer. Practice on a piece of cardboard before starting on your cabinets.
9. Cure And Reassemble
Let the paint cure for at least 24–48 hours before handling the doors and drawers. Full curing can take up to 2 weeks, so be gentle during this time.
Reinstall all hardware and hang doors and drawers back in their original places, using your labels as a guide.
Choosing The Right Paint And Primer
Not all paints are equal. For cherry cabinets, durability and stain-blocking are key.
| Paint Type | Durability | Finish Options | Best For |
|---|---|---|---|
| Acrylic Enamel | High | Satin, Semi-gloss | Kitchens, Bathrooms |
| Hybrid Alkyd | Very High | Satin, Gloss | Heavy-use cabinets |
| Latex | Medium | Matte, Satin | Low-traffic areas |
Acrylic enamel and hybrid alkyd paints are the best choices for painted cherry cabinets. They resist chips, stains, and moisture better than standard latex.
Best Colors For Painted Cherry Cabinets
Color choice makes a big impact. Here are some popular options:
- White: Brightens and modernizes any room. Works well in small kitchens.
- Light gray: Sophisticated and neutral, easy to decorate around.
- Navy blue: Bold and elegant, pairs well with brass hardware.
- Soft green: Adds a calm, fresh look, especially in country or farmhouse kitchens.
- Charcoal: Sleek and dramatic, hides fingerprints well.
- Cream or beige: Warms up spaces and pairs with many countertop styles.
Test colors with samples before committing. Cherry’s undertones can affect how paint looks when dry.
How Long Will Painted Cherry Cabinets Last?
With proper prep and high-quality paint, your cabinets can look great for 5–10 years. The finish will resist chips and stains, and cleaning is easy with a damp cloth.
Overlooked detail: Allowing enough curing time is critical. Many people use their cabinets too soon, causing fingerprints or chips. If you wait the recommended 2 weeks for full curing, your painted finish will be much more durable.
Common Mistakes And How To Avoid Them
Painting cherry cabinets is not hard, but it’s easy to make mistakes. Here’s what to watch out for:
- Skipping prep: Failing to clean or sand properly leads to peeling.
- Using the wrong primer: Latex primers do not block tannin bleed. Use shellac-based.
- Not labeling doors: Reinstalling can become a puzzle if you don’t keep track.
- Applying thick coats: Thick paint runs and chips more easily. Use thin layers.
- Not allowing enough drying time: Rushing leads to smudges and damage.
Credit: www.youtube.com
How Much Does It Cost To Paint Cherry Cabinets?
DIY painting is much cheaper than hiring a pro or replacing cabinets. Here’s a typical cost breakdown for a standard kitchen (20 doors, 6 drawers):
| Item | Estimated Cost |
|---|---|
| Primer (2 quarts) | $30–$50 |
| Paint (2 quarts) | $40–$80 |
| Sandpaper, tack cloths | $15–$30 |
| Brushes/rollers | $20–$40 |
| Cleaner (TSP) | $10 |
| Drop cloths, tape | $15 |
| Total | $130–$225 |
Hiring a professional painter can cost $3,000–$8,000 depending on your location and kitchen size. DIY saves thousands, but requires time and patience.
Should You Paint Or Refinish Cherry Cabinets?
Some people wonder if they should paint or refinish (restain) their cherry cabinets. Painting covers the wood’s natural color, while refinishing keeps the cherry look and just refreshes the finish.
Paint if:
- You want a big change in color or style.
- The current finish is worn or you dislike the red tone.
- Your cabinets are solid and in good shape.
Refinish if:
- You love the cherry wood’s grain and color.
- You only want to refresh and protect the existing look.
- There are only minor scratches or fading.
Credit: dfrancowallpaper.com
How To Maintain Painted Cherry Cabinets
Painted cabinets are easy to care for, but need some attention:
- Wipe spills quickly to avoid stains.
- Clean with a damp cloth—avoid harsh chemicals or scrubbers.
- Touch up chips with leftover paint.
- Avoid hanging wet towels or placing hot pans on painted surfaces.
With care, your cabinets will look new for years.
Advanced Tips For A Pro-level Finish
- Tint your primer: Ask the paint store to tint your primer close to your final color. This boosts coverage and hides the original cherry tones better.
- De-glossing liquid: For very glossy cabinets, use a liquid sandpaper (de-glosser) before sanding for extra paint adhesion.
- Paint the backs first: Paint the back of each door, let dry, then flip to paint the front. You’ll avoid smudges on the visible side.
- Use cabinet-grade paint: Brands like Benjamin Moore Advance or Sherwin-Williams Emerald Urethane are formulated for cabinets and give a hard, smooth finish.
- Upgrade hardware: New handles or knobs can dramatically update your cabinets’ look. Use a template to align holes for a perfect fit.
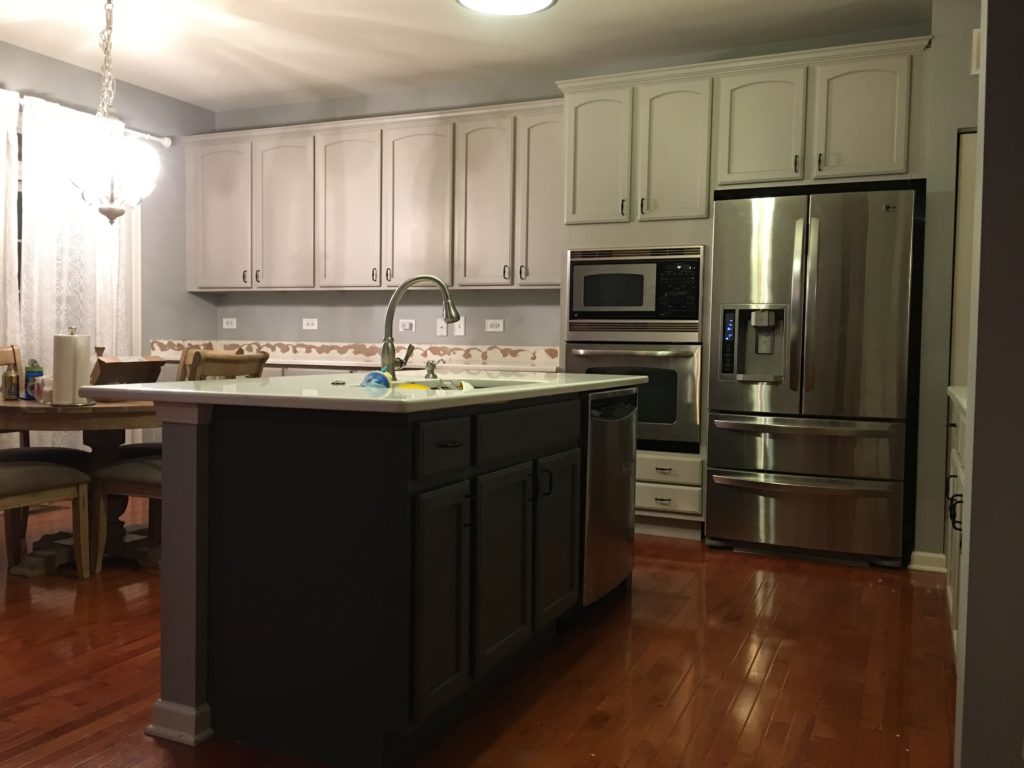
Real-life Example: A Small Kitchen Makeover
Maria wanted to update her small, dark kitchen with cherry cabinets. She chose a soft gray paint and gold hardware. After removing the doors and cleaning everything, she used a shellac-based primer and two coats of cabinet enamel. The project took three weekends, cost under $200, and made her kitchen feel twice as big.
Her guests often think she installed brand-new cabinets.
When To Call A Professional
If your cabinets are badly damaged, or you don’t have the time or patience for detail work, hiring a pro is a good option. Professionals have tools like spray booths for a perfect finish, and can complete the job faster.
It’s also smart to call a pro if you have lead paint (in homes built before 1978).

Credit: pnpcraftsmen.com
Environmental And Health Considerations
Painting produces fumes—especially with primers and paints designed for cabinets. Open windows and run fans while working. Wear a mask rated for paint fumes. Dispose of rags and brushes safely, as some products can spontaneously combust.
Many cabinet paints are now low-VOC or zero-VOC, which are safer for indoor air quality. Check labels before buying.
Alternative Finishes: Distressing, Glazing, And More
If you want a more decorative look, consider:
- Distressing: Lightly sand edges after painting for a vintage look.
- Glazing: After painting, apply a glaze to bring out detail or add an antique effect.
- Two-tone cabinets: Paint upper cabinets one color and lower cabinets another for a modern style.
These techniques require extra steps and practice, but can personalize your space even further.
Timeline: How Long Does It Take?
Painting cherry cabinets is not a one-day project. Here’s a typical timeline for DIYers:
- Day 1: Remove hardware, clean, and sand cabinets.
- Day 2: Apply first coat of primer. Let dry.
- Day 3: Sand and apply second coat of primer. Dry overnight.
- Day 4: First coat of paint. Dry 4–6 hours.
- Day 5: Sand and apply second coat. Dry overnight.
- Day 6: Touch-ups and reassembly.
Total time: 5–7 days (allowing for drying and sanding). Add 7–14 days for full curing before heavy use.
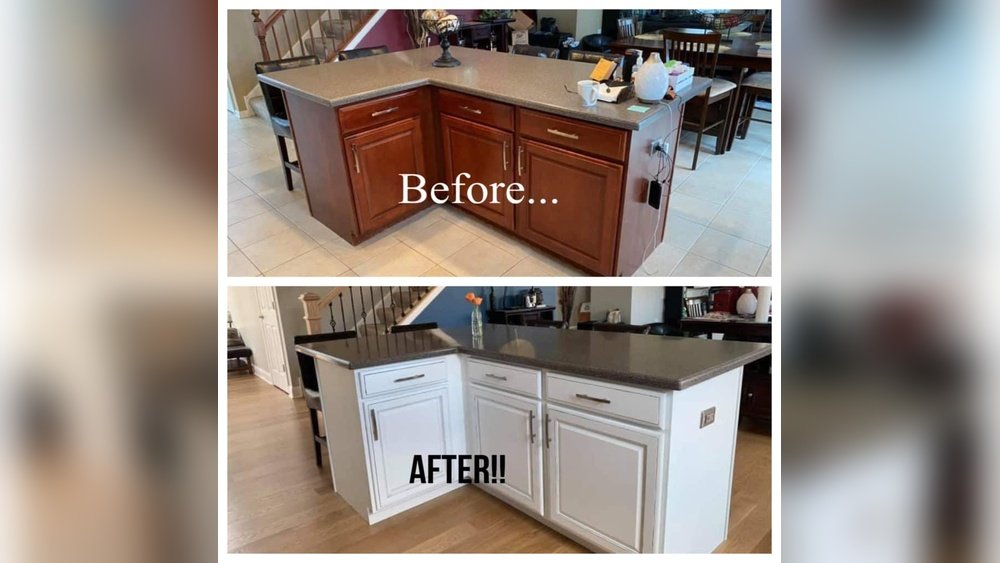
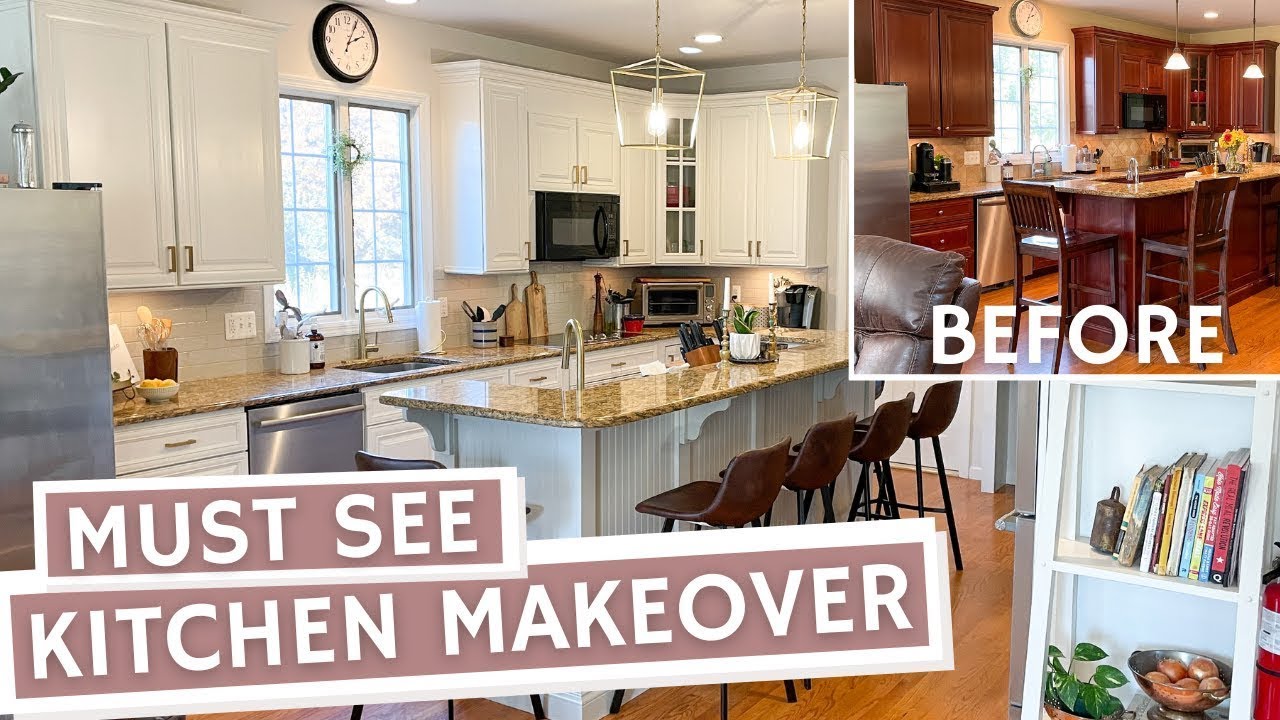
Painted Cherry Cabinets: Before And After
The transformation is often dramatic. Dark, dated kitchens become bright and fresh. Many people report that their home feels more modern and valuable after painting cabinets. Real estate agents also note that painted cabinets can boost a home’s resale value, as buyers prefer lighter, updated kitchens.
Recommended Resources
For more step-by-step photos and advanced tips, check out the Family Handyman’s guide to painting kitchen cabinets.
Frequently Asked Questions
How Do I Prevent Tannin Bleed When Painting Cherry Cabinets?
To prevent tannin bleed, always use a high-quality, shellac-based primer. Apply at least two coats, letting each dry fully. Sand lightly between coats. Do not use latex primer, as it will not block cherry’s natural oils and color.
Can I Paint Cherry Cabinets Without Sanding?
It’s possible with a bonding primer or liquid de-glosser, but sanding gives the best results. Skipping sanding often leads to peeling or chipping paint. Even a quick scuff with 220-grit sandpaper greatly improves adhesion.
What Is The Best Paint Finish For Kitchen Cabinets?
Semi-gloss and satin finishes are the most popular for kitchen cabinets. They’re durable, easy to clean, and resist stains. Avoid flat or matte paints—they show fingerprints and are harder to wipe clean.
How Long Should I Wait Before Using My Painted Cabinets?
Wait at least 48 hours before reattaching doors and hardware. Avoid heavy use for 7–14 days to allow the paint to fully cure. This prevents chips, dents, and smudges during the curing process.
Is It Better To Spray Or Roll Paint On Cherry Cabinets?
Spraying gives the smoothest finish, but requires more prep and equipment. Rolling and brushing work well for most DIYers—use a foam roller for flat areas and a brush for details. If you want a factory finish, consider renting or borrowing a sprayer.
Painting cherry cabinets is a rewarding project that can completely change the look and feel of your kitchen or bathroom. With careful prep, the right tools, and attention to detail, you’ll achieve a professional, lasting result that adds value and style to your home.