Making a cabinet look beautiful and function well often comes down to small details. One of these details is the placement of cabinet pulls—the handles or knobs you use to open drawers and doors. Installing them evenly can be tricky, especially if you have many cabinets in your kitchen, bathroom, or workshop. This is where a template for cabinet pulls comes in. A good template helps you drill holes in the right spots every time, so all your pulls line up perfectly.
Many people try to “eyeball” the placement, only to end up with crooked or uneven handles. Fixing these mistakes often means patching holes and repainting doors, which is a lot of work. Using a template saves you time, avoids errors, and gives your cabinets a professional look.
This guide shows you how to make your own reusable template for cabinet pulls, even if you have never tried it before. You’ll learn about the materials you need, the steps to make and use a template, and tips for perfect results.
Why Use A Template For Cabinet Pulls?
Most cabinets look best when pulls are straight and evenly spaced. Even a tiny mistake can be obvious—your eye naturally notices when one handle is higher or farther from the edge than another. This is especially true in kitchens, where you might have 20 or more handles in a row. A template works as a drilling guide, so each hole is in the correct spot every time.
A good template helps with:
- Accuracy: Holes are placed in exactly the same spot for every door or drawer.
- Speed: Mark and drill faster, especially if you have many cabinets.
- Consistency: No worries about “which way does the handle go?” or “did I measure from the top or the side?”
- Reducing mistakes: Less chance of drilling a hole in the wrong place.
Many professionals use templates for every cabinet job. With a little effort, you can get the same results at home.
Tools And Materials Needed
Before you start, gather your tools and materials. You do not need special machines—most items are easy to find at a hardware store or you may already have them.
You will need:
- Template material: A piece of sturdy material like 1/8-inch thick acrylic, plywood, MDF, or hardboard. Size: about 6 x 12 inches works for most cabinets.
- Tape measure or ruler: For accurate measuring.
- Pencil or fine marker: For marking hole locations.
- Drill: A cordless or corded drill is fine.
- Drill bits: Match the size to your cabinet pull screws (often 3/16″ or 1/4″).
- Clamps (optional): To hold the template in place.
- Masking tape: Helps with marking and prevents splintering.
- Sandpaper: For smoothing edges.
- Awl or nail: To make small starting points for the drill.
- Safety glasses: To protect your eyes while drilling.
Bonus tip: If you plan to install lots of pulls, consider using clear acrylic for your template. It lets you see the cabinet edge, making alignment easier.
Choosing The Right Template Material
The best template material is strong, flat, and easy to drill. Here’s a quick comparison:
| Material | Pros | Cons | Best For |
|---|---|---|---|
| Acrylic (clear plastic) | Durable, see-through, smooth edges | More expensive, can crack if forced | Frequent use, high accuracy |
| Plywood | Cheap, easy to drill, strong | Can splinter, not see-through | DIYers, one-time jobs |
| MDF (fiberboard) | Very smooth, easy to mark | Dusty when drilled, can break if thin | Detailed marking, indoor use |
| Hardboard | Cheap, smooth, lightweight | Bends easily, not durable long-term | Quick, light-duty jobs |
For most people, plywood or acrylic is the best balance of cost and durability.
Measuring For Cabinet Pull Placement
Before making your template, you need to know exactly where to put the holes for your cabinet pulls. Cabinet pulls come in many sizes—some have one screw (knobs), some have two (handles or bars).
Key measurements:
- Hole spacing: Distance between the two screw holes (called “center-to-center” or CTC). Common sizes: 3″, 3-3/4″, 5″.
- Vertical placement: How far from the top or bottom of the door or drawer you want the pull.
- Horizontal placement: How far from the edge or center you want the pull.
How to measure:
- Check your pulls: Use a tape measure to find the exact screw spacing.
- Decide on placement: For doors, pulls usually go 2–4 inches from the edge. For drawers, many people center the pull.
- Write down your measurements: You’ll need these for the template.
Pro insight: If you have pulls of different sizes, consider making a separate template for each size. This avoids confusion and mistakes.
Designing Your Template
Now, you’re ready to lay out your template. The goal is to make a reusable guide you can flip or shift for different cabinet types (doors, drawers, left and right sides).
Steps to design:
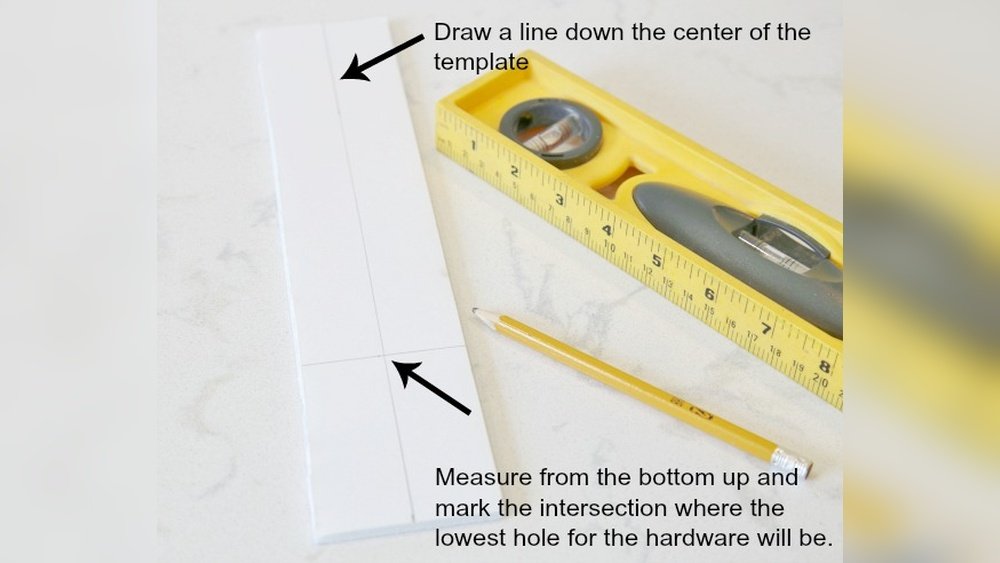
- Draw a straight baseline on your template material, near one edge. This is your reference edge.
- Mark “zero point”: This will always line up with the edge or corner of your cabinet.
- Mark hole positions: Use your measurements to mark exactly where the drill holes go. For two-hole pulls, mark both spots according to the center-to-center size.
- Add labels: Write which holes are for left doors, right doors, drawers, etc. It’s easy to forget later.
Example: For a 3-inch center-to-center pull, you’d mark two holes 3 inches apart, both at the same distance from the edge. If making for a drawer, the holes would be centered top-to-bottom.
Extra tip: Use masking tape to mark your layout first. If you make a mistake, you can peel off the tape and try again.
Making The Template: Step-by-step
Here’s how to create your drilling template from start to finish:
- Cut your template material to size (about 6 x 12 inches is common).
- Sand the edges to remove splinters or sharp parts.
- Mark the baseline near one long edge.
- Measure and mark your hole positions using a tape measure and pencil.
- Use an awl or nail to press a small dent at each drill spot. This keeps the drill bit from slipping.
- Drill the holes at the marked spots. Use the same size bit as your pull screws.
- Test fit a screw or pull in the holes to check alignment.
- Label the template for “left door,” “right door,” “drawer,” etc.
- Clean up holes with sandpaper if needed.
Pro tip: Drill slowly and support the template to avoid splintering. For acrylic, use a new, sharp bit and don’t press too hard.

Credit: ourhomefromscratch.com
Using The Template On Cabinets
With your template finished, you’re ready to install pulls on your cabinets.
How to use the template:
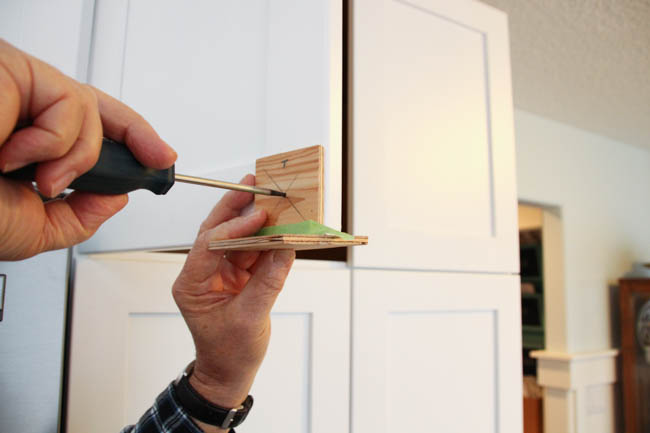
- Line up the template: Place the baseline or “zero point” against the cabinet edge (for doors) or center (for drawers).
- Clamp or hold in place: If possible, use a clamp to keep the template from shifting.
- Mark hole spots: Use a pencil or awl to mark through the template holes onto the cabinet.
- Double-check placement: Make sure the mark is where you want it—especially important for the first cabinet.
- Drill pilot holes: Use a small drill bit to make a pilot hole. This helps prevent splitting the wood.
- Drill final holes: Use the bit size needed for your pull screws.
- Install the pull: Put in the screws and tighten.
Non-obvious insight: Always test the template on a scrap piece or the back of a cabinet first. If there’s a mistake, you can adjust before marking all your doors.
Making A Universal Template For Multiple Pull Sizes
Some kitchens use different pull sizes for different cabinets. For example, small drawers might have 3-inch pulls, while large doors use 5-inch bars. You can make a universal template with several sets of holes.
How:
- Mark several sets of holes on the same template, each clearly labeled for a different size.
- Use different colors or shapes (circle, square, triangle) to identify which set is which.
- Cover unused holes with masking tape when marking cabinets to avoid mistakes.
Example layout:
| Pull Size (CTC) | Hole Mark Shape | Recommended Cabinet |
|---|---|---|
| 3 inches | Circle | Small drawers |
| 3-3/4 inches | Square | Medium doors |
| 5 inches | Triangle | Large doors or drawers |
This saves time if you have a big project with mixed hardware.
Common Mistakes And How To Avoid Them
Even with a template, mistakes can happen. Here are the most frequent problems people run into—and how to fix or prevent them.
- Wrong hole size: Drill bits that are too small or too large make it hard to fit the screws. Always check the pull’s screw size before making your template.
- Template slips during marking: Always hold or clamp the template tightly against the cabinet. If it moves even a little, the holes will be off.
- Using the wrong side of the template: Mark your template clearly for left and right doors. Otherwise, you could install pulls upside-down or backwards.
- Forgetting to test on scrap: Practice on an old piece of wood before marking your actual cabinets.
- Drilling through the cabinet: Use a drill stop or wrap masking tape around the bit to control depth.
- Misreading measurements: Double-check all numbers, especially if you’re tired or distracted.
Advanced tip: If you’re installing very expensive or custom cabinets, consider making a second “backup” template to check your first. This extra step can save you hundreds of dollars in repairs.
Using Store-bought Vs. Diy Templates
You may have seen store-bought cabinet pull templates in home improvement stores. These are often made of plastic, with many pre-drilled holes for common sizes. Are they better than a homemade template?
DIY Template Advantages:
- Custom fit for your specific hardware and cabinet layout
- Larger, easier to hold and align
- You can add labels, colors, or shapes for easy use
Store-Bought Template Advantages:
- Fast to set up
- Good for standard pull sizes and layouts
- Often includes both knob and pull holes
Downsides of store-bought templates: They may not match your cabinet design or pull size exactly. If your hardware is not a standard size, you may end up drilling new holes in the template or guessing, which brings back the risk of mistakes.
Pro insight: For one or two cabinets, a store-bought template is fine. For a full kitchen, a custom DIY template is worth the small extra effort.
Advanced Template Features
If you’re doing a large project or want a template you can use for years, you can add some advanced features:
- Clear acrylic with etched lines: Lets you see exactly where the template sits on the cabinet.
- Adjustable stops: Some templates have movable parts that set the distance from the edge.
- Multiple baselines: For top, bottom, left, or right alignment.
- Measurement grid: Add a grid with permanent marker for fast changes.
- Hanging hole: Drill a small hole to hang your template on a pegboard when not in use.
Pro builders use these features to speed up big jobs and reduce errors.
Step-by-step Example: Making And Using A Template
Let’s go through a full example, step by step. This will help you see the process in action.
Step 1: Gather Materials
Suppose you have 20 kitchen cabinets, all using 3-3/4″ center-to-center pulls. You choose a piece of 1/8″ clear acrylic, a tape measure, a pencil, a drill with a 3/16″ bit, and masking tape.
Step 2: Cut And Prepare
Cut the acrylic to 6″ x 12″. Sand the edges smooth. Place a strip of masking tape along one long edge (this will be your baseline).
Step 3: Mark Layout
Draw a straight line 1-1/2″ from the long edge—this is your vertical placement. Mark the center of the short edge, then measure out 1-7/8″ to each side (for 3-3/4″ spacing). Mark these points for the drill holes.
Step 4: Drill Holes
Use the awl to make small dents at the drill spots. Drill slowly through the acrylic. Sand any rough edges.
Step 5: Test Fit
Insert a pull through the holes to make sure the spacing is correct.
Step 6: Label And Use
Write “3-3/4 CTC” and “baseline” on the template with a marker. To use, line up the baseline with the cabinet edge, hold in place, and mark through the holes. Drill and install the pulls.
Extra insight: If your cabinets are already installed, use masking tape on the doors to mark drill points before drilling. This prevents chipping and shows mistakes before they happen.
Credit: www.apinchofjoy.com
Safety Tips For Making And Using Templates
Drilling holes in cabinets is safe if you use caution. Here are a few basic safety tips:
- Always wear safety glasses when drilling.
- Drill slowly, especially in acrylic, to avoid cracks.
- Support the template and cabinet with your free hand or a clamp.
- Make sure your drill bit is sharp and the right size.
- Keep fingers clear of the drill path.
Non-obvious tip: Use a piece of scrap wood behind the cabinet door when drilling. This prevents “blowout” (splintering) on the back side of the hole.
Template Maintenance And Storage
Your template can last for many projects if you take care of it.
- Store in a dry place, flat, to avoid warping.
- Hang on a pegboard or keep in a labeled folder.
- Clean with a damp cloth—avoid strong cleaners on acrylic.
- Check holes for wear before each use.
If the template gets damaged or the holes widen, it’s best to make a new one. Accurate holes are key to perfect cabinet pulls.
Real-world Examples And Data
Many homeowners do not use a template and regret it. According to a survey by The Spruce, over 70% of DIY cabinet installers wish they had used a template after seeing crooked or uneven pulls on their new cabinets. Professional installers say a reusable template can save up to two hours on a medium kitchen job.
Case study: A kitchen remodel with 24 doors and 10 drawers. Without a template, the installer made three mistakes, requiring patching, sanding, and repainting. With a template, the remaining pulls were installed with zero errors and all lined up perfectly.
When To Replace A Template
A homemade template can last for years, but sometimes it’s time to make a new one.
Replace your template if:
- Holes become enlarged or worn out.
- The template cracks or warps.
- You switch to a new pull size or design.
- You notice errors when marking cabinets.
Pro tip: Keep your old templates as a reference. If you remodel again or need to add cabinets later, you’ll have the correct guide.
Credit: www.thehappyhousie.com
The Environmental Angle
Making a durable, reusable template reduces waste. Instead of using disposable paper guides or making new templates for every project, one good template can help for years. Use scraps of wood or leftover acrylic instead of buying new material if possible.
This small step helps the environment and saves money.
Digital Tools And Templates
Today, some people use digital tools for cabinet layout. Apps let you plan pull placement and print a paper template. While this is useful for planning, a solid physical template is still best for drilling.
If you want to design a template on a computer, use simple drawing programs. Print at actual size, tape to your template material, and drill through the paper. For most DIYers, measuring and marking by hand is faster and just as accurate.
For more advanced reading on cabinet hardware installation, visit the Family Handyman guide.
Frequently Asked Questions
How Thick Should My Template Material Be?
Your template should be at least 1/8 inch thick (about 3 mm). Thicker templates are stronger and won’t flex, but are also heavier. Thin material can crack or break when drilling, so avoid anything thinner than 1/8 inch.
Can I Use Cardboard Or Paper For My Template?
Cardboard or paper can work for a single use or for marking, but they wear out fast and are hard to keep accurate. For best results, use wood, acrylic, or hardboard. These materials last much longer and give more precise results.
How Do I Mark The Center Of A Drawer For My Template?
Measure the width of the drawer and divide by two. Mark this center point on the drawer. Align your template’s center with this mark. For extra accuracy, use a tape measure and a square tool to keep everything straight.
What If My Cabinet Pulls Are Not A Standard Size?
If your pulls are a unique size, make a custom template. Measure the exact center-to-center distance between the screw holes and mark these on your template. Label your template with the size so you remember for future use.
Can I Use The Same Template For Both Left And Right Cabinet Doors?
Yes, if your template is symmetrical and you mark it clearly for left and right use. Some people flip the template for left and right doors. Always double-check alignment before marking, as mistakes are easy to make if you’re moving quickly.
Making a template for cabinet pulls might seem like extra work, but it pays off in speed, accuracy, and a professional finish. With the right tools and careful measuring, you can install cabinet hardware that looks great every time. Your cabinets will thank you—and so will anyone who sees your handiwork.