Bread baking is an art, but it’s also a science. Every loaf begins with a simple act: making dough rise. If you’ve ever wondered how to rise bread in oven, you’re not alone. Many home bakers struggle with proofing, or rising, bread—especially when the kitchen is cold, or humidity is low. But rising bread in the oven (also called “oven proofing”) is a smart, reliable way to get great results every time. With the right method, you can create beautiful, airy loaves in any season, in almost any kitchen.
Let’s walk through everything you need to know, from the basics to pro-level tips. By the end, you’ll feel confident using your oven for perfect bread rise, whether you’re making classic white bread, sweet rolls, or rustic sourdough.
Why Proper Bread Rising Matters
Bread rising is more than just waiting for dough to get bigger. It’s about developing flavor, structure, and texture. The main goal is to let yeast (or other leavening agents) create gas bubbles inside the dough. These bubbles get trapped by gluten, making the dough expand. If bread does not rise well, it can turn out dense, gummy, or flat.
A good rise means:
- Light texture: Soft, airy crumb inside the loaf
- Better taste: Longer rising lets yeast make more flavors
- Nice crust: Well-risen dough browns and crisps nicely
- Right shape: Dough holds its form, not spreading flat
Many factors affect rising: temperature, humidity, type of flour, and yeast health. The oven creates a steady, warm environment, which is ideal for consistent results.
The Science Behind Bread Rising
When flour, water, yeast, and salt come together, a process starts. The yeast eats sugars in the flour and releases carbon dioxide (gas) and alcohol. This gas stretches the dough, while gluten (from wheat proteins) creates a net to trap the bubbles. The result: the dough grows in size and gets a sponge-like texture.
Key elements:
- Yeast: Needs warmth (ideally 75-85°F or 24-29°C) to work fast, but not too hot
- Gluten: Forms best with kneading, gives dough strength to hold gas
- Time: Longer rise (called “fermentation”) gives better flavor
Too much heat can kill yeast. Too little, and the dough rises slowly or not at all. This is why the oven, with gentle warmth, can be a baker’s best friend.

Credit: www.reddit.com
Methods To Rise Bread In The Oven
There are several ways to use your oven for rising dough. Let’s look at the most common, plus when to use each.
1. Oven With Light On (no Heat)
This is the safest, easiest method for most ovens:
- Place dough in a bowl, cover with plastic wrap or a damp towel.
- Put the bowl in the oven with the oven light turned on.
- Close the oven door.
The oven light gently warms the air, usually keeping it around 80-90°F (27-32°C). This is perfect for yeast. It works best for most doughs, especially those with lots of butter or eggs (like brioche).
2. Warm Oven (low Heat Preheat, Then Off)
If your oven does not have a light, or you want a faster rise:
- Turn oven to the lowest setting (often 170°F or 77°C) for just 1-2 minutes.
- Turn oven OFF.
- Place covered dough inside.
The gentle heat helps dough rise quicker, but be careful: if it feels hot to your hand, wait a few minutes before putting dough in. Too much heat can “cook” the dough or kill the yeast.
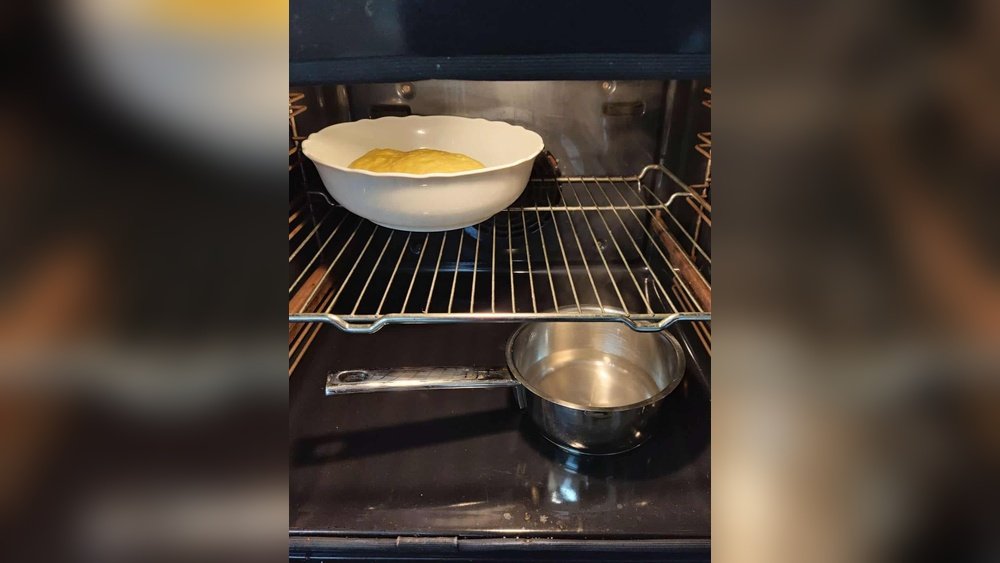
3. Oven With Boiling Water
This method adds humidity, which prevents crust from forming too soon:
- Boil water (about 2-3 cups).
- Place dough in a bowl or pan, cover lightly.
- Put a heat-safe dish on the bottom rack. Pour the boiling water in.
- Place dough on a rack above the water.
- Close the oven door.
The warm, moist air speeds up rising and keeps dough surface soft. This is great for bagels, cinnamon rolls, or any bread that dries out easily.
4. Proofing Function (if Your Oven Has It)
Some modern ovens have a proof or dough rise setting (usually 85-100°F / 29-38°C). Use this if available. Just cover your dough, select the function, and let it rise.
Step-by-step: How To Rise Bread In Oven
Let’s put theory into action. Here’s a detailed, practical guide for rising any yeast bread in your oven:
Step 1: Make Your Dough
Follow your bread recipe. Mix ingredients, knead until smooth and elastic (8-10 minutes by hand, or 6-7 minutes with a stand mixer). The dough should pass the “windowpane test”: stretch a small piece between your fingers—if it’s thin and doesn’t break, you’re ready.
Step 2: First Rise (bulk Fermentation)
- Shape dough into a ball.
- Place in a lightly greased bowl.
- Cover with plastic wrap, a damp towel, or a reusable cover.
Now, use your oven:
- If using oven light: Place bowl in oven, turn on light, close door.
- If using warm oven: Preheat oven to lowest setting for 1-2 min, then turn off. Place bowl inside.
- If using steam: Pour boiling water into a pan on lower rack, dough above.
Let dough rise until doubled in size. This usually takes 1-2 hours, depending on dough type and temperature.
Non-obvious tip: For doughs with lots of sugar, butter, or eggs (brioche, challah), rising will be slower—give extra time.
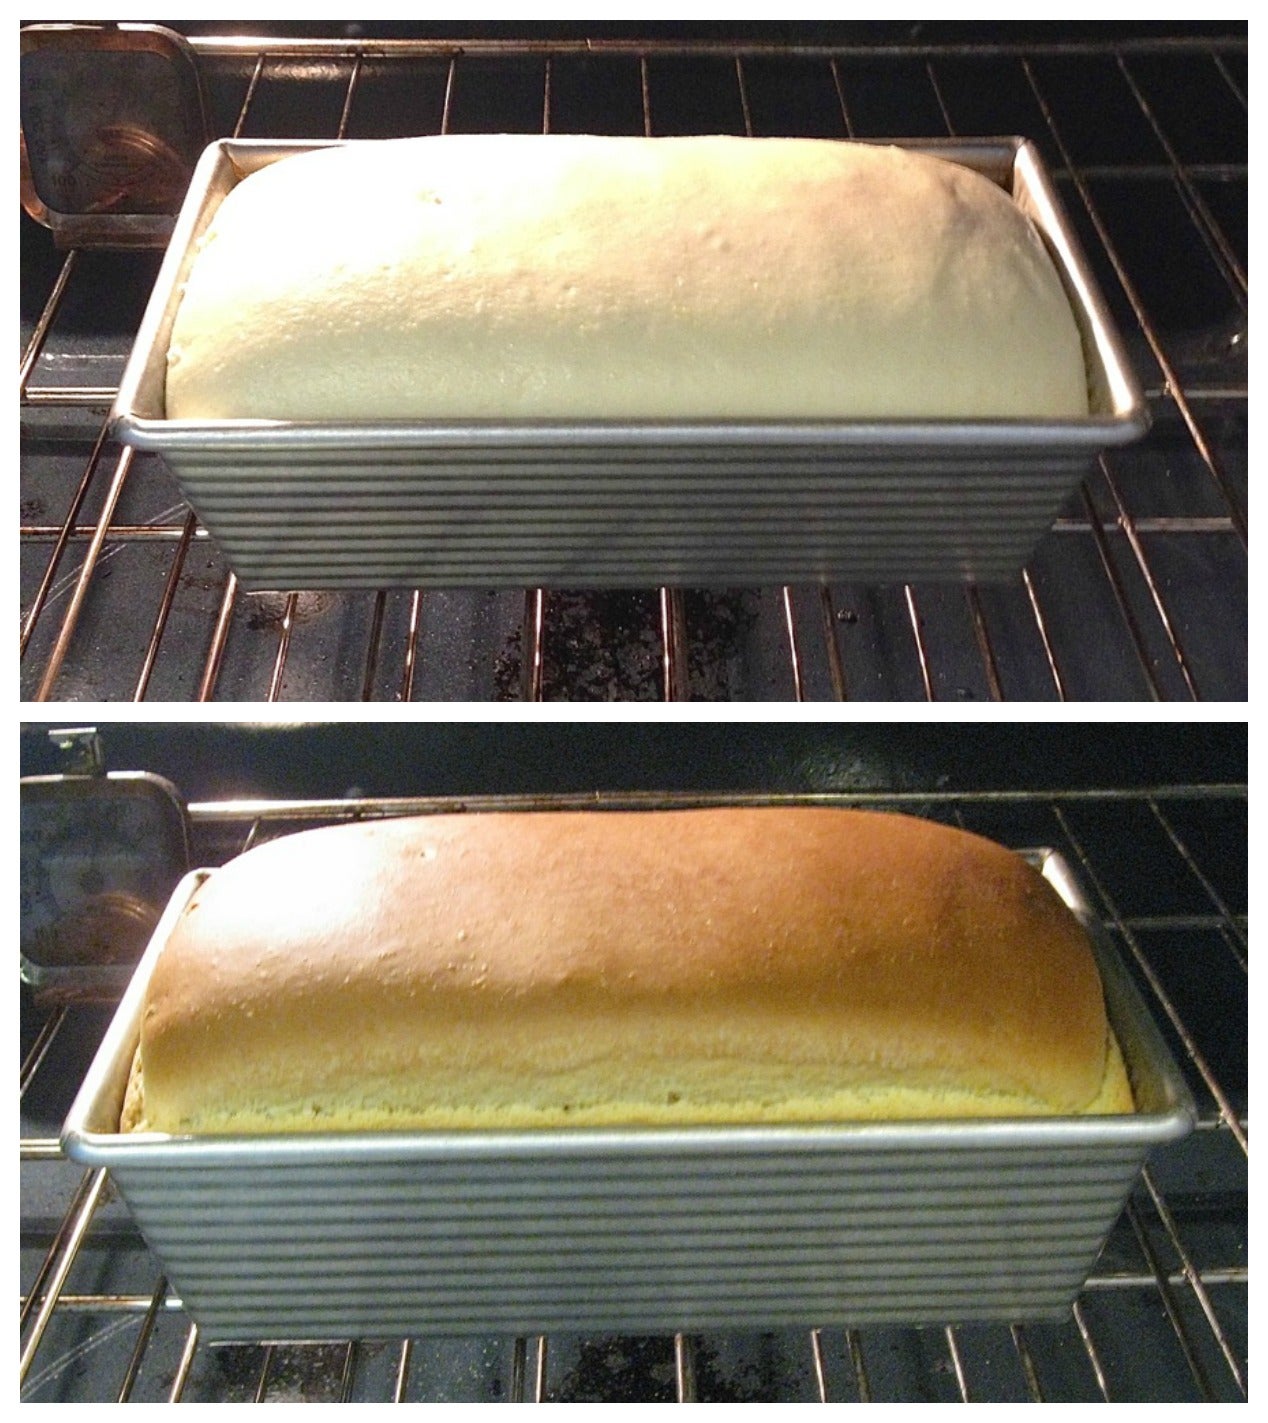
Step 3: Shaping And Second Rise
After the first rise:
- Punch down dough gently to release gas.
- Shape as desired (loaf, rolls, baguette, etc. ).
- Place in greased pan or on a baking sheet.
Cover again. Return to oven using your chosen method. The second rise (called “proofing” or “final fermentation”) usually takes 45-90 minutes.
Pro tip: Under-proofed dough cracks in the oven. Over-proofed dough deflates easily. A gentle finger poke should slowly spring back—this means it’s ready to bake.
Step 4: Bake
Remove dough from oven before preheating! Most ovens need 10-15 minutes to reach baking temperature. Bake as your recipe says.
Credit: www.kingarthurbaking.com
Common Mistakes When Rising Bread In Oven
Baking bread is simple, but small mistakes can make a big difference. Here are key issues to watch for:
- Too Much Heat: If the oven is too hot, yeast dies. Always check with your hand or an oven thermometer.
- No Cover: Uncovered dough dries on the surface. Always cover with plastic, a towel, or a lid.
- Forgetting the Dough: Set a timer! Over-proofed dough can collapse or bake up dense.
- Not Removing Before Preheating: Always take dough out before you turn on the oven to bake.
- Ignoring Humidity: Dry air slows rising. Add a pan of hot water if your kitchen is dry.
- Uneven Heat: Some ovens have hot/cold spots. Rotate the bowl halfway for even rising.
Comparing Bread Rising Methods
Here’s a quick comparison of popular rising methods and how they stack up for home bakers:
| Method | Temperature Range | Humidity | Speed | Best For |
|---|---|---|---|---|
| Oven with Light | 80-90°F | Low | Medium | Most doughs |
| Warm Oven (Preheat/Off) | 90-100°F | Low | Fast | Quick rise, busy kitchens |
| Oven with Boiling Water | 80-90°F | High | Medium | Enriched doughs, rolls |
| Proofing Drawer/Function | 85-100°F | Medium | Medium | All bread types |
| Countertop | 60-75°F | Variable | Slow | Rustic, sourdough |
Bread Types And Their Rising Needs
Different breads need different rising conditions. Here’s how to adjust your approach:
Basic White Or Wheat Bread
- Rises quickly at 80-85°F
- Needs 1-2 hours for first rise, 45-60 min for second
Enriched Doughs (brioche, Challah, Sweet Rolls)
- More sugar, butter, or eggs slow yeast
- Needs slightly warmer environment (85-90°F)
- First rise: 2-3 hours, second: 60-90 min
Whole Grain Breads
- Dense flours slow rising
- Allow extra time (sometimes double)
Sourdough
- Uses wild yeast, works best at 75-80°F
- Often needs longer, slower rises—don’t rush it
- Sometimes best to rise overnight in fridge, then warm in oven
How To Control Humidity In Your Oven
Humidity keeps dough moist, helps crust develop properly, and can speed up fermentation. Here are ways to add or control humidity while rising bread in the oven:
- Steaming Pan: Place a shallow dish with boiling water on the lowest rack.
- Spray Bottle: Lightly mist the oven walls (not the heating element!) Before closing door.
- Wet Towel: Drape a damp towel over the bowl or pan (but not touching the dough).
- Proofing Box: For frequent bakers, a home proofing box gives full control.
Extra insight: Too much humidity can cause sticky dough and pale crust. For lean doughs (no fat), use less steam. For rich doughs (like cinnamon rolls), more humidity helps.
Tools That Make Oven Rising Easier
While you can rise bread in any oven, a few tools make the process smoother and more reliable:
Oven Thermometer
Most ovens are off by 10-30°F. An oven thermometer helps you know the exact temperature inside, so you don’t overheat the dough.
Dough Rising Container
A clear container with straight sides lets you see when dough has truly doubled. Mark the starting level with a rubber band or tape.
Silicone Dough Cover
Reusable silicone lids or covers keep moisture in and fit most bowls.
Digital Timer
Set reminders for 30, 60, or 90 minutes—no more forgotten dough.
Stand Mixer (optional)
For large batches, a stand mixer saves time and helps knead dough evenly.
Step-by-step Example: Classic White Bread
Let’s see how all this works in practice, with a classic white sandwich bread recipe.
Ingredients
- 3 1/4 cups (400g) bread flour
- 2 teaspoons instant yeast
- 1 tablespoon sugar
- 1 1/4 teaspoons salt
- 1 cup (240ml) warm water (100°F / 38°C)
- 2 tablespoons unsalted butter, softened
Instructions
- Mix: Combine flour, yeast, sugar, and salt. Add water and butter. Mix until a shaggy dough forms.
- Knead: Knead by hand 8-10 minutes, or in a mixer 6-7 minutes. Dough should be smooth and slightly tacky.
- First Rise: Place in greased bowl, cover. Use oven light method (see above). Let rise 1-2 hours, until doubled.
- Shape: Punch down. Shape into a loaf and place in greased pan.
- Second Rise: Cover. Rise in oven (light on) for 45-60 minutes, until top of dough is about 1 inch above pan rim.
- Bake: Remove from oven. Preheat oven to 375°F (190°C). Bake 30-35 minutes until deep golden brown.
- Cool: Turn out onto wire rack and let cool before slicing.
Extra tip: If your kitchen is cold, let dough rest near a warm appliance before putting in oven.
Troubleshooting: When Bread Doesn’t Rise
Sometimes, even with the right method, bread dough won’t rise as expected. Here’s how to fix common problems:
Yeast Issues
- Expired yeast: Always check the date. Proof yeast in warm water with sugar—if it doesn’t foam after 5-10 minutes, replace it.
- Water too hot: Kills yeast. Use water that feels warm, not hot.
Temperature Problems
- Oven too cold: Dough rises slowly. Warm oven slightly more next time.
- Oven too hot: Kills yeast or partially cooks dough. Always check with a thermometer.
Dough Too Dry
- Dry dough won’t rise well. Add a bit more water and knead again.
Overproofing
- Dough collapses or bakes up flat. Next time, reduce rising time, or check with the finger poke test.
Comparing First And Second Rises
Many recipes call for two rises. Here’s why both matter:
| Rise | Purpose | Time Needed | Result |
|---|---|---|---|
| First (Bulk) | Develop flavor and gluten | 1-3 hours | Big volume increase, complex taste |
| Second (Proof) | Shape and final rise | 45-90 minutes | Even crumb, good oven spring |
Beginner insight: Skipping the second rise leads to tight, uneven crumbs. Both rises are important for best bread.
Bread Rising And Altitude
Altitude changes how dough behaves. High altitude (over 3,000 feet/900 meters) means lower air pressure and faster yeast action. Here’s how to adjust:
- Use less yeast (about 25% less)
- Shorten rising times (check after 45 minutes)
- Add a bit more liquid (dough dries faster at altitude)
- Punch down more firmly to remove extra air
Unique note: At high altitude, oven rising is even more helpful, as indoor temperatures can be cooler.
Cleaning Up After Rising Dough In Oven
Sticky dough, flour dust, and spills can make a mess. Here’s how to keep things neat:
- Place dough bowl on a baking tray to catch spills.
- Wipe oven walls with a damp cloth (after cooling) to remove any flour or sticky residue.
- If you used a steam pan, let it cool before removing and pouring out water.
Keeping your oven clean ensures even heat and prevents unwanted flavors in future bakes.
How To Know When Your Bread Is Perfectly Risen
It takes practice, but there are good signs your dough is ready to bake:
- Doubled in Size: Mark your bowl to check.
- Finger Poke Test: Press a floured finger into the dough. If the indentation springs back slowly, it’s proofed. If it snaps back quickly, rise longer.
- Smooth Surface: Dough should look puffed and not dry.
- Springy Feel: Light, airy, but not collapsing.
Advanced tip: For shaped loaves, gently shake the pan—if the dough jiggles, it’s ready!
Final Tips For Success
- Be Patient: Rushing means dense bread. Let the dough tell you when it’s ready.
- Check Temperature: Use a thermometer for accuracy.
- Practice Makes Perfect: Each oven is different. Keep notes and adjust as you learn.
- Don’t Overproof: Set timers, and check the dough often.

Credit: www.wikihow.com
Frequently Asked Questions
What Is The Best Temperature For Rising Bread In The Oven?
The ideal temperature for rising bread dough is 80-90°F (27-32°C). Most home ovens with just the light on stay in this range. Warmer than this can kill yeast, while cooler temperatures slow the process.
Can I Rise All Types Of Bread In The Oven?
Yes, almost all yeast-leavened breads can be risen in the oven. However, for sourdough and rustic breads, a slower, cooler rise (even in the fridge) can give better flavor and texture. Use the oven for soft breads, enriched doughs, or when your kitchen is cold.
How Do I Keep My Dough From Drying Out During Oven Rising?
Always cover your dough with plastic wrap, a damp towel, or a reusable lid. For extra humidity, place a pan of hot water in the oven with the dough. This keeps the dough surface soft and prevents crust from forming too early.
Can I Use The Oven To Speed Up Rising If I’m Short On Time?
Yes, the oven can help speed up rising. Use the warm oven method (preheat for 1-2 minutes, then turn off) to create a slightly warmer environment. Just be careful not to overheat, and never exceed 100°F (38°C).
Are There Any Risks To Rising Bread In The Oven?
The main risk is overheating the dough, which can kill the yeast or start baking the dough before you’re ready. Always check the temperature before placing dough inside, and remove the dough before preheating to bake.
For even more detail on bread science and rising methods, check out King Arthur Baking Company’s bread guide.
Learning how to rise bread in oven gives you control, consistency, and delicious results no matter the season. With these techniques, you’ll bake loaves that rise high, taste fantastic, and impress every time. Happy baking!