
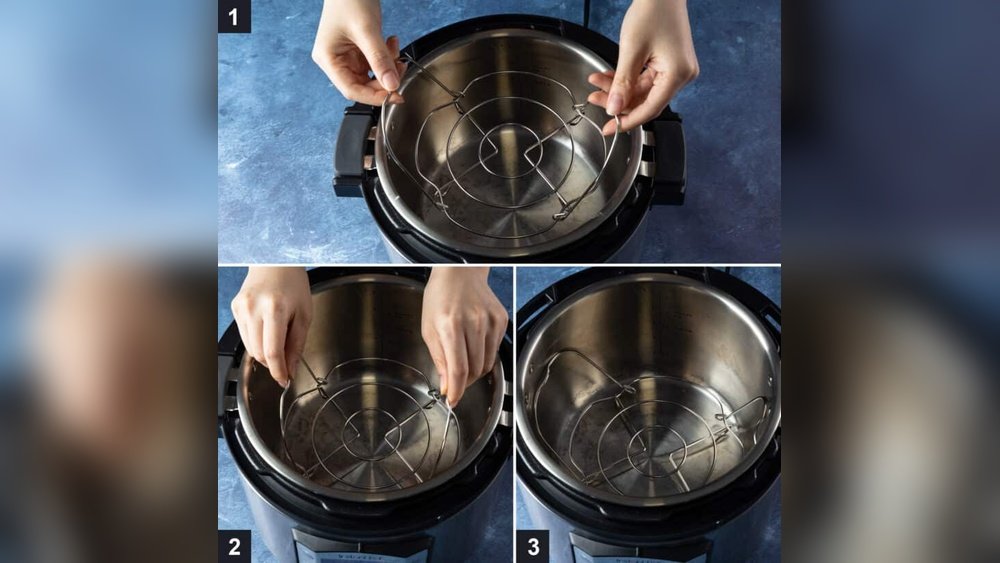
Cooking with an Instant Pot has changed the way many people make meals at home. But using all its features can sometimes be confusing—especially when it comes to the trivet. If you’ve opened your Instant Pot box and found a metal rack with little handles, that’s the trivet. It may look simple, but placing it correctly can make a big difference in your cooking. Whether you’re steaming vegetables, making hard-boiled eggs, or cooking meat above liquid, the trivet keeps your food out of direct contact with water and helps it cook evenly. This guide will show you everything you need to know about how to place the trivet in your Instant Pot, why it matters, and how to get the best results every time.
What Is A Trivet In An Instant Pot?
The trivet is a metal rack that comes with most Instant Pot models. It’s designed to sit inside the stainless steel inner pot. The main purpose of a trivet is to lift food above the liquid at the bottom. This allows for steaming, pressure cooking, and even baking inside the Instant Pot.
Most trivets have short legs, usually about 1 inch high, and handles that make it easy to lift food in and out. Some models have no handles, but the function is the same. You might also see silicone or foldable trivets sold as accessories, but the basic idea is always to keep food away from direct contact with water.
Why Use A Trivet?
Using a trivet is not just about convenience—it’s about improving your cooking results. Here’s why a trivet matters:
- Prevents Soggy Food: Lifting food above the liquid keeps it from getting waterlogged.
- Even Cooking: Steam moves around the food, so it cooks evenly.
- Easy Removal: Handles let you lift hot food out safely.
- Multi-Layer Cooking: You can cook more than one thing at once using stackable trivets.
- Protects the Pot: Delicate items like cheesecake or pudding need to stay off the hot bottom to avoid burning.
Many people who are new to Instant Pot cooking make the mistake of skipping the trivet. This often leads to uneven results or extra cleanup.
Types Of Instant Pot Trivets
Not all trivets are the same. Let’s look at the most common types you might use:
| Type | Material | Best For | Special Features |
|---|---|---|---|
| Basic Metal Trivet | Stainless Steel | General steaming, meats | Comes with most Instant Pots |
| Trivet with Handles | Stainless Steel | Steaming, large items | Easy food removal |
| Silicone Trivet | Food-grade Silicone | Eggs, fish, desserts | Non-stick, flexible |
| Stackable Trivets | Steel or Silicone | Multi-layer cooking | Cook two dishes at once |
| Custom/Accessory Trivet | Varies | Special recipes | Shapes for cake pans, etc. |
Choosing the right trivet depends on what you want to cook. For most recipes, the basic metal trivet is enough. But if you cook a lot of eggs or desserts, a silicone trivet can make cleanup easier.
How To Place The Trivet In Your Instant Pot
Placing the trivet is simple, but a few details matter. Here’s a step-by-step guide:
- Check the Inner Pot: Make sure the stainless steel pot is clean and dry.
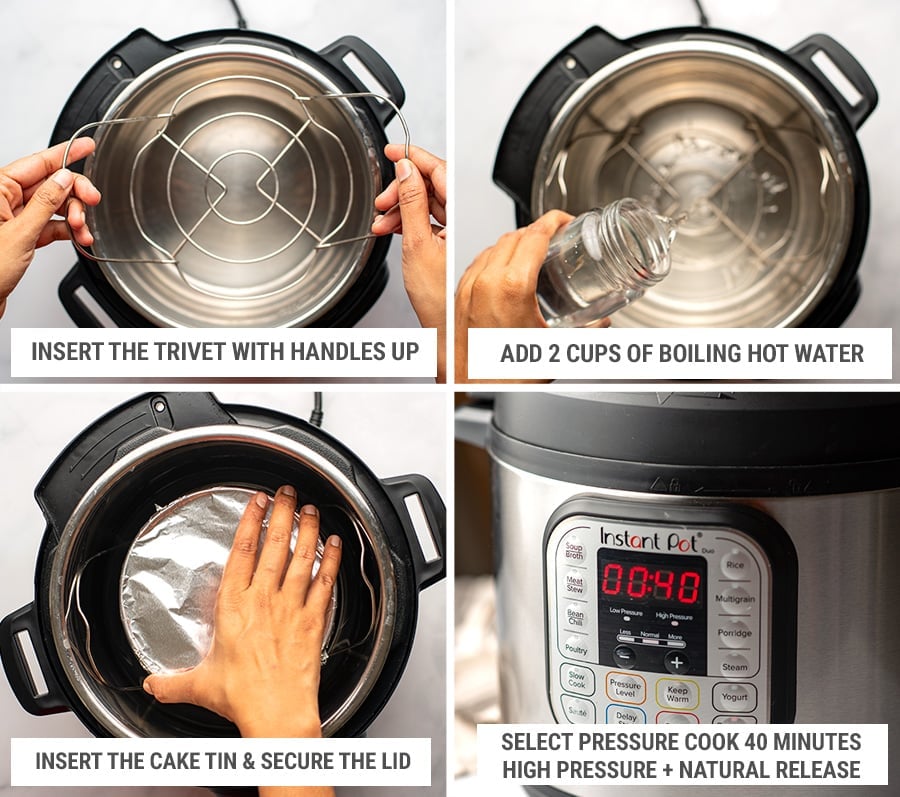
- Add Liquid: Pour in the amount of water or broth your recipe calls for. Most recipes need at least 1 cup of liquid for the Instant Pot to work correctly.
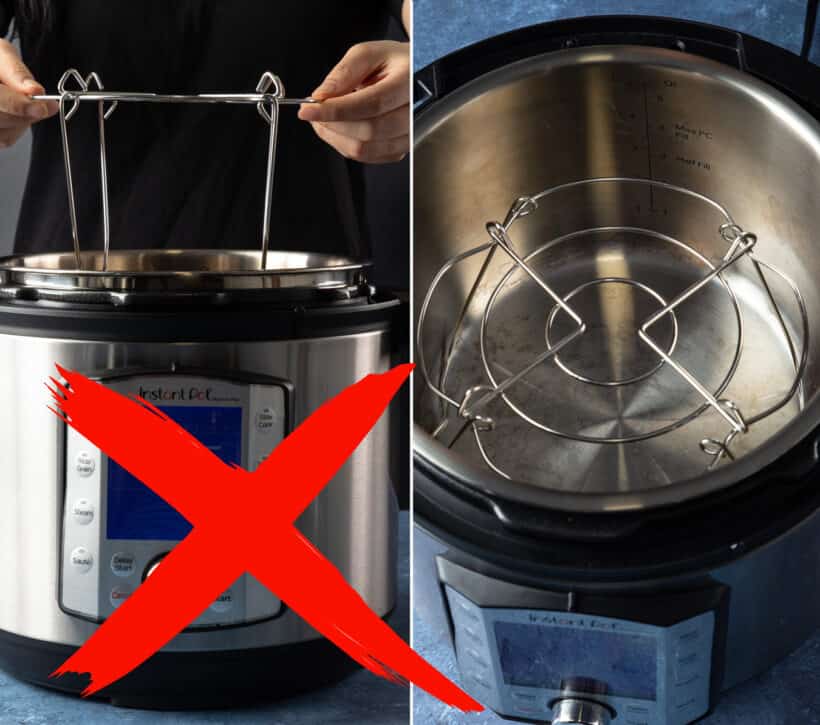
- Set the Trivet: Place the trivet inside the pot. The legs should rest flat on the bottom, and the handles (if any) should point up.
- Arrange Your Food: Put food directly on top of the trivet or, for items like cakes or lasagna, place the food in a heatproof dish before setting it on the trivet.
- Check for Stability: Make sure the trivet is stable and not wobbly. If you’re using a large or heavy dish, double-check that it fits without touching the sides.
- Close the Lid and Cook: Once everything is in place, close the Instant Pot lid, seal the valve, and start your cooking program.
Non-obvious tip: The handles of the trivet should always be accessible after cooking, so you can lift the food out safely. If they fall under the food, use tongs or silicone mitts.
When To Use The Trivet
The trivet is useful for many different recipes and cooking styles. Here are some situations where you should definitely use it:
- Steaming Vegetables: Broccoli, carrots, and green beans stay crisp and bright.
- Cooking Eggs: Hard-boiled eggs peel easily when cooked above water.
- Meat Roasts: Chicken, beef, or pork roast stays juicy and doesn’t sit in fat.
- Baking in a Pan: Cheesecakes, flans, and lasagna need indirect steam.
- Pot-in-Pot Cooking: When cooking rice or grains in a bowl above another dish.
Example: If you cook a whole chicken on the trivet, the fat drips below, and the steam surrounds the bird, making it both moist and flavorful.
Step-by-step Examples: Using The Trivet For Common Foods
Let’s go through real examples of how to place and use the trivet for different foods.
Steaming Vegetables
- Add 1 cup of water to the pot.
- Place the metal trivet with handles inside.
- Spread washed vegetables in a single layer on top.
- Close the lid, select “Steam,” and cook for the recommended time (usually 2-5 minutes).
- Use the handles to lift out the veggies.
Insight: For delicate vegetables, putting a piece of parchment paper on the trivet prevents them from falling through.
Making Hard-boiled Eggs
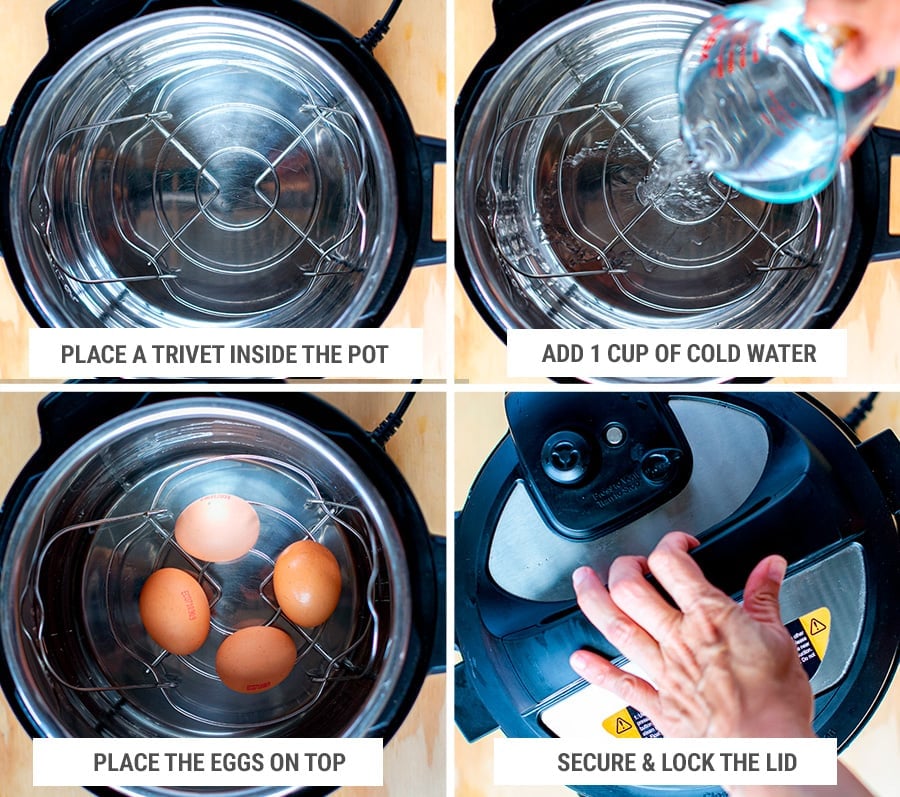
- Pour 1 cup of water into the inner pot.
- Set the trivet in place.
- Arrange eggs in a single layer (they can touch but not stack).
- Cook on “Manual” or “Pressure Cook” for 5 minutes, with a 5-minute natural release.
- Remove eggs with tongs or a spoon.
Pro tip: For large batches, use a silicone egg rack on top of the trivet for extra space.
Cooking A Whole Chicken
- Place 1 to 1.5 cups of water in the pot.
- Put the trivet inside.
- Set the seasoned chicken on the trivet, breast side up.
- Cook on “Poultry” or “Manual” based on the chicken’s weight.
- Lift out with the trivet handles.
Extra tip: If your chicken is very big, check that the lid closes without forcing it. If not, try a smaller bird.
Pot-in-pot Rice
- Add water and trivet as usual.
- Place a heatproof bowl with rice and water on the trivet.
- Cook according to the rice program.
- Carefully lift out the bowl using the trivet handles.
Common mistake: Forgetting to add water under the trivet will cause a “burn” error.
Credit: www.jumpusapark.com
How To Place A Pan Or Bowl On The Trivet
Sometimes, your recipe will say “use a pan on the trivet.” Here’s how to do it:
- Use only oven-safe dishes like metal, glass, or silicone.
- Make sure the dish fits inside the inner pot with space on the sides.
- If you use foil to cover the dish (for cheesecakes or puddings), leave a small gap for steam.
- For easy removal, use a trivet with handles or make a “sling” out of folded foil under the dish.
Sling Vs. Handles: What’s Better?
| Feature | Handles | Foil Sling |
|---|---|---|
| Reusable | Yes | No |
| Heat Safe | Yes | Yes |
| Easy to Make | Already attached | Yes |
| Cost | Free (comes with trivet) | Cheap (aluminum foil) |
| Strength | High | Medium |
Both methods work well, but a trivet with handles is safer for heavy dishes.
Trivet Placement Mistakes To Avoid
Even experienced cooks sometimes make these errors:
- No Liquid in Pot: Without water or broth, the Instant Pot cannot build pressure and you’ll get a burn warning.
- Trivet Upside Down: If your trivet has handles, placing it upside down makes it unstable.
- Overloading the Trivet: Piling on too much food can block steam and lead to uneven cooking.
- Wrong Trivet Height: Using a tall trivet for a large dish may prevent the lid from closing.
- Improper Dish Size: For pot-in-pot, the bowl or pan must fit easily inside the inner pot.
Non-obvious insight: Using a silicone trivet for greasy meats can sometimes cause more steam buildup, which may affect browning. Stick to metal for these recipes.
Credit: www.pressurecookrecipes.com
Cleaning And Caring For Your Trivet
Your trivet will get dirty, especially after cooking meat or using sauces. Here’s how to keep it clean and in good shape:
- Wash after each use: Use warm, soapy water and a brush for stuck-on food.
- Dishwasher safe: Most metal and silicone trivets can go in the dishwasher.
- Avoid harsh chemicals: Stick to mild dish soap.
- Dry thoroughly: Prevent rust by drying completely before storing.
- Check for wear: If legs are bent or loose, replace the trivet.
Pro tip: For burnt-on mess, soak the trivet in hot water with a bit of baking soda before scrubbing.
Storing Your Trivet
Finding space for Instant Pot accessories can be a challenge. Here are smart storage ideas:
- Store inside the Instant Pot: Put the trivet in the inner pot when not in use.
- Hang on a hook: Use the handles or a hole in the leg to hang it in your kitchen.
- Use a drawer divider: Keep trivets upright with other small kitchen tools.
How The Trivet Affects Cooking Results
The trivet does more than just hold food above water. It changes how heat and steam move in the Instant Pot. Here’s why placement matters:
- Moisture control: Food on the trivet absorbs steam, not direct water, which keeps texture and flavor.
- Even heating: Steam surrounds all sides of the food for even cooking.
- Fat separation: Meats cooked on the trivet let fat drip below, making dishes healthier.
Example: A cheesecake cooked on a trivet will have a smooth, creamy texture. If placed directly in water, it can become soggy or split.
Choosing The Right Trivet For Your Recipe
Not every trivet works for every recipe. Here’s a quick guide:
- For eggs: Use a silicone egg rack or a basic metal trivet.
- For cakes and desserts: Use a trivet with handles for easy removal.
- For large meats: Use the strongest metal trivet with handles.
- For multi-layer cooking: Try stackable trivets to cook two foods at once.
If your recipe uses a springform pan (like for cheesecake), double-check that both the pan and trivet fit together inside your Instant Pot.
Using Multiple Trivets Or Racks
Some advanced recipes call for more than one rack or trivet. This allows you to cook two dishes at once—like rice and chicken. Here’s how:
- Place the first trivet in the pot with liquid.
- Set the first dish (for example, chicken) on the trivet.
- Add a second, shorter trivet on top of the first dish.
- Set the second dish (like rice in a bowl) on the upper trivet.
- Cook as usual.
Warning: Make sure there’s enough room for steam to circulate. Don’t block the vent or overfill.
Trivet Alternatives: What If You Don’t Have One?
If you’ve lost your trivet or need a second one, here are safe alternatives:
- Make a foil ring: Roll up aluminum foil into a thick ring and use it as a stand.
- Use a small metal cooling rack: Make sure it fits inside the pot.
- Try silicone bakeware: Only if it’s labeled as pressure-cooker safe.
- Buy a replacement: Official Instant Pot trivets are sold online and in stores.
Caution: Don’t use plastic or glass that isn’t oven-safe—these can melt or break under pressure.
Pressure Cooking Vs. Steaming: Trivet Placement Differences
The trivet is used in both pressure cooking and steaming, but the cooking method changes how you use it.
Pressure Cooking
- Always add enough liquid (usually 1 to 1.5 cups).
- Food sits above the liquid for indirect cooking.
- Use for meats, desserts, eggs, and pot-in-pot grains.
Steaming
- Use less liquid (1 cup is enough).
- The trivet keeps vegetables or dumplings out of the water.
- Steam is gentle and quick; perfect for delicate foods.
Tip: For steaming, don’t overfill the pot. Too much food above the trivet can block steam.
Common Recipes That Require A Trivet
Certain dishes always work better with a trivet. Here are popular examples:
- Hard-boiled eggs
- Steamed vegetables (broccoli, green beans, carrots)
- Whole chicken or turkey breast
- Cheesecake
- Meatloaf
- Steamed fish
- Tamales
- Pot-in-pot rice or quinoa
- Cakes and puddings
- Potatoes (baked or steamed)
Using the trivet keeps these dishes from sitting in water, giving you the best texture.
Trivet Safety Tips
Safety is important when using the Instant Pot and trivet together:
- Always use oven mitts or tongs when lifting out a hot trivet.
- Let the pressure release before opening the lid.
- Don’t fill the pot past the “Max” line, especially with large items on the trivet.
- Make sure the trivet is stable before adding heavy dishes.
- Never use a trivet with missing or broken legs.
Non-obvious insight: If you use a silicone trivet, check for tiny cracks or tears that can weaken it over time.
Troubleshooting: If The Trivet Moves Or Tips
Sometimes, the trivet doesn’t stay in place. Here’s what you can do:
- If the trivet shifts, check for uneven inner pot surfaces.
- For loose trivets, press down gently to seat all legs flat.
- If the dish wobbles, reposition it before starting to cook.
- For heavy pans, double up trivets or use a more robust rack.
Comparing Trivet Placement For Different Instant Pot Sizes
Instant Pots come in sizes from 3 to 8 quarts. The size affects trivet placement and what you can cook.
| Pot Size | Trivet Diameter | Best Uses | Special Considerations |
|---|---|---|---|
| 3 Quart | 6-7 inches | Eggs, small veggies | Only small pans/dishes fit |
| 6 Quart | 7-8 inches | Most recipes | Standard size for most trivets |
| 8 Quart | 8-9 inches | Large meats, multi-layer cooking | Check dish size before use |
Always match your trivet to your Instant Pot size for the best results.
Upgrading Your Trivet: Accessories To Consider
As you use your Instant Pot more, you might want to try new accessories:
- Egg racks: Hold eggs upright for perfect hard-boiling.
- Stackable steamers: Cook two foods at once.
- Silicone baking slings: Make lifting cakes and casseroles easy.
- Non-stick trivets: Easier cleanup for sticky recipes.
Before buying, check that accessories are marked as “Instant Pot compatible. ”
Real-life Examples: How Trivet Placement Changed My Cooking
When I first got my Instant Pot, I tried making cheesecake without a trivet. The result was a soggy bottom and uneven texture. Once I started using the trivet, my cheesecakes became firm and creamy—just like in a bakery.
Another time, I cooked potatoes directly in water. They fell apart. With the trivet, they stayed whole and fluffy. Little changes in placement can make a big difference in your results.
Extra Tips For Beginners
- Always read your Instant Pot manual about using accessories.
- Practice with water and the trivet before your first recipe.
- Use a timer to avoid overcooking when steaming.
- Try recipes designed for the trivet to build confidence.
Beginner mistake: Forgetting to put the trivet in for pot-in-pot cooking usually ruins the recipe. Always double-check before closing the lid.
Where To Find More Information
If you want more details on Instant Pot cooking, visit the official site at Instant Pot Accessories. They have guides, recipes, and accessory recommendations.
Frequently Asked Questions
Can I Cook Without The Trivet In The Instant Pot?
Yes, you can cook directly in the inner pot for soups, stews, and curries. But for steaming, baking, or pot-in-pot recipes, the trivet is necessary to keep food out of the liquid.
What Can I Use If I Lost My Instant Pot Trivet?
You can use a metal cooling rack that fits your pot, roll up a thick aluminum foil ring, or buy a replacement trivet. Just make sure any substitute is oven-safe and fits inside the pot with room for steam to flow.
How Much Water Should I Add Under The Trivet?
Most recipes need at least 1 cup of water under the trivet. Some larger pots or recipes with longer cooking times may need 1.5 to 2 cups. Always follow your recipe’s instructions.
Is It Safe To Use Silicone Trivets In The Instant Pot?
Yes, as long as the silicone trivet is labeled food-safe and heat-resistant (up to 450°F or higher). Don’t use any silicone accessory that looks thin or damaged.
Can I Stack More Than One Dish On A Trivet?
You can stack, but only if steam can move around each dish. Use stackable trivets or racks designed for multi-level cooking, and always check that the lid closes easily.
Cooking with an Instant Pot is easier when you understand how to use the trivet. With these tips, your dishes will come out better, cleaner, and more delicious every time.
Credit: www.jumpusapark.com