Making your own oven mitt might seem like a small project, but it is both useful and rewarding. Many people buy oven mitts without thinking twice, but creating one by hand gives you a chance to customize the color, fit, and style.
Plus, a homemade oven mitt can be safer than some store-bought versions, especially if you use the right materials and follow the best methods. Whether you want to try sewing for the first time, make a gift, or replace an old, worn-out mitt, this guide will walk you through each detail.
Why Make Your Own Oven Mitt?
A store-bought oven mitt is easy to find, but it often comes with problems. Some are too thin, letting heat pass through and risking burns. Others are too bulky, making it hard to grip hot pans. By making your own, you can solve these problems. You can choose thicker materials, a fit that matches your hand size, and even add a hanging loop for storage. Making your own oven mitt also lets you use leftover fabric, reducing waste and saving money.
There is another advantage: personal expression. Your oven mitt can feature your favorite colors or patterns, and you can even create matching sets for your kitchen. This project is also great for beginners because it teaches key sewing skills like layering, quilting, and making curves.
Understanding The Basics Of Oven Mitts
Before you start, it helps to know what makes a good oven mitt. The main job of an oven mitt is to protect your hand from heat when handling hot pots, pans, or baking trays. This means your mitt needs to be thick enough to block heat, flexible enough to grip objects, and sturdy enough to last through washing and repeated use.
A standard oven mitt has three main layers:
- Outer fabric – This is the part you see. It should be strong, washable, and comfortable. Cotton is the most popular choice.
- Insulation – This layer keeps heat away from your hand. It is usually made of special batting, like Insul-Bright, or several layers of cotton batting.
- Lining – This is the soft fabric inside the mitt, which touches your hand.
The mitt is sewn in the shape of a large mitten, with a thumb area for easier gripping. Most mitts also have a hanging loop for storage.

Credit: www.youtube.com
Materials And Tools You Need
Choosing the right materials and tools is key for safety and comfort. Here’s a detailed list of what you’ll need:
Essential Materials
- Outer fabric: 100% cotton (avoid synthetic fabrics, which can melt)
- Insulation: Insul-Bright or cotton batting (at least 2 layers if not using Insul-Bright)
- Lining: Soft cotton (flannel or quilting cotton)
- Thread: Cotton or polyester, strong enough for thick layers
- Bias tape: For binding the edge and the hanging loop (optional but professional looking)
Tools Required
- Sewing machine: Makes sewing through thick layers easier
- Fabric scissors: For clean cuts
- Pins or clips: To hold layers together
- Iron and ironing board: For pressing seams
- Chalk or fabric marker: To trace your pattern
- Needle: For hand-sewing small parts
- Paper and pencil: To create your pattern
- Measuring tape or ruler
Optional Additions
- Quilting gloves: For handling thick layers
- Heat-resistant thread: For extra safety (expensive, but not required)
- Decorative fabric: For a unique look
Many beginners miss the importance of using only natural fiber materials. Synthetic fabrics like polyester can melt when exposed to high heat and are not safe for oven mitts. Another overlooked detail is the number of insulation layers. Using only one thin layer might not protect your hand enough—always use at least two layers if you’re not using a specialty product like Insul-Bright.
Designing Your Oven Mitt Pattern
You can buy a pattern or make your own. Creating a custom pattern ensures a perfect fit for your hand.
Making A Simple Oven Mitt Pattern
- Place your hand flat on a large piece of paper, with your thumb extended as if you were wearing a mitt.
- Draw an outline around your hand, leaving about 1.5 inches extra all around for seam allowance and thickness.
- Smooth out any sharp corners in your outline, especially around the thumb and fingers.
- Cut out your paper pattern.
- Fold the pattern in half vertically to check if both sides are even. Trim if needed.
You now have a basic oven mitt pattern. If you want a longer mitt (to protect your wrist and forearm), just add a few more inches to the base before cutting.
How To Adjust Size
- For smaller hands: Trim a bit from the edges of your pattern.
- For larger hands: Add extra space around your outline.
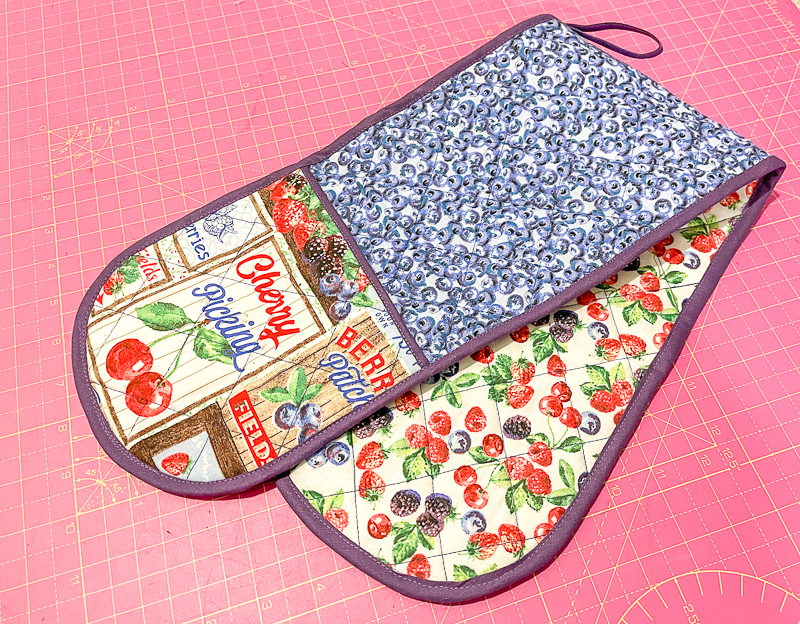
- For a double oven mitt (one piece that covers both hands and the area between), connect two mitt shapes with a long rectangle in the middle.
A good tip is to try your pattern with scrap fabric before cutting your final material. This helps you spot any sizing mistakes early.
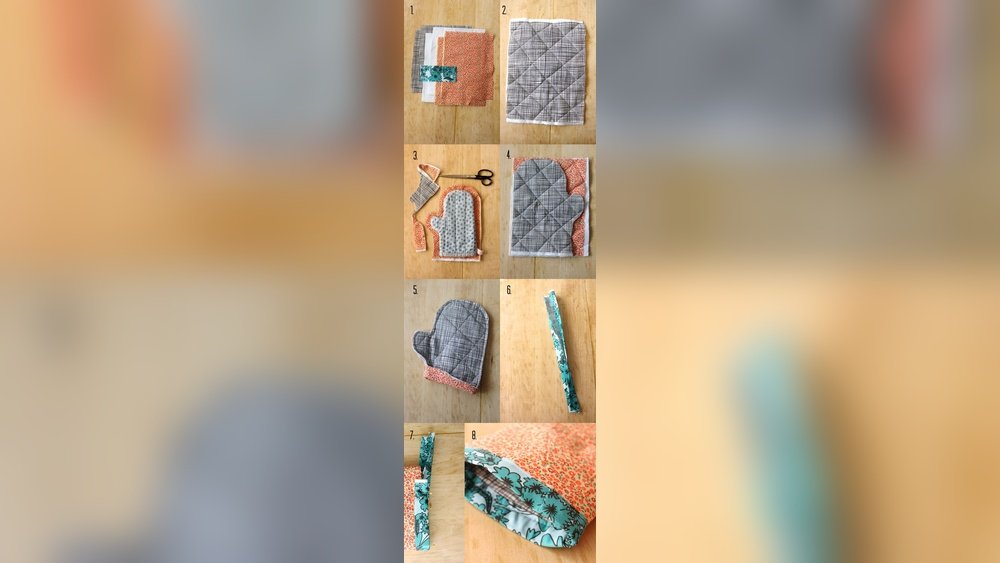
Cutting And Preparing Your Materials
Now it’s time to cut out all the fabric layers. This step needs patience and accuracy.
- Pin your paper pattern to your outer fabric and cut out two pieces (one for the top, one for the bottom).
- Repeat with your insulation layer—cut two pieces.
- Repeat with your lining fabric—cut two pieces.
You should have six pieces in total (two each of outer, insulation, and lining). If you want to add extra layers of insulation, cut more pieces of batting.
If your fabric has a pattern or direction (like stripes or flowers), pay attention to how the design will look when the mitt is finished. Make sure both sides match, or that the design is upright.
Layering And Quilting
Quilting the layers together is important for safety and looks. Quilting means sewing through all the layers to keep them from shifting.
Layer Order
From outside to inside, the layers should be:
- Outer fabric (right side facing out)
- Insulation (one or more layers)
- Lining fabric (right side facing in)
Quilting Steps
- Stack the layers in the correct order for each half of the mitt.
- Pin or clip the layers together well, especially at the edges.
- Use a fabric marker to draw simple quilting lines. Common designs are straight lines, diagonal lines, or a grid. Lines should be about 2 inches apart.
- Sew along the lines with your sewing machine, making sure to catch all layers.
Tip: Go slowly when sewing through thick layers, and use a longer stitch length (3–4 mm). Change to a heavy-duty needle if your machine struggles.
Many beginners skip quilting, but this can cause the insulation to bunch up or slip later. Quilting also helps the mitt hold its shape after washing.
Assembling The Oven Mitt
With both halves quilted, it’s time to put them together.
Sewing The Mitt Shape
- Place the two quilted halves together, right sides facing each other.
- Pin or clip carefully around the edges, making sure the thumb areas line up.
- Sew around the edge, leaving the base (wrist opening) unsewn.
- Use a ½-inch seam allowance to ensure strength.
- Trim the seam allowances to about ¼ inch, and clip notches around the curves (especially the thumb area). This helps the mitt turn right-side out smoothly.
Turning And Pressing
- Turn the mitt right-side out through the open base.
- Use a blunt tool (like a chopstick) to push out the thumb and finger areas.
- Press the mitt flat with an iron, being careful not to burn the fabric.
If the mitt feels too stiff, try pressing the seams open before turning.
Adding The Lining
Some people skip a lining, but it makes the mitt more comfortable and looks neater inside.
- Sew the two lining pieces together, right sides facing, leaving the base open.
- Turn the lining wrong-side out.
- Insert the lining into the mitt, matching the thumb and finger areas.
- Smooth the lining down inside with your hand or a tool.
If the lining is a bit loose, sew a few small hand stitches at the tips of the fingers and thumb to hold it in place.
Credit: sewhayleyjane.com
Binding The Edge And Adding A Hanging Loop
The last main step is finishing the base of the mitt and adding a loop for hanging.
Making And Attaching Bias Tape
Bias tape is a strip of fabric, cut on the bias (diagonal), that wraps around the raw edge to create a neat finish.
- Measure around the base of your mitt.
- Cut a piece of bias tape about 2 inches longer than this measurement.
- For the hanging loop, cut an extra 5-inch piece.
To attach:
- Open the bias tape and pin one edge to the inside of the mitt base.
- Sew in place, following the fold.
- Fold the tape over the raw edge to the outside and sew again, hiding the seam.
Adding The Hanging Loop
- Fold the short piece of bias tape in half to make a loop.
- Tuck the ends of the loop inside the seam at the side of the mitt base before sewing the bias tape.
- Sew over the loop ends to attach.
A loop makes storage easy and helps the mitt dry quickly after washing.
Personalizing Your Oven Mitt
One of the best things about making your own oven mitt is customization.
- Fabric choice: Pick bold colors, fun prints, or even recycled denim for a rugged look.
- Embroidery: Add initials, names, or simple designs to the outer layer before assembling.
- Matching sets: Make a pair of mitts, or add matching potholders and kitchen towels.
- Shape variations: Try different finger/thumb shapes or make extra-long mitts for grilling.
A common beginner mistake is using very thick outer fabric, which can make sewing and turning the mitt difficult. Stick with medium-weight cotton for best results.
Comparing Different Insulation Materials
Choosing the right insulation affects both safety and comfort. Here is a comparison of popular insulation materials:
| Insulation Type | Heat Resistance | Thickness Needed | Cost | Common Uses |
|---|---|---|---|---|
| Insul-Bright | Very High | 1 layer | Medium | Oven mitts, potholders |
| Cotton batting | High | 2–3 layers | Low | Quilts, mitts |
| Wool batting | High | 1–2 layers | High | High-end mitts, blankets |
| Polyester batting | Low | Not recommended | Low | Crafts (not for heat) |
Notice that polyester is not safe for oven mitts. Insul-Bright is a special material made with reflective fibers, designed to block heat effectively.
Safety Tips And Common Mistakes
Safety is the most important part of making and using an oven mitt. Even a small mistake can lead to burns.
Tips For Maximum Safety
- Always use natural fiber fabrics for both the outside and lining.
- Choose quality insulation and use enough layers.
- Quilt the insulation to prevent slipping.
- Double-check your seams for any gaps or weak areas.
- Wash your mitt regularly, as food stains can reduce heat resistance.
Common Mistakes To Avoid
- Using synthetic fabrics that can melt.
- Skipping the insulation or using too few layers.
- Not quilting the layers together.
- Making the mitt too small—this makes it hard to remove quickly in case of heat.
- Using weak thread or loose stitches.
How To Care For Your Homemade Oven Mitt
A homemade oven mitt, with the right care, can last for years. Here’s how to keep it safe and clean:
- Wash your mitt every few weeks, or immediately if it touches raw meat, oil, or sticky foods.
- Use mild detergent and wash in cold or warm water.
- Air dry if possible, or tumble dry on low. High heat can shrink cotton or damage insulation.
- Check for worn areas or holes after each wash.
- If the mitt becomes thin or damaged, make a new one—do not risk burns.
Advanced Techniques For A Professional Finish
If you want your mitt to look and perform like a store-bought one, try these advanced touches:
- Double stitching: Sew all seams twice for extra strength.
- French seams: Hide raw edges inside the seam for a clean look.
- Decorative topstitching: Add a line of stitching ¼ inch from the edge for style and durability.
- Waterproof layer: Add a thin layer of food-safe waterproof material (like PUL) between the outer and insulation layers. This is optional but helps with wet spills.
When To Replace Your Oven Mitt
No mitt lasts forever. Here are signs it’s time to make a new one:
- The fabric is thin or has holes.
- Insulation feels bunched up or uneven.
- Mitt smells burnt or won’t wash clean.
- You feel heat quickly when using it.
For safety, check your mitt every few months, especially if you cook often.
Comparing Homemade Vs. Store-bought Oven Mitts
Let’s see how a homemade mitt stands against a typical store-bought one.
| Feature | Homemade Mitt | Store-Bought Mitt |
|---|---|---|
| Fit | Custom to your hand | Standard sizes |
| Material Quality | You choose | Varies; often synthetic |
| Heat Protection | As thick as you want | Sometimes too thin |
| Style Options | Unlimited | Limited to what’s in stock |
| Cost | Usually lower (if using scraps) | Varies ($5–$20+) |
| Durability | High (if made well) | Varies |
A homemade mitt is usually safer, fits better, and costs less—especially if you already have some fabric and batting at home.
:max_bytes(150000):strip_icc()/hero-5ba3f551c9e77c005042246c.jpg)
Credit: www.thesprucecrafts.com
Useful Resources For Patterns And Inspiration
If you want more ideas or printable templates, many sewing websites and craft blogs offer free patterns. For more about different insulation materials, see the official Wikipedia page on batting (textiles).
Frequently Asked Questions
What Is The Best Fabric For An Oven Mitt?
100% cotton is best for both the outer fabric and lining because it won’t melt under heat. Avoid synthetic materials like polyester or nylon, which can burn or melt. Cotton is easy to sew, washable, and comes in many patterns.
How Many Layers Of Insulation Do I Need?
If you use Insul-Bright, one layer is usually enough. If you use regular cotton batting, use at least two layers for good heat protection. For heavy-duty mitts, three layers may be better.
Can I Wash My Homemade Oven Mitt In The Machine?
Yes, most oven mitts can be machine washed. Use cold or warm water and mild detergent. Air drying is safer than high heat in the dryer. Always check your mitt for damage after washing.
How Long Does It Take To Make An Oven Mitt?
For beginners, making an oven mitt takes about 2–4 hours. With practice, you can finish one in less than 2 hours. The most time-consuming parts are quilting and sewing curves.
Can I Make An Oven Mitt Without A Sewing Machine?
It is possible to sew an oven mitt by hand, but sewing thick layers is much harder and takes longer. Use a strong needle and thick thread. Hand sewing is good for small repairs or details, but a machine is recommended for the main seams.
Making your own oven mitt is not only practical but also fun. You gain a safer, better-fitting kitchen tool and learn new skills in the process. With careful material choices and attention to detail, your homemade mitt can last for years and reflect your personal style.