Removing the pitcher or cup from your Ninja Blender base seems simple. Yet, for many users, it can become a confusing or even stressful task. Sometimes the pitcher feels stuck, the blender won’t release, or you’re not sure which direction to twist. If you force things, you might damage the blender or hurt yourself. This guide will help you understand the right way to remove a Ninja Blender from its base—safely, easily, and without causing any damage.
Why focus on this? Ninja blenders are popular in many kitchens for smoothies, soups, and sauces. But their locking mechanisms are unique, and different models require slightly different approaches. A stuck pitcher can waste time and possibly lead to injury.
In this article, you’ll learn not only the standard process but also troubleshooting steps, model variations, and smart tips that most instruction manuals skip. Whether you’re a new owner or you’ve had your Ninja for years, you’ll leave with the confidence to handle the task quickly—every time.
Understanding Your Ninja Blender Components
Before you try removing the blender from the base, it helps to know what each part does. The Ninja Blender is made with safety and efficiency in mind. But these same safety features can sometimes make removal tricky if you’re not familiar with them.
The Main Parts
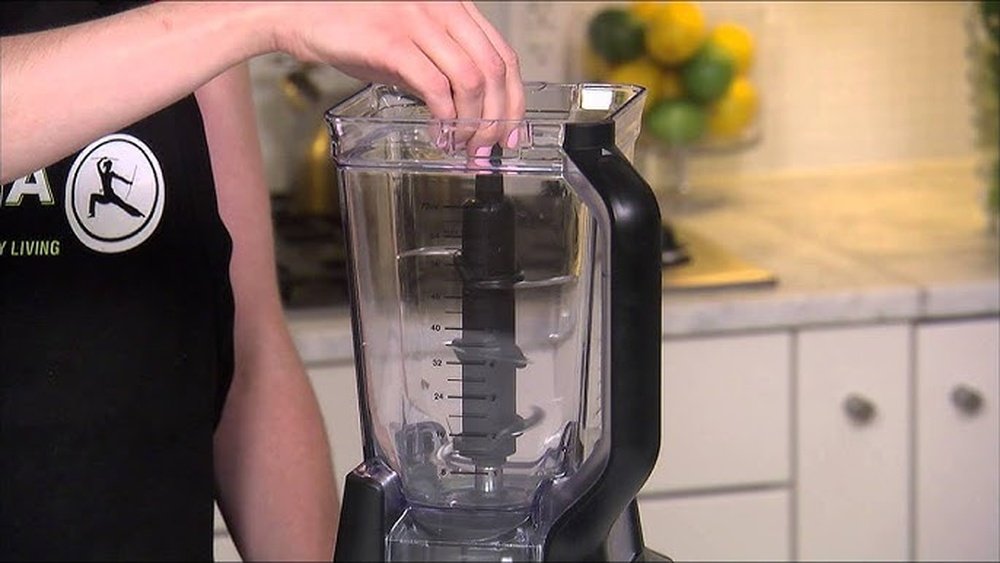
- Base Unit: This is the heavy part that contains the motor. It stays on the counter during use.
- Pitcher or Cup: The blending container that holds your ingredients.
- Blade Assembly: Removable and fits inside the pitcher/cup.
- Lid with Locking Mechanism: Keeps everything sealed during blending.
- Release and Lock Tabs: Small levers or buttons, sometimes on the handle or lid, that must be in the right position for removal.
Common Locking Mechanisms
Ninja blenders use a twist-and-lock system. This means you usually have to twist the pitcher or cup in a specific direction to lock or unlock it from the base. There are also interlock safety features—the blender won’t run unless everything is properly aligned. This prevents spills or injuries but can make the removal process less obvious.
Why It Matters
If you twist the wrong way, force the parts, or miss a lock, you could:
- Break the locking tabs or pitcher base
- Damage the motor
- Pinch your fingers or cut yourself on the blades
Understanding your Ninja Blender’s design is the first step to removing it safely.
Preparing To Remove The Ninja Blender From The Base
Preparation can make the process smoother and safer. Don’t rush—take a few seconds to set things up first.
Unplug The Blender
Always unplug your Ninja Blender before removing the pitcher or cup. This prevents accidental activation, which can cause injuries, especially if your hand slips near the blades.
Wait For The Blades To Stop Completely
Never try to remove the blender while the blades are still spinning. Even after you turn it off, wait a few seconds until all moving parts have stopped. The blades are extremely sharp.
Empty The Pitcher Or Cup (if Possible)
If you can, pour out the blended contents before removing the pitcher. This reduces weight and prevents spills, especially if things get stuck or require extra force.
Wipe Away Spills
Wipe any food or liquid from the base and around the pitcher. Sticky spills can make twisting harder and may hide locking tabs or release levers.

Credit: oxfordtutors.com
Step-by-step Guide: How To Remove Ninja Blender From Base
Now, let’s walk through the exact process. Most Ninja Blender models follow a similar method, but always check your specific manual if you’re not sure.
1. Check The Lid Position
Make sure the lid is locked in place or, for some models, fully removed. Many Ninja models require the lid to be fully closed before you can unlock the pitcher from the base. For others, you must open or remove the lid first.
2. Locate The Lock/unlock Arrows
Look for the arrows on the pitcher and the base. These arrows show you which way to twist. Usually, you twist counterclockwise to unlock and clockwise to lock—but a few models are reversed.
3. Hold The Base Steady
Grip the base with one hand to keep it from moving. Ninja blenders are heavy, but twisting too hard can tip them over or cause spills.
4. Twist The Pitcher Or Cup
With your other hand, hold the handle of the pitcher or the sides of the cup. Apply gentle, steady pressure and twist in the direction marked unlock. Don’t force it—if it doesn’t move, check that all locking tabs are released and the lid is in the correct position.
5. Lift The Pitcher Or Cup Straight Up
Once you feel the pitcher twist free, lift it straight up. Don’t wiggle or tilt, as this can catch on the locking tabs. If you feel resistance, lower the pitcher, twist a bit more, and try again.
6. Remove The Blade Assembly
For models with a removable blade, carefully take out the blade assembly before cleaning. Always hold the blade by its plastic base, not the sharp metal.
Example Removal Sequence
- Unplug blender.
- Ensure lid is closed and locked.
- Locate lock/unlock arrows.
- Hold base with left hand.
- Twist pitcher counterclockwise with right hand.
- Lift pitcher straight up.
- Remove blade assembly with caution.
Tip: If you’re right-handed, use your right hand for the twisting and lifting for better control.
Troubleshooting: When The Blender Is Stuck
Sometimes, the Ninja Blender pitcher or cup seems stuck and won’t budge. This is a common problem, especially with new users or after blending thick mixtures.
Why Does It Get Stuck?
- Food debris in the locking mechanism
- Over-tightened during assembly
- Vacuum seal created after blending hot ingredients
- Misaligned tabs from improper placement
How To Fix A Stuck Blender Pitcher
- Check for Blockages: Look under the pitcher to see if food or debris is blocking the tabs.
- Gently Wiggle: Don’t force it. Try a gentle back-and-forth motion while twisting.
- Release Pressure: If you blended something hot, a vacuum can form. Let the blender cool for 10-15 minutes, then try again.
- Use a Rubber Grip: Place a rubber jar opener or towel over the handle for better grip and leverage.
- Ask for Help: If your hands are weak, ask someone with a stronger grip to assist.
If it’s still stuck, check the manual for your model—some require pressing a release button before twisting.
When To Call Customer Service
If you’ve tried everything and the pitcher or cup still won’t move, don’t force it. Forcing can break the blender and void your warranty. Contact Ninja customer support for advice.
Differences Between Ninja Blender Models
Not all Ninja blenders are the same. Some use a classic pitcher, others use single-serve cups. The locking and removal method can vary.
Here’s a quick comparison of common models:
| Model | Pitcher/Cup Removal | Unique Features |
|---|---|---|
| Ninja Professional | Twist counterclockwise, lift | Large pitcher, stacked blade |
| Ninja Auto-iQ | Twist counterclockwise, lift | Preset programs, single-serve cups |
| Ninja Foodi Power Nutri Duo | Twist clockwise, lift | Powerful motor, small cup, smoothie bowl maker |
| Ninja Mega Kitchen System | Twist counterclockwise, lift | Multiple pitchers/cups, food processor attachment |
Insider Tip: Always check the manual for your exact model. Some have a small arrow or “unlock” mark that’s easy to miss.
Cleaning After Removal
Once you’ve removed the pitcher or cup, it’s important to clean it properly. This extends the life of your blender and prevents future sticking.
Basic Cleaning Steps
- Remove the Blade Assembly: Always do this first—blades can trap food and are hard to clean when left inside.
- Rinse Immediately: Rinse all parts under warm water as soon as possible after use.
- Use Mild Soap: Wash with a soft sponge and a little dish soap. Avoid harsh scouring pads, which can scratch plastic.
- Clean the Lid and Tabs: Food often gets trapped in the locking mechanism. Use a brush or toothpick for small crevices.
- Dry Thoroughly: Let all parts air dry completely before reassembling.
Deep Cleaning (once A Week)
For deeper cleaning, soak the pitcher and lid in warm, soapy water for 15–30 minutes. If there’s a strong odor or stain, add a little baking soda to the water.
Cleaning The Base
Never put the base in water. Instead, use a damp cloth to wipe it down. Avoid getting the electrical components wet.
| Part | Can Be Submerged? | Cleaning Method |
|---|---|---|
| Pitcher/Cup | Yes | Hand wash or dishwasher |
| Blade Assembly | Yes | Hand wash carefully |
| Lid | Yes | Hand wash or dishwasher |
| Base Unit | No | Wipe with damp cloth |
Non-obvious Insight: Clean the locking tabs and grooves regularly. Dried-on food in these areas is a top reason pitchers get stuck.
Safety Precautions When Removing Ninja Blender From Base
Handling a blender always involves some risk, especially with sharp blades and heavy pitchers. Here’s how to stay safe:
Use Two Hands
Always use two hands—one for the base, one for the pitcher. This prevents tipping or sudden slips.
Never Touch The Blades
The blades are extremely sharp. Only touch the blade assembly by the plastic base. Never reach inside the pitcher with your fingers.
Wait Until The Blender Stops
Never remove the pitcher until all motion has stopped. Even a slowly spinning blade can cut skin deeply.
Avoid Excess Force
If the pitcher or cup feels stuck, don’t force it. Extra force can break the locking tabs or crack the base.
Keep Children Away
Blenders are not toys. Keep children away during removal and cleaning.
Preventing Sticking And Difficult Removal
Prevention is better than fixing a stuck blender. Here are some expert tips:
- Clean Immediately After Use: Food hardens quickly and can glue the pitcher to the base.
- Avoid Overfilling: Stay below the max fill line. Overfilling can push food into the locking mechanism.
- Use the Right Assembly Technique: Don’t overtighten when locking the pitcher in place. A gentle twist is enough.
- Lubricate the Tabs (Rarely Needed): If tabs become sticky, use a small amount of food-safe lubricant on the locking grooves—once a year is plenty.
- Check for Broken Tabs: If locking tabs are bent or broken, replace the pitcher. Damaged tabs can make removal impossible.
Non-obvious Insight: The most common removal problem is blending hot liquids. The steam creates a vacuum, locking the pitcher in place. Always allow hot mixtures to cool before blending.
Common Mistakes When Removing Ninja Blender From Base
Avoid these errors for easier and safer removal:
Twisting The Wrong Way
Not all Ninja blenders unlock in the same direction. Forcing it the wrong way can break the pitcher.
Forgetting The Lid
Some models require the lid to be closed for removal; others require it to be open or off. Check your manual.
Not Unplugging First
It’s easy to forget, but unplugging the blender is essential for safety.
Using Excessive Force
If it won’t move with gentle pressure, something is wrong. Forcing can cause expensive damage.
Ignoring Food Debris
Even a small piece of food in the locking groove can jam the pitcher. Check for debris before and after each use.
When To Replace Blender Parts
Sometimes the pitcher or base becomes worn out. Here’s how to know when it’s time to replace parts:
- Cracked Pitcher or Cup: Replace immediately, as cracks can grow and leak.
- Damaged Locking Tabs: If tabs are bent, broken, or missing, the pitcher may not lock or unlock properly.
- Blunt or Rusty Blades: Replacement blades are available. Dull blades reduce performance.
- Malfunctioning Base: If the base makes strange noises or doesn’t power on, contact customer support.
Replacement parts are available from Ninja’s official website and many kitchen retailers. Use genuine parts for best results.

Credit: www.reddit.com
Comparing Ninja Blender Removal To Other Brands
How does the Ninja removal process compare to other blenders? Here’s a quick look:
| Brand | Removal Method | Common Issues |
|---|---|---|
| Ninja | Twist and lift | Stuck if over-tightened, vacuum seal from hot blends |
| Vitamix | Lift straight up (no twist) | Rare sticking, easier removal |
| NutriBullet | Twist cup, no large pitcher | Cross-threading cups, stuck if overtightened |
| Oster | Lift pitcher, sometimes press tab | Tab can jam, less common sticking |
Ninja’s twist-and-lift design adds security but needs more attention to locking/unlocking steps. Other brands may be simpler, but Ninja’s system prevents accidental spills.
Expert Tips For Easy Removal Every Time
Here are some final tips, learned from years of using and troubleshooting blenders:
- Read your manual once: Even if you hate manuals, a quick scan can reveal your model’s unique steps.
- Practice on an empty pitcher: When you first get your blender, practice removing and attaching the pitcher with nothing inside.
- Use the right twisting motion: Don’t jerk—use smooth, even pressure.
- Clean as you go: Wipe the base and locking area after every use.
- Store with the pitcher off the base: This keeps the locking mechanism from warping over time.

Credit: www.youtube.com
Frequently Asked Questions
Why Does My Ninja Blender Pitcher Get Stuck On The Base?
Pitchers usually get stuck because of food debris, over-tightening, or a vacuum seal from blending hot liquids. Always clean the locking tabs and allow hot mixtures to cool before blending.
Can I Remove The Pitcher While The Blender Is Still Plugged In?
It’s safer to unplug your Ninja Blender before removing the pitcher. This prevents accidental activation, which could cause injury.
What Should I Do If The Pitcher Won’t Twist Off?
First, check for any food stuck in the locking tabs. Try gently wiggling the pitcher while twisting. If you blended hot ingredients, let the blender cool for 10–15 minutes. Never force it; contact customer support if it still won’t budge.
Are All Ninja Blender Models Removed The Same Way?
Most use a twist-and-lift system, but the direction to unlock can vary. Always check your model’s manual or look for arrows on the pitcher and base.
Where Can I Find Replacement Parts For My Ninja Blender?
You can find genuine replacement parts on Ninja’s official website or from major retailers. For more details, see the official Ninja support page.
Removing a Ninja Blender from its base is simple once you know the steps. With the right technique, regular cleaning, and attention to your specific model, you’ll avoid stuck pitchers and potential damage. Take your time, follow these tips, and your blender will stay safe and reliable for years of smoothies, soups, and more.