A broken knife tip can feel like a small disaster, especially if you use your knives daily in the kitchen, for outdoor activities, or for specialized work. Many people think a snapped blade means the end of their favorite tool, but that’s not always true.
With the right approach, you can often fix a broken knife tip yourself and restore its usefulness. This guide covers every detail you need to know, from understanding why tips break to practical repair methods, choosing tools, safety, and maintenance.
By the end, you’ll have the confidence to repair your knife or decide when to let an expert handle it.
Why Knife Tips Break
A knife’s tip is its most delicate part. Even high-quality knives can snap if pushed beyond their limits. The main reasons tips break include:
- Improper use: Using a knife to pry, dig, or twist instead of cutting puts stress on the tip.
- Dropping the knife: Hard surfaces like tile or concrete can chip or break the tip instantly.
- Poor storage: Knives jostling in a drawer may hit hard objects, leading to damage.
- Low-quality steel: Some knives are made with brittle steel that snaps easily under pressure.
- Incorrect sharpening: Over-sharpening or grinding at the wrong angle weakens the tip.
Understanding these causes helps you prevent future breaks. It’s a common mistake to think only cheap knives break. Even premium brands can snap if used incorrectly.
Assessing The Damage
Before you start fixing, it’s important to assess how much of the tip is missing and the overall condition of the knife.
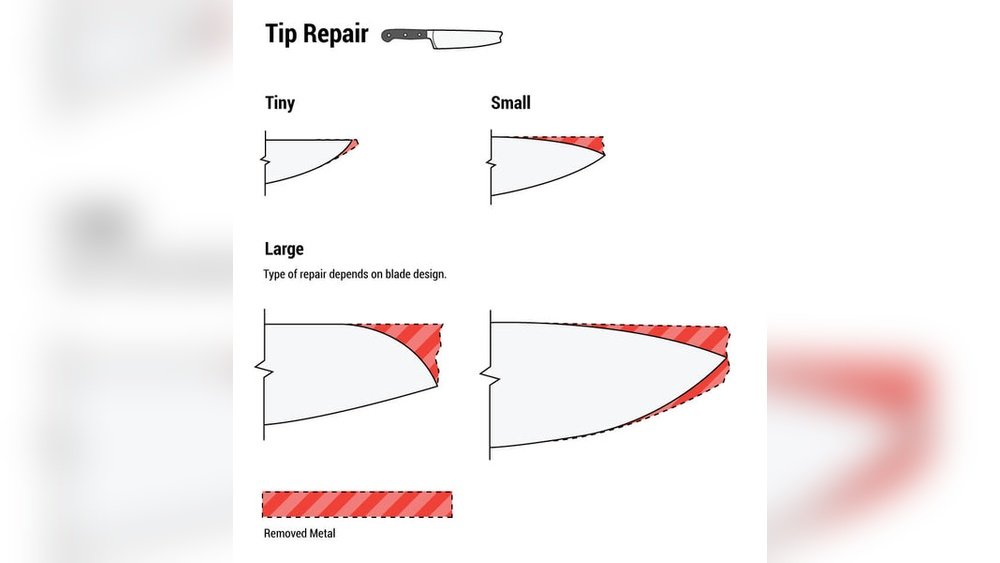
- Minor chip: Only a millimeter or two is missing from the tip. The blade shape is mostly intact.
- Significant break: More than 3mm is gone, or the tip looks blunt and uneven.
- Severe damage: The blade is cracked, bent, or broken in multiple places.
Also, consider the knife’s value. If you own a rare or expensive knife, it might be better to consult a professional. For most kitchen and utility knives, DIY repair is safe and effective.
Tools And Materials Needed
To repair a broken knife tip, gather the following items:
- Bench grinder or belt sander
- Medium and fine sharpening stones
- Permanent marker (for marking the new tip shape)
- Protective gloves and eye protection
- Clamp or vise (to hold the knife steady)
- Sandpaper (optional, for final polishing)
- Rubbing alcohol and clean cloth (for cleaning)
If you don’t have a bench grinder, you can use a coarse file, but it will take more time and effort. Never try to fix a knife tip with a kitchen sharpener or power tools not designed for metal.
Choosing The Right Repair Method
There are three main methods to fix a broken knife tip. The best one depends on the amount of missing steel, the knife’s purpose, and your skill level.
1. Reprofiling The Tip
This is the most common method. You reshape the blade to create a new, slightly shorter tip.
- Best for: Minor to moderate breaks (up to 5mm missing).
- Result: Knife looks and functions almost like new, just a bit shorter.
2. Welding Or Brazing
You add new metal to the blade and grind it to shape. This is rarely done outside professional shops.
- Best for: Very valuable or custom knives.
- Result: Original shape restored, but the weld might show.
3. Partial Tang Or Hidden Tang Repair
Mainly for knives with a tang (the metal part inside the handle) that’s been damaged. This is more advanced and not usually needed for kitchen knives.
For most users, reprofiling the tip is the safest and most practical choice.
Step-by-step Guide: Fixing A Broken Knife Tip By Reprofiling
Let’s walk through the process of reshaping a broken knife tip.
1. Clean And Inspect The Knife
Wash the knife with soap and water, dry it, and check for any cracks or hidden damage. If the blade is bent or the handle is loose, fix those problems first.
2. Mark The New Tip Shape
Use a permanent marker to draw the new outline on the blade. Aim for a natural curve that blends with the existing edge. Avoid making the new tip too thin or pointy, which could break again.
3. Secure The Knife
Clamp the blade in a vise with the edge facing up and away from you. Wear gloves and eye protection to stay safe.
4. Grind Or File The New Tip
Use a bench grinder, belt sander, or coarse file to slowly remove steel from the spine and edge until you reach your marked line.
- Go slow: Grinding too fast can overheat and weaken the steel.
- Cool often: Dip the blade in water every few seconds to keep it cool.
- Check your work: Stop often to make sure you’re shaping the tip evenly.
If you don’t have power tools, a coarse file works but takes longer.
5. Refine The Edge
After the rough shape is done, use medium and fine sharpening stones to smooth the new tip. Sharpen the entire edge to maintain a consistent bevel.
- Start with a medium stone (about 1000 grit).
- Finish with a fine stone (3000–6000 grit) for a razor edge.
6. Polish And Clean
If you want a polished look, use fine sandpaper (2000 grit or higher) to blend any scratches. Clean the knife with rubbing alcohol and a soft cloth to remove metal dust.
7. Test The Knife
Carefully test the tip on a piece of paper or soft food. The knife should cut smoothly with no catching or bending. If the tip feels weak, repeat the sharpening steps.
Comparison: Diy Vs Professional Repair
Choosing between fixing the tip yourself or taking it to a professional depends on a few factors. Here’s a comparison:
| Factor | DIY Repair | Professional Repair |
|---|---|---|
| Cost | Usually free or low-cost (tools only) | Can cost $20–$50 or more |
| Time Needed | 30–60 minutes for most repairs | Several days to weeks (shipping, wait time) |
| Skill Level | Beginner to intermediate (with care) | Expert |
| Finish Quality | Good, but may show small imperfections | Like new; perfect finish |
| Risk | Possible to ruin blade if careless | Very low risk |
For most standard kitchen knives, DIY is a great option. For collector pieces or knives with sentimental value, a professional is often worth the cost.
Common Mistakes To Avoid
When fixing a broken knife tip, beginners often make these mistakes:
- Grinding too much steel: Removing too much can make the knife too short or change its balance.
- Overheating the blade: High heat can ruin the temper, making the steel soft.
- Making the new tip too thin: This weakens the tip and makes it likely to break again.
- Poor sharpening: If you don’t blend the new tip with the edge, the knife won’t cut well.
- Ignoring safety: Not wearing gloves or goggles risks injury.
Always work slowly and check your progress often. If you’re unsure, practice on a cheap knife first.
Knife Types And Repair Differences
Not all knives are the same. The repair process can vary based on blade style and steel type.
Kitchen Knives
Most home kitchen knives are made from stainless steel. They’re usually easy to grind and sharpen. Japanese knives, however, often use harder steel that can chip easily. Be gentle and avoid using too much force.
Outdoor And Survival Knives
These knives tend to be thicker and made from tougher steel. You’ll need a stronger grinder or file. The tip shape is important for tasks like piercing, so draw a precise outline before grinding.
Pocket Knives
Folding knives can be tricky because the blade may not lock open securely for grinding. You might need to remove the blade from the handle for safety.
Specialty Knives
Fillet knives, carving knives, and other specialty tools require careful reshaping to keep their unique features. If in doubt, ask an expert.
Is It Worth Fixing Your Knife?
Sometimes, repairing a broken tip isn’t the best choice. Here’s how to decide:
- Knife value: If the knife is inexpensive and widely available, replacing it might be easier.
- Sentimental attachment: Family heirlooms or gifts are worth saving.
- Blade material: High-quality steel is worth repairing; cheap steel may not hold a new edge well.
- Purpose: If the knife is for heavy use, a slightly shorter blade may not matter.
An important insight: Many people throw away knives that are still perfectly usable after repair. A broken tip rarely means the knife is “ruined.”
Preventing Future Tip Breaks
Prevention is better than repair. Here are ways to protect your knife tips:
- Use knives only for cutting: Never pry, twist, or dig with the tip.
- Store properly: Use a knife block, magnetic strip, or blade guard to avoid contact with hard surfaces.
- Sharpen correctly: Use the right angle (usually 15–20 degrees) and don’t over-sharpen the tip.
- Cut on soft surfaces: Wood or plastic cutting boards are best.
- Handle with care: Don’t drop knives; always set them down gently.
A common beginner mistake is using a knife for tasks it wasn’t designed for—like opening cans or unscrewing lids. This almost always ends in damage.

Credit: togknives.com
Safety Tips For Knife Repair
Working with sharp tools and metal can be dangerous. Follow these safety rules:
- Wear gloves: Protects your hands from sharp edges and hot metal.
- Use eye protection: Grinding produces metal sparks and dust.
- Clamp the blade: Keeps the knife steady and your hands away from the edge.
- Keep your work area clean: Metal filings can be sharp and hard to see.
- Work slowly: Rushing increases the chance of mistakes or injury.
Another less-known safety tip: Always grind away from your body, not toward it. If the tool slips, you’ll stay safe.
Advanced Repair: Welding A New Tip
For rare or valuable knives, sometimes a new tip can be welded or brazed on by a skilled technician. This requires special tools and knowledge.
The Process
- The broken area is ground clean.
- A matching piece of steel is welded to the blade.
- The joint is ground and polished to match the original shape.
- The blade may be re-tempered to restore hardness.
Pros And Cons
| Advantage | Disadvantage |
|---|---|
| Restores original length and shape | Weld line may be visible |
| Preserves collector value | Expensive and time-consuming |
| Stronger repair if done right | Requires expert skills |
For most users, this is not needed. But if your knife is a rare custom piece, ask a professional about this option.
Credit: worksharptools.com
Knife Maintenance After Repair
Once you’ve fixed your knife, proper maintenance will keep it sharp and strong.
- Sharpen regularly: Use a fine stone and keep the edge consistent.
- Oil the blade: Light oil prevents rust, especially on carbon steel knives.
- Inspect for cracks: Check the tip and edge every few weeks for any signs of weakness.
- Store safely: Avoid tossing the knife in a drawer.
A well-maintained knife will outlast many new ones. Repairing and caring for your knife helps it serve you for years.
When To Replace Instead Of Repair
Not every knife is worth fixing. Here are signs it’s time to replace:
- Deep cracks or chips: If the blade is cracked along the spine, it may break again.
- Loose or damaged handle: Unsafe to use and hard to repair.
- Poor steel quality: Blades that won’t hold an edge are not worth the effort.
- Extremely short blade after repair: If too much has been ground away, cutting performance suffers.
If you’re unsure, ask at your local knife shop or check the manufacturer’s warranty. Some companies will replace broken blades for free or at a discount.
Real-world Examples
Many chefs and outdoor experts have stories of repairing their favorite knives. A chef might break a tip during a rush, quickly reshape it on a sharpening stone, and keep working. Outdoor enthusiasts often carry small files to fix blades in the field.
One less obvious insight: Sometimes, a slightly shorter blade actually works better for some tasks, like detail work or peeling. Many users end up liking their “fixed” knives more than before.
Caring For The New Tip
After repair, treat your knife gently for the first few uses. The steel at the new tip may be thinner or softer until you’ve sharpened it a few times.
- Use for light cutting tasks first.
- Avoid twisting or prying.
- Resharpen after a week of use to maintain strength.
With proper care, your knife can last many years after tip repair.

Credit: www.youtube.com
Useful Resources And Further Reading
For detailed sharpening techniques, steel types, and advanced repair, check resources like KnifePlanet’s repair guides. Community forums and YouTube channels also offer step-by-step videos for visual learners.
Frequently Asked Questions
How Long Does It Take To Fix A Broken Knife Tip?
Most repairs take between 30 and 60 minutes, depending on your tools and experience. Using a hand file takes longer than a grinder, but the process is the same.
Can I Use A Regular Kitchen Sharpener To Fix A Broken Tip?
No. Kitchen sharpeners are designed for edge maintenance, not reshaping. They can’t remove enough steel or create a new tip. Use a grinder or file for best results.
Is It Safe To Fix A Knife Tip At Home?
Yes, if you follow safety guidelines—use gloves, eye protection, and clamp the blade. Avoid working with power tools if you’re not comfortable. Practice on an old knife first if you’re unsure.
Will My Knife Be As Strong As Before After Repair?
The new tip will be slightly shorter and may be less strong, especially if you made it very thin. However, with proper technique and sharpening, it will perform well for most tasks.
When Should I Ask A Professional To Fix My Knife?
If your knife is valuable, rare, or has a complicated break (like a cracked blade), it’s best to consult a professional. They have the tools and skills to restore the knife without risk.
Repairing a broken knife tip isn’t just about saving money—it’s about respecting your tools and extending their life. With patience and care, you can turn a damaged blade into a reliable companion once again.