If your Oster oven has stopped working or is not performing as it should, you are not alone. Many people experience problems with their countertop ovens, from simple heating issues to electrical failures. Luckily, most common issues can be fixed at home with basic tools, a bit of patience, and clear instructions. This guide will show you how to fix your Oster oven step by step, helping you save money and avoid unnecessary stress.
Understanding how to repair your own kitchen appliance is more than a money-saver. You also learn valuable skills that help you maintain your oven and keep it running longer. From checking the power cord to replacing heating elements, you will find detailed solutions here for both simple and more challenging problems.
You do not need to be a professional to fix most Oster oven problems. With the right guidance and safety precautions, you can restore your oven’s performance and enjoy your favorite baked goods again. Let’s get started on bringing your Oster oven back to life.
Common Oster Oven Problems And How To Diagnose Them
Before fixing your oven, it’s important to know what is wrong. Most Oster oven issues fall into a few categories. Here’s how to recognize them and what might be causing the problem.
The Oven Won’t Turn On
If your Oster oven does not power on, check these causes:
- Power supply: The outlet or power cord could be faulty.
- Internal fuse: Some models have a fuse that may blow after a surge.
- Control board failure: Less common, but possible in digital models.
Oven Does Not Heat Up
When your oven stays cold, possible reasons include:
- Heating element failure: The heating coil may be burnt out.
- Thermostat problems: The oven may not “know” to heat.
- Loose connections: Wires to the heater could be disconnected.
Oven Overheats
If your food burns quickly, check for:
- Faulty thermostat: It may not be reading temperature correctly.
- Stuck relay: The oven may not shut off heating at the right time.
Timer, Display, Or Buttons Not Working
If you see a blank display or buttons do not respond:
- Control board malfunction: Electronic parts may be damaged.
- Loose ribbon cables: Connections from buttons to the board may be loose.
Unusual Noises Or Smells
If your oven hums loudly or smells burnt:
- Fan issues: The convection fan may be blocked or broken.
- Electrical short: Burning smell can mean a wire is touching metal.
Door Will Not Close Or Latch
A broken door can cause heat loss:
- Bent hinges: The door may be out of alignment.
- Damaged latch: The catch may be broken or worn.
Many of these issues are easy to diagnose by simple observation or listening to your oven. Writing down what you notice helps you focus your repair efforts.
Safety First: What You Must Know
Before you start any repair, always think about safety. Ovens use both high voltage and heat, so mistakes can be dangerous. Follow these steps:
- Unplug the oven before opening any panel or working inside.
- Let the oven cool down completely to avoid burns.
- Work in a dry area and keep liquids away from the oven.
- If you are not sure about electrical work, ask for help or call a professional.
Always check your warranty before opening the oven. Some repairs may void your warranty, so contact Oster support if your oven is still covered.

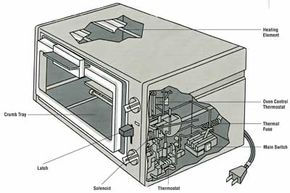
Credit: www.youtube.com
Tools And Parts You’ll Need
For most Oster oven repairs, you’ll need a few common tools. Here is a basic kit:
- Phillips and flathead screwdrivers
- Pliers (needle-nose are best)
- Multimeter (for checking voltage and continuity)
- Replacement parts (heating element, fuse, thermostat, as needed)
- Small brush or vacuum (for cleaning)
- Heat-resistant gloves
- Non-scratch cloth
Oster ovens use standard parts, but always check your model number before buying replacements. Online stores or appliance shops can help you find the right part.
Fixing Power And Electrical Problems
Many Oster ovens do not turn on because of a simple power issue. Here’s how to check and fix this problem.
Checking The Power Cord And Outlet
- Test the outlet: Plug another device (lamp, phone charger) into the same outlet. If it works, the outlet is fine.
- Check the cord: Look for visible cuts, burns, or bends. If the cord feels hot, stop using the oven.
- Wiggle test: Move the cord gently at both ends while watching the oven’s lights. If they flicker, the cord may be damaged inside.
If you find a problem with the power cord, it is safer to replace it than to try to repair it with tape.
Resetting Or Replacing The Internal Fuse
Some Oster ovens have a fuse inside for extra protection. If your oven was hit by a power surge, the fuse may have blown.
- Unplug the oven and remove the back cover (usually 4-6 screws).
- Locate the fuse (looks like a small glass or ceramic tube).
- Test the fuse with a multimeter for continuity. No reading means it is blown.
- Replace with a fuse of the same rating (usually printed on the old fuse).
- Screw the cover back on and plug in to test.
Do not use a fuse with a higher rating. It could cause a fire.
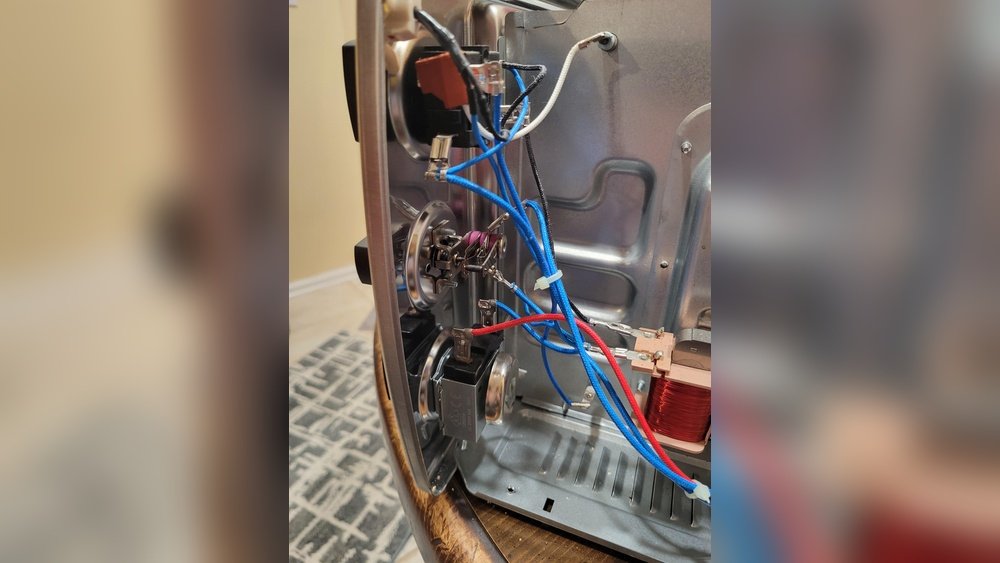
Control Board And Display Issues
If the oven’s display is blank but the power is fine, the control board may need checking.
- Open the back panel as above.
- Look for burn marks or loose cables on the board.
- Gently press ribbon cables back into their connectors.
- If you see damaged components (burnt resistors, swollen capacitors), the board may need replacing.
Most users can replace a control board by ordering the correct part and swapping cables carefully. Take a photo before removing wires to remember where each goes.
Fixing Heating Problems
If your Oster oven turns on but does not get hot, the heating element or thermostat could be the cause.
Testing And Replacing The Heating Element
The heating element is usually a metal coil inside the oven.
- Unplug the oven and open the back panel.
- Find the heating coil (top, bottom, or both).
- Use a multimeter to check for continuity between the terminals. No reading means the coil is broken.
- Remove screws or clips holding the element.
- Install the new element and connect wires tightly.
A new heating element must match the old one in size and wattage. Never force a part that does not fit.
Fixing Thermostat Problems
The thermostat senses temperature and tells the oven when to heat or stop.
- Use a multimeter to test for continuity at room temperature.
- If the thermostat does not show continuity, replace it.
- The thermostat is often held by screws and has wires attached with spade connectors.
If your oven heats but does not stop, the thermostat may be stuck “closed” and should be replaced.
Addressing Loose Or Burnt Wires
Loose wires can stop the oven from heating or cause flickering.
- Inspect all wire connections to the heating element and thermostat.
- Tighten any loose connectors with pliers.
- Replace any wires that look burnt or melted.
Never use the oven with exposed wires.
Fixing Timer, Display, And Button Issues
Digital Oster ovens may have trouble with their displays or buttons.
Checking Ribbon Cables
Many buttons and displays connect to the control board with thin, flat ribbon cables.
- Unplug the oven and open the control panel.
- Gently remove and reinsert ribbon cables to clear corrosion.
- Use a pencil eraser to clean the contacts if they look dirty.
Do not force ribbon cables—they are easy to tear.
Replacing A Faulty Control Board
If cleaning cables does not help, the control board may need replacing.
- Order the correct board for your model.
- Take clear photos before removing the old board.
- Transfer all cables and mount the new board.
- Test before closing the oven.
Replacing the control board usually restores all digital functions.
Credit: home.howstuffworks.com
Fixing Convection Fan And Noise Problems
Some Oster ovens use a convection fan to circulate air. If your oven is noisy or the fan does not spin, follow these steps.
Cleaning And Inspecting The Fan
- Unplug the oven and open the rear or side panel (check your manual).
- Remove any crumbs or grease around the fan.
- Spin the fan by hand. It should turn smoothly.
A stuck fan can often be freed by cleaning.
Replacing The Fan Motor
If the fan does not spin, even with power, the motor may be burned out.
- Disconnect wires from the motor.
- Remove screws and take out the motor.
- Match the new motor to the old one (same voltage and size).
- Reinstall, connect wires, and test.
A working fan keeps cooking even and prevents overheating.
Fixing Door And Latch Problems
If your Oster oven door does not close tightly, heat escapes and cooking suffers.
Adjusting Bent Hinges
- Open the oven door and look at both hinges.
- If one is bent, gently bend it back with pliers.
- Check that the door closes flat and seals evenly.
Do not force the hinge; if it is cracked, replace it.
Replacing A Damaged Latch
- Locate the latch mechanism inside the door or on the oven body.
- Remove screws holding the latch.
- Install the new latch and test the door.
A good seal is key for efficient heating.
Cleaning And Maintenance Tips For Oster Ovens
Regular cleaning prevents many common problems. Here’s how to keep your oven in top shape:
- Unplug and cool before cleaning.
- Use a damp cloth to wipe the inside—do not use strong chemicals.
- Clean the crumb tray after each use.
- Remove and soak racks and trays in warm, soapy water.
- Clean the glass door with vinegar and water for clear viewing.
- Use a small brush or vacuum to clear crumbs from hard-to-reach places.
Never use metal tools inside the oven—they can scratch surfaces or damage heating elements.
When To Call A Professional
Some problems are best left to experts. Call a professional or the Oster service center if:
- You smell burning plastic or see smoke (possible electrical fire).
- The oven keeps tripping your circuit breaker.
- You see sparks inside the oven.
- You are not comfortable working with electrical parts.
Oster’s customer support can help with warranty repairs or recommend local service centers.

Credit: www.youtube.com
Oster Oven Error Codes: What Do They Mean?
Digital Oster ovens may show error codes when something is wrong. Here are common codes and what they mean:
| Error Code | Meaning | Possible Solution |
|---|---|---|
| E01 | Sensor problem | Check or replace temperature sensor |
| E02 | Overheating | Let oven cool, check thermostat |
| E03 | Button stuck | Clean or replace control panel |
| E04 | Internal error | Unplug and restart, replace control board if needed |
If you see an error code not listed here, check your oven’s manual or contact Oster support.
Oster Oven Troubleshooting Chart
This quick reference can help you solve common problems faster.
| Problem | Possible Cause | Solution |
|---|---|---|
| Oven will not turn on | Power cord, fuse, outlet | Check power, replace fuse or cord |
| No heat | Heating element, thermostat, wires | Test and replace bad parts |
| Oven overheats | Thermostat, stuck relay | Replace thermostat or control board |
| Fan not working | Blocked or burnt-out motor | Clean or replace fan motor |
| Buttons do not work | Ribbon cable, control board | Clean/reseat cable, replace board |
| Strange smell | Grease, electrical short | Clean oven, check wiring |
Practical Tips For A Longer-lasting Oster Oven
Many problems can be avoided with simple habits. Here are some tips from real users:
- Preheat fully before baking to avoid undercooked food.
- Do not overload the oven—leave space for air to circulate.
- Avoid using foil on the heating element, which can cause short circuits.
- Store the oven in a dry place to prevent rust or electrical problems.
- Replace the crumb tray if it gets rusty—this keeps the oven safe and clean.
- Test the oven every few months with a thermometer to check accuracy.
Most beginners forget to check the crumb tray and door seal. A dirty tray can cause smoke and fire risk, while a bad seal wastes energy and slows cooking.
Where To Find Oster Oven Parts
If you need a replacement part, try these options:
- Oster’s official website: Enter your model number for accurate results.
- Appliance stores: Bring the old part to match it.
- Online retailers: Use the exact model number (often found on the oven’s label).
Always check part compatibility before buying. Using the wrong part can damage the oven or create a safety hazard.
Comparing Oster Ovens To Other Brands
If you are deciding whether to repair or replace your Oster oven, it helps to compare with other brands. Here is a simple comparison:
| Brand | Typical Lifespan | Common Problems | Repair Cost |
|---|---|---|---|
| Oster | 5–7 years | Heating element, fuse, fan | Low to moderate |
| Black+Decker | 4–6 years | Timer, door | Low |
| Breville | 6–8 years | Board, display | Moderate to high |
| Cuisinart | 5–7 years | Thermostat, buttons | Low to moderate |
Oster ovens are known for their reliability and easy-to-find parts, making them a good choice for repairs.
Resources For Further Help
For more complex repairs, or if you want to learn more, consider these resources:
- Oster’s official support page: Guides, part numbers, and manuals
- Appliance repair forums: Advice from experienced users
- YouTube: Step-by-step video tutorials
- Your local repair shop
A good starting point is the Oster Product Support page, where you can enter your model number and find manuals or contact support.
Frequently Asked Questions
Why Does My Oster Oven Keep Shutting Off?
Many Oster ovens have an automatic shutoff for safety. If your oven turns off before food is done, the thermostat or a faulty sensor may be the cause. Check the thermostat for proper function, and clean the oven to avoid overheating.
Can I Replace The Heating Element Myself?
Yes, most heating elements in Oster ovens are easy to replace with basic tools. Always unplug the oven and match the replacement part to your model. Follow the steps above for safe installation.
What Should I Do If My Oster Oven Makes A Loud Noise?
A loud noise usually means the convection fan is blocked or the motor is failing. Unplug the oven, clean around the fan, and check for broken pieces. If cleaning does not help, the fan motor may need replacing.
Is It Safe To Repair An Oster Oven At Home?
Most simple repairs (cord, fuse, heating element) are safe if you unplug the oven and follow instructions. However, if you smell burning, see smoke, or must handle complex electrical parts, ask a professional for help.
Where Can I Find The Model Number For My Oster Oven?
Look for a label on the bottom, back, or inside the door of your oven. The model number is usually a combination of letters and numbers. This helps you order the correct parts or find the right manual.
Repairing your Oster oven can be simple and rewarding. With careful steps, basic tools, and a bit of patience, you can solve most problems at home. A well-maintained oven lasts longer, saves money, and makes cooking easier every day.