Drying egg shells in the oven is a simple but surprisingly useful kitchen skill. Many people throw away egg shells without knowing their full potential. When dried properly, egg shells can be turned into calcium powder for plants, homemade supplements, or even creative crafts. But the process must be done safely and correctly to remove bacteria and achieve the right texture. If you have ever wondered how to dry egg shells in the oven, this guide explains every step with practical tips, safety advice, and creative ideas for using them.
Why Dry Egg Shells In The Oven?
Egg shells are more than just kitchen waste. They are about 95% calcium carbonate, making them a rich source of calcium. When dried, they become clean, brittle, and easy to crush. Here are some reasons people dry egg shells:
- Safe calcium supplement: Dried shells can be ground into powder for use as a DIY calcium supplement.
- Garden boost: Crushed shells add nutrients to soil and deter pests.
- Craft material: Clean, dry shells are used in mosaics, ornaments, and other crafts.
- Pet food: Some use powdered shells as a calcium boost for chickens or reptiles.
Oven drying is the most reliable way to remove moisture and bacteria. Air-drying takes much longer and does not guarantee complete sanitation. Boiling can sanitize, but oven drying ensures shells are crisp and easy to crush.
Preparing Egg Shells For Oven Drying
Before you use the oven, proper preparation is essential. Egg shells often contain bacteria like Salmonella, so you should always clean them first.
Step 1: Collecting And Saving Egg Shells
Start by collecting egg shells from your daily cooking. Rinse them right after use to prevent drying of egg residue, which can be hard to clean later. Store them in a container in the fridge until you have enough to process, ideally 10–20 shells for a standard oven tray.
Non-obvious tip: Never store unwashed shells for more than a day or two at room temperature—bacteria can multiply quickly.
Step 2: Cleaning The Egg Shells
- Rinse shells under cold running water to remove any egg white or yolk.
- Gently rub the inside with your thumb.
- Remove the membrane (the thin white film inside). This helps with drying and improves texture for powdering later.
Beginner mistake: Skipping membrane removal makes grinding into powder harder and can create an unpleasant smell when baking.
Step 3: Boiling (optional But Recommended)
Boiling is not strictly required if you are oven drying above 250°F (121°C), but it adds an extra layer of safety. Place shells in boiling water for 5–10 minutes. Then drain and rinse.
Practical tip: Boiled shells are easier to peel and clean fully. Let them cool before handling.
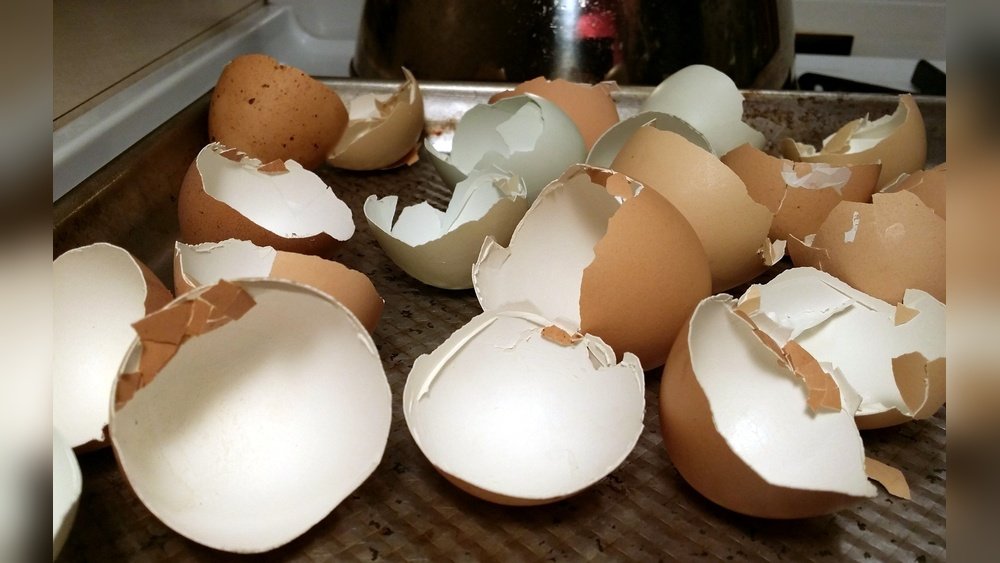
Arranging Egg Shells For Drying
After cleaning, drain excess water and lay shells on a clean kitchen towel. Pat them dry to remove as much moisture as possible. This shortens oven time and prevents steaming.
How to arrange shells on a tray:
- Use a baking sheet lined with parchment paper or foil.
- Place shells in a single layer, rounded side up.
- Leave space between shells for even heat.
If you have a lot of shells, dry them in batches. Overcrowding the tray can trap moisture and slow drying.
Oven Drying: Step-by-step
Now, let’s look at the full process to dry egg shells in the oven. This section includes time, temperature, and safety details.
Step 1: Preheat Your Oven
Set your oven to 250–275°F (121–135°C). This range is hot enough to kill bacteria but not so hot that shells burn or turn brown.
- Gas ovens and convection ovens work equally well.
- Avoid temperatures above 300°F (149°C); shells can become too brittle or start to brown.
Step 2: Place The Tray In The Oven
- Put the tray on the middle rack for even heat.
- Bake for 10–15 minutes. If you boiled shells, 10 minutes is enough; if not, go for 15 minutes.
Pro tip: Check halfway through and shake the tray gently to turn shells. This ensures all sides dry evenly.
Step 3: Watch For Signs Of Dryness
How do you know when egg shells are dry? Look for these signs:
- Shells appear chalky and very white (not glossy).
- They feel crisp and break easily between your fingers.
- No steam or moisture is visible.
If shells look shiny or feel damp, return them to the oven for another 5 minutes.
Step 4: Cooling
- Remove the tray and let shells cool completely before handling.
- Hot shells can burn your fingers and are more fragile.
Safety note: Never grind or store shells while they are still warm. Residual moisture can cause mold.
Time And Temperature Comparison
Here’s a quick comparison for different oven temperatures:
| Temperature (°F) | Temperature (°C) | Baking Time (min) | Notes |
|---|---|---|---|
| 200 | 93 | 20–30 | Extra safe, but slow |
| 250 | 121 | 10–15 | Standard, reliable |
| 300 | 149 | 8–10 | Risk of browning |
Grinding And Storing Oven-dried Egg Shells
Once your shells are dry and cool, you can use them as-is or grind them into powder.
Crushing By Hand
For garden use or crafts, crushing by hand is enough.
- Place shells in a sealed plastic bag.
- Use a rolling pin or the bottom of a glass to crush into small pieces.
Making Powder
For supplements or fine soil additives, grind shells to a powder:
- Use a blender, food processor, or coffee grinder.
- Pulse until you get a fine, sand-like texture.
Non-obvious insight: Sift the powder through a fine mesh strainer. This removes larger bits and ensures a smooth, safe powder for use in food or supplements.
Storing Dried Egg Shells
- Store in an airtight container.
- Keep in a cool, dry place.
- Label the jar with date and “oven-dried.”
Properly dried and stored egg shell powder lasts up to a year.
Uses For Oven-dried Egg Shells
You may be surprised by how many ways dried egg shells can be used. Here are the most popular options:
1. Calcium Supplement
Crushed egg shell powder can be added to food or drinks as a calcium boost. Studies show that one ground egg shell contains about 800 mg of calcium. Always consult a doctor before taking homemade supplements.
2. Garden Fertilizer
Egg shells add calcium to soil, helping plants like tomatoes and peppers avoid blossom-end rot. Sprinkle crushed shells around plant bases.
3. Pest Control
Sharp shell edges can deter slugs, snails, and cutworms. Scatter broken shells around plants to create a barrier.
4. Compost Addition
Egg shells balance the pH of compost and add minerals. Crush them first for faster breakdown.
5. Bird And Pet Food
Ground egg shells are a natural calcium source for chickens, turtles, and reptiles. Mix a small amount with their regular feed.
6. Household Cleaners
The abrasive quality of shells helps scrub pots, pans, and sinks. Mix crushed shells with a bit of soap for a natural scrub.
7. Arts And Crafts
Dried shells are used in mosaics, ornaments, and even as textured paint fillers.
8. Beauty And Skin Care
Some people use fine shell powder as an exfoliant, but this is not recommended for sensitive skin.
9. Homemade Chalk
Mix shell powder with flour and water to create chalk for kids’ art projects.
10. Candle Making
Crushed shells can be used as a decorative layer at the bottom of homemade candles.

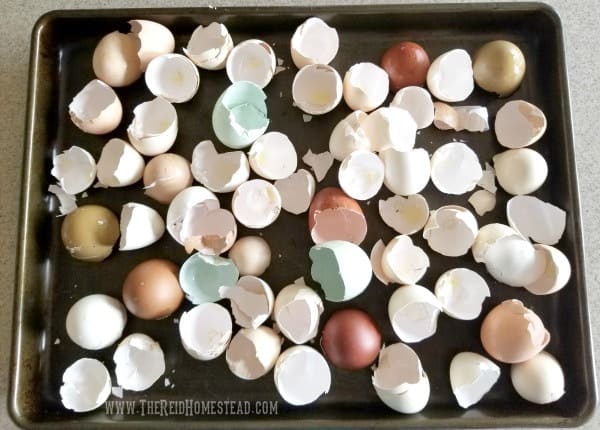
Credit: zerowastechef.com
Safety Tips For Drying Egg Shells
Drying egg shells in the oven is safe if you follow these tips:
- Always clean and rinse shells before drying.
- Avoid using shells from spoiled or rotten eggs.
- Never dry shells with visible mold—discard them.
- Wash hands after handling raw shells to avoid cross-contamination.
Common beginner mistake: Not preheating the oven. This can lead to uneven drying and possible bacteria survival.
Troubleshooting Common Problems
If you run into issues, here’s how to solve them:
Shells Turn Brown
- Oven temperature is too high. Lower to 250°F next time.
- Shells left in oven too long.
Shells Are Still Damp
- Not enough drying time. Add 5–10 more minutes.
- Overcrowded tray—dry in smaller batches.
Powder Feels Gritty
- Membrane not fully removed.
- Grind again and sift for smoother texture.
Credit: www.reddit.com
Egg Shell Drying Methods Compared
Oven drying is the gold standard, but let’s compare it with other techniques.
| Method | Time Needed | Sanitation | Texture | Best For |
|---|---|---|---|---|
| Oven Drying | 10–15 min | Excellent | Crisp, easy to grind | Supplements, garden, crafts |
| Air Drying | 24–48 hrs | Poor | Sometimes rubbery | Crafts only |
| Microwave | 3–5 min | Good | Sometimes uneven | Quick small batches |
| Boiling Only | 5–10 min | Good | Wet, needs further drying | Extra safety step |
Creative Recipes Using Dried Egg Shells
If you’re interested in food uses, here are safe, simple ideas:
Calcium-boosted Smoothie
- 1 cup milk (or plant milk)
- 1 banana
- 1 teaspoon honey
- 1/2 teaspoon dried egg shell powder (finely ground)
Blend all ingredients until smooth. Start with a small amount of shell powder to test tolerance.
Egg Shell Powder For Bread
Add 1/2 teaspoon of fine egg shell powder to your bread dough for extra calcium. The taste is not noticeable but the nutritional content improves.
Tip: Always bake the powder into food—never sprinkle raw powder on finished dishes.
Environmental Impact
Drying and reusing egg shells reduces waste. The U.S. produces over 250,000 tons of egg shell waste every year. By recycling shells, you help lower landfill use and return minerals to the earth.
Expert Insight: Why Oven Drying Works Best
Most home ovens hold a steady temperature, which means egg shells dry evenly and thoroughly. The process removes dangerous bacteria like Salmonella, making shells safe for pets, garden, or even food. Oven drying also makes shells brittle, so they are much easier to grind finely.
According to the Eggshell Wikipedia page, calcium carbonate is stable when heated, and oven drying does not destroy the useful mineral content. This is why it is the method of choice for both home and industrial uses.
Credit: thereidhomestead.com
Sustainability And Egg Shell Upcycling
Reusing egg shells is a simple step toward a greener kitchen. Instead of throwing them away, you create a valuable resource for plants, pets, or crafts. Many gardeners report healthier tomatoes and peppers after adding dried, crushed shells to the soil.
Pet owners appreciate the safety and cost savings of a homemade calcium supplement.
Common mistake: Many people grind shells without drying. This can cause mold and a strong “eggy” odor. Always dry before grinding.
The Science Behind Egg Shell Drying
When egg shells are heated, all residual protein (albumin) dries up, and bacteria are destroyed. The membrane inside the shell shrivels, making it easy to remove. This gives a clean, safe, and odorless powder. The final product is almost pure calcium carbonate, which is safe for most uses.
Example: In one small study, adding dried egg shell powder to pet food improved the bone health of older dogs and cats after 3 months.
How To Scale Up For Large Batches
If you have a lot of eggshells (for example, from a bakery or school), you can use multiple trays. Here’s how:
- Use convection ovens for even drying.
- Rotate trays halfway through baking.
- Cool shells fully between batches.
Tip: Batch-dry shells once a week to save energy and time.
Storage And Shelf Life Comparison
How long do dried egg shells stay good? Here’s a quick overview.
| Form | Storage Method | Shelf Life | Notes |
|---|---|---|---|
| Whole, dried shells | Airtight jar, cool place | 12 months | Best for garden/crafts |
| Powdered shells | Airtight jar, cool place | 6–12 months | Food/pet use |
| Crushed, not dried | Room temperature | 1–2 days | High risk of mold |
Common Mistakes To Avoid
- Drying at too high a temperature—shells turn brown and smell burnt.
- Not cleaning shells—can cause bad odors and unsafe powder.
- Storing shells while damp—leads to mold.
- Using shells from cracked or dirty eggs—increases contamination risk.
Helpful reminder: Always label containers with drying date and intended use.
Final Thoughts
Drying egg shells in the oven is a smart way to turn kitchen scraps into something valuable. With a little effort, you can produce a safe, versatile material for the garden, home, or even your own health. The steps are simple, but attention to detail—like cleaning, membrane removal, and proper drying—makes all the difference.
Whether you want to boost your tomato crop, create homemade chalk, or simply reduce waste, oven-dried egg shells are a great solution. Next time you crack an egg, think twice before tossing the shell—your plants, pets, and planet will thank you.
Frequently Asked Questions
How Do I Know When Egg Shells Are Fully Dry In The Oven?
Egg shells are fully dry when they appear chalky white, are brittle to the touch, and no steam or moisture is visible. If in doubt, bake for an additional 5 minutes at 250°F.
Can I Dry Egg Shells In A Microwave Instead Of The Oven?
Yes, you can use a microwave for small batches. Spread shells on a plate and heat for 3–5 minutes. However, the oven dries more evenly and is better for large amounts.
Is It Safe To Eat Egg Shell Powder?
Yes, if you clean and dry shells properly in the oven, the powder is generally safe. Always consult a healthcare provider before using as a supplement, and avoid shells from untrusted sources.
Do I Need To Remove The Membrane Before Oven Drying?
It is best to remove the membrane. This prevents bad odors, improves texture, and makes grinding easier. If the membrane is hard to remove, boiling first helps.
How Should I Store Dried Egg Shells For Later Use?
Keep dried or powdered egg shells in an airtight container in a cool, dry place. Label with the date. Properly stored, they last up to one year for garden or household use.