Adjusting Ikea drawer fronts can feel tricky at first, especially if you’re not used to assembling furniture. Many people find that after putting together their Ikea cabinets or dressers, the drawer fronts don’t line up perfectly. Maybe they’re crooked, sticking out, too high, or too low.
This is a common problem, but the good news is that you can fix it yourself with a few simple tools and techniques. Understanding how to adjust these fronts will not only make your furniture look better, but also help the drawers open and close smoothly.
You don’t have to be a professional to get great results. With a bit of patience and careful adjustment, you can make your Ikea drawers look like they were installed by an expert. This guide will walk you through each step in detail. We’ll cover the tools you need, how Ikea drawer systems work, the different types of adjustments, and specific tips for common models like Malm, Sektion, and Pax. Along the way, you’ll also learn how to fix common issues and avoid mistakes that can make things worse. By the end, you’ll know exactly what to do, even if this is your first time.
Understanding Ikea Drawer Fronts
Before you start, it helps to know how Ikea drawer fronts are designed. Ikea uses modular systems, which means that many drawers and fronts use similar mechanisms, even in different furniture lines.
Most Ikea drawers have:
- A drawer box (the part that holds your items)
- A front panel (the visible face of the drawer)
- Adjustment screws (usually accessible from inside the drawer)
- Clips or brackets that connect the front to the box
Each Ikea system may look a bit different, but they all let you move the drawer front up, down, left, right, in, or out. The goal is to line up the fronts so the gaps are even and the drawers open smoothly.
Common Ikea Drawer Systems
- Malm – Used for chests and dressers
- Sektion – Kitchen drawers and cabinets
- Pax – Wardrobe drawer systems
- Platsa – Modular storage
Each system has its own style of mounting and adjustment, but the basics are similar.
Tools And Preparation
Getting the right tools is the first step. Ikea provides a small Allen key (hex key) with most drawers, but using a good screwdriver or drill can make things faster and easier.
What You’ll Need
- Phillips screwdriver (or a power drill with Phillips bit)
- Flathead screwdriver (for some older systems)
- Allen key (often size 3 or 4 mm, included with Ikea products)
- Measuring tape or ruler
- Level (a small bubble level works best)
- Soft cloth (to protect surfaces)
- Flashlight (for seeing inside dark cabinets)
Preparing Your Workspace
- Empty the drawers to avoid damage or extra weight.
- Work on a flat, stable surface. If you’re adjusting large dressers, you may want to move them away from the wall.
- Clean the area. Dust or dirt can hide screws or affect how parts fit.
- Check for missing parts. If you lost a screw or bracket, Ikea offers replacements.
Safety Tip
Always keep your fingers clear of moving parts while adjusting. Don’t force screws—if something won’t move, check for obstructions first.
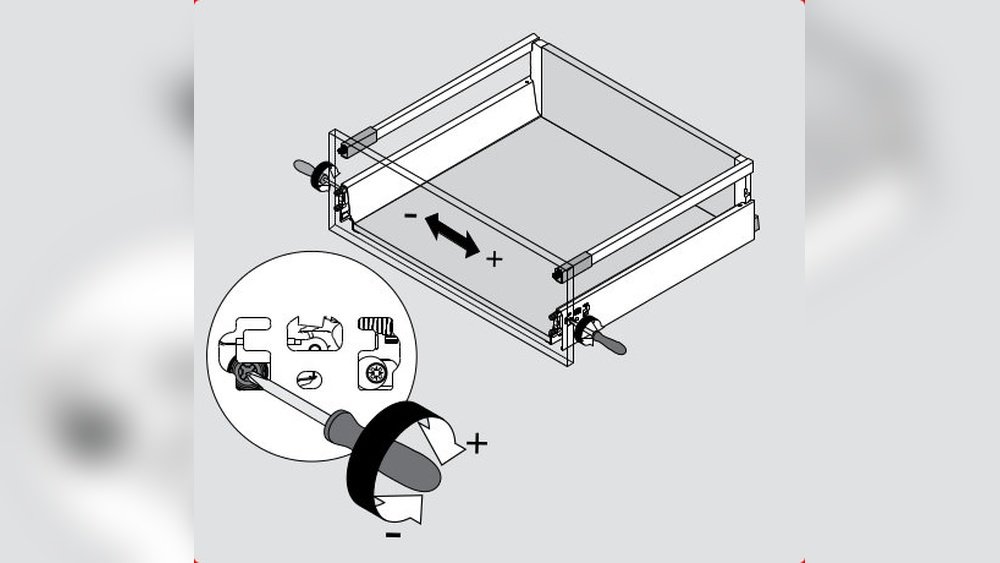
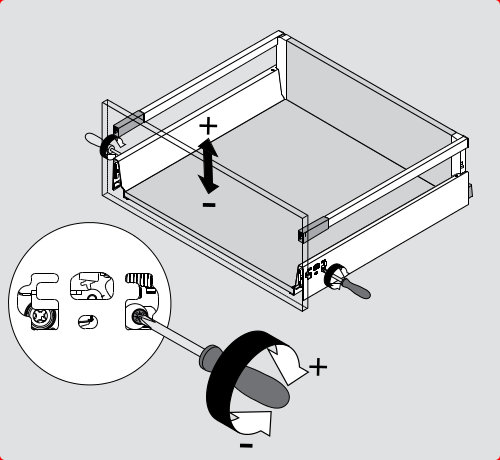
How Ikea Drawer Adjustment Mechanisms Work
Ikea’s drawer adjustment system is simple but very effective. Most fronts are attached to the drawer box using a combination of screws and clips. Adjustment screws let you change the position of the front without removing the whole drawer.
Types Of Adjustments
- Vertical Adjustment – Moves the front up or down
- Horizontal Adjustment – Moves the front left or right
- Depth Adjustment – Moves the front in or out
Each movement is controlled by a different screw, usually found on the inside of the drawer near the front. On some models, you’ll see small plastic wheels or levers instead of screws.
Why Proper Adjustment Matters
- Even gaps between drawers look better
- Drawers open and close smoothly
- Prevents rubbing or sticking
- Extends furniture life
Step-by-step Guide To Adjusting Ikea Drawer Fronts
Let’s get into the practical steps. These instructions cover most Ikea drawers, but always check your specific model’s manual if something looks different.
1. Remove The Drawer (if Needed)
Some adjustments are easier if you pull the drawer out. On most Ikea drawers:
- Open the drawer fully.
- Find the release levers (usually on both sides).
- Squeeze or push the levers and pull the drawer forward.
For small adjustments, you can often leave the drawer in place.
2. Identify Adjustment Screws
Look inside the drawer near the front corners. You’ll usually see two or three screws on each side. These control:
- Up/Down (vertical)
- Left/Right (horizontal)
- In/Out (depth)
Each system is a bit different. Here’s a quick comparison:
| System | Vertical | Horizontal | Depth |
|---|---|---|---|
| Malm | Yes | Limited | No |
| Sektion | Yes | Yes | Yes |
| Pax | Yes | Yes | Yes |
| Platsa | Yes | Limited | No |
3. Vertical Adjustment (up/down)
If your drawer front is too high or too low, adjust the vertical screws.
- Insert your screwdriver into the vertical adjustment screw.
- Turn clockwise to raise the front.
- Turn counterclockwise to lower it.
Make small turns and check your progress often. Use a level or measure the gap between drawers to keep things even.
4. Horizontal Adjustment (left/right)
If the drawer front is too far left or right:
- Locate the horizontal adjustment screw (often the middle screw).
- Turn clockwise to move the front right.
- Turn counterclockwise to move it left.
Again, make small adjustments. Check that the gaps on both sides are even.
5. Depth Adjustment (in/out)
If the front is sticking out or sunken in:
- Find the depth adjustment screw or lever (sometimes hidden under a plastic cap).
- Turn or slide as needed to move the front in or out.
Depth is especially important for kitchen drawers. The front should sit flush with the cabinet frame.
6. Test The Drawer
After each adjustment:
- Open and close the drawer fully.
- Check for smooth movement.
- Look at the gaps and overall alignment.
Repeat small adjustments as needed.
7. Secure All Screws
Once you’re happy with the position, tighten all screws firmly—but not too tight. Over-tightening can strip the holes or damage the hardware.
8. Reinstall The Drawer
If you removed the drawer, slide it back into the rails. It should click or lock into place.
Special Tips For Different Ikea Drawer Systems
Different systems have their own tricks. Here are some model-specific insights.
Malm Drawers
Malm dressers and chests use a simple bracket system:
- For vertical adjustment, loosen the screws holding the front to the box. Slide the front up or down, then retighten.
- For horizontal movement, there’s usually only a little play—enough for fine tuning.
Pro tip: If you see uneven gaps that won’t fix, check that the entire dresser is level. Malm drawers are sensitive to small tilts in the frame.
Sektion Kitchen Drawers
Sektion systems are more advanced:
- They use special cam screws and wheels for precise adjustment.
- You can usually adjust all three directions without removing the drawer.
Non-obvious insight: The depth screw on Sektion drawers often sits behind a small plastic cover. Poke gently with a screwdriver to pop it off.
Sektion kitchen drawers are designed for “frameless” cabinets, so even small misalignments are easy to spot. Use a level for best results.
Pax Wardrobe Drawers
Pax wardrobe systems often use metal rails and brackets:
- For vertical and horizontal changes, turn the visible screws inside the drawer.
- For depth, some Pax models use a clip system. Release the clip, adjust, then snap back in place.
Experience tip: If you can’t get a perfect line, check if the wardrobe itself is square. Slight twists in the Pax frame can cause misalignment.
Platsa Modular Drawers
Platsa drawers are lighter and use plastic brackets:
- Adjust up/down by loosening the side screws and sliding.
- Side-to-side movement is limited.
Watch out: Overtightening screws in Platsa can crack the plastic brackets.
Common Problems And How To Fix Them
Even with careful adjustment, some issues can happen. Here’s how to solve them.
Drawer Front Won’t Stay In Position
- Check if the screws are stripped or the holes are damaged.
- Try moving the front to a new position and retighten.
- If a bracket is broken, get a replacement from Ikea.
Gaps Are Uneven Even After Adjustment
- Make sure the entire piece of furniture is level. Use a bubble level.
- Sometimes floors are not flat; use shims under the legs to level the frame.
Drawer Rubs Or Sticks
- Check for obstructions inside the cabinet.
- Make sure the rails are clean and free of debris.
- If the front is too far in, use the depth adjustment to pull it out.
Drawer Front Is Crooked
- Adjust both the left and right sides evenly.
- If one side won’t move, check for bent brackets or rails.
Cannot Find Adjustment Screws
- Look for plastic covers or caps hiding the screws.
- Consult the Ikea assembly manual (most are available online).
Advanced Tips For A Professional Finish
It’s possible to get your Ikea drawers perfectly aligned—even better than some professional installers. Here are expert-level techniques:
Use A Laser Level
Laser levels create a straight line across your drawers, making it easy to match all fronts exactly. They’re especially useful for kitchen and wardrobe installations.
Adjust All Drawers Together
Instead of adjusting one drawer at a time, set all fronts loosely first. Then, adjust them together so the gaps and lines match from top to bottom.
Check Gaps With Spacers
Cut small pieces of cardboard or plastic to the gap size you want (usually about 2-3 mm). Use them as spacers between drawers while tightening the fronts.
Final Tightening Sequence
After all adjustments, start at the bottom drawer and tighten screws upwards. This prevents “creep” where the weight of upper drawers pulls the fronts out of position.
Clean Hardware After Adjusting
Wipe rails and screws with a dry cloth. Clean hardware works smoother and lasts longer.
Comparing Adjustment Features: Malm Vs. Sektion Vs. Pax
If you’re choosing new Ikea furniture, the type of adjustment system may affect your decision. Here’s a comparison of key features:
| Feature | Malm | Sektion | Pax |
|---|---|---|---|
| Vertical Adjustment | Manual (loosen/slide) | Precision screw | Precision screw |
| Horizontal Adjustment | Limited | Full | Full |
| Depth Adjustment | No | Yes | Yes |
| Easy Access | Good | Excellent | Excellent |
| Replacement Parts | Easy | Easy | Easy |
Sektion and Pax offer more adjustment options and are better for kitchens and wardrobes, while Malm is great for bedrooms but less flexible.
Mistakes To Avoid When Adjusting Ikea Drawer Fronts
Even experienced DIYers sometimes make simple mistakes. Here’s what to watch for:
- Over-tightening screws – This can strip holes or crack brackets, especially in particleboard.
- Ignoring the frame – If the furniture isn’t level or square, no amount of adjustment will fix the gaps.
- Adjusting only one side – Always adjust both sides evenly for a straight front.
- Forgetting to check drawer movement – After adjusting, always open and close the drawer to check for smoothness.
- Losing screws or clips – Keep a small container nearby for hardware.
Non-obvious insight: Sometimes drawers that won’t align are actually caused by warped floors or walls. Check your room before blaming the furniture.
When To Replace Vs. Adjust
Most alignment issues can be fixed by adjusting, but sometimes parts are damaged. Consider replacing:
- Brackets or clips that are broken or cracked
- Screws that won’t tighten (stripped holes)
- Drawer fronts that are warped or swollen from water
Ikea sells spare parts at most stores or you can order online. Replacing just the damaged part is usually cheaper than buying a whole new drawer.

Credit: www.youtube.com
Caring For Your Adjusted Drawers
Once your drawers are aligned, a little care keeps them working smoothly:
- Clean rails and hardware regularly to prevent dust buildup.
- Check alignment every few months, especially after moving the furniture.
- Tighten screws if you notice any movement or rattling.
- Avoid overloading drawers with heavy items—this can cause sagging over time.
Real-world Example: Adjusting A Sektion Drawer In The Kitchen
Imagine you just installed a Sektion kitchen drawer. The left side is higher than the right, and the front sticks out a bit.
Here’s what you’d do:
- Open the drawer and find the adjustment screws at the front corners.
- Use a Phillips screwdriver to turn the left vertical screw counterclockwise (to lower it).
- Use the horizontal screw on the right to move the front slightly left.
- Use the depth screw to pull the front in until it’s flush.
- Check with a level and adjust both sides evenly.
- Tighten all screws, close the drawer, and admire your work!
This process works for most Ikea drawers—you just need to adjust the right screw in the right direction.
Credit: www.youtube.com
Troubleshooting Table: Quick Solutions
Here’s a handy reference for common issues:
| Problem | Likely Cause | Quick Fix |
|---|---|---|
| Drawer front too high | Vertical screw set too high | Lower vertical screw on both sides |
| Front sticks out | Depth screw set out | Push in depth screw until flush |
| Drawer rubs when closing | Front set too low or deep | Raise or pull out slightly |
| Uneven side gaps | Horizontal screws uneven | Adjust left/right screws |
| Drawer won’t close fully | Obstruction or misaligned rail | Remove debris, re-seat rails |
Where To Find More Help
If you get stuck, Ikea’s website has downloadable assembly manuals for every product. There are also many helpful videos online showing real adjustments step by step. For complex kitchen setups, you might want to check Ikea’s official assembly instructions.
Credit: www.kitcheninstallation.ca
Frequently Asked Questions
How Do I Know Which Screw To Adjust On My Ikea Drawer Front?
Most Ikea drawer systems have clear markings or symbols near the adjustment screws. Typically, the top screw is for vertical movement (up/down), the middle is for horizontal (left/right), and the bottom (if present) is for depth (in/out). If you’re unsure, turn each screw a little and watch how the front moves, or consult your product’s manual.
Can I Adjust Ikea Drawers Without Taking Them Out?
Yes, in many cases you can adjust vertical and horizontal alignment with the drawer in place. For depth adjustments or for easier access, it helps to remove the drawer. Sektion and Pax systems are especially easy to adjust without full removal.
What Should I Do If The Adjustment Screws Are Stripped Or Won’t Hold?
If a screw won’t tighten or just spins, the hole may be stripped. You can try using a slightly larger screw, or fill the hole with a wooden toothpick and some wood glue before reinserting the screw. If the bracket itself is broken, get a replacement from Ikea.
Why Are My Ikea Drawer Fronts Still Crooked After Adjusting?
If you’ve adjusted all screws and the fronts are still uneven, check if the furniture is level. Use a bubble level on top and adjust the feet or place shims under the legs if needed. Sometimes, the room’s floor or wall is uneven, not the furniture.
Do All Ikea Drawers Use The Same Adjustment System?
No, but most modern Ikea drawers use similar principles: screws or levers for up, down, left, right, and depth movement. Older systems or special models (like Platsa or custom inserts) may look different, but adjustment is usually possible with basic tools.
Aligning your Ikea drawer fronts can transform the look and function of your furniture. With the right approach, a little patience, and the guidance above, you can get perfect results every time. Don’t rush—small, careful adjustments make a big difference.
If you get stuck, remember that help is available both from Ikea and many online resources. With practice, you’ll find that adjusting Ikea drawer fronts is a simple skill with lasting rewards.