Building a kitchen island with a sink and dishwasher can completely transform your cooking space. Not only does it add more workspace, but it also makes kitchen tasks smoother and more enjoyable. Many homeowners dream of having a functional, stylish island in the center of their kitchen, but turning that idea into reality can feel overwhelming.
If you plan well and understand the steps, this project can fit both your needs and your kitchen’s style. Whether you want more storage, extra seating, or just a better workflow, a kitchen island with a sink and dishwasher could be the perfect solution.
Let’s walk through the entire process, from planning and design to installation and finishing touches. Along the way, you’ll learn what’s really involved—beyond just buying cabinets and connecting pipes. With practical advice, expert tips, and clear examples, this guide will help you avoid common mistakes and make confident decisions at every stage.
Why Choose A Kitchen Island With Sink And Dishwasher?
A kitchen island is more than just a piece of furniture. When you add a sink and dishwasher, it becomes a true work center. Here’s why many people choose this setup:
- Better workflow: Washing, prepping, and cleaning are all in one place.
- Extra workspace: Islands add countertop area for cooking and baking.
- More storage: Cabinets and drawers under the island help reduce clutter.
- Social space: Family and friends can gather around while you cook.
- Modern look: It gives your kitchen a fresh, updated style.
But there are also challenges. Islands with plumbing and appliances need careful planning, proper installation, and sometimes a bigger budget. Let’s see how to do it right.
Planning Your Island: What Really Matters
Before you start buying materials or calling contractors, take time to plan carefully. Rushing this step can lead to costly changes later.
Space Requirements
Not every kitchen can fit an island with a sink and dishwasher. Measure your kitchen first. You need enough space to move around the island and open cabinets or appliances. Here are the key measurements:
- Minimum clearance: Leave at least 42 inches (107 cm) between the island and other counters or walls. For kitchens with multiple cooks, 48 inches (122 cm) is better.
- Island size: The typical island is 3–4 feet wide and 6–8 feet long, but it can be smaller or larger depending on your kitchen.
- Dishwasher and sink space: Make sure there’s space to open the dishwasher door fully and stand in front of the sink.
Plumbing And Electrical Needs
Adding a sink and dishwasher means you need water supply lines, a drain, and power. Check these before you design:
- Water lines: You’ll need hot and cold water to the island.
- Drain: The island must connect to the main drain line. Sometimes, this means cutting into the floor.
- Electrical outlets: Code usually requires at least one outlet on the island. The dishwasher also needs a dedicated circuit.
If your kitchen is on a slab foundation, or your main plumbing is far away, installation can be more complex and expensive.
Choosing The Right Location
The island should fit your kitchen’s layout and workflow. The “kitchen work triangle” (sink, stove, fridge) is a classic design rule. The island should not block paths between these three key areas.
Many designers recommend placing the island sink across from the stove or next to prep space. Avoid putting the dishwasher in a spot where its open door blocks key walkways.
Style And Function
Think about how you’ll use the island. Do you want extra seating for breakfast? More drawers for pots and pans? Open shelving for cookbooks? Write a list of must-haves before you start shopping.

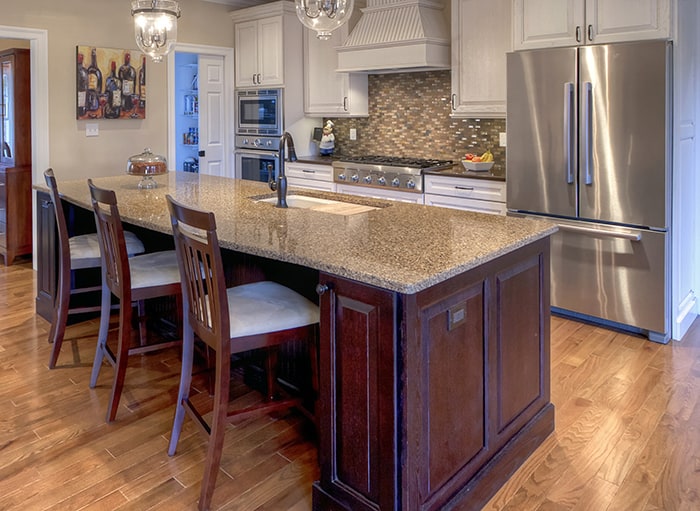
Credit: www.housingdesignmatters.com
Designing Your Kitchen Island
Now that you have a plan, it’s time to design the island itself. This stage shapes how your island will look and work.
Choosing Cabinets And Materials
Islands are usually built from standard base cabinets joined together. You can use:
- Stock cabinets: Least expensive and fastest to get, but limited sizes.
- Semi-custom cabinets: More choices for size and style.
- Custom cabinets: Made to order, perfect fit, but higher cost.
For the island’s surface, popular choices include:
- Granite: Durable, natural stone, many colors.
- Quartz: Non-porous, easy to clean, modern look.
- Butcher block: Warm wood, great for prep, but needs regular care.
- Laminate: Budget-friendly, many styles.
If you plan to install a heavy farmhouse sink, make sure your cabinets and countertop can support the weight.
Selecting The Sink
The right sink makes your island more useful. Consider these factors:
- Size: A 24–33 inch sink fits most islands. Deeper basins are good for washing large pots.
- Material: Stainless steel is popular and easy to clean. Fireclay or composite sinks offer other looks.
- Style: Undermount sinks look modern and make cleaning the counter easy. Drop-in sinks are simpler to install.
If you want a garbage disposal, check that your plumbing and electrical setup can handle it.
Choosing A Dishwasher
Look for a dishwasher that fits both your space and your needs. Key considerations:
- Size: Standard width is 24 inches, but compact 18-inch models are available.
- Noise level: Quieter dishwashers (44 dB or less) are better for open kitchens.
- Panel-ready: Some models can be covered with a cabinet panel for a seamless look.
- Efficiency: Look for ENERGY STAR certified models to save on water and power.
Planning Storage And Seating
Maximize your island’s usefulness with smart storage. Add drawers for utensils, pull-out shelves for pots, or even a built-in trash bin. If you want seating, leave at least 12 inches of countertop overhang for comfort.
Example Island Design
Here’s a sample layout for a medium-sized kitchen:
- 7-foot long island with a 30-inch sink and 24-inch dishwasher on one end
- Storage cabinets and drawers in the center
- Seating for three at the opposite end
- Quartz countertop with a waterfall edge
This design gives a good balance of prep space, washing area, and social seating.
Budgeting And Cost Breakdown
Building a kitchen island with a sink and dishwasher is a serious investment. Costs vary based on materials, labor, and your kitchen’s layout. Here’s a realistic breakdown:
| Item | Low-End Cost | High-End Cost |
|---|---|---|
| Base Cabinets | $400 | $2,000 |
| Countertop | $600 | $3,500 |
| Sink & Faucet | $250 | $1,000 |
| Dishwasher | $400 | $1,500 |
| Plumbing | $700 | $2,500 |
| Electrical | $300 | $1,000 |
| Labor (Install) | $1,000 | $3,000 |
| Total | $3,650 | $14,500 |
These prices are for a typical US kitchen in 2024. DIY installation can save on labor, but plumbing and electrical work often require licensed professionals.
Ways To Save Money
- Use stock cabinets and laminate countertops.
- Choose a basic stainless steel sink and a mid-range dishwasher.
- Do demolition and simple assembly yourself.
- Get multiple quotes from contractors.
Common Budget Mistakes
Many homeowners forget to budget for:
- Permits and inspections
- Unexpected plumbing challenges
- Extra electrical work
- Countertop cutouts for sink and faucet
Always keep a 10–20% cushion for surprises.

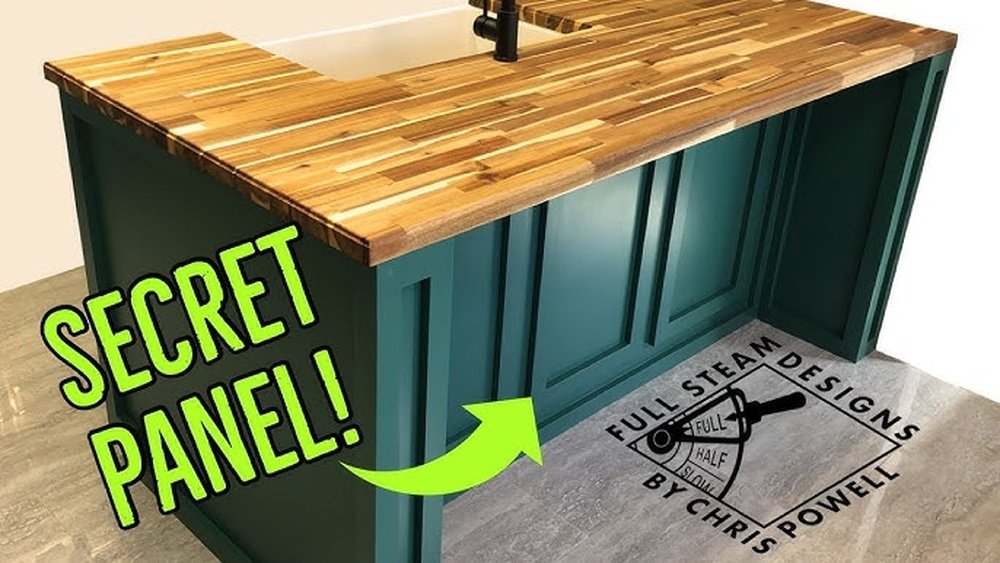
Credit: www.youtube.com
Tools And Materials Needed
Before you start building, gather all tools and materials. Here’s a checklist for a typical DIY project:
Tools
- Tape measure and pencil
- Level and square
- Cordless drill and bits
- Screwdrivers
- Circular saw or jigsaw
- Wrench set
- Pipe wrench and pliers
- Utility knife
- Stud finder
- Safety glasses and gloves
Materials
- Base cabinets (ready-to-assemble or pre-built)
- Countertop (pre-cut or custom)
- Sink, faucet, and related plumbing parts
- Dishwasher and installation kit
- Water supply lines and shut-off valves
- Drain pipes, P-trap, and venting materials
- Electrical wire, outlet box, and circuit breaker
- Mounting screws, brackets, and shims
- Wood glue or construction adhesive
- Trim and finishing materials (toe kick, panels, paint)
For plumbing and electrical, always use materials that meet local codes.
Step-by-step Installation Guide
Let’s walk through each phase of building your kitchen island.
1. Prepare The Space
Start by clearing the area and marking the island’s outline on the floor with painter’s tape. Double-check measurements for walking space and appliance doors.
If your kitchen floor is tile or hardwood, use a chalk line to mark cabinet locations. Remove any flooring if you need to run new pipes or wires.
2. Install Plumbing And Electrical
This is the most complex part and often requires professionals. Here’s what happens:
- Plumbers cut the floor to run water supply and drain pipes to the island.
- Electricians run a dedicated circuit for the dishwasher and install outlets on the island.
- All work must follow local building codes and may need inspection.
Non-obvious tip: Plan for future repairs by using flexible water lines and making access panels for shut-off valves.
3. Assemble And Place Cabinets
Build your base cabinets according to the manufacturer’s instructions. Set them in place on the marked outline. Use shims to level the cabinets (especially if your floor is uneven).
Join cabinets together with screws through the side walls. Anchor the cabinets to the floor using L-brackets or wood blocks.
4. Cut Countertop Openings
Measure and mark the locations for the sink and faucet on the countertop. Drill pilot holes, then use a jigsaw to cut out the shapes. Always double-check sizing—mistakes here are expensive.
If you have a stone or quartz countertop, the fabricator usually cuts holes before delivery.
5. Install Sink And Faucet
Drop the sink into the cutout and seal with silicone caulk. Secure the faucet and connect water supply lines. For undermount sinks, use the mounting clips provided.
Install the P-trap and connect the drain to the main line.
Practical tip: Test for leaks before finishing the cabinetry.
6. Install The Dishwasher
Slide the dishwasher into place next to the sink cabinet. Level it with the adjustable legs. Connect the water supply, drain hose, and power cord according to the manufacturer’s instructions.
Use a dedicated shut-off valve for the dishwasher’s water line.
7. Add Countertop And Finish Edges
Carefully lower the countertop onto the cabinets. Attach it with screws or adhesive. Seal the edges around the sink and walls with waterproof caulk.
Install side panels, toe kicks, and any decorative trim. Paint or stain as needed.
8. Test Everything
Turn on the water, plug in the dishwasher, and test all functions. Check for leaks under the sink, proper drainage, and that all outlets work safely.
9. Final Touches
Install drawer pulls, cabinet handles, and any accessories. Clean the island thoroughly. Add bar stools or decor to finish the look.
Credit: mosbybuildingarts.com
Safety And Building Code Considerations
Kitchen islands with sinks and dishwashers must meet local building codes. Here’s what to keep in mind:
- Electrical outlets: Most codes require at least one GFCI (Ground Fault Circuit Interrupter) outlet on the island.
- Ventilation: Some codes require an air admittance valve (AAV) if the drain cannot connect to a vent stack.
- Dishwasher air gap: Some locations require a small device (air gap) on the sink to prevent drain water from backing up into the dishwasher.
Always check with your local building department before starting. Permits and inspections protect your investment and safety.
Comparing Island Vs. Wall Sinks
Some people wonder if it’s better to keep the sink and dishwasher against the wall. Here’s a quick comparison:
| Feature | Island Sink | Wall Sink |
|---|---|---|
| Workflow | Central, easy for multiple people | Classic work triangle, familiar |
| Plumbing complexity | Usually higher | Usually lower |
| View | Open to room | Often faces wall or window |
| Social aspect | Great for entertaining | Limited interaction |
| Cost | Generally more expensive | More affordable |
Choose the setup that fits your cooking style and kitchen layout best.
Common Mistakes To Avoid
Many DIYers make the same errors when building a kitchen island with a sink and dishwasher. Here’s how to avoid them:
- Not checking for plumbing or electrical access: If you can’t easily run pipes or wires, costs go up fast.
- Crowding the kitchen: An island that’s too big or too close to other counters makes the kitchen hard to use.
- Skipping permits: Unpermitted work can cause problems when selling your home or if there’s an insurance claim.
- Choosing the wrong countertop: Some materials can’t handle water and heavy use.
- Poor ventilation: Without the right drain venting, sinks can smell or drain slowly.
- Forgetting about seating comfort: Leave enough legroom under the counter for stools.
- Ignoring appliance specs: Check dishwasher and sink measurements carefully before cutting countertops.
Non-obvious tip: Take photos of plumbing and wiring before covering walls or floors. This helps with future repairs or upgrades.
Maintenance Tips For Your Kitchen Island
A well-built island lasts for decades if you care for it. Here’s how:
- Wipe up water spills quickly to prevent damage to cabinets and countertops.
- Clean the sink and dishwasher filters regularly to avoid clogs.
- Check under the sink for leaks every few months.
- Reseal stone countertops as recommended by the manufacturer.
- Use cutting boards to avoid scratching surfaces.
Real-life Example
Consider the Miller family, who remodeled their kitchen in 2023. They installed a 6-foot island with a deep stainless steel sink, a quiet dishwasher, quartz countertops, and three seats. The project took six weeks and cost around $9,000, including labor and permits.
Their biggest challenges were running new plumbing under a concrete slab and picking a dishwasher that fit the cabinet depth. With help from a licensed plumber and a local cabinet shop, they solved both problems. Now, their kitchen island is the center of family life—used for homework, parties, and daily meals.
When To Hire A Pro Vs. Diy
Some parts of this project are perfect for DIY—like assembling cabinets or painting. But plumbing and electrical work should be done by licensed pros, especially if you need new lines or circuits.
If your kitchen is older, or you’re unsure about building codes, it’s smart to hire a general contractor. They can coordinate plumbers, electricians, and inspectors, saving you headaches and costly mistakes.
DIY is usually best for:
- Assembling and installing cabinets
- Painting and finishing
- Installing simple countertops (like laminate or butcher block)
Hire a pro for:
- All plumbing and electrical work
- Heavy countertops (stone or quartz)
- Major structural changes
Trends And Modern Features
Want to make your island stand out? Consider adding:
- Pop-up outlets: Hidden in the countertop, perfect for blenders or laptops.
- Integrated cutting boards: Slide-out boards for easy prep.
- Smart faucets: Touchless or voice-activated for hygiene.
- Recycling bins: Pull-out systems under the sink.
- Water filtration systems: Built-in for better taste and safety.
- USB charging ports: Great for busy families.
These features can add cost but also boost your kitchen’s value and comfort.
Environmental And Efficiency Considerations
Choosing eco-friendly appliances and materials helps the planet and saves money. Look for:
- ENERGY STAR dishwashers: Use 12% less energy and 30% less water than standard models.
- Low-flow faucets: Reduce water waste without losing pressure.
- Recycled countertops: Options like recycled glass or paper composites.
- LED lighting: For under-cabinet and accent lights.
Recycling your old sink or appliances keeps waste out of landfills.
Is A Kitchen Island Right For You?
Not every kitchen needs an island, and not every island needs a sink and dishwasher. Ask yourself:
- Do I have enough space for clear walkways?
- Will the island improve my workflow?
- Can I afford the plumbing and electrical costs?
- Do I want extra seating or storage?
- How will it impact the rest of my kitchen’s design?
If you answer “yes” to most, an island could be a smart investment.
For more design inspiration and technical info, check out this This Old House guide.
Frequently Asked Questions
What Size Should My Kitchen Island Be?
Most islands are at least 3 feet wide and 6 feet long. The exact size depends on your kitchen. Always leave at least 42 inches of space on all sides for easy movement.
How Hard Is It To Add Plumbing To An Island?
Adding plumbing is one of the hardest parts. It usually means cutting into the floor to run pipes. Older homes or slab foundations can make this even more difficult and expensive.
Can I Install A Sink And Dishwasher In A Small Kitchen?
It’s possible, but only if you have enough space for walkways and appliance doors. Compact sinks and 18-inch dishwashers can help fit smaller islands.
Do I Need A Permit To Build A Kitchen Island With A Sink And Dishwasher?
Yes, in most places you need permits for plumbing and electrical work. Always check with your local building department before starting.
What’s The Best Countertop Material For An Island With A Sink?
Quartz and granite are the most popular for durability and water resistance. Butcher block is beautiful, but needs regular oiling to prevent water damage.
A kitchen island with a sink and dishwasher can change the way you cook, clean, and connect with others. With careful planning, smart choices, and the right help, you can create a kitchen that’s both beautiful and practical—one you’ll enjoy for years to come.