Building a floor to ceiling kitchen cabinet is one of the most effective ways to add storage and a custom look to your kitchen. For many homeowners, this kind of project seems intimidating—after all, it stretches from the floor to the ceiling, must fit perfectly, and needs to look good for years.
But with careful planning, the right tools, and a step-by-step approach, you can create a functional and beautiful cabinet that becomes a centerpiece in your kitchen.
In this guide, you’ll discover exactly how to build a floor to ceiling kitchen cabinet. You’ll learn how to measure, design, select materials, construct, and install your cabinet with professional results. Along the way, you’ll find real-world tips, expert insights, and some things that even many DIYers miss.
Whether you’re an experienced woodworker or a handy homeowner ready for a new challenge, you’ll find everything you need to complete your project with confidence.
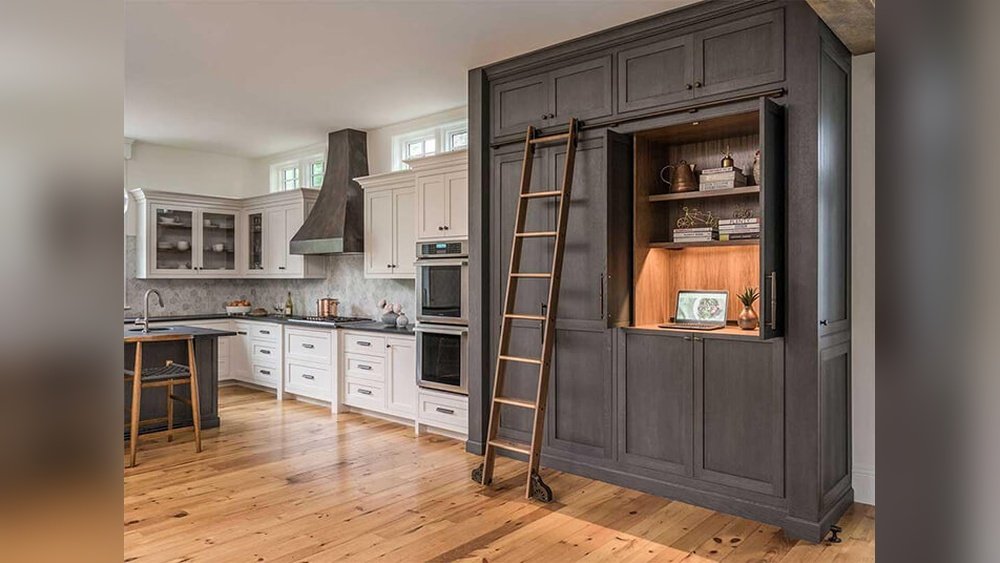
Why Build A Floor To Ceiling Kitchen Cabinet?
A floor to ceiling cabinet transforms a kitchen, but its benefits go deeper than just appearance. Here’s why many people choose this style:
- Maximizes storage: It uses the full height of your room, allowing you to store items you don’t use daily up high.
- Creates a built-in look: These cabinets look custom-made, blending seamlessly with your kitchen.
- Reduces clutter: More storage means less mess on countertops and open shelves.
- Increases home value: Custom cabinetry is often seen as a premium upgrade by buyers.
- Hides appliances: Tall cabinets can be designed to conceal ovens, microwaves, or even refrigerators.
Planning Your Floor To Ceiling Cabinet
Careful planning is the key to a successful cabinet. Rushing this step leads to mistakes, wasted money, and frustration.
Measuring Your Space
Begin by measuring the height, width, and depth of the area where your cabinet will go. Use a good tape measure, and write everything down. Measure at several points—walls and floors are rarely perfectly straight. Note any obstacles like vents, outlets, or pipes.
- Ceiling height: Most kitchens range from 8 to 10 feet. Measure at the wall and 12 inches out, as ceilings can slope.
- Width and depth: Consider adjacent cabinets, appliances, and walkways.
Choosing The Location
Common locations for a floor to ceiling cabinet include:
- At the end of a row of lower cabinets
- Between two walls (creating a pantry effect)
- Beside a refrigerator
- As a room divider between kitchen and dining area
Think about how you’ll use the cabinet. For example, if it’s a pantry, you’ll want adjustable shelves. If it’s for brooms and mops, you’ll need tall vertical space.
Sketching Your Design
Draw a simple sketch on paper or use free online tools. Mark shelf positions, doors, and any special features like pull-out drawers or appliance spaces. Planning helps you spot problems before you start building.
Deciding On Cabinet Style
There are several common styles for tall cabinets:
- Full-height pantry: Doors from floor to ceiling, with shelves inside.
- Appliance garage: Lower section for appliances, upper for storage.
- Open shelving on top: Closed cabinet below, open shelves above for display.
Choose a style that matches your kitchen and needs.
Selecting Materials And Tools
The right materials will make your cabinet sturdy, attractive, and long-lasting. The wrong ones can lead to sagging shelves, warping, or a poor finish.
Material Options
- Plywood: The best choice for most DIY cabinets. Use 3/4-inch furniture-grade plywood for the sides, top, bottom, and shelves. Plywood is strong, stable, and resists warping.
- MDF (Medium-Density Fiberboard): Smooth and easy to paint, but heavier and not as strong as plywood. Can sag if shelves are too wide.
- Solid wood: Looks beautiful, but expensive and can expand/contract with humidity. Often used for face frames and doors.
- Melamine: Particle board with a plastic coating. Easy to clean, but edges can chip during cutting.
Example Material Comparison
| Material | Strength | Finish Options | Cost | Durability |
|---|---|---|---|---|
| Plywood | High | Paint, Stain, Laminate | $$ | Excellent |
| MDF | Medium | Paint | $ | Good (indoor only) |
| Solid Wood | Very High | Stain, Paint | $$$ | Excellent |
| Melamine | Medium | Laminate | $ | Good |
Hardware And Accessories
- Hinges: Choose soft-close if possible for a premium feel.
- Drawer slides: Full-extension slides let you reach everything.
- Handles/pulls: Match your kitchen style.
- Adjustable shelf supports: Allow shelves to move as your needs change.
Tools You’ll Need
- Circular saw or table saw
- Drill and bits
- Screwdriver
- Clamps (at least 4 large ones)
- Carpenter’s square
- Tape measure and pencil
- Level
- Stud finder
- Wood glue
- Sander or sandpaper (120 and 220 grit)
- Safety glasses and hearing protection
If you don’t own all these, many hardware stores rent tools.
Preparing The Workspace
Building a large cabinet takes space. If possible, use a garage or basement. Lay out your materials and tools so everything is easy to reach. Cover the floor to protect it from glue or scratches.
Clear the area in your kitchen where the cabinet will go. Remove baseboards and check for hidden pipes or wiring in the wall.

Credit: cocolapinedesign.com
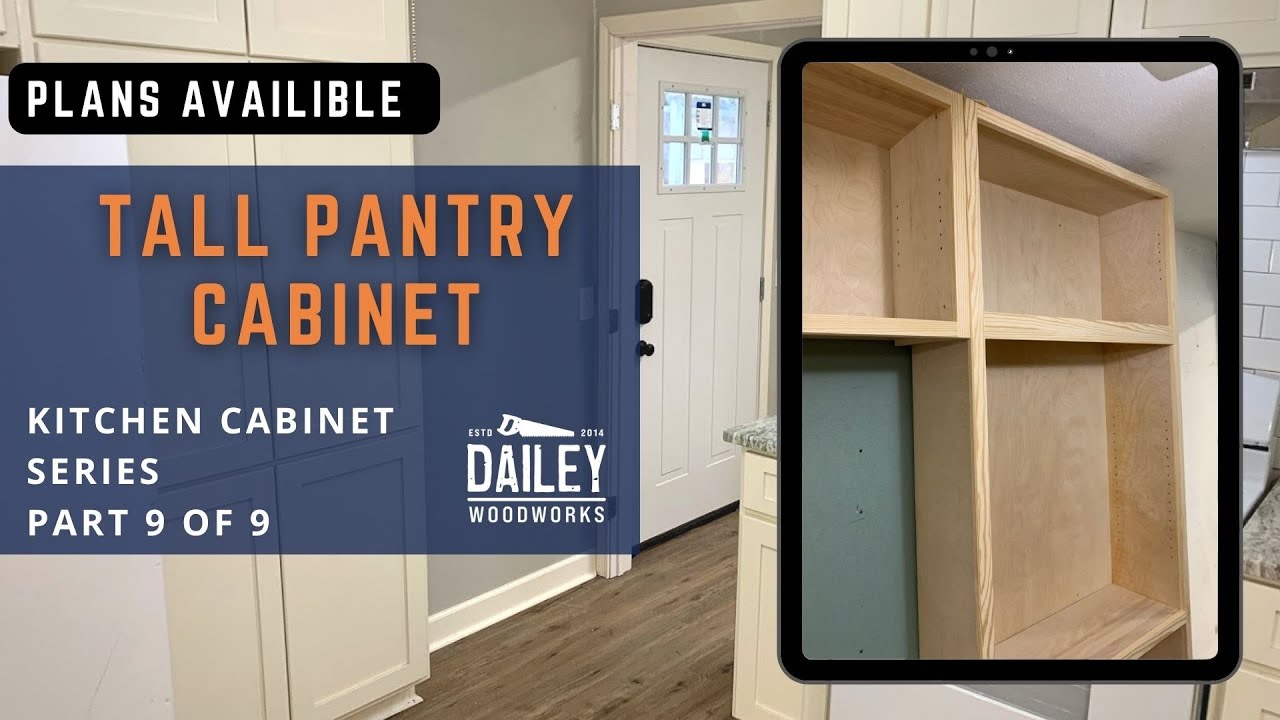
Cutting And Preparing The Cabinet Parts
Accurate cuts are the foundation of a quality cabinet. Take your time on this step.
Cutting The Panels
- Sides: Cut two panels the full height of your cabinet, minus the thickness of the top and bottom panels. For an 8-foot ceiling, sides will be about 95 inches if using 3/4″ plywood.
- Top and Bottom: Cut panels the width of your cabinet, minus the thickness of the sides (usually 1.5 inches total for two 3/4″ sides).
- Shelves: Cut as many shelves as you need, the same width as the top/bottom, and the desired depth.
- Back panel: Use 1/4″ plywood for a lightweight, sturdy back.
Making The Face Frame
A face frame covers the front edges of the plywood, making the cabinet look more finished. Use 1×2″ solid wood strips. Miter the corners for a professional look.
Drilling Shelf Pin Holes
If you want adjustable shelves, drill holes for shelf pins. Use a jig or make a simple template to keep holes evenly spaced.
Labeling Parts
As you cut, label each piece with a pencil. This avoids confusion during assembly.
Assembling The Cabinet
Now you’re ready to see your cabinet come together.
Dry Fit First
Before gluing or screwing, stand up the pieces to check the fit. Make sure everything is square.
Assembly Steps
- Join the sides to the top and bottom using wood glue and 1-1/4” wood screws. Pre-drill holes to prevent splitting.
- Attach the back panel using glue and small nails or staples. This squares up the cabinet and adds rigidity.
- Install the face frame by gluing and clamping it to the front edges. Nail with brads for extra strength.
- Install shelves: Fixed shelves add strength; adjustable shelves add flexibility. If possible, include at least one fixed shelf.
- Add supports: A horizontal rail across the back near the top makes wall mounting easier and strengthens the cabinet.
Example Cabinet Part Comparison
| Part | Recommended Material | Alternative | Purpose |
|---|---|---|---|
| Sides | 3/4″ Plywood | MDF | Structure/Strength |
| Back | 1/4″ Plywood | Hardboard | Stability |
| Face Frame | Solid Wood | Plywood | Appearance |
| Shelves | 3/4″ Plywood | Melamine | Storage |
Checking For Square
Use a carpenter’s square at each corner. Measure diagonals—if they match, your cabinet is square.
Filling Holes And Sanding
Fill screw holes with wood filler. Sand all surfaces smooth with 120, then 220 grit sandpaper. Wipe away dust with a tack cloth.
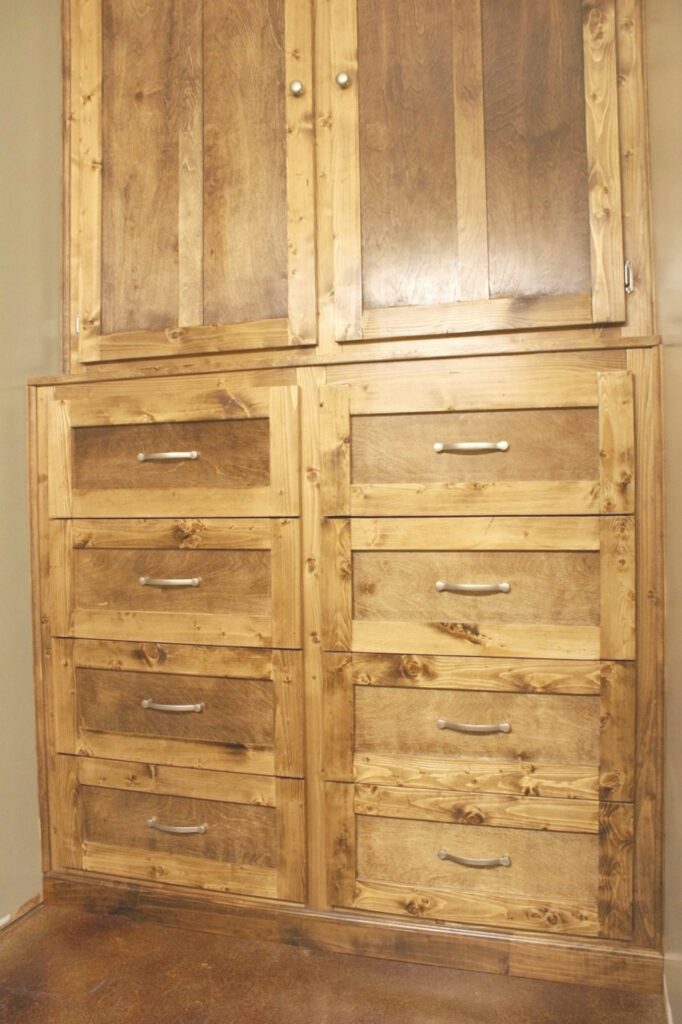
Building And Hanging Doors
A floor to ceiling cabinet looks best with custom doors. You can build simple slab doors (flat plywood or MDF) or Shaker style (a frame with a flat panel).
Measuring For Doors
Measure the opening and add 1/8” on all sides for clearance. For example, if your opening is 20” wide by 80” tall, doors should be about 19-3/4” x 79-3/4”.
Building Slab Doors
Cut plywood or MDF panels to size. Edge band exposed edges with wood veneer tape for a clean look.
Building Shaker Doors
Cut 1×3” rails and stiles for the frame. Cut a 1/4” groove along the inside edge. Insert a plywood panel, glue, and clamp.
Painting Or Finishing Doors
Paint with two coats of high-quality kitchen cabinet paint, or stain and clear coat for a wood finish.
Installing Hinges
Mark hinge positions 3” from the top and bottom, and one in the center if the door is tall. Use a concealed hinge jig for accuracy.
Hanging The Doors
Mount doors with the cabinet lying on its back, if possible. Adjust for even gaps.
Surface Preparation And Finishing
A smooth, durable finish protects your cabinet and makes it easy to clean.
Painting
- Prime all surfaces with a stain-blocking primer. Sand lightly after.
- Apply two coats of semi-gloss or satin enamel paint. Use a foam roller for a smooth finish.
Staining
- Apply wood conditioner if using softwood.
- Stain with a brush or rag, wipe off excess.
- Seal with two coats of polyurethane.
Hardware Installation
After paint or finish is dry, install handles, knobs, and shelf supports.
Credit: www.youtube.com
Installing The Cabinet In Your Kitchen
Installing a floor to ceiling cabinet is a two-person job. The cabinet is heavy and awkward, so don’t try to lift it alone.
Preparing The Wall
- Use a stud finder to locate wall studs.
- Mark stud positions on the wall and inside the cabinet.
Leveling The Cabinet
- Set the cabinet in place.
- Check for level front to back and side to side. Use shims under the cabinet to adjust.
- If the floor is uneven, you may need to trim the bottom of the sides to fit.
Securing The Cabinet
- Drill through the back rail into studs with 3” screws. Use at least two screws per stud.
- Check for level as you tighten.
Reinstalling Baseboards And Trim
- Cut baseboards to fit around the cabinet.
- Add crown molding at the top for a built-in look.
Customizing Your Cabinet
One of the best parts of building your own cabinet is adding features you won’t find in store-bought versions.
Pull-out Drawers
Install pull-out shelves or baskets in the lower section for easy access to heavy items.
Built-in Lighting
Add LED strip lights inside for visibility. Plug into a nearby outlet or hardwire if you’re comfortable.
Message Center
Install a corkboard, chalkboard, or whiteboard on the inside of a door for notes and shopping lists.
Appliance Garage
Design a lower compartment with a roll-up door to hide small appliances, keeping counters clear.
Charging Station
Add an electrical outlet and shelf for charging phones and tablets.
Custom Feature Comparison
| Feature | Difficulty | Cost | Benefits |
|---|---|---|---|
| Pull-Out Drawers | Medium | $$ | Easy access to items |
| Lighting | Easy | $ | Better visibility |
| Message Center | Easy | $ | Organizes notes |
| Appliance Garage | Medium | $$ | Hides appliances |
| Charging Station | Medium | $$ | Keeps devices organized |
Credit: www.woodshopdiaries.com
Safety Tips And Common Mistakes
Safety Tips
- Wear safety glasses and hearing protection when cutting.
- Work slowly—rushing with power tools leads to mistakes.
- Lift with your legs, not your back, when moving heavy panels.
- If wiring is involved, turn off power at the breaker.
Common Mistakes To Avoid
- Not measuring accurately: Double-check all measurements before cutting.
- Skipping a dry fit: Assembling without a test fit leads to big problems.
- Poor sanding: Rough spots show through paint.
- Using cheap materials: Low-quality plywood warps and doesn’t hold screws well.
- Ignoring wall/floor unevenness: Scribe or shim the cabinet to fit perfectly.
- Weak fastening: Always screw into wall studs, not just drywall.
- Forgetting ventilation: If you’re storing appliances, allow for air flow.
One non-obvious tip: Always leave a small gap at the top or sides for expansion. Wood can swell with humidity, and a cabinet that fits too tightly may warp or crack.
Another detail beginners miss: Plan for how you’ll get the finished cabinet into your kitchen. Measure doorways and consider building the cabinet in two sections if needed.
Maintenance And Care
A quality cabinet will last for decades with simple care:
- Wipe spills immediately with a damp cloth.
- Use gentle cleaners; avoid harsh chemicals.
- Check hinge screws and handles yearly—tighten if loose.
- Touch up paint or finish as needed.
If you install lighting or charging stations, check cords and plugs for wear.
When To Call A Professional
Building a floor to ceiling kitchen cabinet is within reach for most handy homeowners. However, hire a pro if:
- You want a built-in look with complicated moldings.
- The cabinet must fit around plumbing, HVAC, or electrical.
- You lack the tools or time for a big project.
- You need a perfect match for existing custom cabinets.
A skilled carpenter can build and install a cabinet in 2-3 days, but it will cost more than DIY.
Real-world Example
Linda, a homeowner in Ohio, built a 9-foot-tall pantry cabinet in her 1950s kitchen. She used 3/4″ birch plywood, painted it white, and added adjustable shelves and a pull-out spice rack. The project took one weekend for construction and another for painting and installation.
Her total cost was under $400, compared to a $1,200 estimate from a cabinet shop. Now she stores everything from baking pans to cleaning supplies, and her kitchen feels more organized.
Useful Resources
For more detailed plans and design inspiration, the DIY Network offers free guides and videos on cabinetry. See the DIY Network Kitchen Cabinet Guide.
Frequently Asked Questions
How Long Does It Take To Build A Floor To Ceiling Kitchen Cabinet?
For most people, plan on two full weekends: one for building and finishing, one for installation and final details. If you’re painting, add extra drying time.
What Is The Best Wood For A Kitchen Cabinet?
Plywood is the best all-around choice for strength, stability, and cost. Use solid wood for face frames and doors if you want a stained wood look.
Can I Build The Cabinet Without A Table Saw?
Yes, a circular saw with a straightedge guide works well for most cuts. For perfect results, ask your lumberyard to cut large panels to size.
How Do I Attach A Tall Cabinet To The Wall Safely?
Always screw through the back rail into wall studs. Use at least two screws per stud for a secure installation. Never rely on drywall anchors alone.
Should I Build The Cabinet In Sections?
If your ceiling is over 8 feet, or access is tight, build the cabinet in two sections (upper and lower) and join them during installation.
A floor to ceiling kitchen cabinet is a big project, but the rewards are just as large. With careful planning, quality materials, and a step-by-step approach, you’ll create a storage solution that adds both beauty and value to your home.