To fix a leaking garden hose connection, replace the washer or apply plumbing tape. Ensure the connection is tight and secure.
A leaking garden hose connection can be a nuisance, turning your gardening routine into a messy chore. Not only does it waste water, but it also reduces the efficiency of your hose, making watering plants, washing your car, or cleaning outdoor surfaces more challenging.
The good news is, fixing a leaking garden hose connection is usually a straightforward task that doesn’t require professional help. With the right approach and some basic tools, you can quickly address the issue, preserving water and ensuring your hose performs optimally. This guide will walk you through the simple steps to diagnose and repair common leaks, so you can get back to enjoying your garden with minimal interruption.

Credit: www.reddit.com
Identifying The Leak Source
Before fixing a leaking garden hose connection, find the leak’s origin. A systematic approach can save time and ensure a proper fix. Start with a visual check, then conduct a water pressure test.
Visual Inspection
First, inspect the hose and connections closely. Look for cracks, holes, or worn-out connectors. Check seals and washers within the fittings. Often, wear and tear are visible. Visible damage requires replacement parts.
Water Pressure Test
Next, perform a water pressure test. Turn on the water supply slightly. Observe where water escapes. This test helps confirm the visual inspection. Remember, a dry hose can mask some leaks. So, test with water.
Tools And Materials Needed
A dripping hose can dampen any gardening day. Fixing a leak quickly is crucial. Gather the right tools and materials before you start. This ensures a smooth repair process. Let’s dive into what you’ll need.
Common Household Tools
Start with items found at home:
- Adjustable wrench: Tightens and loosens connections.
- Screwdriver: Helps dismantle the hose connector.
- Utility knife: Cuts away damaged hose sections.
- Scissors: Trims hose ends for a snug fit.
- Bucket: Catches any water during repair.
- Towels: Clean up spills and dry the workspace.
Specialized Hose Repair Kits
For a professional fix, consider these kits:
- Hose mender: Reconnects severed hose segments.
- Rubber washers: Seals joints to prevent leaks.
- Hose clamps: Secures the hose in place.
- Hose coupling: Joins two hose pieces together.
- Thread seal tape: Enhances seal integrity.
Choose quality products for lasting repairs.
Quick Fixes For Minor Leaks
Dealing with a leaking garden hose connection can be frustrating. Yet, many leaks are minor and easy to fix. This section will guide you through quick solutions to stop those annoying drips. You don’t need special tools for these fixes.
Using Electrical Tape
Electrical tape is a quick fix for small leaks. Here’s how:
- Clean the hose area around the leak.
- Dry it completely.
- Wrap electrical tape tightly around the leak.
- Overlap each wrap to ensure a good seal.
- Press the tape firmly.
This method works well for temporary fixes. It gives you time to get a permanent solution.
Applying Hose Menders
Hose menders are great for small to medium leaks. They join two hose pieces together. Follow these steps:
- Cut out the leaky section of the hose.
- Insert the mender into both hose ends.
- Secure the mender with clamps provided.
Make sure the hose is dry and clean before starting. This fix is more durable than electrical tape.
Replacing Faulty Washers
A leaking garden hose is a common problem. Often, it’s due to faulty washers. Replacing faulty washers can fix this issue. Let’s explore how.
Types Of Hose Washers
Not all hose washers are the same. They come in different materials.
- Rubber: Most common. Good for general use.
- Silicone: Resists weather well. Lasts longer.
- Fiber: Good for heavy-duty use. Very durable.
Step-by-step Washer Replacement
Replacing a washer is simple. Follow these steps:
- Turn off the water. Unscrew the hose from the tap.
- Remove the old washer. Use a screwdriver if needed.
- Check the inside. Make sure it’s clean.
- Place the new washer. Press it down firmly.
- Screw the hose back on. Test for leaks.
Remember: Choosing the right washer type is key. Follow the steps closely to stop leaks.
Fixing The Hose End Connector
Discover the simple steps to stop leaks in their tracks with our guide on repairing a garden hose connector. Learn the essentials of sealing a faulty hose connection and keep your watering system efficient and drip-free.
A leaking garden hose can dampen your gardening joy. A common culprit for leaks is a faulty hose end connector. Fear not, as fixing it is simple and quick. First, assess the damage. Then, follow these steps to restore your hose’s functionality.
Cutting The Damaged End
- Locate the damaged area near the end.
- Use a sharp knife or garden shears for a clean cut.
- Ensure the cut is straight across the hose.
- Remove any debris from the cut end.
Installing A New Connector
- Choose a suitable connector for your hose diameter.
- Slide the clamp onto the hose before attaching the connector.
- Push the new connector firmly into the hose end.
- Tighten the clamp securely using a screwdriver.
- Test the connection by turning on the water.
With a new connector installed, your garden hose should be as good as new. Enjoy leak-free watering sessions once again.

Credit: www.youtube.com
Professional Repair Solutions
A leaking garden hose connection can dampen your gardening spirits.
Sometimes, DIY fixes won’t cut it. It’s time to call in the pros.
Professional repair services ensure a long-lasting solution. Let’s explore when and why to seek their help.
When To Seek Professional Help
Observe your hose; complexity may require a professional’s touch.
- Continuous leaks even after DIY attempts
- Multiple damage spots
- Worn-out connectors
- Cracks along the hose body
Professionals have the right tools and expertise.
Costs Of Professional Repair Services
The cost varies based on repair complexity.
| Service | Cost Range |
|---|---|
| Connector Replacement | $15 – $50 |
| Hose Mending | $10 – $30 |
| Complete Overhaul | $20 – $100+ |
Consider the hose’s value versus repair costs.
Sometimes, a new purchase is more economical.
Preventive Measures For Future Leaks
Preventive measures keep garden hose connections leak-free. Regular care saves time and money. A well-maintained hose lasts longer, too. Let’s explore steps to prevent future leaks.
Proper Hose Storage
Storage protects hoses from damage. Proper methods extend hose life. Keep these tips in mind:
- Avoid kinks by coiling the hose loosely.
- Use a hose reel or hanger for tidy storage.
- Store out of direct sunlight to prevent material degradation.
- Drain water before storage to avoid freezing and expansion damage.
Routine Maintenance Tips
Regular checks keep connections tight. Follow these maintenance tips:
- Inspect washers and gaskets; replace if worn or cracked.
- Check for rust on metal parts; clean or replace as needed.
- Tighten connections if they feel loose.
- Clean threads on hose and spigot. Debris can cause leaks.
Adopt these habits for leak-free hose use. Enjoy a lush, healthy garden without the hassle of leaks.

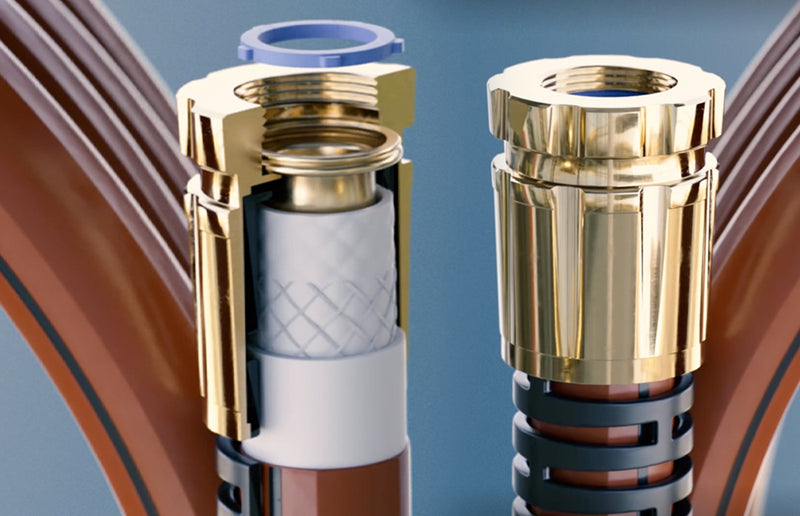
Credit: swanhose.com
Choosing Quality Replacement Parts
Choosing quality replacement parts can turn a leaky garden hose connection into a thing of the past.
Let’s focus on the materials and brands that ensure longevity and leak-free performance.
Material Considerations
Material choices directly impact the durability of your hose fittings.
- Brass – Resists corrosion, withstands high pressure.
- Stainless steel – Tough, avoids rust, lasts long.
- Rubber washers – Essential for a tight seal, choose high-quality.
Brand Recommendations
Selecting the right brand is key for a lasting fix.
| Brand | Features |
|---|---|
| Gardener’s Choice | Top-rated, durable, offers variety |
| ForeverSeal | Leak-proof design, industry favorite |
| EcoHose | Eco-friendly, innovative, reliable |
Frequently Asked Questions
Why Does My Garden Hose Connection Leak?
A leaking garden hose connection is often due to worn-out washers or improper fitting. To fix it, replace the old washer with a new one and ensure the connection is tightly secured.
Can Teflon Tape Stop Hose Leaks?
Yes, wrapping Teflon tape around the hose’s threading before connecting can help prevent leaks. It acts as a sealant, filling any gaps that may cause water to seep through.
How Do I Choose The Right Washer For My Hose?
Select a washer that matches the size of your hose and is made from durable rubber or silicone. Check the hose’s specifications for the recommended washer size for a snug fit.
What Tools Do I Need To Fix A Hose Leak?
Basic tools like pliers or wrenches are needed to tighten the connection. You may also need scissors to trim Teflon tape and a screwdriver if a clamp is involved.
Conclusion
Sealing a leaky garden hose connection is straightforward with the right tools and steps. Regular maintenance can prevent future leaks, ensuring your watering routine remains efficient. Remember, a durable hose and quality fittings make all the difference. Tackle leaks promptly to keep your garden lush and thriving.

