Cabinet doors hitting the wall can be more than just a minor annoyance. Over time, these repeated impacts cause dents, scratches, and paint chips—both on your cabinet and your wall. If you’re tired of seeing marks where your cabinet door swings open, you’re not alone.
Many homeowners face this issue, especially in kitchens and bathrooms where space is tight, and cabinet doors are opened frequently.
This guide will help you solve the problem of cabinet doors hitting the wall. You’ll learn practical solutions, from easy fixes to more advanced methods. We’ll cover why this happens, how to choose the right solution, and steps to install simple hardware.
By the end, you’ll know exactly how to stop cabinet doors from banging into your walls, preserve your home’s appearance, and avoid costly repairs.
Why Cabinet Doors Hit The Wall
Before you fix the problem, it’s important to understand why cabinet doors hit the wall. There are several reasons, and knowing them helps you choose the right solution.
Common Causes
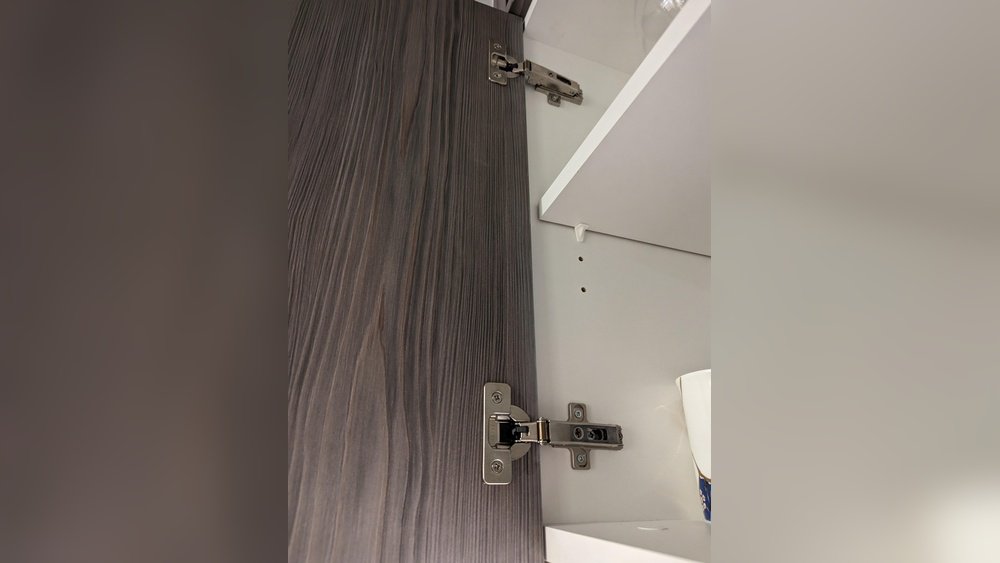
- No Door Stops: Many cabinets are installed without any stopper to limit the swing. Without a stop, the door can open all the way until it hits something else.
- Loose Hinges: Hinges that are not tight or are worn out can let doors swing too far.
- Improper Installation: If cabinets are installed too close to the wall, the doors may naturally swing into the wall.
- Heavy Use: Frequent opening and closing can cause screws to loosen over time, increasing the door’s range of motion.
- Gravity and Age: Over years, the weight of the door can pull it down, changing its path.
Example
Imagine a small kitchen where the cabinet above the counter is only two inches from the wall. If you open the door quickly, it can hit the wall with force, leaving a noticeable mark. This is common in homes with limited space.
Risks Of Ignoring The Problem
Some people ignore cabinet doors hitting the wall, thinking it’s harmless. However, there are real risks:
- Wall Damage: Repeated hits chip paint and create dents.
- Cabinet Damage: The door edge can crack or splinter.
- Noise: Constant banging can be disturbing, especially at night.
- Resale Value: Damaged walls and cabinets lower your home’s value.
- Costly Repairs: Fixing dents and repainting can cost hundreds of dollars.
According to the National Association of Home Builders, maintaining cabinetry is among the top home improvement tasks for protecting property value.
Types Of Cabinet Door Stops
There are several ways to stop cabinet doors from hitting the wall. Choosing the right type depends on your budget, skill level, and the look you want.
1. Rubber Bumpers
Rubber bumpers are small pads that stick to the cabinet or wall. They absorb impact and stop damage.
- Pros: Cheap, easy to install, available in many colors.
- Cons: May wear down over time, not very stylish.
2. Magnetic Door Stops
These stops use a magnet to catch the door before it hits the wall.
- Pros: Strong hold, easy to use, no visible damage.
- Cons: Require installation, may not fit all doors.
3. Hinge Restrictor Clips
These clips attach to the hinge and limit how far the door opens.
- Pros: Invisible when installed, customizable for different angles.
- Cons: Only work with certain hinge types.
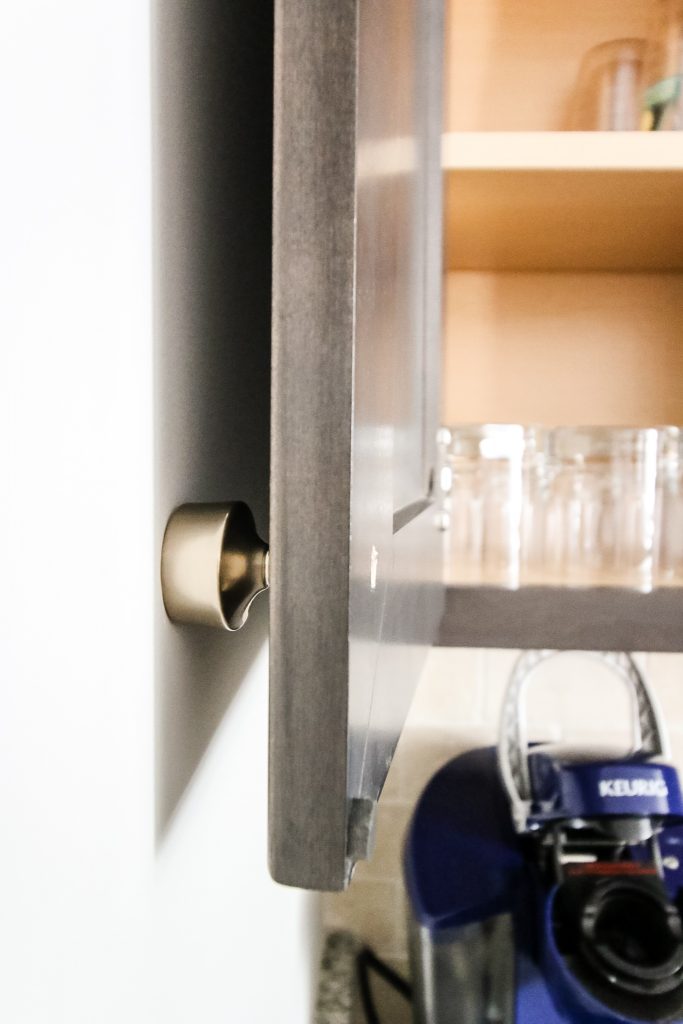
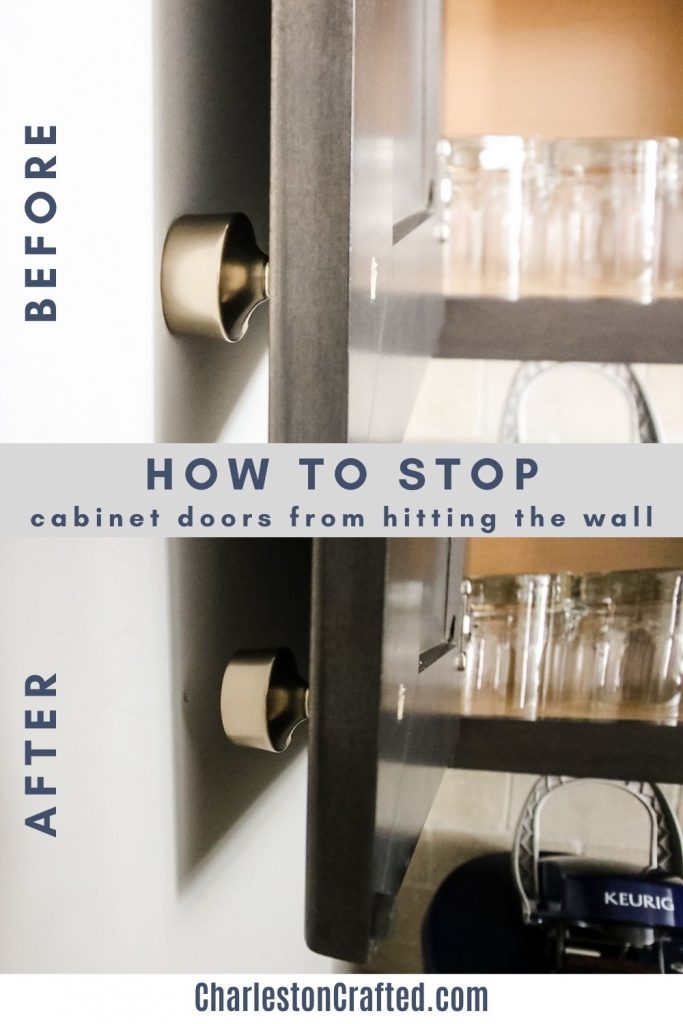
4. Wall-mounted Door Stops
Mounted on the wall, these stops absorb the impact of the door.
- Pros: Durable, visible for easy maintenance.
- Cons: May not look good in all spaces.
5. Floor-mounted Stops
Used mostly for larger doors, these stops are installed on the floor.
- Pros: Good for heavy doors, strong protection.
- Cons: Not ideal for upper cabinets.
6. Soft-close Hinges
These hinges slow down the door as it closes, preventing a hard bang.
- Pros: Elegant, reduces noise, protects both door and wall.
- Cons: Higher cost, requires replacement of existing hinges.
7. Cabinet Door Limiters
Limiters are installed inside the cabinet and restrict how far the door swings open.
- Pros: Hidden, adjustable, easy to install.
- Cons: Not suitable for all cabinet types.
Comparison Table: Cabinet Door Stop Types
Here’s a quick comparison of the most popular options:
| Type | Cost (USD) | Visibility | Durability | Installation Difficulty |
|---|---|---|---|---|
| Rubber Bumper | $2–$5 | Low | Medium | Easy |
| Magnetic Stop | $10–$25 | Medium | High | Medium |
| Hinge Restrictor | $6–$15 | None | High | Medium |
| Wall-Mounted Stop | $5–$10 | High | High | Easy |
| Soft-Close Hinge | $15–$40 | None | High | Hard |
| Door Limiter | $10–$20 | None | High | Medium |
How To Choose The Right Solution
Selecting the best option depends on your specific cabinet setup and your preferences.
Consider These Factors
- Cabinet Type: Is it a kitchen, bathroom, or wardrobe cabinet? Some solutions work better for certain types.
- Door Material: Heavier doors need stronger stops.
- Space: If your cabinet is very close to the wall, you need a slim stopper.
- Budget: Simple bumpers cost less; soft-close hinges cost more.
- Style: Do you want the stopper to be hidden or visible?
- Installation Skill: Some stops need tools; others are peel-and-stick.
Example Scenario
A kitchen cabinet door made of solid wood is heavier than a bathroom cabinet made of MDF. For heavier doors, a magnetic stop or hinge restrictor is safer. For lighter doors, rubber bumpers are enough.
Step-by-step: Installing Rubber Bumpers
Rubber bumpers are the simplest solution. Here’s how to use them:
- Choose the Right Bumper: Pick a size and color that matches your cabinet.
- Clean the Surface: Use alcohol wipes to remove dust and grease.
- Position the Bumper: Place it where the door meets the wall.
- Peel and Stick: Remove backing and press firmly for 30 seconds.
- Test the Door: Open and close to see if the bumper stops the door before hitting the wall.
Tips
- If the door is still hitting too hard, use two bumpers for extra cushioning.
- Replace bumpers every 12–18 months for best results.
Step-by-step: Installing Hinge Restrictor Clips
For a more professional look, restrictor clips are ideal. Follow these steps:
- Identify the Hinge Type: Most clips fit European-style hinges.
- Buy the Correct Clip: Check the hinge brand and angle.
- Open the Cabinet Door: Unscrew the hinge slightly (do not remove).
- Attach the Clip: Slide it onto the hinge.
- Tighten Screws: Secure the hinge again.
- Test Door Swing: Open and close to check the new stop angle.
Common Mistakes
- Using the wrong clip size: Measure first.
- Overtightening: Can damage the hinge.
- Not testing: Always check the swing before finishing.
Step-by-step: Installing Soft-close Hinges
If you want a premium touch, soft-close hinges are a great upgrade.
- Buy Soft-Close Hinges: Choose ones that match your cabinet style.
- Remove Old Hinges: Unscrew and take out the old hinges.
- Install Soft-Close Hinges: Follow the manufacturer’s instructions.
- Adjust Closing Speed: Many hinges have a screw for this.
- Test Multiple Times: Make sure the door closes softly and doesn’t hit the wall.
Practical Advice
- Soft-close hinges are best for high-traffic cabinets.
- They also reduce noise, which is helpful for families.
Step-by-step: Installing Wall-mounted Door Stops
Wall-mounted stops are easy for beginners.
- Choose the Stop: Find a design you like.
- Mark the Spot: Open the door to see where it hits the wall.
- Drill a Pilot Hole: Use a small drill bit.
- Screw in the Stop: Attach firmly.
- Check Placement: Make sure the stop absorbs impact.
Extra Tip
- Use stops with a rubber tip for better protection.
Step-by-step: Installing Door Limiters
Door limiters are adjustable and hidden inside the cabinet.
- Buy Door Limiter: Choose an adjustable model.
- Open Cabinet Door: Find the best spot inside the cabinet.
- Mark Screw Holes: Use a pencil.
- Drill and Screw: Attach the limiter.
- Adjust Angle: Set the limiter to the desired swing angle.
- Test Thoroughly: Open and close to check effectiveness.
Data Table: Door Limiter Effectiveness
Here’s a comparison of door limiters vs other stops:
| Stop Type | Average Swing Reduction | Visibility | Ease of Adjustment |
|---|---|---|---|
| Door Limiter | Up to 90% | None | High |
| Wall Stop | Up to 70% | High | Low |
| Hinge Restrictor | Up to 95% | None | Medium |
Advanced Solutions For Unique Cases
Sometimes, basic stops are not enough. Here are advanced options:
1. Custom Cabinet Modifications
If your cabinet is too close to the wall, consider moving it slightly. This can be expensive, but it solves the problem forever.
2. Install Decorative Guards
Decorative guards protect the wall and add style. These are metal or wood plates mounted where the door hits.
3. Use Door Dampers
Door dampers are special devices that slow the door, similar to soft-close hinges. They can be added without changing the entire hinge.
4. Reinforce Wall Area
If your wall is already damaged, reinforce it with a protective panel. Use acrylic, metal, or thick paint to prevent further damage.
Credit: www.charlestoncrafted.com
Common Mistakes And How To Avoid Them
Many people make mistakes when trying to fix this problem. Here’s how to avoid them:
- Wrong Stop Type: Not all stops fit all doors. Check compatibility.
- Poor Placement: If the stop is not placed at the right spot, it won’t work.
- Skipping Cleaning: Dirt can prevent adhesives from sticking.
- Overtightening Screws: This can crack the cabinet or wall.
- Ignoring Regular Checks: Stops wear out. Check every 6 months.
- Using Cheap Materials: Low-quality stops wear out quickly.
- Forgetting Door Weight: Heavy doors need strong stops.
Maintaining Your Cabinet Door Stop
After you install a door stop, maintenance is important for long-lasting results.
Routine Checks
- Inspect every 6 months: Look for wear and tear.
- Clean regularly: Dust and grease can affect adhesive stops.
- Tighten screws: For mounted stops, check if screws are loose.
- Replace as needed: Bumpers and rubber tips need replacing after 1–2 years.
Example
A family with small children needs to check stops more often. Kids tend to open doors with force, so stops wear out faster.

Credit: www.reddit.com
Real-world Examples
Example 1: Small Apartment Kitchen
In a small apartment kitchen, the cabinet above the sink kept hitting the wall. The owner installed rubber bumpers and noticed less noise and no new marks after two weeks. Cost: $5.
Example 2: Busy Family Bathroom
A family bathroom with heavy doors had constant wall damage. After installing soft-close hinges, the problem stopped. The hinges cost $25 each, but the family saved on future wall repairs.
Example 3: Office Break Room
An office break room had cabinets that opened too wide. Hinge restrictor clips were installed, limiting the swing to 110 degrees. Now, the doors never hit the wall, and the office looks cleaner.
Comparing Solutions: Durability And Cost
Let’s compare the most common solutions by durability and long-term cost:
| Solution | Durability (Years) | Initial Cost | Replacement Cost | Value for Money |
|---|---|---|---|---|
| Rubber Bumper | 1–2 | $5 | $5 | Medium |
| Hinge Restrictor | 5–10 | $10 | $10 | High |
| Soft-Close Hinge | 10+ | $30 | $30 | Very High |
| Wall-Mounted Stop | 5–8 | $10 | $10 | High |
| Door Limiter | 8–12 | $15 | $15 | Very High |
Credit: www.charlestoncrafted.com
Practical Tips For Homeowners
- Test Different Solutions: Try a bumper first; if it doesn’t work, move to a stronger option.
- Protect the Wall: Use stops with a rubber tip for maximum protection.
- Match Style: Choose a stop that suits your cabinet and room style.
- Don’t Overlook Maintenance: Set reminders to check stops every 6 months.
- Professional Help: For advanced solutions, hire a carpenter if needed.
Non-obvious Insights
- Angle Matters: The angle at which the door opens is critical. A small change in hinge alignment can prevent the door from hitting the wall.
- Hidden Damage: Sometimes the cabinet door damages the wall behind the paint, causing problems you can’t see until repainting. Regular checks can prevent this.
- Cabinet Material: Soft woods like pine dent easily. If your cabinet is made of soft wood, use a thick rubber stop or soft-close hinge.
- Humidity Impact: In humid rooms like bathrooms, adhesives wear out faster. Use screws or clips instead of sticky pads.
- Children and Pets: Homes with kids or pets need stronger stops. Children often open doors quickly, causing more impact.
When To Call A Professional
If you tried several solutions and the door still hits the wall, it’s time to call a professional. Some cabinets are installed incorrectly, and fixing them may require removing and reinstalling the unit. Professional carpenters have the tools and experience for this.
You can find certified professionals through organizations like the National Kitchen & Bath Association or check trusted sources like HomeAdvisor.
Frequently Asked Questions
What Is The Easiest Way To Stop A Cabinet Door From Hitting The Wall?
The easiest way is to use rubber bumpers. They are cheap, easy to install, and effective for most light doors. Simply clean the surface, stick the bumper where needed, and test the door.
Can I Use Soft-close Hinges On Any Cabinet?
Soft-close hinges can be used on most cabinets, but you must check the size and type of your current hinges. Some older cabinets may need new mounting holes. Always check compatibility before purchasing.
How Often Should I Replace Cabinet Door Stops?
It depends on the material. Rubber bumpers usually last 1–2 years, while hinge restrictors and soft-close hinges can last 5–10 years or more. Check stops every 6 months for wear.
What If My Cabinet Door Is Too Heavy?
For heavy doors, use magnetic stops or soft-close hinges. Avoid simple bumpers, as they may not absorb enough force. Stronger stops protect both the door and the wall.
Are Door Limiters Adjustable?
Most door limiters are adjustable. You can set the angle to limit how far the door opens. This makes them ideal for cabinets installed close to walls or corners.
Final Thoughts
Stopping cabinet doors from hitting the wall is a simple project that saves money and keeps your home looking good. Whether you use rubber bumpers, hinge restrictors, soft-close hinges, or more advanced solutions, the key is choosing the right option for your cabinet and room.
Regular maintenance and careful installation will keep your cabinets and walls safe for years.
Remember, the best solution depends on your cabinet type, space, and budget. Don’t wait until you see damage—act now to protect your home. With these practical steps, you can enjoy a quieter, cleaner, and more valuable home.